DIY fence posts
According to the types of building materials used, fence posts are divided into:
- Wooden poles , the manufacture of which is simple, but their life is short-lived. Even if the tree is impregnated with the most active antiseptic solutions, such poles will not stand for more than 10 years. Therefore, wooden poles are placed in temporary fences, low fences or front gardens.
- Pillars made of asbestos-cement pipes are technologically advanced and not subject to corrosion. The disadvantage is that it is difficult to attach logs to asbestos pipes. Also, on clay soils with poor drainage, the pipe will eventually collect water inside. And under the influence of frost the pipe will burst. Therefore, asbestos pipes should be protected from moisture on top with an “umbrella”.
- Poles made of metal pipes are durable, reliable, technologically advanced, and last a long time.
- Concrete pillars are most often made by hand. This is a rather labor-intensive process, but such a pillar will last a very long time.
- Brick pillars are very heavy, expensive, and require the construction of a serious foundation and ligation between the pillars with a shallow foundation. In cross-section, it is a metal pillar lined with brick.
There is a widespread misconception that it is best to install pillars with your own hands, concrete the base. But this is not so - on heaving soils, any pillar will be pushed out by heaving forces, no matter how deeply it is buried. You can read more about soils here.
A universal way to install poles
Can be used on any soil, even the most heaving. You need to drill a hole for the post that is wider than the diameter of the post. When installing a pillar, the space around it must be compacted with crushed stone.
What will it give? High-quality drainage around and replacement of heaving soil with non-heaving soil.
This means that buoyancy forces no longer act on the pillar. Instead of eliminating heaving with burial and anchoring devices, the cause of the problem is simply eliminated.
Unlike concreting, when groundwater, when frozen, tends to push the concrete out, now the water simply goes down, below the freezing depth, drains, and does not affect the column in any way.
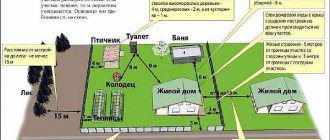
Legislative standards for country fences
There are standards for the location of fences on the site. It is important to follow them. Then in the future there will be no problems with neighbors, especially if relations with them are tense. To correctly position the fence, you will need to use a land survey plan. It is necessary that the object be located strictly on the border (by agreement) or on the territory of the owner. There are rules regarding the height of the site being built. If the fence is too high, it shades the neighbors’ garden plot, vegetable garden and other plantings, a controversial situation may arise. Such conflicts often end in litigation. It is recommended that you first familiarize yourself with the legislative framework or contact the relevant organizations to receive qualified advice.
Fence made of corrugated board. Instructions. Video
First, the perimeter of the fence is calculated, the location for the gates and gates is specified, and the locations for installing the posts are determined. The number and length (height) of corrugated sheets is determined by the total height of the fence.
Any of the above building materials can serve as supporting pillars. It is better to use round or square metal pipes for a corrugated fence. The top hole of the pipe is closed to prevent moisture from entering it.
To install the pillars, holes are dug 1-1.5 meters deep and 150-250 mm wide. The higher the fence, the deeper the holes should be - the underground part of the post is buried on average 1/3 of the above-ground height.
Next, we build the fence like this: the bottom of the foundation pit is filled with gravel to almost the entire depth after installing the post, the upper part of the pit (300-350 mm) is filled with concrete mortar (sand and cement 4/1).
The pillars are installed level and fixed with two supports made of a metal rod diagonally. To do this, the rod is welded to the post and driven into the ground 250-400 mm. The hardening time of concrete is 2-3 days.
Then metal profiles UD or SW are installed as logs for fastening corrugated sheets. The number of logs in the fence sections is determined by the height: up to 1.7 m, two logs are installed at a distance of 300-400 mm from the ground and from the top level of the fence.
With a fence height of up to 2 meters, the logs are installed in 3 rows. Joists and support posts are coated with a primer to protect the metal from corrosion.
The corrugated sheeting is fastened with self-tapping screws every 50 cm. The sheets are overlapped in one wave. A fence made of corrugated sheeting in a country house is by no means a temporary fence, so the supporting pillars should be covered with facing bricks or stones.
Corrugated sheets with a sheet thickness of less than 0.5 mm are not recommended for use in the construction of fences.
Preparing for installation
A set of preparations before installing the fence is required. Proper preparation will reduce labor and time costs. Analysis of aspects will eliminate the possibility of errors, difficulties during construction or lack of material.
Useful Checkerboard fence made of Euro picket fence or wood, do-it-yourself installation of a metal picket fence
Preparation is carried out in stages:
- Fence type: material, dimensions, construction method. A monetary estimate is drawn up, the necessary products are purchased and the technological features of the work are calculated.
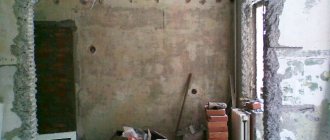
- Dismantling of the previous fence, if any. The old foundation and supporting structures are removed. If necessary, earth-moving equipment is involved - for example, if the pillars are cast in concrete.
- Preparing the perimeter. Spaces are cleared for storing materials, assembling the structure and direct installation. Grass, trees, and construction debris are removed.
- Installation planning. Often the land is uneven. If leveling is not expected, then construction with a “ladder” is taken into account. The height of one "step" should be formed with the same difference or slope.
- Marking according to the diagram. The installation locations of the pillars should be marked according to the requirements.
Before installing the fence, you need to draw up a plan with fixed locations for supports, gates and gates.
Required Tools
Tool sets differ depending on the fence material. The standard set includes: a tape measure, a building level, a square, shovels and a cord for leveling the height. The rest depends on the specific material:
- Wood: saw, set of clamps, nails, hammer.
- Brick or stone masonry: hammer, pick, trowel, plaster trowel.
- Metal (for example, profiled sheet): drill, screws, screwdriver.
Concrete for working with stone is usually mixed by hand, so renting a concrete mixer is usually not necessary. However, if the perimeter is large, it makes sense to rent it to speed up the work.
How to make a foundation correctly
The foundation is necessary not only for houses, but also for fences. Thanks to it, the fence will stand firmly for a long time and will not shrink or warp. Several types of foundation are used, but the strip foundation is the most popular.
The advantages of the strip base are the shallow depth and small volume of materials used. Its device is easy to make, the main thing is to correctly calculate the loads. Accordingly, a stone fence will give more weight than its wooden counterpart.
Construction technology:
- determine the size and depth of the location (taking into account soil freezing and the weight of the structure);
- dig a trench;
- compact the bottom with a layer of sand and/or gravel (at least 20 cm);
- reinforce the foundation - lay metal gratings;
- install formwork (pouring boundaries from boards);
- pour concrete.
The depth is strictly no less than 80 cm, the supports are installed lower - to a depth of at least 90 cm. The width is calculated depending on the material. For example, it is advisable to make a narrow strip under a profiled sheet - it is thin.
Pillar foundations are used much less frequently, often for wooden fences. The depth of the pillars reaches 150 cm. The pits are reinforced in the same way as a strip trench.
Making a wooden fence
The construction of a wooden picket fence has always followed the same rules. First, the supporting load-bearing pillars are installed, as described above.
Supports are required for any fence, and the technology for installing support posts is always the same.
Then the wooden lattice is prepared. A horizontal beam 50-100mm wide along the entire perimeter of the fence is screwed onto the supporting posts (for a wooden fence it is better to use wooden posts) in the upper and lower parts using wood screws.
In concrete and brick pillars, wooden mortgages should be provided; in metal supports, the timber is secured with bolts.
After 1-1.5 meters, transverse bars are installed. Boards are attached to this lattice at an arbitrary distance or close to each other. Boards with a width of 85 to 150 mm are nailed or screwed.
It is convenient to maintain the distance with a block or any object of a fixed width, for example a level (see video):
The last operation is painting the fence with a preliminary primer or impregnation with drying oil. How to paint a fence is described in detail in this article.
Materials and tools required for work:
- profiled sheets;
- fastening materials;
- rivet device;
- concrete mixture;
- anti-corrosion coating;
- rope;
- pegs;
- welding equipment;
- a screwdriver or drill, a tool for cutting sheets and pipes;
- profile pipes suitable for creating structural supports or profiles with a square cross-section;
- level, tape measure, etc.;
- digging equipment.
You may also need brushes, various containers, primer, drills, discs and other consumables.
An important point that should not be forgotten when installing a fence is that the transportation of profiled sheets must be very careful. After all, doing it incorrectly can lead to damage to the integrity of the protective layer, which will significantly reduce the service time and affect the aesthetic qualities.
Next, we will analyze detailed instructions on how to correctly and evenly build a fence from corrugated sheets with your own hands. We will use a sectional type of construction for the supporting type of fence.
Sectional fence made of chain-link mesh.
A fence with a chain-link base is even simpler in design than a wooden fence and is cheap. The metal mesh will not sag if the distance between the support pillars is 2.5-3 m.
But the appearance of such a fence is not very beautiful. A fence made of tightly stretched galvanized chain-link, through which a wire with a diameter of 5-6 mm is pulled between the support posts of the fence, will look more aesthetically pleasing. A fence that has wooden beams measuring 40x40 reinforced along the bottom of the support posts, and a mesh is already attached to them, will also be beautiful.
The beam or board is attached to the supports with screws or bolts (depending on what the supports are made of).
A fence made of chain-link, which is mounted on a frame made of a metal corner, will be more reliable and durable. The chain-link mesh is attached to the frame using electric welding. The size of the frame sections for the sections is 1.5 meters wide and 2.5 meters high.
Why do you need a fence?
The construction of fences is not a fad, but a way to protect the house and the area around it. The goal is safety, but fencing also marks property boundaries. The fence completes the overall composition of buildings on the dacha area.
Fencing is installed using traditional materials: wood and stone. Sheet iron is used much less frequently and hedges are erected. The range of construction products allows you to diversify the types of fencing.
Expert opinion
Vladimir Ulyanov
I have been involved in fences for over 10 years, answering questions and helping people cope with the installation task on their own.
Ask a question to an expert
The fence has a practical or decorative use. Some areas are not conducive to protecting a site; sometimes it is simply necessary to delimit the land. Such cases involve the construction of a wooden fence or a hedge of bushes. Often found in villages or in the suburbs - cottage communities, townhouses, etc.
Massive fences are observed around the territories of factories, military bases, and prisons. The structures are monolithic; concrete or metal mesh is often used here. The fence is high, twice the standard height of a person. Goal: not to let anyone in or out.
Metal fence for a summer residence
Sectional and forged decorative fences are manufactured at the factory in the form of finished sections.
The sections are attached to the supports with screws or welding. This type of fence lasts a long time, has an elegant appearance, and requires minimal maintenance. But the advantages of a metal fence do not come cheap. The design of the fence can be very different - it all depends on the customer’s imagination.
Choosing the type of fence
Today, a huge number of materials are produced that can be used for the construction of fencing. The work is very easy to do yourself without the help of specialists. The most popular today are fences made of profiled sheets. It protects the territory from intrusion and prying eyes, and has an attractive appearance. Using it at the dacha, you can create extra shading areas, especially in the vegetable garden area. The perimeter of summer cottages is often fenced with a chain-link mesh.
The material is practical, durable, and easy to install. It is worth noting the low cost of the material. If desired, the fences can be made of wooden picket fences. It is an order of magnitude inferior in its characteristics to metal materials. This is due to the negative effects of moisture. Even with high-quality treatment with protective materials, after a short period of time the picket fence will simply begin to rot or be damaged by microorganisms. All the features of each material should be studied in advance in order to make the right choice.
Wicker fence
Typically, a wicker fence (wattle fence) is made from willow, willow or hazel. Branches for the fence are harvested in August-September. As a last resort, you can use any type of wood. In addition to standard supports, you can use regular stakes. To make a wicker fence, prepare vertical stakes with a thickness of 2 to 5 cm.
The stakes for the supports are driven into the ground to a maximum depth (usually 30-40 cm); a distance of 50-100 cm should be left between the stakes.
Horizontal tree branches (twigs) should be prepared 1.5-5 cm thick and 1.5-4 meters long. Since the rods dry out over time, they must be laid as tightly as possible into the fence.
Transverse logs for a fence made of corrugated sheets
The logs can be made of a profile pipe with a cross-section of 30 by 20 or 40 by 20 mm, or from a wooden beam of approximately 70 by 40 mm. Metal, of course, is preferable, since wood is more susceptible to rotting, especially at fastening points, and has a shorter service life.
If you are installing a metal profile fence with your own hands using wooden logs, do not skimp on a good wood impregnation, which it is advisable to apply several times. Ideally, you can immerse wooden joists in a bath with an antibacterial solution, for example, Senezh Ultra, and soak in the solution for 20-25 minutes, and then dry thoroughly.
The number of logs directly depends on the height of the fence. If the fence is no more than 2 meters, then two transverse joists are enough. If the fence is from 2 to 3 meters, then install 3 logs. Anything over 3 meters needs at least 4 joists.
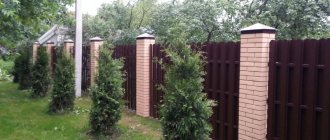
Brick fence on foundation
The trench for the foundation is dug with an excavator or manually. Gravel and sand are placed in the trench, the layers are compacted and watered.
A formwork is built from boards, and metal reinforcement is placed in it. Concrete is poured into the formwork in portions. The foundation must be left for 7-10 days, the formwork must be removed, and the base must be treated with a waterproofing solution.
When constructing a brick fence, the bricks are laid in one row.
Combined or openwork masonry is often used - the brick is laid with gaps or combined with brick halves, which are laid in the shape of a diamond. For a high brick fence, it is necessary to lay the bricks in two rows. The main rule is that you need to tie the seams well and follow the order of installation.
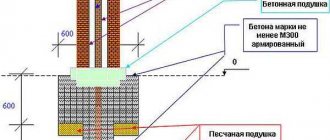
A strong foundation is the basis of a reliable fence
To form a reliable foundation for a heavy foundation, it is necessary to drill (that is, deepen) into the ground in the places where the pillars will be located, below the level at which the ground freezes in winter. For stone and brick fences, you can combine the piles under the pillars into one monolithic base concrete strip with reinforcement frames. This design increases resistance to temperature changes and gives strength to the fence. Obviously, such a foundation will not be very cheap for the owner of the site, sometimes even its cost exceeds the cost of the materials for the fence, but its reliability will be increased, you will be able to operate it for more than 50 years.
Many people wonder: does it make sense to make the foundation yourself? In any case, it is better to entrust such work to specialists in their field, who will do everything quickly and efficiently. After all, building foundations is much more important than installing a fence on ready-made poles. For a strong foundation you need strong formwork, it is best to take steel formwork. During installation, it must be securely fastened.
If you want to make your fence more accessible without making a strip foundation, you can do this. Drive the pillars into the depth of the soil below the frost line, or concrete the pillars into the ground again, below the frost line. In this case, you will need to drill holes under each post to the required depth. The diameter of the drill will be 25 centimeters. Rebar frames are installed in the resulting holes and the piles are concreted. Before pouring, a cylindrical formwork is made and concrete is poured into it. This is necessary for smooth concrete pile walls, which will prevent the foundation from rising out of the concrete.
Concrete fence
Support pillars are installed according to the standard scheme, which is described at the beginning of the article. For concrete fences, special posts with grooves for slabs are used. A rail is inserted into the groove of the support post, the other end of which is inserted into the next post.
The position of the pillar is checked so that the level of the staff corresponds to the spirit level readings. All pillars are aligned in this way.
Next you need to prepare a cement-sand mortar in a ratio of 4:1 and fill the holes under the pillars. The solution must be left to dry completely for 3-5 days. Then you can begin installing the concrete fence.
General installation technology
Diagram of a fence made of corrugated board.
General construction technology requires compliance with the following steps:
- Marking the territory using a tape measure, stakes and rope. In those places where installation will be carried out, stakes are driven in and a cord is pulled.
- Installation of poles for support. To do this, holes are made in the soil using a shovel or a hand drill (if available). The depth of the holes will depend on the type of soil and its density. After this, pillars are installed in the pits at the same depth. Gravel, sand, stone or ordinary broken brick are poured into the recesses, after which the pillow is again sprinkled with sand and compacted.
- Now we begin to prepare the solution, for which we need to mix four parts crushed stone, four parts sand, one part cement; The solution is diluted with water to medium thickness. After pouring, it is necessary to leave the pillars until the solution hardens; if necessary, the position of the pillars must be adjusted.
- The metal frame, that is, logs, etc., is mounted using a welding machine. The strength of the entire fence and its service life will depend on the quality of welding in the future. Horizontal log pipes are placed parallel to each other and only in one plane.
- If the fence is more than two meters high, then it is necessary to install two rows of joists. After strengthening, the entire structure is covered with a primer; it is recommended to apply a layer of anti-corrosion paint.
- The installation of corrugated sheets is carried out last, for which the prepared sheets are attached to the metal frame using self-tapping screws with special protective overlays. When using sheets with a colored polymer coating, it is recommended to immediately purchase self-tapping screws that are painted to match the color of the sheets; this will make the structure more decorative.
Sometimes when installing a fence, it is recommended to pre-fill the formwork to a height of up to thirty centimeters. This is usually done when installing a tall structure, which should be given additional strength. The sequence of work is almost the same, only after installing the support pillars, formwork is made, which is filled with prepared cement mortar.
Many experts recommend, along with self-tapping screws, the use of steel rivets (but not aluminum!), which create additional fastening. The advantage of rivets is that they do not unscrew and provide additional security under wind loads.