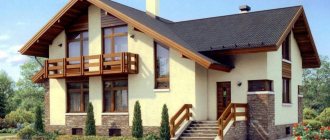
Harsh winters, old walls, ever-increasing prices for utilities: all these are the reasons that force many people to save energy. A wise decision is to insulate the walls of your home. If you have minimal construction skills, you can save a lot. Correctly insulating a wall from the outside with mineral wool with your own hands will not be difficult if you study this topic and follow the tips and instructions.
Advantages of external insulation
Insulate housing from the inside only in the most extreme cases. The justification may be the impossibility of insulating the walls due to the height, or the authorities’ ban on changing the appearance of the structure. Insulating walls outside with mineral wool often spoils the appearance of an apartment building. A separately insulated apartment stands out noticeably and disrupts the architecture of the city. But the main reason why the process is carried out outside is thermal engineering and physics. There is a term - “dew point”. If the insulation is located from the street, the dew point moves away from the internal walls. The house is warm and cozy, the walls remain dry.
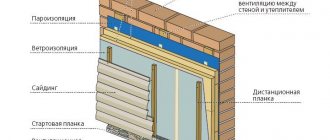
Placement of the dew point, depending on the method of wall insulation.
Placing insulation inside will cause the walls to become damp. You will need to invest a lot of effort and money into a vapor barrier. No less important reasons:
- The usable area inside the apartment does not decrease. There is not a single case when a person wants less free space.
- The outer wall of the house is perfectly protected from all negative factors of nature.
- Good indoor ventilation.
- The appearance of the building is improved. You can hide gloomy gray walls, create a unique design and update the facade. This is very beneficial if you decide to sell your home.
Material
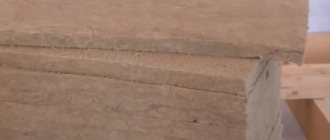
There are many options for wall insulation. Modern technologies have filled this market segment. The most commonly used insulation is mineral wool. It is also called basalt, because it is made from natural raw materials - basalt. An additional component is silica. During the production process, the product is treated with water-repellent compounds. Everything is thought out in such a way that vapor permeability does not become worse. The building material is supplied to the client in the form of mats and slabs. A less convenient form of delivery is in rolls. The parameters of the final product may vary. The material itself has a fibrous structure. The fibers can be oriented in all sorts of ways. When positioned “parallel” we have ordinary slabs. If the fibers are oriented perpendicularly, these are lamella slabs.
Most often, the walls of buildings are insulated with cotton wool with a density of 75 to 145 kg/m3. A low-density slab can be attached directly to the wall. Low density allows you to fill all the unevenness in the wall (brick, concrete). It is customary to mount slabs with a density of 100 kg/m3 above the first layer. They allow you to get a smoother surface and make finishing work easier. To calculate the required quantity, you must proceed from the total area of the walls. From the resulting amount you need to subtract the sizes of windows and doors. A reserve of 5 to 10% is quite justified: you will spoil something, and the remainder will be useful on the farm.
Advantages of mineral wool
The material has significant advantages:
- Complete, high-quality filling of all voids. This cannot be achieved using polystyrene foam.
- There is no need to use a vapor barrier.
- The insulation technology is not particularly difficult.
- Fire resistance. The material does not burn and does not support combustion. It can withstand almost 6 thousand degrees of heat.
- Long service life if all installation requirements are met.
- Light weight. Mineral wool is easy to work with and does not place much load on the walls and foundation.
- Excellent thermal insulation.
The minimum total thickness of the insulation should be ten centimeters! The best option is to attach the insulation to a load-bearing wall, and then lay the brickwork using facing bricks. The insulation layer is located in the middle, is perfectly protected and “works” more efficiently. Mineral wool can be used to insulate a wooden house or a brick house. Sometimes buildings made of gas silicate blocks are finished with mineral wool. This action is justified if you live in the northern regions. But significant thickness is not required.
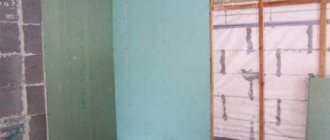
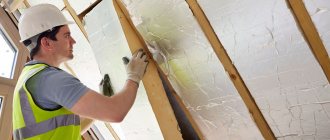
Is it possible to insulate a house from the inside with mineral wool?
Internal insulation with mineral wool.
Despite the fact that, according to the rules, thermal insulation is laid on the outside, there are still situations when insulating a brick wall from the inside with mineral wool is not only a necessary measure, but also technologically correct. For example, insulation of a steam bath, which is performed only from the inside. In this case, thermal insulation inside the house can be laid not only on the walls, but also on the floor, ceiling, pitched roof of the attic or attic.
During installation, it is necessary to install a vapor barrier. It will protect the heat-insulating material from moisture getting into it, which is extremely undesirable, since once it gets wet, it stops holding heat. It should be understood that the use of even the best vapor barrier will not give 100% results and some moisture will still leak out. Therefore, it is necessary to create such conditions so that steam can leave the thermal insulation cake.
Methodology for how to properly insulate a house from the inside with mineral wool:
- the sheathing is made of wooden blocks or metal guides under the drywall;
- mineral wool is laid - better than glass wool, it produces less dust;
- vapor barrier is attached;
- the finishing is attached - usually drywall.
A gap between the vapor barrier and the drywall is optional. If foil materials are used as a vapor barrier, then there must be a gap.
Materials and tools
It is impossible to insulate a house from the outside with mineral wool without tools and devices:
- Scaffolding. They can be rented. Using stairs is dangerous and uncomfortable.
- Hammer.
- Plaster grater.
- Whisk for mixing the solution.
- Wood saw.
- Extension.
- Putty knife.
- Container for solution.
- Hammer.
- Water level. Desired length: from 5 to 10 meters. Ideally use a laser device.
- Building level.
Consumables:
- Corners for reinforcing corners.
- Glue for mineral wool.
- Primer.
- Fabric reinforcing mesh.
- Paint, decorative plaster.
- Fasteners for mineral wool, dowels.
- Sand, cement.
- Cornices.
What to choose?
Foam plastic can be an effective and inexpensive insulation material for brick walls.
Insulating a brick house from the outside using modern methods allows you to achieve maximum thermal insulation effect, but it is important to choose the right material. To do this, you need to study its characteristics. If the housing is built of concrete slabs, high-quality insulation is possible using foam plastic or mineral wool. These materials are also suitable for stone buildings.
If you need to insulate a house made of foam blocks, it is recommended to use mineral wool, polystyrene foam, or polyurethane foam. To increase the thermal insulation of a building made of aerated concrete blocks, the following materials are used:
- plaster,
- Styrofoam,
- polyurethane foam,
- mineral wool.
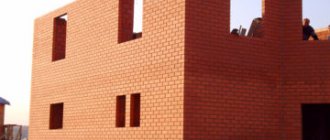
Brick walls are insulated with polyurethane foam, mineral wool, polystyrene foam, and polystyrene sheets. After installing the thermal insulation, it is necessary to finish and cover the facade with the selected facing material. The walls of an insulated and tiled house will retain heat indoors as efficiently as possible, making the climate in the house pleasant and comfortable.
Installation technology
Insulation of walls from the outside with mineral wool is carried out at air temperatures ranging from +5 to +25 ° C. If you use antifreeze additives, then it is allowed to carry out work on installing insulation at temperatures down to minus 10 °C.
The entire wall insulation technology can be divided into the following stages:
- Preparing the base of the facade;
- installation of galvanized cornice and window frames;
- wall primer;
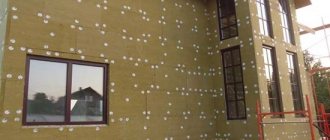
- gluing mineral wool slabs;
- installation of dowels;
- gluing protective pads and metal corners to protect corners and slopes;
- applying a reinforcing layer;
- installation of window sills and other drainage elements;
- priming and installation of a decorative protective layer.
Before starting the main work, you need to clearly understand the scheme of the future structure. The ideal “pie” looks like this:
- Layer of decorative protection.
- Reinforcing layer.
- Mineral insulation.
- A layer of glue.
- The wall of the structure (substructure).
- Anchor devices.
Preparing the walls
The walls must be strictly perpendicular to the horizon. The permissible deviation is 15 millimeters per floor. If there are cracks, they should be repaired. A wall that is too “dead” can first be primed and plastered with reinforcement, and only then can the installation of the main insulation “pie” begin.
Note! If the walls were leveled with plaster compounds, you should wait at least 7 days to begin further work.
Installation stages
Initially, the galvanized cornice is secured with dowels. It is located at the bottom of the wall. This is a very important step, which will allow all layers of material to lie flat. It can also be called installation of plinth strips. And this is also a sure protection against mice and other rodents.
In order to install the plinth level evenly around the entire perimeter of the house, you should use a laser level or hydraulic level. The second option is in no way inferior to the first in terms of accuracy, the only downside is that you will need a partner for marking, plus it is more economical.
After installing the base strip, we install the window sill crutches. Then we prime our prepared base using a spray gun or a roller with a brush.
Note! To start gluing the insulating boards, you need to wait until the primer has completely dried.
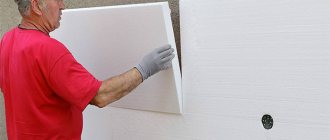
The main stage of work is gluing the insulation boards. To do this, a layer of glue is applied to the back of the insulating material, in one of two ways, the toothed base method (solid) or the side-point (beacon) method.
The notched foundation method is acceptable when the base of the house is level. The glue is applied in a continuous layer over the mineral wool slab and leveled with a notched trowel.
The side-point method is used when the wall surface has acceptable unevenness. The glue is applied in a continuous layer around the perimeter of the mineral wool slab, 100 mm wide, in the center we make 8-10 beacons with a diameter of 100 mm. The thickness of the applied glue, in both methods, should be about 3 mm.
Special mixtures are used as glue. During the direct gluing process, apply slight pressure with your hand. Next, we align using the rule and level. Gluing the slabs should be done with a bandage of at least 100 mm. If there is a slight mismatch between the joints of adjacent slabs, their unevenness should be leveled with sanding floats. Glue should not get into the seams between the slabs; if the slabs are not joined tightly, they can be adjusted by slightly cutting them at the required angle.
Note! From the moment of gluing the insulation boards to the stage of installing the anchors, at least 2 days should pass.
The next stage is the installation of anchor devices. To do this, use an electric hammer drill to drill holes of the required length. We insert the dowel bushings into the holes, then hammer the metal cores into them with a hammer. The consumption of dowels for fastening mineral wool is 5 pieces per square meter. The insulation boards are held in place by umbrella-shaped dowels, also called mushrooms. A wide hat is great for attaching mineral wool.
This is followed by gluing protective linings made of fiberglass mesh and metal corners. These corners will protect slopes and corners. We attach them to the glue, applying it along the entire inside of the corners, pressing them tightly against the corners, and leveling them.
This is followed by the installation of a reinforced layer. To do this, you will need glue and reinforcing material, a fiberglass mesh with cell sizes of 5 by 5 mm. Gluing should be done on a dust-free surface, using a tool made of inert materials (stainless steel, plastic). Glue is applied to the wall in small sections, and the mesh is gradually pressed into it, it is laid with the inside of the roll against the wall, from top to bottom. The overlap of the meshes must be at least 100 mm in all directions. At the corners, the mesh is wrapped onto the adjacent wall by 100 mm (without taking into account the thickness of the insulation). On door and window slopes, the mesh is wrapped over their entire width.
Note! After installing the reinforced layer, you should wait at least 5 hours before applying the leveling layer.
After installing the reinforced layer and leveling layer, window sills are installed, and various drainage elements are often constructed.
Before applying the decorative protective layer, at least 2 days must pass after applying the leveling layer. If necessary, carry out another priming of the surface, wait for the primer to dry completely. The decorative and protective layer is made according to the taste and requests of the owner.
Insulation of the facade with mineral wool under plaster
This method of insulation must be carried out in dry weather so that the heat does not get on the material. Because this can cause all the material to slide off. As always, at the initial stages we thoroughly clean and inspect the facade to remove dirt, dust and other things.
Be sure to level the surface and apply a primer with deep penetrating ability. We glue the slabs using a special adhesive composition, which we pre-mix with a construction mixer. Carefully coat all the material with glue and apply it to the facade surface.
We glue all the plates exactly in a row, without creating cracks or holes. After we have insulated the walls from the outside, our next step is to reinforce the tops of the corners and openings. After everything has dried (at least 24 hours), we proceed to the last step - finishing the walls with 3-5 mm plaster.
Subtleties of insulating a house under construction
There are several rules that help achieve maximum effect from this work when constructing a new building. A few tips will help you properly insulate your home:
- Insulation boards are installed along the entire façade of the house.
- Fastenings in the form of an anchor are drilled into the wall. They are necessary to securely hold the material.
- The slab is threaded onto an anchor. Special fasteners are locked to the plate with clamps.
- Above the insulation layer, a brick wall is constructed, intended for facing purposes.
- To grout the joints, use a solution of sand and cement or use beautiful plaster.
Recommendations and common mistakes
Laying insulation on the facade requires precise adjustment of the slab dimensions. The most common mistake made by beginners is incorrect planning and cutting of the material before laying mineral wool on the walls. Often the space around the window is made up of scraps of insulation. Whereas, according to technology, the perimeter of a window or doorway should be sheathed with solid slabs with cut out corners. In places where window openings are bypassed, the vertical distance from the corner of the window to the horizontal edge must be at least 150 mm.
The second mistake is not applying the glue carefully enough. To ensure that the places where mineral wool is glued to the facade are strong, you need to rub the slabs as gently as possible, but at the same time with force, with small amounts of facade glue, then most of the adhesive mass is applied in several “splashes” or along the perimeter of the slab.
Additionally
To insulate the slope, you can use mineral wool on both sides. It is important to remember the principle of mineral wool - the thinner it is, the less space it takes up. But its heat preservation properties are reduced. When doing this work with your own hands, a simple assistant will not hurt: this will speed up the process. Even on your own, without any special skills, you can lay up to 25 squares of insulation in a day. Remember safety precautions. The main criteria in the work are attention and caution. The progress of work may be slightly affected by the weather. Postpone work if there is strong wind or rain. Before work, you need to inspect the area around the house: there should be no dangerous objects sticking out of the ground.
Types and characteristics of mineral wool
There are several types of mineral wool, which differ in their characteristics and scope of application:
- Basalt (stone) . It is made from gabbro-basalt fibers with a thickness of 5-15 microns, does not contain mineral or binding additives, therefore it can withstand temperatures from -190 C to +1000 C, is characterized by minimal hygroscopicity, and is used for insulating facades;
- Slag . Made from metallurgical waste, fiber thickness 4-12 microns, not suitable for insulating metal surfaces, for example, pipelines, as it can contribute to the development of corrosion;
- Glass wool . The most budget option with a fiber thickness of 5-15 microns contains formaldehyde, therefore it is used for insulation of non-residential premises (warehouses, workshops).
Basalt wool is most often used to insulate facades. It is one of the most versatile insulation materials due to its characteristics:
- Thermal protection (thermal conductivity). With a thickness of the insulation board of 10 cm, this parameter for mineral wool varies from 0.036 to 0.042 W/K*m.
- Density – 40-300 kg/m³.
- Fire resistance. Belongs to the category of non-combustible facade materials. It does not light up even at a temperature of 1000 C.
- Sound insulation level. The noise absorption coefficient of the material is 0.95.
- Vapor permeability. Allows excess moisture to freely leave the room. The vapor permeability coefficient is 0.49 – 0.6 Mg/m*h*Pa.
- Hygroscopicity. Moisture saturation is no more than 1-1.5%.
It is important to know!
When working with mineral wool, it is imperative to follow safety regulations. The installer's hands and face are protected with special clothing. You need to put glasses on your eyes. To prevent mineral wool fibers from entering the respiratory system, a respirator should be used. Microdust from the insulation, if it comes into contact with mucous membranes or skin, can cause allergies (itching, redness).
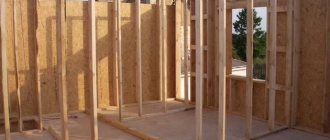
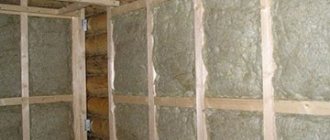
Installation of insulation for a frame structure
The technology for insulating a frame house is generally similar to the process of insulating wooden houses described above.
On the interior walls, chipboard is attached to the frame. They are joined along the beams and beams of the strapping. Then the vapor barrier is fixed and drywall or lining is installed.
Installation of mineral wool
Mineral wool slabs are laid on external wall surfaces. The number of layers depends on the region in which the house is located. The joints of the previous layer are covered with the next row of insulation. First, at the bottom of the wall, it is necessary to fix the galvanized cornice using dowels: it will help the insulation boards lie flat and protect the building from rodents and insects.
After the heat insulator is laid, it is covered with a membrane to protect it from the wind and secured with a stapler.
You can fix the mineral wool on the wall using a special adhesive solution. It is applied to the back side of the mat, slab or roll, which is then applied from bottom to top, easily pressing it against the wall.
You can attach the heat insulator with dowel-nails “umbrellas”. It is necessary to control that the material does not move apart when punched. Its surface is smoothed with sanding brushes. A primer mixture is applied to the mineral wool mats or slabs.
Creating an air gap and finishing
The sheathing will help retain the heat insulation layer. It will also create a ventilation gap between the windproof membrane and the outer skin. Chipboard is installed on the sheathing. Then the cladding (for example, siding or lining) is installed.
Thus, mineral wool slabs placed between the frame posts will be sewn between the chipboard slabs from the outside and inside.
Production of thermal insulation for a brick building
The process of insulating a brick house with mineral wool is similar to that described above. The creation of a ventilated facade begins with the manufacture of sheathing on the load-bearing wall. The insulation is fixed on it. A windproof membrane is laid on top and secured. You also need to install ventilation ducts measuring 4-6 mm. All this is covered from above with the selected finishing material.
Insulating walls with mineral wool in frame, wooden, and brick houses is a simple process. If you purchase the simplest tools and necessary building materials, then 2-3 people can properly insulate a medium-sized house in one day.
Characteristic features of brick walls
In its properties, brick differs from other building materials. It is worth noting the following:
- Bricks can be either full or hollow - the choice of material directly depends on operational factors: the average temperature in the region, the load on the foundation, the chosen thermal insulation option.
- The format of the brickwork is also taken into account. The most common option is solid masonry, this method is the simplest. A more complex option is well masonry - in this case, so-called air pockets are made of bricks, and it is in them that the insulating material is placed.
- Alternatively, thermal insulation material can be installed between two layers of building material. This multi-layer structure consists of a load-bearing wall made of foam blocks, a layer of thermal insulation and a facing layer - the air space between the thermal insulation and the facing layer ensures the necessary air circulation.
- Since brick has good sound insulation properties, additional sound insulation for a brick facade is not needed.
Material options
Articles on the topic
Strengthening the foundation of a brick house - how to do it, instructions, advice from masons
Brick sides - what they are called, characteristics, instructions, advice from masons
How to brick a house made of SIP panels - required materials, instructions, advice from masons
Installing a bathtub on bricks - what materials are used, instructions, advice from masons
Wooden floors in a brick house - types, how to install, instructions, advice from masons
The size of a standard window in a brick house - Brezhnev, Khrushchev, Stalin, instructions, advice from masons
Cladding windows with bricks - options, stages of implementation, instructions, advice from masons
How to paint the outside of a brick house - types of paint, instructions, advice from masons
Reviews ()
Installation of sheathing and siding
The question of how to install the sheathing should be given special attention, since the strength of the entire structure depends on this. It is preferable to install the slats in this order: if the siding is installed horizontally, then the slats are mounted vertically
In cases where it is necessary to install siding vertically, the sheathing is laid horizontally. Please note that the pitch between the slats is determined by the distance between the holes for fastening the siding. The slats must also be installed in corners, near openings, and so on.
Siding insulation scheme
It should be noted that the plane of the sheathing must be checked at all times with a building level, because the evenness of the siding installation depends on this. Wooden slats are mounted into walls using dowels or galvanized nails (weave). Please note that the sheathing is also treated with a primer if it is made of wood.
Siding is installed directly onto the sheathing elements using screws or nails. In this case, it is necessary to make a ventilation opening of several centimeters between the insulation and the facing material. Thanks to this, the walls will breathe. Siding is laid directly from bottom to top.
Types of thermal insulation materials
The following options for insulating materials can be purchased on the market:
Mineral wool
Mineral wool made from mineral fibers has good heat-saving properties. The manufacturing method involves breaking up molten minerals - it can be glass, slag or basalt. The material prepared in a centrifuge from thin mineral threads has a low density and is actually an air cushion, which has a low level of heat transfer. It is the air that prevents the penetration of cold through the layer of thermal insulation material. As for the properties of mineral wool, it demonstrates good heat-saving characteristics, but only in a dry state - when the mineral wool gets wet, it loses its properties. It is worth noting good fire safety - this facing insulation is non-flammable.
Expanded polystyrene
Expanded polystyrene is made from liquid polystyrene, which is saturated with air bubbles. It can be sold either in plates or in the form of round granules.
Due to the closed-cell structure, such material is less afraid of moisture, but fire safety is significantly lower than that of mineral wool. At high temperatures, the foam begins to melt and burns out completely, while the masonry may not even be damaged.
Expanded clay
Bulk insulation is also suitable for thermal insulation when arranging three-layer masonry, instead of installing blocks, the crumbs are poured into internal wells. The base is expanded clay, slag and any other material that allows you to create a structure with a high air content. This option is significantly more affordable than using ready-made sheets of insulating materials, but is much worse in efficiency. This is due to the low thermal protection of expanded clay and slag. Crushed materials are also hygroscopic, which implies the need for good waterproofing - otherwise, water increases thermal conductivity and destroys layers of brick and aerated concrete.
Choosing insulation for brick walls
When choosing facing insulation, you need to familiarize yourself with the recommended list of options that comply with SNiP:
- We take into account the thermal conductivity indicator - the thermal insulation layer must ensure protection of the microclimate of the premises at the minimum temperatures typical for this region. On the packaging, the manufacturer must indicate the thermal insulation characteristics of the material, which makes it possible to calculate the required thickness of the insulation layer, taking into account winter temperatures.
- Good vapor permeability indicators - water entering the insulation should not accumulate inside it. Otherwise, its thermal insulation qualities are sharply reduced.
- Fire resistance is also a very important indicator that ensures fire safety; a layer of insulation can create a fireproof layer in the facade of a building.
The process of fixing the insulation
All work is divided into several stages:
Preparing for work
For high-quality installation and minimal time spent on it, it is necessary to prepare working tools and accessories:
- tape measure, level, plumb line,
- drill, screwdriver, hammer drill (for brick walls),
- screwdrivers, hammer, stapler,
- hacksaw, metal scissors,
- protective equipment (glasses, gloves),
- fasteners, staples for staplers,
- ladder or stepladder (depending on the height of the house).
Frame installation
The initial stage of the insulation process is to clean the facades from various protruding parts in order to install frame profiles. The drainage system, eaves overhangs, window treatments and trims around the doors are dismantled. It is advisable to treat the surfaces of prepared wooden walls with special antifungal and fire retardant compounds; for brick walls, it is enough to eliminate cracks and small defects.
After priming the surfaces, a vapor barrier film is secured to the facades using a stapler or tape. It will protect the insulation from condensation and evaporation, and keep it dry, which will help maintain the high thermal conductivity properties of the material.
Then vertical lathing is performed to tightly place the insulation in increments of 50 - 60 cm (depending on the size of the slabs). The bars or profiles are attached using adjustable brackets. When using wooden blocks, it is also recommended to treat them with a protective compound. For rigidity and strength of the frame, it is advisable to fix several horizontal axes (3-4 per wall). The geometry of the frame lines is periodically checked with a level.
useful in work
The use of a metal frame structure when insulating a house with mineral wool is preferable, since it is not subject to rotting (unlike wood) and is generally more durable in use.