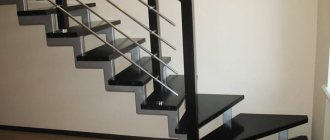
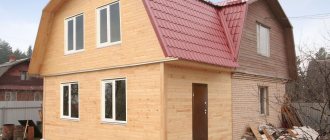
Any adult who is more or less familiar with the basics of frame construction and has at least a little experience working with tools can assemble or make a change house with their own hands. Arrangement of a compact, light and well-insulated residential building on 15-20 m2 of area will require at least a week for the box, and 3-4 days for finishing the trailer, connecting light, sewerage and water.
Does it make sense to build a change house with your own hands?
There are several ways to get a residential trailer for the temporary residence of a small team of construction workers. The situation is usually complicated by the fact that you will have to live in a change house in the winter in a suburban area, when the dacha or house itself, as such, does not yet exist, or is just being built.
The problem of changing houses for workers is solved in several ways:
- Rent a residential trailer from friends, neighbors, a construction or specialized company. The worst option. They will give you a good cabin for a maximum of a week, but for an old and broken trailer, the owners usually require repairs;
- Build a change house using hired workers. They will do it quickly and at the same time for little money. The quality of the constructed residential unit is low, and most often, after a month, another will need to be repaired or even re-equipped;
- Buy a ready-made change house or order it from a construction company according to pre-agreed conditions and drawings. It turns out to be quite expensive and not always correct.
Most construction companies prefer to sell their standard trailers, heated trailers, and living boxes, which are produced on the market. Therefore, there is no hope at all that a company will agree to make or build a good quality change house according to an individual project and an acceptable price.
In terms of price, a typical 6x3 m residential trailer costs $1100-1200, plus delivery and installation will require another 10% of the cost. If you add the costs of making a foundation and sewerage, it turns out that it is easier and cheaper to build a change house with your own hands. High-quality, solid, according to your taste and layout.
What can you build a cabin from?
Before planning construction, it would be right to think and select a variant of the cabin design so that, after completing construction work on a suburban site, you can turn the trailer into a useful room for the household. For example, refurbish a bathhouse or build a summer kitchen, or even a small garage for a vehicle.
More often, country houses are built according to several standard schemes:
- Frame building made of boards, wooden beams and lumber;
- A change house with a metal frame and a subfloor base;
- Construction from OSB boards and panel materials;
- Panel board or temporary housing made of plywood;
- A warm version of a cabin made from sandwich panels.
Any of the listed schemes is quite accessible to even a novice carpenter or carpenter to build a residential block with his own hands. If you have no construction experience at all, then you can find step-by-step instructions that will help you make a change house with your own hands without making gross mistakes, and the quality of workmanship depends entirely on your attitude to the work. It’s clear that for your needs, you don’t need to force anyone to make a residential trailer efficiently and efficiently.
Construction of a change house at the dacha with your own hands
We offer step-by-step instructions on how to build a shed from scratch using frame technology with your own hands.
How to make a frame for a country house with your own hands
- Prepare a site on the land. Ideally, this should be a horizontal surface with solid soil. This will save time and money on excavation work.
- Before installing the foundation, carry out preparatory work. They include removing 30 cm of soil over the entire area of the future shed with removal of half a meter beyond the perimeter. Replace the removed soil with compacted sand, preferably laid on geotextiles.
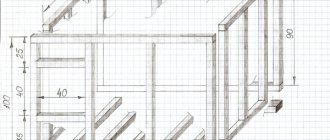
- The choice of foundation is yours; it can be a cast concrete option for a steel support, cinder block or brick pillars, or concrete blocks. Lay the pillars to a depth of more than 30 cm; be guided by the cords, marked according to the drawing of the cabin frame and aligned horizontally. A typical foundation for a 6x3 cabin consists of 15 pillars every 1.5 meters (3 pieces in width, 5 in length).
- Construction work cannot be carried out on a fresh, damp foundation for a whole week.
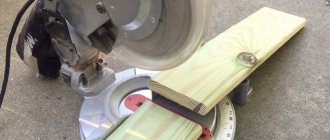
- Saw the wood according to the drawing parameters, treat with hydrophobic and antiseptic compounds. Fire protection treatment is also desirable.
- Before installing the base of the cabin frame, supplement the pillars with 2-layer roofing material waterproofing. The base will consist of 150x100 timber: three longitudinal ones and a pair of transverse ones. Based on the drawing, lay the beams with the wide side down, then level them and secure them with reinforcement ties or anchors to the columns.
- Next will be the installation of the lower trim of the frame cabin. Strictly along the perimeter of the structure, a 100x100 beam is attached to the crown. There is no need for strapping on the middle beam. In the final stage of this stage, a 50 mm step appears along the entire inner edge.
- Install the logs on the floor correctly, that is, on 3 longitudinal beams of the base, edge down, with a pitch of 60 mm. The timber will fit into the 30mm slots in the bottom trim of the cabin frame. The logs are made from 100x50 timber.
- If desired, you can install an underground floor . This is done in order to extend the life of the cabin, as well as for additional insulation of the structure. Place construction waste in the gaps between the posts around the perimeter, and then fill the subfloor with expanded clay.
- Next, all that remains is to install and level the vertical corner posts (beam with a section of 100x100) using a level, organize the top trim and strengthen the frame of the cabin with vertical additional posts (they require a 100x50 beam).
Useful: How to cheaply build a house with your own hands
Further stages of arranging a country house
After erecting the frame, perform the following types of work:
- limit windows and doors with horizontal bars 50x50mm;
- Replace the temporary rack braces with permanent ones (40x100mm boards will be needed);
- install rafters, sheathing and roofing material;
- lay the subfloor in a continuous flooring of 30x150 tongue and groove boards, complete with a waterproofing and vapor-proof membrane;
- insulate the space between the joists with mineral wool or expanded polystyrene, lay a polyethylene membrane on top;
- Lay the flooring from a 40x150 edged board across the joists;
- sheathe the outside frame of the cabin with vapor-proof material, cover it with clapboard or plywood panels;
- install doors and windows;
- carry out engineering communications;
- the ceiling and internal lining are covered with polyethylene and thermal insulation, then with sheet building materials in the form of plywood, chipboard, OSB or fiberboard;
- After the construction of the frame cabin, decorative work awaits you.
Wooden cabin
Most often, prudent owners plan to build a trailer or temporary living block with further plans to use the room as a bathhouse or summer kitchen. In this case, it is best to build a shed from timber 70-90 mm thick.
The box is installed on a permanent foundation made of concrete or bored piles. The walls of the cabin are assembled using the traditional technology of laying wooden beams.
Customers prefer to build the roof, window and door openings, and the floor of the cabin according to a temporary plan, for shrinkage. A residential block without any insulation with mineral wool or penoplex provides comfortable living conditions from May to October, during the period of the most intensive work at the dacha. It is at this time that most construction has to be done on a suburban site.
For your information! It is more expensive to build a change house from timber than to buy a ready-made standard version of a residential block or trailer.
The benefits of such a solution are calculated for the future. In just a year or a year and a half, when the dacha box has been built, rough cladding has been completed and electricity has been connected, the log cabin, which has completely completed the shrinkage processes, can be converted into a bathhouse or summer kitchen with a clear conscience.
Panel change house
The vast majority of inexpensive standard trailers or residential blocks are manufactured using a panel design. Most of the wall, floor, roof and interior trim parts are cut on woodworking machines and sold as a kit. All that remains is to transport the purchased change house to the site and build it according to the attached assembly diagram.
Features of panel residential premises include:
- Simplicity and high speed of assembly. In order to build a panel shed, you will need a screwdriver with a double set of batteries, a saw and several hundred wood screws;
- Low price for the building. On average, a panel structure costs 20% less than classic frame and metal trailers - cabins;
- A minimal amount, and sometimes a complete absence of insulation.
The walls of the residential block are made of sheet plywood, with virtually no frame; only the corners, ceiling and floor are sewn from timber. The rigidity and stability of the shed room is ensured only by the strength of the plywood sheets. Often, strong storm winds can easily deform and sometimes even break the structure.
For your information! Panel structures of cabins are often used by unscrupulous shabatniks in order to build living quarters and blocks for urgent orders in the shortest possible time.
The box assembled from plywood is insulated with mineral wool and lined with clapboard or sheet metal profiles. The result is a beautiful building, but absolutely weak and practically uninhabitable.
Change house made of OSB boards
Approximately 60% of all summer cottages are built in the form of frame structures covered with OSB boards. The material, similar in properties to plywood, but at the same time much cheaper, perfectly withstands atmospheric moisture, has better heat and sound insulation. The strength of OSB boards is lower, so it will not be possible to build a panel shed from them; the walls of the residential block will simply delaminate and fall apart under load.
You can make a wonderful frame shed from OSB boards. It is somewhat more expensive to build a room box from panels, since the wooden frame made of timber is insulated with polystyrene foam boards and sheathed with OSB on the outer and inner surfaces of the sides. Of course, using frame technology, it is possible to make a residential block based on plywood, sandwich panels or SIP materials.
If the cabin trailer is going to be made mobile, then it is best to use a metal frame made of a square pipe. But in this case, after the completion of the construction of the dacha or cottage, the change house will be suitable for a maximum of building a utility block or garage.
Change house made of metal profiles
As a rule, sheet metal and rolled metal are not used for temporary summer cottages. The change room turns out to be cold in winter and hot in the summer heat. Considerable expenses will be required to make effective thermal insulation of increased thickness.
In addition, the cost of purchasing metal will be approximately twice the cost of building a frame wooden structure. Metal profiles and profiled sheets are used for the construction of capital premises with a high level of comfort at the dacha.
In this case, it is easier to buy an old sea container; its price will not exceed $400-450. About the same amount will be required to finish the inside of the box, install windows, insulate the walls, build a sewer system, and install water and electricity.
With an estimate of $800, spending a week of vacation, you can build not just an excellent shed, but a full-fledged guest house in which you can live in the winter, store materials and tools, like in a safe, and not worry about your country property.
Change house made of sandwich panels
Of all the existing temporary housing schemes, trailers and residential blocks made of SIP panels are considered the warmest and most comfortable. It is unlikely that you will be able to make a change house with your own hands from industrial-type metal sandwich panels, since the dimensions of the slabs may exceed the required dimensions of 6x3 m. Full-fledged hangars and garages on a metal frame are built from sandwiches; such structures are not used as living quarters.
The process of building a cabin from SIP panels is in many ways similar to the technology of panel houses. Finished foam blocks cut to size, covered with OSB boards on both sides, are laid on a rough timber frame and secured with polyurethane foam.
If you first make a high-quality pile foundation and cut out the blocks, it will take a maximum of two to three days to build the trailer box with one assistant.
We build a shed from metal profiles
Country house from a change house
Change house
Construction of a frame made of metal profiles will require more effort compared to the construction of a wooden analogue. But the iron change house will last much longer.
The set of necessary tools includes:
- hammer;
- welding machine;
- drill;
- screwdrivers;
- corner;
- grinder;
- tassels;
- construction stapler;
- roulette;
- hacksaw
We also buy the following materials:
- profiled pipe measuring 2x2 cm, 4x2 cm, 4x4 cm and 4x6 cm;
- mounting rail 2x4 cm;
- galvanized sheet steel;
- corrugated sheeting;
- primer for metal;
- self-tapping screws for fastening corrugated sheets;
- screws for metal;
- staples for a construction stapler;
- rivets;
- OSB boards;
- polyurethane foam.
Making the base
We will assemble the base of the frame from a pipe measuring 4x6 cm. We cut the pipes in accordance with the dimensions of the structure being built.
We weld the pipes according to their external dimensions and get a rectangular edging. In total we need to make 2 identical rectangles. We will make the floor from one, and the upper part of the cabin from the other.
To make the floor reliable, we create a grid inside the rectangle from the same profiled pipes. We are making a change house with a width of 250 cm. With such dimensions, it is enough to weld 2-3 longitudinal pipes along the entire length inside the edging. We weld cross pipes every 50 cm.
Floor for change house
Next, we take a galvanized sheet and fix it with self-tapping screws to the base of our change house. We turn the base over and lay it with the galvanized sheet down on cinder block supports or simply a leveled area. The structure does not need to be attached to the cinder block - the cabin will be sufficiently supported by its own weight.
We mount the racks
Installation of racks
Installation of racks
Installation of crossbars
The bottom of the floor is covered with steel sheet.
The racks are mounted. We make vertical supports from a 4x4 cm pipe. We cut it into pieces in accordance with the planned height of the change house. Usually it is 250 cm.
We place the first supports in the corners of the foundation constructed at the previous stage. We check that the angle at the junction of the posts with the base is strictly straight.
We fix the leveled rack by welding. Similarly, we set up the racks in the remaining corners.
Additionally, we will need to install intermediate racks. To do this without disturbing the geometry of the structure, we take the second rectangular pipe base made in the previous step and lay it on top of the corner posts.
We scald the resulting “cube” with intermediate posts and spacers. First, we take pieces of corrugated pipe 4x4 cm along the height of the structure and weld them vertically between the lower and upper bases. The recommended installation step is 100 cm. At the same stage, we provide an opening for the door.
We weld the horizontal cross member around the support structure. The pipe must be welded to the vertical posts at a height equal to half the height of the change house.
We make the spacers from a 2x4 cm profiled pipe. We cut it into 30-centimeter pieces. We cut each edge of the workpiece at a 45-degree angle. We scald all the corners of the structure with the resulting spacers. Additionally, we can scald the floor with them.
We make the roof
Frame for the roof
We made the lower part of the frame and the wall. Next we are engaged in the manufacture of the “skeleton” of the roof.
We make trusses in the form of isosceles triangles. We use a 2x4 cm pipe. The recommended installation step for the trusses is 1 m. We weld them along the length of the frame. We cover the roof with corrugated sheets. If you wish, you can use another material of your choice.
We cover all metal elements of the frame with a special primer, and after it dries, we apply paint of the desired color.
Types of frame cabins
If we proceed from the criterion “price – quality – comfort”, then the best option is temporary housing built using a frame scheme. The popularity of cabins on a supporting frame is explained by two factors:
- Flexibility of the construction scheme. You can choose materials for insulation, room decoration and exterior cladding to your taste, without being tied to a specific type of wall construction;
- High comfort and relatively simple construction technology that forgives mistakes even for inexperienced workers.
If you make a defect or make a mistake in calculations during the work, you can always correct the defect, although this will require additional costs and resources.
Change house with wooden frame
A residential trailer with a frame made of timber and boards can be built on almost any soil. According to the technology for constructing a trailer cabin, it is usually necessary to make a small foundation of brick, concrete blocks or piles, on which, like on a pedestal, the following are successively built up and installed:
- The base of the floor of the future living space;
- Wall frame posts and horizontal ceiling beams;
- Insulation is laid and wall cladding is made of wooden lining, siding or corrugated sheets.
Thanks to the separation of processes, a frame change house can be built simultaneously by a team of two or ten people, everyone will find a task to do. The shed can be done in one go or assembled gradually over several weeks or summer months.
The only problem with the frame structure is the protection of insulation and wood from rain and ground moisture. Therefore, they either try to build residential blocks with a wooden frame and put a roof on them in the shortest possible time, or use special expensive oil-varnish impregnations for protection.
Change houses with a metal frame
In addition to wood, you can use a metal corner or a square pipe of any profile to assemble the frame base. Most often, cabins on a steel frame are built for mobile trailers with a base on metal supports.
If a suburban area is located in swampy areas or on soils with a high groundwater level, the use of a metal frame avoids deformation of the building body due to frost heaving.
The most popular option is to use a frame from a steel railway container. In order to build a change house, sheets of walls and ceiling are cut out, leaving only the frame. The floor and ceiling are reinforced with a 60x60 mm square pipe, and boxes made of steel angle are welded in places where windows and doorways are installed.
After laying the insulation, the walls are sheathed with profiled sheeting.
Portable cabins
Construction on a suburban site does not always require the arrangement of a full-fledged, albeit temporary, living space; a team of workers can come to the site on a separate schedule. But even in such a situation, you will need to make a temporary trailer to organize the simplest living conditions, where you can shower, wash, and go to the toilet.
The version of the change house shown in the diagram can be made from wooden lining, or built from galvanized steel profile. Plastic panels are best suited for bathroom cladding; the material is not afraid of moisture and does not absorb odors.
Change house from a construction trailer
The scheme for making a temporary shed from a mobile construction box is no different from using a wheeled version of the shed. Most owners of suburban areas do not even try to remodel or refurbish the premises.
The box is simply delivered and installed on a prepared, planned site on concrete blocks. Construction sheds and wagons are usually used as temporary housing mainly in the autumn-winter season, since the cabin box lined with corrugated sheets or plastic does not get wet and does not lose its thermal insulation even in heavy rain and wind.
DIY cabin projects
The most popular are frame cabin cars made from the hulls of sea containers or assembled using timber technology.
The change room is divided into two sections - sleeping and living. The dimensions of the container allow you to make a small kitchen.
A container shed, in fact, remains the only option when you can build an entire house to accommodate 7-10 people without any problems.
If necessary, you can build a non-residential change house, make a shower stall and install wardrobes or hangers for clothes.
Wooden shift cabins are considered more comfortable when it comes to staying for several weeks or months. It is clear that the perception of a metal box and a wooden house is different; a room made of wood is still more convenient and pleasant.
In this case, you will need to make a comfortable bathroom inside the room, build a small steam room and a covered terrace at the entrance to the room. All these are little things, but it is thanks to them that you can maintain the proper level of comfort.
Log cabins
Cabins made from logs or wooden beams look very impressive, they are durable and relatively warm, but their construction is very expensive. They are absolutely not suitable as temporary structures.
A foundation in the form of a slab is used extremely rarely for them - traditionally a light strip base is used. When building a shed on rocky ground, four 200x50 mm boards can easily play the role of a foundation.
Lightweight strip base for sheds
The main rule when building such cabins with your own hands is to cover all wooden parts and elements with antiseptic materials, otherwise the wood will quickly rot and turn black . In addition, we should not forget about the fairly long time required for the shrinkage of log houses.
Log cabins take time to shrink
How to build a 6x3 shed with your own hands: step-by-step instructions
If you want to make a simple, inexpensive and at the same time convenient shed-trailer, then it is best to try to build with your own hands an ordinary frame room from timber and clapboard.
Premises made from timber, boards and OSB boards are inferior to those made from containers or car boxes, but this is an invaluable experience for novice builders and an opportunity to avoid mistakes when building a cottage or bathhouse.
Foundation installation
As a basis for a wooden cabin measuring 6x3 m, you can use supports made of concrete blocks or build brick supports to a height of at least 20 cm. First, the turf and fertile layer of soil are removed from the area of the base of the foundation, the soil is leveled in a horizontal plane, compacted, covered with geotextiles and dumped layer of sand with crushed stone screenings.
In total, for a change house measuring 6x3 m, you will need to make 12 pillars, three rows of four supports. The tops are carefully leveled and adjusted in the same plane along the horizon so that the trailer does not turn out crooked or sway. Roofing felt is glued onto the supports using mastic insulation.
Next, on top of the foundation you need to make a frame box from timber. If the change house is planned to be built in winter, then the base will additionally need to be insulated. For example, after filing the subfloor boards, lay film waterproofing and cover it with expanded clay.
Frame installation
The supporting structure of the cabin can be welded from a square pipe; on top of the wooden frame, you will need to make and secure a metal frame, to which the vertical frame posts will be welded.
The frame of the metal trailer is assembled by welding from a square profile pipe 20x40 mm.
For an ordinary wooden cabin, the frame system can be built from pine beams with a cross-section of 90 mm. Each rack must be aligned vertically and temporary side braces must be made. The racks are attached to the frame with steel angles, which you can make yourself from the remnants of rolled stock.
The heads of the wooden racks must be trimmed to the level, making sure that the ends of the vertical beams of each row are located in the same horizontal plane. To strengthen the frame, two struts need to be made under each rack.
Change house from a construction trailer
Cabins on wheels
Cabins on wheels
Don't want to bother with assembling the frame and other related activities? You can buy a ready-made trailer and equip it for a cabin. Such trailers do not even need their own foundation - you just need to carefully level the site and install the container (trailer).
If you equip a used trailer as a cabin, carefully examine its condition. Clean off traces of rust, replace heavily damaged cladding elements with similar ones, weld patches onto the through holes, coat the metal with a special primer and paint.
The installed structure must be insulated. The rest of the arrangement is at the discretion of the owner. These points will be discussed separately below.
You can also buy a trailer on wheels. The option is mobile and very easy to use. After completing all the measures for arranging such a trailer, it is installed on the frame of the trailer.
Installation of windows and doors
Installing door and window units is not particularly difficult. First you will need to make markings on the racks where exactly you plan to build the windows. Based on the marks, you will need to build supporting horizontal jumpers on which the boxes will directly rest.
The final installation of windows and doors in the cabin can be done after laying insulation and installing film insulation, the edges of which will need to be tucked under the edges of the window frames. After finishing the walls with OSB boards, you need to make and install platbands on the windows and doors, otherwise the wall insulation will quickly become damp.
Traditionally, plank and slab floors are used in cabins. After laying the mineral fiber layer, the surface is covered with a vapor barrier film and hammered with a tongue and groove board.
The second option for arranging the floor instead of boards involves laying sheets of bakelite waterproof plywood. If you have to enter the change house in very dirty shoes, then it is better to supplement the plywood with linoleum.
Advice! Before building a plywood floor, markings of the location of the joist beams are transferred to the sheets. In this case, the risk of the self-tapping screw missing the support beam is practically zero.
Roof installation
For wooden trailers, pitched roofs are used. The row of vertical posts on the front side of the building needs to be made longer, about 40 cm higher than the supports on the back side of the frame.
The rafter system rests on two parallel beams. A sheathing is sewn onto the rafters, followed by a film vapor barrier, a layer of mineral wool, waterproofing and plywood padding for laying the roofing.
Wall cladding and insulation
The easiest way is to make a warm layer of the walls of the cabin based on polystyrene foam or mineral slabs. It is best to use PPS insulation in a metal trailer; basalt fiber mats are laid in the walls and secured with sheathing slats.
The next step is to lay a vapor barrier on the floor of the cabin to make the canvas durable and airtight; the joints between the individual tapes are taped. Windproofing needs to be done on the outer surface of the walls; it is also fixed with slats and tape.
Phased construction
Now let’s list the types of work, the sequential implementation of which will allow us to complete the construction of a frame change house in the shortest possible time:
- Thinking, planning, designing.
- Choosing a location for a country trailer.
- If necessary, install pile supports in the ground. Or the construction of small supports on top of the ground.
- Assembling the frame of a frame cabin.
- Installation of roofing sheets - they should overlap each other by 3-5 cm.
- Installation of external wall panels - chipboard, boards, metal profiles.
- Installation of windows and external doors.
- If necessary, insulation is done with polystyrene foam or mineral wool.
- Installation of internal walls - from plywood, chipboard, boards.
- Interior decoration.
A construction video on frame cabins will help you understand this process.
Arrangement of a change house
The outer walls of the cabin trailer are sheathed with clapboard or OSB boards if finishing is planned for painting. In this case, the overhangs along the perimeter of the roof are not large enough, or the building itself is located in an open area, it is best to cover the outer walls with profiled roofing sheets. Ventilation windows are cut out along the upper and lower edges of the sheet, or it is better to build independent vents for water vapor.
Interior decoration of the cabin
If the building is planned to be built with subsequent repurposing as a bathhouse or guest house, then the best finishing option is considered to be cladding the walls and ceiling with ordinary clapboard.
After two or three years of operation of the cabin, the material darkens, a dark coating of dampness and even mold may appear along the lower edge, so anything else is rarely used for the walls.
The exception is the bathroom and shower block of the change house. In this case, it is best to make the walls and ceiling based on plastic panels.
Lighting in the cabin
According to fire safety rules, the exit from the room and the installation location of the heating device, stove, air heater must be illuminated. The rest of the room is equipped with lighting at your own discretion. Typically, a change house is divided into two parts in which ceiling lamps need to be made - a bathroom and a recreation area.
All electrical wiring of the cabin is mounted in metal corrugations. All lines must be located on top of the wall cladding. The place for the box with the circuit breaker and the bags is chosen so that the working panel is illuminated by a ceiling lamp.
Water supply and sewerage in the cabin
The supply of water and drainage communications into the premises is carried out through the subfloor of the trailer. To prevent the pipes from freezing in the winter, a caisson or collector is built in the ground under the sewer and water supply system, insulated with polystyrene foam and covered with a plastic box.
For mobile and summer versions of the trailer, you can build a connection to water and drainage using flexible and corrugated pipes.
Ceiling insulation
A significant part of the warm air rising upward is lost through the ceiling, so its insulation is a necessary step.
- A waterproofing material is laid on the outside to protect the roof sheathing.
- Thermal insulation slabs are laid in the spaces between the beams and secured using thermal insulating adhesive or polyurethane foam.
- Penofol is laid.
- A lining or sheet decorative material is attached.
To avoid heat loss through the windows of a trailer insulated for the winter, there are two options to choose from:
- Install a third glass into the frame of a regular wooden window with two glasses;
- Replace standard windows with efficient metal-plastic double-glazed windows.
Heating in a change house
To heat the room, you can use two options:
- Make heating with a wood stove with a cast iron body;
- Build a heating system for a cabin using several electric convectors.
The electrical option is simpler; you only need to lay power copper wiring from the entry point of the switchboard and circuit breaker. In this case, for each heater you will need to make your own wiring and grounding branch, and build a suspension. To heat a room with an area of 15-20 m2, you will need to make two points of 1 kW each.
For a wood-burning stove, you will need to build a niche or set aside a corner of the room for it. The walls and floor are lined with thick metal with vermiculite thermal insulation. It is clear that if they plan to build a bathhouse on the basis of a change house, then it is better to choose a place for the stove in the warmest corner of the room without windows.