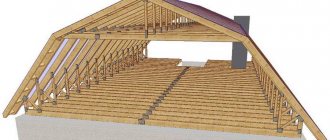
Purpose of the entrance canopy
If we talk about the structure as a whole, the canopy or canopy over the porch consists of a frame and roofing material (cladding). There may also be support posts that support the outer edge of the canopy. They are an optional element. They are needed when there is no confidence that the structure without additional supports will be able to retain precipitation.
Canopy over the entrance: general device
Precipitation generally means snow. In regions with a lot of snow, you can either make the slope of the canopy steep so that the snow melts quickly, or install additional supports. You can do both, as is usually done - the margin of reliability/strength reassures and instills confidence.
Frame and stand materials
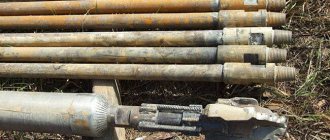
The frame and supports of the canopy over the front door are made from:
- metal: steel angle;
- metal strips;
- round pipe;
- profiled pipe;
Rolled metal of various types and wood are two materials that are used in the construction of a canopy over the porch
The most popular material recently for making the frame of a canopy over a porch is profiled pipe. With equal dimensions and wall thickness with a round pipe (if we compare the diagonal and diameter), the profile has greater rigidity. At the same time, it comes in a variety of sections - a square and a rectangle with different sides, it can be bent into arcs, it is easier to weld and attach to walls, it goes well with elements of traditional or cold forging, and its durability is the same as other steel products. In general, it is the profiled pipe that is in favor today.
What is the lining of the canopy over the porch made of?
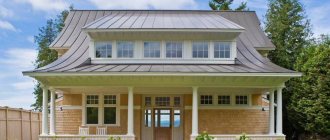
If we talk about materials for cladding the canopy over the porch, there is a very wide choice. Very often the canopy over the entrance to the house is made of the same material as the roof. And this is correct, since in this case the result is a harmonious design of the house. With this solution, any roofing material is used:
- slate;
- metal tiles; The canopy over the porch and the roof are covered with the same material - tiles
The style must also match
Soft tiles on the porch and roof
Metal tiles on the roof and canopy
When style and material match, a harmonious look is obtained - soft bitumen shingles;
- natural tiles;
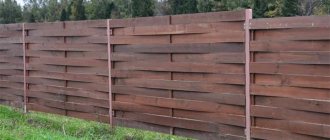
The second option is to use the material that is used in the fence. In this case, both the design style and decorative elements should be recognizable. This will create a single ensemble with the site. Here the materials can be like this:
- slate (usually flat, but not a fact);
- corrugated sheeting;
- polycarbonate;
- wooden plank.
And the third option for designing a canopy over the porch is to install a canopy that is “neutral” in style and material. This may include:
- wooden canopy;
- polycarbonate (not necessarily cellular polycarbonate, there is also sheet polycarbonate); Polycarbonate combined with wood
Looks good
A long canopy not only over the porch, but also over the entrance path
A long canopy not only over the porch, but also over the entrance path - sheet plastic;
- glass.
Glass is used less often. It is necessary to use reinforced types such as triplex, and not only are they expensive, they also weigh heavily, so additional suspensions or powerful support columns are definitely required. And if you consider that sheet polycarbonate or plastic is not much different in appearance from glass, it becomes clear why glass is unpopular.
Shapes of canopies
There are more than a dozen forms of canopies over the front door. The easiest one to make is a lean-to canopy. Requires a minimum of effort and materials, and can look very good. The downside is that when the snow melts, a snowdrift will end up in front of your door and will urgently need to be removed. Other models with slopes tilted forward suffer from the same “disease”. These are excellent options for regions with little snow in winters, but with hot sun - not quite for our latitudes. Although, if you are not afraid of the need for urgent snow removal, you can do any of the options.
Shapes and names of canopies over the porch
It’s a little more difficult to make a gable canopy (this is the house) and a simple arch. They are good because the melted snow ends up on the sides of the entrance and, even if there is a large amount of it, there is no need to urgently remove it. So for regions with a lot of snow, these are the best models.
Varieties of design
To make a protective structure, you can use various materials and create elegant shapes. Canopies and awnings over the entrance perform a protective function and are the most important element of the architectural ensemble. Drawings of canopies over the porch of a private house have flooded the Internet, so choosing the model you are interested in is not difficult.
Materials used:
- tree;
- polycarbonate of various colors or transparent;
- corrugated sheeting, metal tiles;
- metal;
- flexible tiles;
- built-up roof.
Wooden canopy covered with tiles
The frame is often made of wooden blocks, a round metal pipe, a profile pipe, or a corner. The manufacture of lightweight structures allows for an aluminum profile as a support. The shape of the canopies over the porch are:
- single-pitched;
- two- or multi-slope;
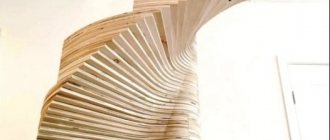
- arched;
- semicircular;
- domed;
- folding, sliding, stationary.
Canopies over the entrance can have a complex multi-level shape, providing protection and an architectural masterpiece. Depending on the style, materials of manufacture, the method of fastening also changes: lightweight structures are attached to the wall of the building, massive ones - on special supports or spacers.
Monolithic
Suspended structure with wooden supports on a pile foundation
Monolithic types of canopies are made as one piece with a wall made of wood or metal. A positive quality of a stationary structure is durability. Durable material stands motionless, fastenings do not loosen. The downside is the impossibility of moving the visor to another place. Installation is complicated. It's better to trust the professionals.
Modular
A popular type of design is modular. During installation, the modules are connected to each other using detachable fasteners, which is convenient for repairs. Certain types of structures are easy to dismantle or move from place to place. These types of roofs over the porch consist of a massive base, a light roof, and other removable elements. The structure can be easily assembled independently element by element, without the involvement of third-party builders.
Mounted
Options for mounted products have various modifications of fastenings. Most often these are struts with a wall or full-fledged supports going into the ground, resting on the terrace. The canopies themselves are mounted on the wall. Supports are used for strength and stability. It is possible to install mounted options without supports. Light materials are used for this. The lightweight design looks openwork and airy. However, in areas with stormy winds, such structures can be damaged.
Hanging
Suspended single- and double-slope canopies are the simplest structures. Wood and metal are used to make the frame. It is allowed to use a metal corner. The frame is attached to the wall of the building without the use of additional supporting structures. The gable roof of the canopy better protects from precipitation and is reliable in terms of wind load.
For the roof of a structure, it is optimal to use the material with which the roof of the house is covered. This way all the designs will look like one.
How to connect the canopy over the porch and the wall of the house
One of the most difficult moments is to join the covering of the canopy over the porch so that water does not flow down the wall. Usually, standard methods of joining the roof are used - using a bumper strip. This method is suitable for any roofing material, as well as sheet metal and wood. You just need to choose the right color. There are two approaches: matching the wall or matching the roof covering of the canopy. The options are equal, so it’s up to you to decide/choose.
How to connect a canopy to a wall
A groove (5-7 mm deep) is made under the fender strip in the wall. The edge of the plank is inserted into the recess, secured, and the seam is sealed with moisture-resistant sealant for external use. The other edge of the strip rests on the roofing material. When water runs down the wall, it flows onto the plank, from it, bypassing the joint, onto the roofing material and further into the storm drain system or directly to the ground - depending on how it’s done.
If you use metal tiles, sellers have a special wall profile. It can also be used with other materials - it is important to choose the color. The standard unit includes rubber seals, which are placed a couple of centimeters from the outer edge. In this case, during strong winds, water and debris do not fall under the bar.
Standard solution for metal tiles. Suitable for slate and corrugated sheets
If the canopy over the front door and porch is made of polycarbonate, glass or sheet plastic, the method described above is unacceptable - it looks too rough. In this case there are two options:
- Place a sealing tape made of rubber or polyurethane between the polycarbonate and the wall. The material is pressed against the wall through this gasket, then fixed to the frame using self-tapping screws. You should look for seals at points of sale of polycarbonate. How to seal the joint between a polycarbonate canopy and a wall
- Place the sheet as close to the wall as possible, and seal the joint with transparent sealant (not white, because it will quickly become an incomprehensible color).
There are no other good options. You can only combine both proposed ones for reliability.
Canopy or canopy
If we approach the definition strictly, as interpreted by urban planning standards, then a canopy is a specific structure for a wide purpose, which can stand alone or be adjacent to a building. The supports for this type of roof are pillars, as well as the wall of the building if the canopy is adjacent to it.
The canopy is part of the structure, which should be considered as an architectural element. And if you follow the letter of the standard, then even the slope should be within certain limits, depending on the roofing materials and regional climate characteristics.
The owners of private houses do not attach importance to such “legal” subtleties, and they can install both a canopy and a canopy over the porch. Moreover, the requirements for them are almost identical - the roof over the porch must be light, and at the same time strong, so that the supporting structure can withstand the weight of the roof, precipitation and wind loads.
How to fix if the wall is multi-layered
Recently, more and more buildings have multi-layered external walls - ventilated facades, insulation... The load-bearing part of the wall turns out to be covered with a couple of layers of materials, the load-bearing capacity of which is only enough to hold its own weight. You won't be able to attach anything to them. The entire load must fall on the load-bearing wall.
How to attach a canopy over the front door to a three- or two-layer wall
Even if the outer layer is a finishing brick, it costs nothing to attach to it. Masonry is usually carried out in half a brick. So it only looks durable on the outside. Even the smallest and lightest canopy cannot support the weight, and the supporting columns do not help either.
Therefore, with any multi-layer wall, holes are made in all finishing/insulating layers, and the structural elements are attached to the load-bearing wall.
Varieties
Most often, owners of private houses make visors to order. If you also do not have time to make this design, then you can do the same. But if you need to save your family budget, you can make a visor yourself. Be that as it may, so that your visor is of high quality and meets your needs, we suggest that you familiarize yourself with the types of visors and their features.
Polycarbonate
Polycarbonate visors are in great demand among consumers today. This is not surprising, because this material has a number of advantages:
- Long lasting.
- Lasting.
- Practical.
- Sold in a wide range of colors.
Although there are cheaper materials for covering the visor, the performance characteristics of polycarbonate fully justify its cost. Below are instructions for making an arched canopy from this material.
Made of metal
To work with metal you need a welding machine and some skills in working with it. Although metal is cheaper than polycarbonate, it is much more difficult to work with. You can bypass welding work by using standard mechanical connections of metal elements using bolts and nuts.
Among the advantages of metal it is worth noting:
- Reliability.
- Affordability.
- Durability (provided that it is promptly treated with anti-corrosion agents).
It is precisely because of the need for regular maintenance of metal that many consumers refuse to make visors from it.
To install a polycarbonate canopy, you will still have to make a metal base for it. In this case, polycarbonate still has more advantages, since the frame for it takes up up to 30% of the entire structure, due to the lightness of the roofing material. And if you cover the structure with a metal canopy, then you will have to take care of both the frame and the roof.
Made of plastic
Plastic boards suitable for constructing a canopy are more expensive than PVC used for interior work. Therefore, the cost of PVC roofing is not as low as we would like. Externally, such plates resemble polycarbonate.
Plastic can be installed on a frame of any shape. You can buy white slabs and stick a film of the desired color on them, or purchase them already covered.
Advantages of the material:
- A light weight.
- Durability.
- Reliability.
- Easy to install.
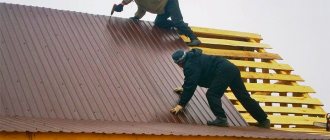
From corrugated sheets
Today, corrugated sheets are in great demand among consumers. Based on sales, we can say that it has taken a leading position in the market. It is used to make fences and roofing. Among the disadvantages of the material, it is worth noting its instability to mechanical damage. Even the slightest dent will already be noticeable on the corrugated sheet.
If you decide to purchase this particular covering option for arranging the canopy, then buy corrugated sheeting of higher quality and thicker. It is much easier to work with than metal tiles and metal.
From metal tiles
If you decide to make a canopy from metal tiles, then remember that its color and structure must match the roofing material of the roof. The difference in color and texture, even the slightest, will be very noticeable.
It is best to make a canopy from metal tiles at the stage of covering a house or other building on the front door of which you decide to make a canopy. In this case, you will be able to make a canopy from the remnants of metal tiles from the roof.
The roofing material for the canopy can also be bitumen shingles or other similar roofing material, even roofing felt from a domestic manufacturer.
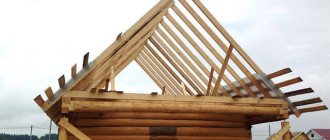
Made of wood
This involves making a wooden frame. The same polycarbonate, metal tiles, sheet metal, slate, etc. can be used as roofing materials. For old-type houses, this canopy is best suited. In addition, among the buildings for the exterior of which a wooden canopy structure is suitable are log houses, restored mud huts and structures made in the half-timbered style.
From forging
The best design solution would be a visor, the frame of which is made of forging. It will serve as a worthy decoration for your home. However, this design will cost you a pretty penny. A forged visor can be combined with roofing materials such as polycarbonate, tiles and even plastic.
The forged visor is quite heavy, so in order for it to last really long, you need to install it correctly.
Forging is suitable for almost any design, as it can consist of both rough and refined elements. If there are already forged elements on the plot, then the visor should be made in the same style as them.
Single-pitch canopy: design features
An inclined or straight single-pitched canopy is the simplest thing that can be. We rarely see straight ones - they are not very functional, but there are quite a lot of single-slope inclined ones.
The inclined single-pitch canopy is based on a right-angled triangle. A right angle is adjacent to the wall, and the length of the sides depends on the desired slope.
Design of a single-pitched canopy over the entrance
In the simplest case, you can weld three identical triangles from a profiled pipe (as in the figure above), make holes in them for fasteners (at least three). These three elements can be combined into a single whole using sheathing for roofing material - as in the figure. Or you can weld cross members from the same pipe (but of a smaller cross-section) or a strip or corner. This option - with metal jumpers - is more suitable for a canopy over a porch made of polycarbonate or plastic. It is also good for metal sheets - it will be convenient to weld it or screw in self-tapping screws.
The idea is the same, but the material is different
There is also an option with a variable tilt angle. This is a rectangular frame with sheathing lintels to which lightweight roofing material is attached. This frame is attached above the entrance using a wall beam fixed to the wall (we described how to make the connection above).
Variable angle
Depending on the required angle of inclination, struts are made. They can be made of metal or wood. Fixed to the frame.
If desired, this option can be made with an adjustable tilt angle. Make the fastening of the frame and struts to the wall movable (on hinges, for example), make several holes in the frame. By rearranging the struts into different holes, you can get a different angle of inclination. This feature is not very relevant for doors - except for glass ones - to block out too bright sun, but for windows it can be useful.
Materials and tools
A plan and drawing are great, but you need to build something out of something and work with something - you will need materials for a polycarbonate canopy and tools for processing and fastening:
- Base and frame elements
- Covering material, connection details if necessary
- Construction knife (for thick sheets, a circular saw with undetected fine-toothed discs or a jigsaw)
- Grinder, drill (hammer) and screwdriver
- Tape measure and construction pencils (marker), level
- Sufficient fasteners
If excavation work is expected, you will need an entrenching tool; for concrete work, at least a trough and a trowel. Now let's talk about some points in more detail.
Metal or wood
It’s up to you to decide what to build a canopy from with your own hands – from metal and polycarbonate, or with a wooden frame. You need to take into account the availability and cost of metal and wood in your region, the availability of specialized tools and the desired style.
Metal structures have a more modern look, are stronger, but are more expensive and heavier. Wooden ones are good for areas designed in rustic (country) and similar styles; timber and boards are cheaper than metal, but do not forgive mistakes in processing and when installing a protective coating. Of course, metal is more durable, and metal buildings are not subject to shrinkage, but wood, with proper protection, can last 50 years or more without any problems!
photo of a polycarbonate canopy adjacent to the house
It is better to take a rectangular profile for a polycarbonate canopy - it is easier for a beginner to work with it, especially if welding will be used for fastenings!
Cellular or monolithic
"Polygal" produces both types of construction polycarbonate, so when choosing the type of coating, you must first remember their differences from each other. It will be cheaper to build a canopy from cellular polycarbonate with your own hands, since its price is lower. On the other hand, repair of such a coating is required more often, because it is easier to break through a thin layer than a monolith, and although the coating usually does not allow water to pass through, its visual appeal decreases.
Cellular, naturally, is lighter than monolithic, and although it has a greater light transmittance, due to multiple refraction of rays it provides better protection from ultraviolet radiation. But with insufficient experience, it can easily be damaged during installation, and errors made in calculations and fastening will quickly affect the integrity and reliability of the structure.
The materials are similar in terms of flexural strength and ductility. At the same time, multilayering gives better thermal insulation performance, so if you plan not just to build a polycarbonate canopy with your own hands, but to build a special structure such as a greenhouse, then it is better to refuse a monolithic one. When everything is selected and prepared, you can begin construction.
Gable canopy frame
There are at least two ways to assemble a canopy with two slopes: from two or more (depending on the length of the canopy) triangular rafters or from two rectangular frames with sheathing, secured with crossbars. The second option is shown in the figure below, and the first will be a little further.
A canopy with a house is one of the popular options
Method one
Two quadrangles are assembled from a timber or thick board, which are united by a ridge board. The angle of inclination of the slopes is set by cuts on the ridge, fixed by crossbars - a spacer bar. Since the roofing material is laid from the ridge down, the sheathing strips are laid in the opposite direction. A continuous flooring is required under soft tiles. This can be moisture-resistant plywood or OSB.
How to make a canopy over a door in the shape of a house
Also, brackets are assembled on the ground - stops that will transfer the load from the canopy to a large area of the wall. It is better to assemble the structure on the ground (without fastening the roofing material). In order to lift and secure the canopy, assistants or the services of a manipulator will be required.
Method two
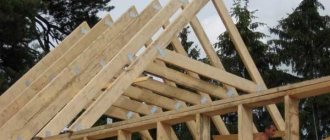
The second option is the assembly of individual rafter structures. Maybe this option will seem easier to you - all gable roofs are assembled according to this principle.
An example of a gable porch with a rafter system
Here, too, a frame is assembled from timber and brackets are needed. But the frame lies in a horizontal plane, supported by brackets. Two or three triangles are assembled from rafters, which rest on a ridge beam, and it rests on a post, the other end of which is fixed to the frame. It turns out a mini-model of a conventional rafter system.
To improve the appearance, bevels are placed near the counter. In the photo above they are curved, but this is far from necessary. You can simply make it from timber, sawing it at the desired angle. It is also better to assemble the system on the ground - it will not be possible to connect it smoothly at a height.
Made of metal
If the canopy frame is made of a metal pipe, everything is much simpler. The pipe has a high load-bearing capacity, so there are much fewer supporting and auxiliary elements.
Two identical triangles are cooked - according to the size of the future canopy. They are connected by jumpers, the length of which is determined by the “depth” of the visor. To prevent the cladding from bending, additional crossbars are welded.
Gable canopy over a porch made of metal pipe
The finished canopy structure is complemented by brackets - stops. In the picture above, the canopy over the porch has only a stop without slopes. For regions with little snow in winter, this is enough, but to hold a significant mass of snow, you will need a mow or stand. Or maybe both (as in the diagram below).
Beautiful gable canopy over the entrance, made of steel pipe with figured stops and pillars (diagram with dimensions)
Decorative elements are an optional part. There may be an ordinary triangle here.
Frame material
The material for the frame must be durable, strong, and not require complex work during installation. It is important that it looks good and matches the style of the barbecue and the area as a whole.
Wooden beam
A barbecue canopy made of timber fits well into the design of a summer cottage. The material is environmentally friendly, affordable, and easy to install. Disadvantages: high risk of fire, vulnerability to rot and pests.
The most common materials are timber made of pine, larch, oak, and beech. They have a dense structure, are almost not susceptible to moisture, do not deform, and serve for a long time. The wooden beam must be well dried, sanded and coated with an antiseptic.
The cross-section of the supports depends on the weight of the rafter system and coating. If a wooden rafter system with significant weight will rest on wooden supports, choose pillars or beams of large cross-section accordingly. If the canopy is light enough, use timber of a smaller cross-section.
For supports, use profiled, glued or planed timber 10x15, 90x90 cm. For the rafter system - floor beams 50x40, 50x150 cm, boards.
Metallic profile
The barbecue canopy made of profile pipe is a strong, fire-resistant, durable structure. The main disadvantage of a metal frame is corrosion. Treatment with an anti-corrosion solution, priming, painting, and the ability to remove the structure for storage slows down rusting, extending its service life.
Any sheet or profiled material can be attached to the frame
Depending on the dimensions of the structure, profile pipes of square or rectangular section 30x30, 40x40, 40x20, 40x25, 50x50, 60x60, 60x40, 100x100 mm are used. Metal profile supports are made from a round profile pipe with a diameter of 60 mm or rectangular 60x40 mm.
Arched canopy diagram: types of profile pipes used
Arched canopy over the porch: manufacturing features
A canopy over the front door in the form of an arch cannot be called difficult to manufacture. It is more convenient to make this shape from a steel pipe, and from a profile, rectangular section. Using a pipe bender (you can do it manually, but it’s more complicated) you make several arches of the same size. They are connected by jumpers, the length of which is determined by the desired size of the roofing part.
Arched design is the simplest option
The first and last arches are connected by horizontal jumpers, brackets or, as in the figure above, ordinary stops are welded to the last one.
You can often see double arches with decorative and not very decorative filling. They are typical for large structures. Still, the windage and snow load turn out to be large and it is better to play it safe by making a safety margin than to do everything all over again.
Preparing the base for different types of soil
First of all, when arranging a canopy, you need to take care of a solid foundation for the canopy. If you don’t want a strong gust of wind or a spring thaw to damage the strength of the entire structure, then you need to approach this issue carefully.
So, a lot depends on what kind of soil you have on your site. Moreover, you need to consider not just the ground anywhere, but exactly where the canopy will stand. The fact is that literally plus or minus two meters, and there may already be a completely different composition.
The depth of drilling under the foundation posts depends on whether your soil is heaving or not. It should always be no less than the freezing depth. This is necessary so that while the ice inside the ground melts and the soil “moves” a little, the racks will remain in place.
This is the whole secret, i.e. how to make a canopy on unstable soil: the posts will end below the freezing depth level, and the frame will not warp. In Russia, the standard freezing depth is often more than 2 meters, and therefore the racks are installed 2.30-2.50 meters into the ground. In special illustrations, the freezing depth is marked as H:
But, if we are talking about non-heaving soil (it is clear from the name that it “does not lead”), then it is advisable to make a foundation in the form of concrete or brick pillars to the depth of the plant layer. Those. not deep.
Additionally, backfilling with coarse sand or small pebbles, which it is advisable to protect with geotextiles, helps to reduce the severity of frost heaving of the soil. By the way, if it so happens that you installed the pillars higher than the freezing depth of the ground, then over time the structure will become skewed, but this can be easily corrected by wedging and jacking up the sagging sides.
Photo ideas
Canopy over the porch made of metal pipes and polycarbonate: different models
Beautiful design using traditional or cold forging
Canopy over the porch on a metal frame: single-pitch, gable (house), arched models
Different in style and shape
With pole supports and metal lace for decoration
The canopy over the porch is not only over the front door, but also over the terrace too
Wooden canopy over the entrance in the form of a house - options with support pillars under the tiles
Features of polycarbonate fastening
Materials for the visor
A high-quality canopy over the porch is durable and can withstand any adverse weather conditions. Anything can be used: wood, glass, metal, polycarbonate, different types of roofing coverings. If you choose heavy materials, be sure to take into account the load on the frame: for example, reinforced beams with a larger cross-section are needed for ceramic tiles.
Polycarbonate visors
Polycarbonate is a durable and undemanding material with transparency up to 86%. It is hardy, not afraid of temperature changes, corrosion, fungus and rot. It is not affected by moisture and ultraviolet radiation, and it is almost impossible to scratch or damage it.
Polycarbonate can be cellular or monolithic - depending on the shape and size of the visor you want. It is flexible and can be shaped into different shapes for shaped and textured canopies. At the same time, it does not require a reinforced frame and does not create additional load on the facade or foundation.
You can buy a polycarbonate visor ready-made or make it yourself. The main disadvantage of the material is its characteristic appearance. It may not be entirely appropriate on classic log houses, in the style of country, Provence or northern chalets.
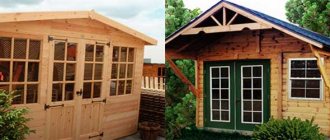
Wooden canopy
Wood is the most environmentally friendly and diverse material, ideally complementing similar wooden houses. In the wake of eco-trends, it is used to make everything: canopies, gazebos, verandas. It is easy to work with and process, paint, varnish, carve and decorate.
Different types of wood differ in strength and moisture resistance, but they are all still quite sensitive to external influences. Such a visor will require regular maintenance, and in cold and humid regions they may not be practical to begin with. With proper preparation and impregnation of the wood, the canopy will last 7-10 years.
Glass canopies
The use of glass for visors is a controversial decision, around which there are many myths. It is considered to be too fragile and not the most practical material. But for a long time now, manufacturers have been creating impact-resistant tempered glass that is almost impossible to damage. And even if it breaks, it crumbles into small, safe fragments.
The main advantage of glass is its aesthetic appearance, which ideally complements modern architecture. You can experiment with tinting and decoration, without being afraid of rust and rotting. The only negative is that the glass requires maintenance so that smudges and stains do not remain on it after rain.
Canopies made of metal tiles
Metal tiles are a high-strength roofing material with excellent technical characteristics. It is durable and unpretentious, it is almost impossible to damage it. Metal tiles have the best anti-vandal properties among popular roofing coverings.
The service life of such a visor can easily reach 50 years without special care. And during all this time it does not fade, does not rust and does not lose its attractive appearance. Metal tiles can be combined with any other building materials, but require special preparation of the base during installation.
Canopies made of corrugated sheets
Corrugated sheets or metal profiles are cold-rolled steel sheets coated with a protective polymer layer. Their main advantages are low price combined with increased mechanical strength and durability. In the assortment of manufacturers you can find colors from a wide and diverse palette.
Corrugated sheeting is easy to work with, it does not require complex preparation and does not weigh down the base, and does not require special treatment or maintenance. Just keep in mind that a canopy made of corrugated sheets is best combined with an identical roof. And during heavy rains, hail or gusty winds, steel sheets will be noisier than wood or polycarbonate.
Forged visors
Forged metal visors are a decorative accessory and not real functional protection. They complement classic homes and rustic style. This is a traditional combination with wooden structures that will never go out of style.
Modern forging technologies allow you to create the most interesting and bizarre patterns. Now it is much more affordable, because previously only the rich and aristocrats could afford such luxury. And forged elements retain their attractive appearance for decades, regardless of frost, snow, heat or rain.
Manufacturing methods: welding or forging?
It should be noted that in this case we are talking about the manufacture of the canopy frame, since the coating can be installed later and does not have to be metal. Let's consider the two most popular methods in modern construction - welding and forging. You can make a canopy using the welding method with your own hands, provided, of course, that you have welding equipment. You just need to weld metal profile pipes prepared in advance, cut according to strictly measured measurements. Connect them in the correct order and the visor is ready. All that remains is to attach it to the wall of the house and install a covering on top. Below are the pros and cons of why you should choose this manufacturing method.
Welding is a fairly simple way to make canopies over a porch
"BEHIND":
- relatively simple manufacturing process (compared to forging);
- speed of execution (time costs are minimal from half an hour to an hour);
- low cost (welding a canopy costs an order of magnitude cheaper than forging it; of course, making it yourself costs nothing except the cost of materials).
"AGAINST":
- Without special equipment and experience in welding, it is impossible to do it yourself;
- cannot compete in originality and decorativeness with forged visors;
- welding points will be visible.
Forging is a complex and labor-intensive method of making canopies over a porch. In order to ultimately get a forged visor, it is necessary to forge all the rolled metal and give it the necessary artistic form. If you are not a forging master, it is impossible to make such a canopy with your own hands. Is it worth stopping at these options?
A forged visor is a real masterpiece if it was done by a real pro
"BEHIND":
- a forged visor is stronger than a welded one;
- if it was done by a professional, then the forged canopy will decorate the exterior of your home.
"AGAINST":
- quite expensive pleasure;
- has more weight compared to forged, which means it is more difficult to fix it on the wall
- its production will take a certain period (several days, or even a week).