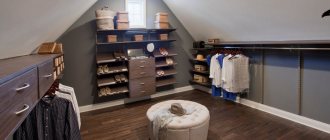
The buildings
Publication date: 12/19/2019
0
46371
- What is it for?
- Technology and step-by-step instructions
- Insulation of a new room
- If you decide to add a bathhouse
- Roof for a new premises
- New room - new floor
- Internal insulation
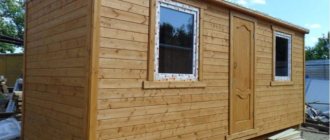
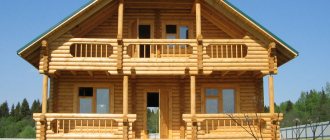
If your home plan does not include an additional room, garage or other space that you need, you need a frame extension. The easiest way is to make an extension to a wooden house. You don’t have to hire specialists, because if you have at least some construction experience, you can do all the work yourself.
Frame residential extension to the house
Purpose and features of extensions
Before starting work, you need to decide on the functions that your extension will perform. After all, the requirements for different rooms are different - whether it is a kitchen, a bathroom, a veranda or an additional room - it matters.
Let’s say, if you decide that there will be a room in the extension, then you need to prepare for the fact that the complexity of your construction will become equal to the construction of a miniature house. The floor and ceiling, as well as the foundation and thermal insulation, will have to be treated much more carefully and given increased attention.
If you decide that it will be a veranda, then everything is much simpler - the requirements for this room are lower, a powerful foundation is not needed, and the area will not be heated. It is very important that, whatever your choice, the extension matches the overall style of the house.
Difficulties begin if you decide that there will be a kitchen or bathroom in the extension; in these cases, you will need to take into account water supply and drainage, and difficulties with heating are also possible.
It is advisable to resolve all these issues before pouring the foundation, or to equip the points where communications will penetrate into the extension.
And yet, no matter what you are going to build, you should adhere to a certain order of work:
- Creating a project;
- Foundation installation;
- Installation and covering of the wall frame;
- Roof installation.
It turns out that a frame extension to a residential building is practically no different from the construction of any other building. And to build any structure you need a strong and solid foundation.
Purpose of the extension
Although the extension is not difficult to construct, remodeling it is not the most interesting activity. Therefore, think in advance about how and for what you want to use the structure:
- as an additional room. To make it comfortable to live in, the room must be insulated - make sure that all walls facing the street are protected from the cold and do not allow drafts and dampness to pass through. Mold will not miss the opportunity to get inside if you skimp on insulation. In fact, building a new room is equivalent to building a house, only in a mini format;
- kitchen, utility room, bathroom. Here you also need to deal with insulation plus connecting the necessary communications. The only exception is an outbuilding for storing agricultural implements, dishes, etc., that is, things that do not deteriorate from cold and moisture. But even here it is better to make a full-fledged room so that in the future it can be used for various purposes without expensive repairs. It is more convenient and profitable to take into account all the little things at the planning stages of construction;
- veranda. The simplest option. The room is used in the warm season, in winter - occasionally and not for long. It is enough to build walls, a reliable roof and take care of a strong flooring. It is important to think over the appearance of the veranda so that the building does not look like a foreign growth on the body of the house.
Related article:
Electricity meter on the street - is it legal to require the meter to be moved to the street?
Required Tool
In order to start building with your own hands, you need to make an audit of your tools, because you may need a lot of things for the work:
- Roulette;
- Portable power saw;
- Folding metal ruler;
- Crosscut saw;
- Hacksaw for metal;
- Hammer and nail puller;
- Pliers;
- Carpenter's hammer (mallet);
- Screwdriver;
- Awl;
- Metal scissors;
- Carpenter's knife;
- Level (at least 60 cm long);
- Rope level;
- Crimping pliers;
- Screwdriver;
- Protective glasses.
Additionally, you will need at least one assistant - some work cannot be done alone, and work always goes better in a company.
Insulation of walls and floors
Mineral wool is used as insulation material for walls. The mats are easily and quickly laid between the frame bars, as can be seen in the photo. When laying insulation in several layers, the mats are shifted relative to each other to prevent heat loss through the joining seams. The insulation is covered on both sides with steam and wind insulation material, which will protect the material from moisture accumulation, and the top is sheathed with finishing material. Internal walls can be sheathed with chipboard, plasterboard and covered with wallpaper or lined with clapboard. For the exterior wall, use wood, siding, or materials that match the finish of the house.
The wall pie towards the outer wall looks like this:
- internal lining;
- vapor barrier;
- insulation material;
Wall insulation
- windproofing;
- external cladding.
Floors on wooden joists are insulated in the same way as walls: mineral wool is laid on the subfloor between the joists, after covering the boards with a waterproofing membrane. A second layer of waterproofing is laid on top of the insulation and then leveled with plywood. After this, the finished floor covering is installed.
A concrete floor can be insulated in the same way as a wooden floor, using a dry screed, making a concrete screed and installing water or electric heating.
Do-it-yourselfers often overlook the need to comply with safety regulations. Use personal protective equipment and well-functioning, reliable tools, and then you will have only the warmest memories from the construction of the extension.
All about the foundation
There are two types of extension; it can be built-in or attached. The built-in one, as a rule, is included in the project at the stage of building the house, while the second option will require pouring a separate foundation.
The gap between the wall and the additional foundation should be about 4 cm. Otherwise, deformation may occur during shrinkage. The foundation can be made of various materials: brick, stone, concrete, wood, metal or concrete piles. The foundation comes in different types:
- Slab;
- Tape;
- Pile;
- Columnar;
- Pile-grillage.
The most popular in private construction, as a rule, is a strip or columnar foundation. For a frame extension to a house, the base is selected based on the weight of the future structure:
Columnar foundations are used in buildings that are not very heavy, this could be a bathroom, a summer kitchen or a veranda;
Tape, in turn, is more suitable for buildings with high mass; all calculations should be made at the planning stage;
A slab foundation for private construction is a monolith made of concrete or reinforced concrete on which walls are erected;
Pile-grillage and pile foundations are complex reinforced concrete structures; such a foundation is extremely durable. But it is rarely used in construction.
As a rule, when constructing such premises, a columnar or strip foundation is used.
Pouring the foundation
Regardless of the intended use of the frame extension, the structure requires a reliable foundation. To do this, at the initial stage of construction, the foundation is poured. There are two possible options here, each of which has its own advantages and disadvantages.
Tape
Suitable for cases where a screed will be poured before installing the floor. The arrangement of the strip foundation occurs according to this scheme.
A trench is dug along the perimeter of the future extension. The depth should be equal to the foundation of the main building, the width should be 10–15 centimeters greater than the thickness of the walls.
A cushion is placed at the bottom of the trench. First, a layer of sand (10–12 centimeters) is poured, then crushed stone or broken brick. Both layers are thoroughly compacted.
Reinforcement is being carried out. First, the formwork is installed, inside which a frame is made of reinforcement and wire.
Advice! Ideally, the reinforcing mesh should be connected to the main foundation.
Pouring concrete mixture. The internal space of the formwork is filled with concrete, the surface is smoothed after pouring. Before further work is carried out, the mixture must harden and gain initial strength. If the weather is hot outside, the hardening foundation must be periodically sprayed with water.
When the concrete hardens, a layer of waterproofing made of roofing felt or bitumen mastic is laid.
Columnar
This option for a frame extension is more suitable for wooden floors, and in terms of price it looks more attractive than a strip foundation. The work is carried out according to this scheme.
The perimeter of the extension is marked, and according to the markings, holes for the pillars are dug at a distance of about 1.5 meters from each other. The recommended dimensions of each hole are 50 x 50 cm.
The bottom of the pits is covered with a cushion of sand and crushed stone, each layer is compacted using the tamping method.
For brick columns, a layer of cement-sand mortar is poured, which will serve as the base.
Note! Concrete pillars require the production of formwork; reinforcement can be neglected in this case.
When the pile foundation hardens, the formwork is removed and the surface is protected with a waterproofing layer. The remaining free space is filled with soil mixed with crushed stone. The backfill is compacted every 15–20 centimeters.
Foundation installation
The work begins with the installation of the foundation; as a rule, the extension is installed on a separate base, which, in turn, is attached to the base of the house using reinforcement. The ideal option would be for the foundation for the extension to be laid during the construction of the main house. When installing the base for an extension, it is desirable that the foundations match each other as closely as possible, both in shape and depth.
If monolithicity is not feasible, it is worth leaving an expansion joint in case of ground movement and to avoid the appearance of cracks.
Strip foundation
For large and heavy buildings, a strip type of base is chosen. It is advisable to make it from concrete in this sequence.
- Using string and pegs, markings are made along which the trench will be dug.
- The soil is selected to the depth of the base of the house foundation. Sand is poured onto the bottom and compacted. A layer of crushed stone is laid on top, which is also compacted with a hand tamper.
Preparing a trench for a strip foundation - Prepare formwork equal to the height of the future foundation. Waterproofing is laid inside along the perimeter and welded reinforcement is installed on the crushed stone layer.
- Prepare a concrete solution in a ratio of 1:3:6 (cement, sand, crushed stone).
- Pour the prepared mixture onto 1/3 of the formwork. After hardening, fill the remaining height. The solution is compacted with a vibrator to remove air bubbles. Or tap the formwork walls with a hammer.
Pouring strip foundation - The upper part is leveled. Cover with film. While the solution gains strength, the surface is periodically wetted to prevent cracks from occurring.
Important. Before erecting walls, waterproofing must be applied to the foundation. Use rolled materials or mastic.
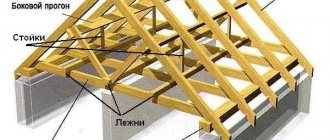
Frame installation
It is very important to secure the racks correctly. We pay special attention to the step between the vertical posts, which should not exceed 600 mm; in this case, there will be no problems when filling the space with mineral insulation. For the same purposes, we set the same distance between the rafters and floor joists.
Upper harness
The upper trim is made in the same way as the lower one - from a metal profile, preferably, of course, from aluminum. The harness is also made of double or single wooden panels or timber.
Construction of frame and walls
It is most convenient to assemble timber walls first in a horizontal position, making a kind of shield, and only then install them in the right place. You can work with each beam separately, placing it sequentially and connecting it to the beams.
Related article:
Landscaping a blind area at home: tips for gardeners
Construction of frame and walls
Main stages:
- every half a meter they make recesses on the lower trim - vertical bars will be installed in them;
- install them, carefully securing them with self-tapping screws;
- make a similar strapping on top;
- to connect the veranda with the house, vertical beams are placed on its wall and the structure is secured to them with anchor bolts;
- the resulting skeleton does not withstand bad weather well, so that it does not collapse, you must immediately proceed to covering the walls;
- window and door openings remain empty until the roof is completed;
- then they are inserted.
Insulation and finishing of the ceiling
The optimal solution for finishing the ceiling and walls is to choose lining. This coating is excellent in terms of budget and aesthetics. This coating will last more than 40 years, and if you provide proper care, then much longer. For big savings, it is worth using expanded clay; the layer of this insulation should be 100-120 mm.
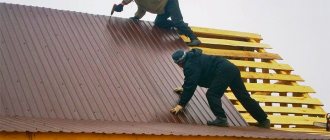
There are nuances in attaching the roofing material: the sheets overlap; to connect to the main building, it may be necessary to dismantle part of the roof of the main house.
Floor: wood or concrete
It is necessary to decide what the floor of the extension will be before building the foundation. If you can lay both wood and concrete on a strip one, then only the first option is suitable for a columnar one.
Related article:
Vestibule interior design: simple and stylish
Let's look at the features of both technologies:
- tree. The beams are laid on the base, then waterproofing is laid and the ceiling is made. After that come the logs, a layer of insulation and the final part – the floor covering itself;
- concrete. A hole 0.3 - 0.4 meters deep is made within the boundaries of the foundation, the bottom is lined with sand and then expanded clay. You can use crushed stone, but expanded clay provides additional insulation. Next, the reinforcement is installed and cement is poured. After it has dried, you can lay the finished floor (wooden, tile).
Important! Wood is a natural material. It must be protected from pests and negative environmental influences. An antiseptic does an excellent job of this task.
Characteristics of wall panels
A frame extension to a house must be durable and also meet the requirements of comfort and quality. Proper quality of panels significantly improves these indicators. Vapor and moisture insulation are among the most important points when installing an extension. If you follow all the rules of insulation, the room will last a long time without additional investments.
The wall panel of the frame extension from the inside looks like this:
- Exterior finishing;
- Windproofing;
- Insulation layer;
- Vapor barrier;
- Air cushion (1-2 cm);
- Interior decoration.
Options for frame extensions to the house
To avoid having to change plans during the construction process, you must immediately decide what functions the frame extension to a wooden house or brick building will perform. Purposes of use may vary.
Another living room . Adding an additional room is not so easy. You need to do all the same steps as when building a full-fledged frame house: prepare the foundation, build the frame, insulate it. If this is not done, the use of the room will be ineffective, since heat loss will be large. It is also important to waterproof the property to prevent mold and dampness.
Additional bathroom or kitchen .
Before you begin to build on this structure, you will need to install the appropriate utilities, and only then pour the foundation. All places where sewer and water pipes pass through the foundation must be insulated. And it’s better to do all this during construction, and not later. Frame veranda . Today, frame houses with a veranda are very popular. They can be either open or enclosed with glass structures. Verandas are useful for relaxing in the summer. This extension is much simpler than a room, since it does not need to be insulated and there is no need to install communications there. To build a veranda, a deck is made, walls and a roof are erected. You should consider the dimensions of the structure so that a frame house with a terrace or veranda looks harmonious.
Insulation and nuances
For a comfortable stay in your extension, you should pay special attention to insulation. It should be understood that insulating the extension is just as important as doing the same in the house; the whole work is practically no different from the same insulation of any frame house. For these purposes, you can use various materials, from traditional to more modern: ecowool, basalt mineral tiles, sawdust, extruded polystyrene foam, etc.
But still, the simplest and fastest, in terms of installation, is mineral tile insulation.
This type of insulation is tightly laid in the spaces between the frame studs, preferably not in one layer, but avoiding pinches and kinks, as over time this will lead to the appearance of “cold bridges”. It is necessary to properly combine the slabs at the joints - this will help maintain the indoor climate, and this principle should also be observed when insulating the floor and ceiling.
Important! After purchasing the material, all elements should be checked and, if necessary, treated with bio-fire-retardant solutions. All inserts, such as windows and doors, are installed strictly level.
Ceiling and roofing
The easiest way to erect a pitched roof. Another advantage is that it perfectly complements a home of any configuration, so the problem of incompatible styles most often does not arise. How to make such a roof:
- one end of the rafters rests against the wall of the house, the second lies on the wall of the future veranda. To fix the structure, metal corners are used. It is important to calculate a convenient roof angle;
- the ends of the rafters should protrude beyond the wall of the veranda to protect it from precipitation and allow water to drain onto the ground and not onto the boards;
- Ideally, the coating chosen for the roof should be the same as that on the main part of the house. It's beautiful and convenient. First, a layer of solid material is laid (plywood will do). You can do without it, but then logs must be placed often;
- the roof needs a layer of waterproofing suitable for the roof material;
- Next comes a layer of insulation (usually mineral wool);
- All that remains is to sew up the ceiling, then move on to painting or another chosen type of decor.
Related article:
Forced exhaust device in the bathroom and toilet of a private house
We do everything according to the law
Upon completion of all construction work, the frame extension to the house should be legalized. Owners often belatedly begin to think about legalizing their building. But a more far-sighted owner understands that this should be done before starting work. It is much more difficult to legalize an unauthorized extension than to have everything agreed upon before starting work.
If you have already erected a building, then you will need to go to court, the decision of which is not always clear and, if you lose the case, you will have to demolish the masterpiece of the architectural structure. The most unpleasant thing is that you will have to do this at your own expense. You can, of course, not inform anyone and enjoy the use of unaccounted square meters, but this risks the fact that you will subsequently not be able to sell, rent, or bequeath or give your property.
In order to avoid awkward moments, it is worth preparing thoroughly for going to court, collecting all the necessary (and not only) documents, among which the most important are:
- Land ownership document;
- On the right of ownership of residential premises;
- Paper from BTI;
- Permit act from housing and communal services;
- Extract from the house register about registered citizens in your house;
- Plan of a frame extension;
- House project;
- Shooting of the attached structure on a scale of 1:500;
- Approval of neighbors (if the building borders their plot of land);
- Certificate from the epidemiological service;
- In some cases, a photograph of the site, the main building and the extension itself may be required.
After filing a claim, you should expect a response that will arrive by mail. To be sure that your claim has reached the address, you should call and confirm delivery; this is usually done within 10 business days.
Judges have the right to reject a claim only in 2 cases:
- A decision has already been made regarding your request;
- Or an illiterately drawn up statement of claim. In case of the second refusal option, you should file a second claim.
During the trial, the municipality becomes the defendant, while the plaintiff in this case is the owner of the property to which the extension was made. If the court decision is positive for the owner, he should take a payment document from Rosregistration to pay the state tax, deposit money and receive all the documents due to legitimize the unauthorized structure.
If we talk about expenses, then about 10,000 rubles will be spent on the services of lawyers, collecting information, etc. The state duty in this case is, on average, 500 rubles; in the Town Planning Cadastre, an entry will cost about 20,000 rubles, and no more than 60 000 rub. there is a need for a forensic construction and technical examination. Having calculated all these expenses, we understand that in addition to the costs of the construction itself, its legalization will require, on average, 100,000 rubles.
Therefore, it is strongly recommended to legalize the structure before its construction; it will be simpler, faster and easier, and most importantly - much cheaper.
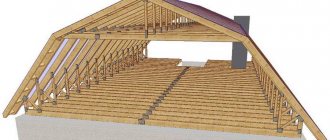
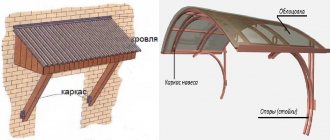
Roof construction
The best option for a frame extension is a pitched roof ; it can be combined with any main roof.
Mount it as follows:
- First, the rafters are secured on one side under the slope of the existing building, and on the other side - on the wall of the veranda. Metal corners with a pre-calculated angle of inclination are used as fastening.
- Make sure that the protrusion of the rafter legs beyond the wall is not less than 30 cm. Thanks to such a canopy, the veranda will be maximally protected from getting wet by sewage.
- The choice of roofing is made in advance. The best option would be the same material as for the roof of the house . Slate can be installed directly on the rafters or on the sheathing, and soft roofing can only be installed on OSB sheets or plywood.
- The rafter structure is sheathed with a layer of waterproofing, depending on the type of roofing.
- All roofing materials are installed from the bottom up.
- To insulate the roof, it is best to use mineral wool.
concrete-area.com
Not all people are satisfied with their living space. Therefore, some people want to make their home more spacious. And for this they decide to create a frame extension. And this is not surprising. After all, a frame extension is an excellent solution. And all because with the help of a frame extension you can easily and quickly create additional living space. Therefore, today the construction site will talk about how to create a frame extension to a house with your own hands. Step-by-step instructions can help in this matter, which will completely help solve absolutely any complexity.
Features of a frame extension
A frame extension must have a frame. The frame will be the supporting skeleton in this case. A similar frame is created mainly from edged timber. Corner posts and the bottom frame of the building are also made from edged timber. Horizontal lintels and row racks are made from boards.
Also, boards are used to mark door and window openings. The racks have a thickness that is equal to the thickness of the heat-insulating layer. For the construction of a frame extension in central Russia, it is recommended to use thermal insulation material, which has a thickness of 15 cm. For upcoming work, it is also worth using lumber from the 150 line. And the pitch of the racks for such an extension will be 59 cm. And the pitch of the horizontal jumpers of the future frame should be 99 cm.
To assemble the frame, it is recommended to use hardware fasteners. It must be emphasized that such fasteners are quite convenient and reliable to use when assembling the frame. Moreover, such elements are very affordable.
In order to make a frame extension to the house, first of all, you need to assemble the frame. Then it is recommended to insulate the extension. When insulating, it is important to pay attention to hydro- and vapor barrier. After proper insulation of the frame extension, you need to do the rough cladding of the finished frame. For these works, DSP, OSB and SML sheets are usually used.
Pay attention to studying the publication: How to make a foundation for your home with your own hands
In this article we talk in detail about how to make a frame extension to a house. It is very important to remember many details of such work. So, after the rough finishing, you need to start finishing the frame extension. After this work, you should get a multilayer structure, which, due to its multilayer nature, will be a reliable structure. In this case, the design will have good characteristics, which will relate to heat conservation and sound insulation of the extension. You can build a frame extension with your own hands. Such work will not require a lot of money or special skills.
Important qualities of a frame extension
Today, a large number of buildings are being built using frame technologies. Moreover, in European countries this technology has come out on top. In such countries, not only extensions to existing buildings are being built, but also one-story private houses. Construction work using frame technologies can be carried out in two versions. It can be:
- frame work,
- frame-panel construction.
If we talk about frame-panel construction, then an extension to an already finished structure will be created from ready-made panels that are already equipped with door and window openings in production. In order to make an extension from such panels, you will only need to assemble these panels into a single whole. After which they must be securely secured with special materials.
It is worth saying that such panels are made only to order according to the wishes of the customer. Special enterprises are engaged in the production of these panels. During production, the size of the panels must necessarily match the dimensions of the foundation. And if complex construction is planned, then frame-frame technology is used. If you are planning to build a frame extension in your own yard, then all the elements must be assembled at the construction site.
It should be noted that frame extensions and houses made of this material have all the same characteristics of any ordinary house that was built from more modern materials. But the most popular characteristics of such an extension include high thermal insulation characteristics. Indeed, such a room can be quickly warmed up with any modern heating systems.
If we talk about the finishing of the frame extension, then there should be no problems in such work either. Finishing work begins immediately after construction work is completed. A frame-type extension can be freely built not only in the warm season, but even in the cold.
It should be mentioned that frame extensions can retain heat in a room several times longer. And it follows that with the help of such an extension you can save your money on heating. And if the need arises, then additional buildings of the same type can be added to the existing frame extension.
Step-by-step instructions for building a frame extension
If you don’t know how to make a frame extension to your house with your own hands, then you shouldn’t despair. It turns out that our publication is ready to fully answer this question.
In order to make a frame extension, you need, first of all, to stock up on the necessary materials and tools that may be needed for the work. So, you will need:
- hot bitumen;
- concrete mixture;
- gravel or crushed stone;
- edged boards;
- wooden slats;
- steel corner;
- electric drill;
- cord;
- electric screwdriver;
- shovel and sledgehammer;
- ax and hammer;
- screws and sledgehammer;
- wooden wedges;
- gypsum mortar;
- wooden boards;
- dry tow.
As a rule, the construction of any residential or industrial facility cannot begin without drawing up a project.
If the project is already ready, then you can start pouring the strip foundation. The foundation for a frame extension is created in 4 stages:
- creating a sand-crushed stone cushion,
- laying the reinforcement frame,
- installation of formwork,
- pouring a mixture of concrete.
Supports are installed under the floor joists at a distance of 130-150 cm. The joists are installed approximately 90 cm apart from each other. Such supports need to be made if they were not created when constructing the foundation.
Before pouring concrete into the pits, a layer of sand is poured onto their bottom, which should be at least 10 cm thick. After that, roofing material or rubemast, which is needed for waterproofing, is laid over all surfaces of the base in 2 layers.
Now a strapping beam is laid around the entire perimeter of the extension, the width of which should be 150 mm. The lower beam is treated with an antiseptic composition, which, due to lack of funds, can be replaced with used automobile oil . Fastening at the corners should be done halfway or in a paw. After which the harness should be leveled.
Then the corner posts are installed. It is better to make them from 150x150mm timber. All elements are installed strictly vertically using a plumb line or level. The racks are secured with technological braces using available boards. And those racks that will be located next to the wall of the house should be slightly lower than the overhang of the roof of the house. The outer posts should also be lower. And the shorter they are, the better it will be for water and snow to roll off the roof.
At another stage, additional racks are installed along the entire perimeter of the frame extension. They are usually installed at a distance of 1 m. To be more precise, they need to be placed at a distance of 90 cm from each other.
After all the indicated work has been completed, you need to strengthen the corner posts using inclined braces. Inclined braces are usually installed at an angle of 45 degrees. After that, the technological braces are removed from the edged boards, and then they begin laying the rafter boards. The boards should be laid on edge. The extension beyond the crown can be 30 cm. Next, you need to lay sheathing boards on the rafters, which will have a thickness of 25-35 mm.
Now you need to lay glassine in one layer on the sheathing boards, but only with an overlap. This material will protect the building from excess moisture.
We arrange the roof for frame construction
The roof is considered an important element of the frame structure. Absolutely any material is suitable for roofing. However, many people use 8-wave slate for this case, which has a length of 175 cm. If you have built an extension measuring 5x11 m, then it is important to buy 30 such sheets for the roof.
The place where the roof adjoins the extension is usually covered with an apron. For this situation, galvanized iron is used.
The final stage of construction of a frame extension
After the roof is installed, the construction of the floor begins. First, the subfloor will come off. For this purpose, a 50x50 mm cranial block is placed on the sides of the floor joists. And edged boards are laid on it. Glassine, insulation and glassine again are placed on the boards. After this work, they begin laying the finished floor.
If the floor has already been created, then the next step is to install doors and windows. In these works a level is used. Windows and doors are secured using spacers or self-tapping screws.
After installing the windows and doors, they begin to insulate the walls of the building. It is possible to use glassine or penofol as insulation. The mirror side of the penofol is placed in the direction where moisture may appear. Long self-tapping screws are used to fasten the insulating material.
After insulating the walls inside, they begin to insulate the outside. For this case, you can use different materials. But a cheaper option would be the “25” edged board. It is recommended to cover the inside walls and ceiling with clapboard.
In order for a do-it-yourself frame extension to your house to serve for a long time, you need to adhere to all the important rules during construction. Remember that only in this case will you be able to make a high-quality extension to your home, with the help of which you will be able to increase your living space.
Useful articles
- Turnkey construction of a house extension
- Types of extensions to the house
- Features of building a foundation for warehouses
- Openings in the walls. Installation of drywall. Installation…
- Construction of a country cottage in Moscow
- DIY monolithic foundation