Pros and cons of a timber roof
Roofs with a timber rafter system are used for wooden and frame houses, as well as for structures made of slabs and piece building materials. This type of coating is considered universal and has many advantages:
- environmental friendliness and safety;
- warm house, wood retains heat well;
- good sound insulation (largely depends on the type of roof);
- natural ventilation of the attic floor or attic;
- low cost and ease of installation.
The disadvantages of timber roofs include low fire resistance and high requirements for timber for the installation of rafters. The fire resistance of timber can be increased by treating the wood with fire retardants.
How to build a roof? Video
The best posts
- How to move a heated towel rail
- DIY solar system model for school: master class with photos
- DIY bookcase from scrap materials with photos and videos
- DIY bottle decor: photos and videos on decorating
- Test No. 18 What kind of business could you manage?
- How to properly and easily make a wooden rack with your own hands?
- How to make a glass table with your own hands
- Mosquito curtains with magnets: advantages and rules of operation
Choosing timber for rafters
For rafters, it is preferable to use coniferous timber.
The timber must be aged and have a humidity of 18-22%. If the humidity is above 22%, the wood will shrink unevenly, which will lead to misalignment of the rafter system and disrupt the geometry of the roof. For country houses and residential cottages, timber with a section size of 50*150, 50*200, 100*200 mm is most often chosen for making rafters. It is not advisable to use a larger beam, because at the same time, the load on the walls of the building will increase significantly. The timber must be treated before installing the rafters. For processing we use:
- flame retardants - increasing fire resistance and reducing flammability;
- antiseptics - protection against rotting and fungus;
- insecticides - protection against insects and rodents.
Types of timber rafter systems
A rafter system made of timber can be one of two types:
Layered rafters. This is the most popular option in private construction. With this method of installation, the rafter legs rest on a beam, which is located around the perimeter. The central part is reinforced with a ridge girder. In large buildings, additional beams are used to increase strength.
Hanging rafters. The structure is mounted on external walls. Crossbars, struts, headstocks, etc. are used as additional elements. The bars are held together by tightening. The use of hanging rafters requires detailed calculations.
When choosing a rafter system, designers take into account the angle of inclination of the future roof: for steep slopes, the optimal solution is layered rafters, for flat ones - hanging rafters. In some cases, the rafter system is combined: layered rafters alternate with hanging ones.
A few words about designing a hip roof yourself
The installation of a hip roof requires planning of the rafter structure, with adjusted angles and correctly made joints. Calculating the load is a necessary procedure, arising from how to use the rafters as a support for the hips or whether they themselves perform the function of the hips.
The top beam (mauerlat) is not the main support as in a conventional gable structure; here the main support is on the ridge element. The installation begins at the ridge; brick supports are made for its installation.
The hip roof consists of:
- rafters, corner rafters, short rafters (ribs), central side rafters (ribs) and intermediate rafters;
- ridge racks;
- ties holding the rafters together;
- a filly that provides increased extension beyond the roof wall;
- wind beam;
- Mauerlat (upper crown for houses made of timber);
- trusses, diagonal beams that provide rigidity for connecting the four slopes to each other;
- struts;
- runs.
The run is the gap between the fastening of the rafter beams to the ridge element.
The installation of a hip roof goes like this. Markings are applied to the timber replacing the Mauerlat, where all the structural elements that are connected to it are marked.
Then the ceiling is laid. It’s better to immediately cover it with boards to make it comfortable to walk on.
The next stage is the installation of racks on which the ridge is attached.
The central rafters of the hip slopes and the intermediate beams of the front sides of the roof are mounted on it.
Next, install diagonal rafters connecting the ridge element to the corners.
Installation of shortened rafter legs and extensions on a diagonal beam
Fix the sprigs, struts, trusses, and wind beams.
The next step will be the installation of sheathing, vapor barrier, roofing pie with insulation, counter sheathing and roofing material.
The components of a hip roof for self-production are particularly difficult, as are the methods of attaching the rafter system. There are so many installation methods. Rafters can be layered or hanging, depending on this, the method of fastening is chosen.
In order for the roof to be strong, withstand any load and serve for a long time, you need to make competent calculations, be able to choose the right fasteners, and use measuring tools. It is better to take advice from experienced roofers; when installing a roof yourself, their advice can be invaluable.
Calculation of timber for rafters
The purpose of calculating the rafter system is to determine the required cross-section of the beam. To do this, you need to know: the length of the rafter legs, the installation pitch of the elements and the parameters of future loads. The dependence of the cross-section of the beam on the installation pitch of the rafters is shown in the table:
| Length of rafter legs, cm | Rafter spacing, cm | Section of rafter beam, cm |
| up to 300 | 120 | 8 x 10 |
| up to 300 | 180 | 9 x 10 |
| up to 400 | 100 | 8 x 16 |
| up to 400 | 140 | 8 x 18 |
| up to 400 | 180 | 9 x 18 |
| up to 600 | 100 | 8 x 20 |
| up to 600 | 140 | 10 x 20 |
Example: to make rafters from timber 3.5 m long, you can use two options: 1) timber 8x16 cm in increments of 1 m; 2) timber 8x18 cm with a pitch of 1.4 m. Knowing the length of the house wall and the pitch, you can easily calculate the required number of rafters and beams.
For other roof elements, dimensions should be taken based on SNiP 3.03.01-87 (updated SP 70.13330.2012):
- Mauerlat - 10x10 or 15x15;
- purlins, crossbars and struts - 10x10, 15x15 or 10x20;
- puffs - 5x15;
- hemming boards - 2.5x10 or 3x10.
The length of the rafters should not exceed 6 m! A structure greater than 6 m will not provide sufficient deflection strength.
When designing a timber roof, design engineers must calculate the current loads on the rafter system. The calculation takes into account the weight of the final roofing covering, thermal and waterproofing, sheathing, drainage and snow retention elements, as well as temporary loads. The calculation is made using special programs. It is impossible to make such a calculation on your own due to the large number of variable variables.
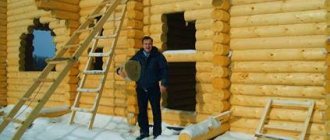
How to build a roof with your own hands?
Building a roof is a rather difficult process, and it is better to entrust it to specialists. Before starting construction, when designing, it is necessary to carry out a calculation for permissible loads, while determining the necessary parameters of the structural elements. To do this, it is convenient to use special programs where the calculation is carried out automatically.
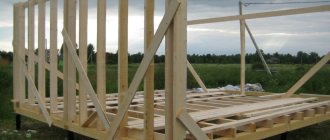
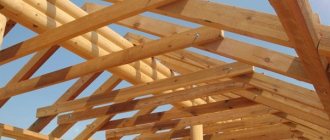
The roof structure is based on a frame made of wooden beams - a rafter system. The main elements of this system are rafters - beams that absorb loads from the roof, as well as from external factors, and transfer them to the walls. All components of the rafter system must be securely connected to each other using “groove-lug” type fasteners.
Before you start building the roof, you need to additionally strengthen the walls of the house and tie the beams of the top row to reduce the lateral loads created when attaching the rafter legs. The screed is performed by connecting opposite walls using beams with a section of 150x100 mm. For screeds, you must use exclusively solid beams; you cannot extend them by fastening several beams together. The beams are attached at ceiling level.
Related article: Austrian curtain: sewing it yourself
If the building area is large, at the floor installation level, beams are attached - beams with a cross-section of at least 150x150 mm, which make it possible to more evenly distribute the loads from the supports. Unlike couplers, beds can be made from several beams, if the joints between them are supported by strapping beams or beams. The joints must be reinforced with metal corners or staples. The dimensions and number of beds are determined when calculating the rafter system and depend on the area of the house, the type of roof, the slope of the slopes, the presence and size of the attic space. In cases where the attic is planned to be used for economic purposes, the beds must be secured in such a way that they coincide with the line of the walls. The attic can be replaced with a full-fledged living space - an attic, but for this it is necessary to provide for the required type of roof, the slope of its slopes and the required height at the project stage.
The ties and beams are attached after installing the floor beams on an additional row of strapping laid on top of them. The connections of the strapping beams with the beams and ties are reinforced with metal plates, which provides additional protection against possible separation of the grooves and tenons when the beams warp. Thus, a rigid and durable structure is obtained, which serves as a reliable basis for a roof of any complexity.
Depending on the angle of inclination of the roof slopes, the loads on it change. For example, at large angle values, when the roof is high, it is largely affected by wind loads, while at a low slope the load is mainly from snow. Therefore, when choosing a roof, you must also take into account the climatic conditions of the region.
Installation of timber rafters
To install prepared and processed timber into a rafter system, you need a set of professional tools: a construction level (preferably laser), an angle grinder, a gas or electric saw, a drill with a set of drills. It is also necessary to prepare fasteners in advance: screws, corners, clamps, etc.
There are two options for assembling rafters:
- Assembly is carried out on the ground, and the finished rafters are lifted up and installed. This option is not suitable for massive rafter systems, because A construction crane is needed to lift the structure.
- Assembly is carried out on the roof. In this case, only timber, boards and tools rise to the top.
Installation of a gable roof made of timber includes the following steps
Mauerlat installation
The strapping is laid on the long walls of the house and attached to them using anchor bolts. In this case, the Mauerlat should be leveled along the inside of the wall. Waterproofing must be lined under the harness: geotextile, TechnoNIKOL, waterproofing or regular roofing felt. For timber houses, the role of the mauerlat can be performed by the very top crown. However, if the roof needs to be raised higher, then the Mauerlat is indispensable here. In the same way, 1-2 planks are laid on the internal load-bearing walls of the house.
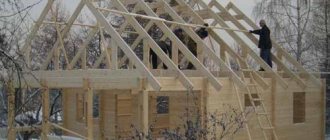
Installation of supports and skates
The timber supports are mounted on a bench with a selected pitch. The supports are leveled and secured with jibs - boards 2.5x10 cm. The racks are rigidly attached to the bed with nails or metal corners (reinforced version). The ridge beam (purlin) is laid on the posts and secured with nails and metal corners.
When installing hanging rafters, the racks are installed temporarily, and the Mauerlat is attached to the wall using additional metal ties, because with this type of rafter system, an increased load will be applied to it.
Mauerlat for hanging rafters. Rafter legs are secured with brackets
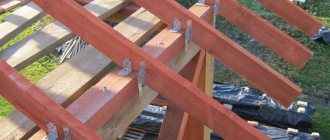
Installation of rafter legs. The method of installing rafter legs depends on the type of rafters chosen. The legs of the layered structure are installed on the Mauerlat and secured using brackets, screws or staples. Reinforcement with brackets gives the rafters additional rigidity. If the length of the timber does not allow for overhangs, then fillets are mounted, which are made from the same timber as the rafters. The fillies are fastened with nails. The rafters are connected at the ridge of the roof, forming a triangle.
The hanging rafters are laid on the mauerlat, a cut is made, into which the rafter leg is then inserted and fastened with nails. Thanks to the sawing, the beam fits tightly to the Mauerlat and does not need to be fastened with brackets and brackets. Tightenings are applied to the installed rafters.
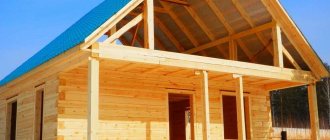
Construction and types of timber roofs
In the field of private housing construction, the following types of timber roofs are most often used:
- Single-pitch. Rafters are installed on external walls at different levels. They are used for outbuildings, bathhouses, verandas and other small structures.
- Gable. The classic version of the coating with the same or different angles of inclination. A variant of a gable roof is a mansard structure, in the attic space of which a living space is located.
- Hip or hipped. Complex roof configurations, used for large cottages and mansions. Two slopes are trapezoids, and the other two are triangles (hips).
The type of roof for a house is selected at the project development stage. As a rule, design is carried out by design organizations or construction companies that build turnkey houses. The second option is more preferable, because allows you to quickly make adjustments to the project.
The standard roof structure looks like this:
- Rafters are internal load-bearing supports on which the sheathing and roof are attached.
- Mauerlat is a frame on which the rafters rest. Distributes the load from the roof to the walls of the house.
- Ridge - the intersection of the roof slopes in the upper position.
- Eaves overhang is an element protruding beyond the contour of the walls.
- Beams and racks are additional structures that prevent sagging of rafters and roofs.
- Struts - provide additional stability to the rafters.
- Fillers are boards at the end of the rafter legs, forming overhangs.
Also part of any roof are necessarily gables, cornices, attic windows, and gutters.
Installation of sheathing
Once the roof timber rafter system is ready, you can begin installing the sheathing. For the lathing, 50x50 timber and dry boards 3 cm thick and 20-35 cm long are selected. Before lathing, the rafters are covered with waterproofing. The material is laid with overlaps of at least 10 cm and secured with construction tape.
The pitch of the sheathing depends on what roofing material was chosen for the covering and the slope of the roof. The pitch of the sheathing for corrugated sheeting and ondulin can be determined from the table:
| Corrugated sheet | Roof inclination angle, gr | Sheet thickness, mm | Lathing step |
| S-8 | at least 15 | 0,5 | Continuous sheathing |
| S-10 | up to 15 | 0,5 | Continuous sheathing |
| S-10 | more than 15 | 0,5 | up to 300 mm |
| S-20 | up to 15 | 0,5 — 0,7 | Continuous sheathing |
| S-20 | more than 15 | 0,5 — 0,7 | up to 500 mm |
| S-21 | up to 15 | 0,5 — 0,7 | up to 300 mm |
| S-21 | more than 15 | 0,5 — 0,7 | up to 650 mm |
| NS-35 | up to 15 | 0,5 — 0,7 | up to 500 mm |
| NS-35 | more than 15 | 0,5 — 0,7 | up to 1000 mm |
| N-60 | at least 8 | 0,7 0,8 0,9 | up to 3000 mm |
| N-75 | at least 8 | 0,7 0,8 0,9 | up to 4000 mm |
For metal tiles and seam roofing, continuous sheathing is performed (for roofs with a slope of more than 20 degrees) or discharged (for a slope of less than 20 degrees). Continuous sheathing is carried out with minimal gaps - no more than 5 cm. The best option: perform the sheathing in accordance with the recommendations of the manufacturer of the selected roofing product.
Regardless of the type of roofing covering and the calculated pitch, the sheathing is continuously mounted around roof windows, in places where complex roofs are broken and in those places where heavy elements of the drainage and snow retention system will be installed.
Under a soft roof, the sheathing is made of panel materials: plywood or OSB. The sheets are attached end-to-end to the rafters using self-tapping screws, forming a flat surface on which bitumen shingles are then installed.
Roof elements
Rafters for the roofs of houses of this type are made from beams measuring 100×50, 150×50 or 200×50 millimeters.
The extension of the rafters beyond the wall must be at least thirty centimeters so that subsequently water flowing from the roof does not fall on the walls, leading to their destruction.
The lathing can be made from 25 mm boards, and the counter lathing can be made from 40x50 mm timber.
The roof must contain in its design ridges, crossbars, beams, vertical posts, struts, tie rods, a chimney, as well as a drainage system.
The roof of a house made of timber does not need a mauerlat; the main thing is to install a brace to reduce the pressure on the walls. The topmost beam will act as the Mauerlat.
A ridge is a horizontal roof element that is formed at the junction of its two slopes.
Sometimes a ridge is called a beam that is fixed on vertical posts resting on floor beams or tie beams. The rafters, in turn, rest on this beam.
There is another option for making a ridge - when at the top point the rafters are covered with boards, forming a ridge element.
Some people share the concepts of roof ridge and roof, others do not. The ridge of the roof is the covering that covers the gap at the top point, which is formed after laying the roofing material. The material of the ridge element is the same as the roof. This element can be of any shape.
The ridge is installed at the last stage of roof construction and in such a way that there is a gap in the under-roof space for ventilation. At the same time, ventilation material, for example, mineral wool, is laid. It is needed to protect the space under the roof from the penetration of birds and insects, as well as precipitation.
By the way, building the roof of a house from timber is the last stage. Before reaching it, it is necessary to lay the foundation for a house made of timber, build walls, and make floors. Particular attention must be paid to the construction of the foundation, because This is the foundation of any home.
Don’t forget, if you choose to build a house from timber with a bay window, then the foundation under the bay window is buried at the same level as under the log house. Other features of the construction of such a house are described here.
The crossbar is necessary to impart rigidity to the structure. It is installed between the rafter legs, preventing their convergence and divergence.
The distance from the ridge to the crossbar should be about one and a half meters. If you install it too high or low, the roof will fall apart.
Struts (rafter legs) are spacers that are attached between the rafters and the load-bearing elements of the roof.
You can install struts and crossbars at the same time. This design will be stable even with wide spans.
Tightening is necessary in order to reduce the load of the roof on the load-bearing walls, and also to prevent the rafter legs from moving apart.
For racks, timber with a cross section of 10×10 or 15×15 centimeters is used. They are necessary in order to transfer the load from the roof to the building frame, preventing the destruction of the roof.
A beam is a horizontal beam on which the vertical roof posts are installed. It evenly distributes the load from them. For the bench, use a beam of the same cross-section as for the racks.
Choosing a roofing covering
A timber roof is universal, allowing you to choose any type of roofing covering. The following roofing options are popular in private housing construction:
- Seam roofing.
- Metal tiles.
- Ondulin.
- Profiled sheeting.
All these types of roofing materials are characterized by high strength and durability. The most affordable is ondulin, made from cellulose and polymers. Metal tiles are more expensive, but have a presentable appearance and require minimal maintenance. The disadvantages of roofing made from these materials include the need for sound insulation, because... every blow, precipitation and gusts of wind will be heard in the house. Also, such a roof necessarily requires insulation.
Separately, it is worth mentioning soft tiles - this is a relatively new roofing material based on synthetic bitumen. The material has a beautiful design, is silent, and is not subject to corrosion or rotting. A significant disadvantage of flexible tiles is their relatively high cost.
Timber roof insulation
Despite the fact that a timber roof is quite warm, it needs insulation. Thermal insulation is carried out after the installation of the roof covering. Inside, the timber roof consists of rafters with sheathing and waterproofing. The following can be used as insulation:
- polystyrene foam or extruded polystyrene foam;
- mineral wool;
- sprayed polyurethane foam.
Each type of thermal insulation has its own advantages and disadvantages. For example, polystyrene foam is fire hazardous, flammable and does not allow the roof to “breathe”, but it has excellent heat-retaining properties and is low cost. Insulation based on mineral wool is suitable for large buildings, because... The weight of the mineral wool is quite large. The material is used in slabs or rolls. Thermal insulation is attached to the sheathing. The thickness of mineral wool slabs depends on the region and averages 15-20 cm. Mineral wool is environmentally friendly, breathable and durable.
Polyurethane foam spraying is the best way to insulate a roof. The material is sprayed with a special installation and creates a sealed coating without seams or joints. The disadvantage of polyurethane foam is its high cost.
In order for a timber roof to last a long time and not require expensive repairs, it is necessary to install an effective drainage system that will prevent water from entering the roof. The calculation of gutters is carried out taking into account the slope of the roof, roofing material and the amount of precipitation.
You can ask your question to our author:
Do-it-yourself roof installation
As for the roof structure, its construction is completed. Next comes the insulation process, as well as the installation of roofing material. You should start with the sheathing, to which the roof will be attached. Lathing consists of wooden boards attached to the rafters end-to-end or with some distance between them.
The finished roof should have smooth rectangular slopes, absolutely identical to each other (we are talking about a gable roof). Precise manufacturing of the structure will make it possible to evenly distribute the loads on the walls, and a flat surface will facilitate the installation of roofing material.
Now it’s time to install the so-called “roofing pie”. A roof is more than just roofing material nailed to the sheathing. It is also a rather complex system of layers of hydro, heat, steam and sound insulation, providing the most comfortable living conditions in the house. With the correct selection and proper installation of all these layers, during the operation of the house you can significantly save on heating, ventilation and damp control. The roof also reliably protects the rafter system from the influence of weather conditions and high humidity.
Related article: The wiring in the apartment smells, what to do
The first layer of the “pie” - vapor barrier - is a special film that is stretched at the base of the roof and along the entire perimeter of the building. The individual film sheets are secured together with tape. Vapor barrier prevents evaporated moisture from entering the under-roof space from the lower rooms.
The second layer is thermal insulation . Here it is very important to choose exactly the insulation that is suitable for the given conditions. It must be harmless, biostable, and able to withstand seasonal temperature changes and high humidity. The thickness of the insulation is selected depending on the operating conditions. One of the most common insulation materials is mineral wool, as well as insulation based on basalt or fiberglass. But it’s better not to use polystyrene foam, especially if there are rodents living in the attic that can chew through it, and it has a short service life. The insulation layer can be laid both inside the roof and outside. There must be a small gap for ventilation between the insulation layer and the next layer of waterproofing.
The waterproofing layer is represented by a breathable membrane. It must have a place for air to escape from the gap between the layers so that moisture does not accumulate in it. In addition, it is necessary to provide for condensate drainage along the membrane sags, which would prevent water from entering the wooden structural elements.
The last layer of the “pie” is roofing material . It is attached to the sheathing boards in such a way that there is a small ventilation gap between it and the waterproofing layer. The choice of roofing material depends on the type of roof, climatic conditions, general style of home decoration, financial capabilities, etc. The most popular are metal tiles, bitumen shingles, copper sheets and others. When choosing, you need to pay attention to the performance indicators of the material, which will allow you to save money, for example on sound insulation. In some cases, the roof is made of wood. This is not done for practical reasons, but rather to create a certain “antique” appearance. As a roofing material, wood is inferior to others because it requires additional processing, which is not cheap. In addition, even after treatment, wood is quite sensitive to moisture, so the waterproofing layer must be laid with special care.
In most cases, roofing materials are attached to the sheathing using special nails or self-tapping screws with rubber press washers, which seal the joint without allowing moisture to pass through.
After laying the last layer, you can begin constructing wind strips, installing the ridge, and arranging gutters.