Is it possible to highlight some main detail in the roof? This is unlikely to work, since here each element performs its own function. For example, rafters are a part of a roof that has slopes, which can be called a frame. It is on them that the roofing material will be laid and other elements will be attached. The final shape of the roof will depend on how the rafter system is assembled and installed. But if you do the work of creating the roof yourself, then how to attach the rafters? In fact, this is a rather complex stage of work, on which the strength, reliability, and even geometric correctness of the roof will depend.
How to attach rafters
A few words about the rafter system
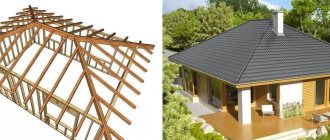
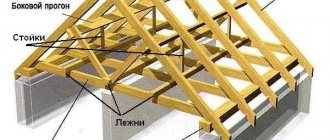
The rafter system is a roof frame with slopes, assembled from the rafter legs themselves, as well as the mauerlat and ridge beam. The Mauerlat is a support beam that is located along the perimeter of the upper part of the walls of the house, and the ridge beam is installed directly in the upper part of the roof in the place where two opposite rafter legs are connected at an angle.
Main parts of the rafter system
Designing a rafter system is an important task, during which it is necessary to correctly calculate the wind and snow loads that will fall on the roof, as well as take into account other parameters. The first indicators will depend on the climatic region in which the facility under construction will be located. Next, based on the data obtained, the thickness of the walls of the house itself (load-bearing) is calculated, and the quality and type of material for the roof itself is selected, the angle of inclination of its slopes and other points are calculated.
Designing a rafter system is an important task
Attention! Shortcomings and errors made during the design can negatively affect the quality of the roof. In some cases, they can lead to rapid collapse or destruction of the roof.
The design of the rafter system may include the rafters themselves, the ties that will be located between them, purlins, additional supports - the so-called rafter legs - and other elements. The assembled rafter system usually rests on the same Mauerlat or on floor beams. Mauerlat helps to evenly distribute the load along the entire perimeter of the walls. This is the main difference between this method of fastening. If you attach the rafter system to the floor beams, that is, without installing a Mauerlat, then the main load will fall on the attachment points and not be distributed evenly over all walls.
Mauerlat helps to evenly distribute the load along the entire perimeter of the walls
On a note! The latter case is not an option if the walls are made of brick, which will begin to collapse over time in places experiencing maximum load. But for a wooden log house this method is quite suitable.
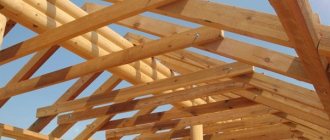
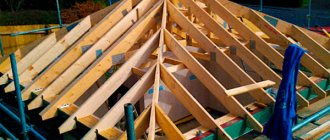
Details of rafter systems using the example of a gable roof, which can be used for various structures
Above are examples of wooden roof trusses; in addition, in some cases trusses made of concrete and metal are used
Table. Dependence of the cross-section of rafter legs on their length and pitch.
| Pitch, cm / Length, cm | 300 | 350 | 400 | 450 | 500 | 550 | 600 |
| 60 | 4x15 | 4x17.5 | 5x15 | 5x15 | 5x17.5 | 5x20 | 5x20 |
| 90 | 5x15 | 5x17.5 | 5x20 | 7.5x17.5 | 7.5x17.5 | 7.5x20 | 7.5x20 |
| 110 | 7.5x12.5 | 7.5x15 | 7.5x17.5 | 7.5x17.5 | 7.5x20 | 7.5x20 | 10x20 |
| 140 | 7.5x15 | 7.5x17.5 | 7.5x20 | 7.5x20 | 7.5x20 | 10x20 | 10x20 |
| 175 | 10x15 | 7.5x20 | 7.5x20 | 10x20 | 10x20 | 10x25 | 10x25 |
| 215 | 10x15 | 10x17.5 | 10x20 | 10x20 | 10x25 | 10x25 | — |
Calculator for calculating the length of rafter legs
Go to calculations
Traditional “wooden” troubles
The design of the rafter frame of a pitched roof is extremely simple. It is a series of parallel laid boards or beams, resting their edges on two walls of different heights. To install and attach the rafter legs to the building structure, a transition element made of wood is used.
Depending on the type of box being installed and the wall material, the function of the transition element is performed by:
- Mauerlat. In a shed roof scheme, these are two separately laid wooden beams that complete concrete or brick walls.
- The upper frame of the frame structure. A belt made of double stitched boards or timber installed on top of the frame posts.
- The upper crown of the foot, made of timber or logs.
The rafter legs and the elements in contact with them are made of wood, which has the property of changing its own dimensions following fluctuations in the background humidity and temperature changes. In spring and autumn, especially during the rainy season, the length of the rafter legs will be slightly longer than in dry summers and frosty winters.
Imagine what will happen if the rafters, rigidly fixed at the top and bottom, increase in size. Gaps will appear in the waterproofing, fasteners will become loose, slate sheets will move, and metal tiles will shift. In addition, deflection and heaving of the roof frame will certainly affect its wear resistance.
However, changes in the linear dimensions of the rafters are not at all the main problem with wooden rafter systems. An unpleasant surprise, if not taken into account, will be the settlement of the newly built box.
It is most pronounced on wooden walls, but it is also very characteristic of structures made of concrete and brick. Let us remember that pitched roofs rest on walls of different heights. Without calculations, you can understand that they will sag by different amounts. Those. there is a threat that, due to the difference in the subsidence of the walls, the new roof will not simply change the angle of the slope. There will be a possibility of disruption of nodes with extremely negative destructive consequences.
Despite the simplicity of pitched roofs and the close-to-horizontal direction of laying the rafters, the listed risks should not be forgotten. The nodes used to fasten the rafter legs of a pitched roof must take into account the “whims” of the wood.
The work of the developer of his own pitched roof project is to find the right solution to three important problems, according to which:
- It must be possible to move the wooden parts relative to each other.
- All possible causes of connection failure should be excluded.
- It is necessary to provide the rafters with the opportunity to adapt to the consequences of wall subsidence so that they can take a stable position.
The rafter legs of shed roofs erected over walls of equal height are classified as layered. The hanging type is used if the box being equipped has walls of equal height, and the slope is formed by rafter triangles.
Everything is clear about fastening the triangles: with the horizontal side they are installed on the harness or Mauerlat, they have a maximum joining area with the supporting elements, and are fixed in the usual way.
With layered rafter legs, everything is much more complicated. They are installed at an angle to the supporting elements. Without processing and preparation for installation, the rafters have only two unreliable points of contact with the strapping or Mauerlat.
No matter how powerful the fastener is, two points are not enough to firmly seat the part. Even with a slight impact, such a slope will simply slide down along with the continuous sheathing and multi-layer roofing cake. However, there are methods invented by ancient builders to avoid such troubles.
In order to prevent unwanted movements, the contact area between the rafter and the supporting element is increased, for this purpose the following is done:
- Selection of cuts. These are cuts in the shape of a triangle or a triangle with a tooth. They are cut exclusively on the rafters, so as not to weaken the supporting mauerlat.
- The top or bottom edge of the rafter leg is filed down, thereby creating a support platform that increases stability. Performed strictly vertically or horizontally.
Depending on the type and location of sawing or trimming, notches and cuts may or may not limit the movement of the wooden part. The restrictions are considered relative, because there are no absolutely rigid fastenings in the construction of pitched roofs. Experts classify the units used by degrees of freedom: from one to four.
In the construction of roofs with one slope, the following most often appear:
- Fastening nodes with one degree of freedom are practically stationary connections that allow the rafter to rotate slightly around the fastening point.
- Fastening units with two degrees of freedom are connections that provide the ability to rotate around the fastener and cause slight horizontal displacement.
- Fastening units with three degrees of freedom are connections that allow rotation and displacement horizontally and vertically.
The presence of degrees of freedom does not mean that the rafter will be able to rotate and move freely in the area of the node. They are fastened quite rigidly, because they have to hold the lathing, corrugated sheets or other type of covering, or snow cover.
The connection will only show its capabilities if the load is exceeded. Then the rafter legs will just move and take a new position, and the system will remain without damage.
Any diagram of a pitched roof clearly shows us the presence of at least two connecting nodes. Let's divide them conditionally into upper and lower. In the construction of rafter roofs, the rule applies: if one of the nodes is rigidly fixed, then the second should have more opportunities for movement.
Projecting and simplifying the technological principle, we can say: if the fastenings in the upper nodes of a pitched roof are made rigidly, then the lower connections must be freer to ensure the possibility of displacement when the pressure is exceeded. And vice versa: if the lower mount is practically motionless, then the rafter at the top needs to be provided with some reserve for movement and rotation.
Attachment options at the bottom of the legs
The rafters are attached either to the mauerlat or to the ceilings. But how can fairly massive rafter legs be secured to these foundations? There are two main ways of attaching rafter legs directly to the Mauerlat - rigid and sliding connection options. The rigid version is suitable for layered rafters - in this case, the leg will “sit” firmly on the Mauerlat, which is what needs to be achieved. This can be done by creating a notch in the rafter or by attaching a special support block to it. In the first case, a template is made, and the required dimensions of the notch on each rafter leg are cut out from it. The rafters rest on the edge of the mauerlat with just these notches and are fixed in place with nails or other fasteners. It is also additionally required to drive the nail vertically into the leg. The connection will be strong and rigid.
The rafters are attached to the mauerlat
Important! The notch should not be deeper than 1/3 of the rafter width. Otherwise the system will be unreliable. It is completely prohibited to make cuts in the Mauerlat, otherwise its load-bearing capacity will be greatly weakened.
Creating notches can be replaced by attaching bars to the rafters, which will rest against the mauerlat. The beams are attached to the rafters using metal corners - thanks to them, the leg simply cannot move to the side.
Nodes for supporting rafters on purlins and mauerlat
It should be remembered that if on one side of the rafter a rigid type of connection was implemented, then on the other side the type of fastening should be different. If you use a hard method on both sides, then the risk of deformation of the wooden structure in the future increases. Wood is a living and breathing material that has the ability to shrink and expand under the influence of a number of factors, including humidity and temperature.
a sliding option for attaching rafter legs can be used . In this case, the wooden elements are able to move slightly. There are even special mounting systems called skids on the market. But you can also use metal corners that have oblong holes through which fasteners are driven/screwed.
Example of sliding rafters
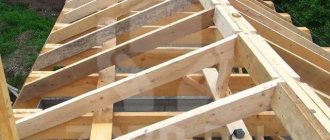
What elements are used to increase the stability and load-bearing capacity of rafters
As a result of the correct choice of the rafter system and methods of fixing its elements, the structure must be stable, compensate for natural fluctuations in linear parameters and withstand various loads that arise during operation. To fulfill the conditions during fixation of rafters, additional fixation elements can be used.
Runs
Most often they are mounted in the ridge part of the system; the upper ends of the rafter legs rest on them. To increase stability, cuts may be provided. The top connection is rigid or floating with bolts. On large roofs, purlins can be installed in the middle of the rafters or in other places with critical loads.
Master class: building a gable roof
Vertical racks
They are installed to strengthen rafters; through the use of racks, elements can be made from thinner lumber. The upper end of the vertical racks rests against the rafters, and the lower end against the beam or ceiling beams.
Rack on the diagram
Corner supports
Resists bending and expansion forces, universal use. Corner stops can be placed in any places of the rafter leg that cause concerns about strength. Due to such stops, the resistance of rafters to bending and tearing forces significantly increases.
Rafter braces or rafters with struts
Tightenings (crossbars)
The purpose is to keep the rafter legs from spreading; they are used on hanging rafter systems. Most often they are placed in the upper part of the truss; for manufacturing, you can use boards approximately 20–25 mm thick. The fact is that they work in tension, lumber holds such forces well. The boards do not work well under compression, quickly sag and lose their original strength.
The crossbar is a tie installed under the very ridge of the structure
Overlays
They are used in the upper ridge part of the rafters; due to the use of puffs, the strength of the joint connection is increased. Pulls can be made of wood, plywood, OSB or metal.
Rafter covers on the diagram
Rafter covers in the photo
Lugs (stops)
They have many specific names. They are ordinary pieces of boards 30–40 cm long and 40–50 mm thick, fixed at the bottom of the rafters. They rest against the mauerlat and prevent the structure from slipping. The use of bosses allows for a rigid connection of elements without sawing down the rafters. We talked about the problems that arise in connection with sawing in this article above.
Options for attaching rafter legs to the Mauerlat. The third diagram shows fixation using a wooden shorty or boss
Prices for various types of timber
timber
Fasteners
So, to fasten the rafters at the bottom the following can be used:
- metal studs . In this case, you will also need reinforcing metal linings;
- nails and staples . Reliable, simple, not expensive. Frequently used option;
- nail strips made of galvanized steel . They have several rows of teeth about 8 mm high. These plates allow you to achieve the most durable and reliable connection.
Types of fasteners
Self-tapping screws, bolts, various metal corners, and brackets can also be used. Clamps, studs and other elements are used. As for the corners, they come with or without a notch and may differ in parameters, including the thickness of the metal and the number of holes for fasteners. There are also reinforced corners, with an additional stiffening rib on the bend.
On a note! It is better to choose a fastening method depending on the complexity of the entire roof structure.
Attaching the rafters to the mauerlat
Prices for various types of fasteners for rafters
Rafter fasteners
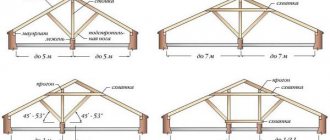
Approximate parameters of pitched roof elements
Layered rafters can be made from grade 2 lumber. Most often these are round hewn logs, plates, which are a log, timber or boards hewn on both sides, sewn together in pairs.
The cross-section of the rafters is determined by the load on the roof from wind, snow and roofing. To determine the parameters of the elements of a pitched roof, you can use a computer program.
But in most cases these values are constant:
- A rafter frame covering a span of more than 4.5 meters should be constructed from logs and plates with a diameter of 18-20 cm and timber with a cross-section of 10*15 cm or 15*15 cm.
- For smaller spans, you can build a frame from logs and plates with a diameter of 12-18 cm and a beam with a cross-section of 10*10 cm.
In both cases, it is possible to replace the timber with double boards, the final size of which is similar to the required cross-section of the beam.
It is very important to understand that rafter systems for pitched roofs should not be constructed from smaller components. Even for minor buildings, the specified parameters are the lowest limit.
To make a Mauerlat, it is recommended to use timber with a cross-section of 18-20 cm. For struts on long roofs, it is allowed to take timber with a cross-section of 8*8 cm, logs with a diameter of 10 cm or double boards, the final size of which is 2.5*15 cm.
The purlins of long-span single-pitched roofs are arranged parallel to the slopes. In this case, they are used as additional support and increase the strength characteristics of the structure. To fasten the purlins, install supports and beams, relying on the technology of constructing a gable roof. In this case, it is not the formation of the ridge that occurs, but the support of the plane of the long slope is provided. To make purlins, a beam with a cross-section of 18*18 cm or a log with a diameter of 20-26 cm is used. Racks for purlins can be made from a beam with a cross-section of 12 cm or a log with a diameter of 13-20 cm. In this case, you can use different methods of fastening the rafters of a pitched roof. Quite often, rafters are installed on floor beams, which makes installation easier.
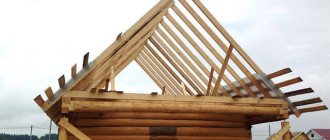
Connection of rafters in the ridge area
In the upper part, the rafter legs are also attached in one of two main ways - end-to-end or directly to the ridge girder. In the first case, the upper part of the rafters is sawed off at a certain angle and two opposite legs rest against each other at the place of the cut. It is most convenient to make cuts using a pre-made template, with the help of which it will be easier to maintain the correct angle, which depends on the angle of the roof slope. Or the cut can be made directly along two legs at the top. The two rafter legs can be connected to each other using various fasteners. If nails are used, their length should not be less than 15 cm. They are driven in at an angle.
Fastening the rafters to the roof
The rafters can also be overlapped. In this case, the ends are not cut off; fastening is done between the side planes using pins. This, by the way, is the easiest way to connect.
Directly attaching rafters to the ridge girder is somewhat more difficult. But, nevertheless, the use of this method is not uncommon. In this case, the fixation is made on the ridge beam itself. The rafters do not rest on each other.
Methods for attaching rafter legs
Types of roof rafters
There are two main types of rafter systems - hanging and layered. The rafters used in them are called exactly the same, and in some situations both types of rafters are combined to create the most efficient structure.
The features of different types of rafters can be described as follows:
- Hanging . Hanging type rafters rest solely on the walls of the building. When attaching rafters to the wall, as a rule, to reduce the load, a Mauerlat is mounted on the top of the walls, acting as a supporting element for the rafter legs. However, you can do without it if there are reliable floor beams protruding beyond the perimeter of the building. Reducing thrust loads in hanging rafters is ensured by various lintel options. In the case of large spans, the rafter frame can be further reinforced to increase rigidity.
- Layered . Layered rafters, unlike the previous ones, are installed using additional supports, which imposes certain restrictions - such a structure can only be created if there is a load-bearing wall or other supporting elements inside the building. The lower part of the layered rafters, however, rests on the Mauerlat, so the walls must be thick enough for its installation. The upper part of this type of rafters is attached to a ridge girder mounted on vertical posts.
Technology for attaching rafters to the Mauerlat
In this instruction, we will look at how cuts are made on the rafter legs, and how the structural parts themselves are attached to the Mauerlat.
Step 1. To make the correct cut on the rafter leg, it is important to apply markings. It is most convenient in this case to use squares and a pencil.
Marking
Step 2. Next, you should make cuts along the applied markings. To do this, you can use a jigsaw or a regular handsaw. To speed up the work, it is recommended to use the first option. The resulting “heel” or cut will be laid directly on the already installed Mauerlat.
Making cuts
You can use a hand saw for work
The resulting “heel”
Step 3. Next, the leg with the notch should be installed in its place.
Installing a leg with a gash
Step 4. Two large metal corners are installed on one and the other side of the rafter leg.
Metal corners are attached
Step 5. In the side parts, the corners are fixed with fasteners - for example, self-tapping screws, nails. They need to be screwed or driven into small holes - at least 4 pieces in each direction.
Self-tapping screws are used for fastening
Another photo of the process
Step 6. Next, the rafter leg needs to be drilled through - the hole should be suitable for a pin with a diameter of 12 mm.
A through hole is made
Step 7. Next, you need to insert a pin into the resulting hole and tighten the corners together, tightening the nut on the other side of the pin.
Tightening the corners
Step 8. After this, you need to install the “grouse” into the Mauerlat through the hole in the other side of the corner. “Capercaillie” is also a fastener.
After this, you need to install the “grouse”
Step 9. Next you need to install the small corners. They are attached to the mauerlat and rafter leg, but on the other side of the heel.
Fastening small corners
By the way, you can now use various online calculators to calculate rafter cut angles. There you can specify all the necessary roofing parameters, and the system will produce the desired result in a matter of seconds.
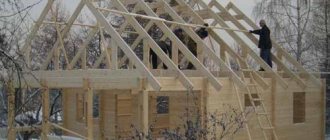
We carry out installation
How to install rafters on the roof? What nuances and subtleties are there? First of all, you should remember about safety. Laying rafters at high heights is dangerous. It is best to make scaffolding before starting installation. But such a thing is very expensive and rarely used. Therefore, the installation of rafters on the roof should be carried out with personal protective equipment - mounting belts and so on.
In addition, doing everything with your own hands and alone is an almost impossible task. It will be impossible to lift and install the rafters alone. Wood weighs a lot. In addition, the structures themselves will be quite large. Therefore, you cannot do without an assistant.
The technology for installing rafters on the roof is as follows:
- If you will be installing using a rigid fastening, then it is initially advisable to make a template for cutting. To do this, we lift two rafters onto the roof and put them in their place. In this case, cutting is done in the place where the element will be attached to the Mauerlat. A template is made using the first rafters. This can be done using a piece of plywood. Using the template below, you can prepare the remaining rafters for installation.
- You can also prepare a template for the top joint. This is done if the rafter pair will be assembled on the ground. Then it is lifted onto the roof and placed in its place. But assembly can also be done on the roof. In this case, the climb will be noticeably easier. In addition, the fit will be more accurate.
- The first step is to install rafters at both ends of the house. After this, a rope is pulled between them. This is necessary in order to place the remaining pairs evenly and in the same plane.
- Next, the remaining rafters are lifted, connected and installed. In this case, the same distance must be maintained between each pair, which is calculated in advance. As a rule, this parameter ranges from 60 centimeters to 1 meter; more details in the material: the distance between the rafters.
- After installing the rafters, all connection points should be further strengthened. To do this, you can use metal corners, staples or thick steel wire.
- Next, you should lay and secure the pepper strips and supports. After which you can begin laying the sheathing and the roof itself.
Video on the topic:
It is worth noting that there are some features of installing rafters when using a hanging or layered system. In the first case, a tightening is applied. This element secures the lower ends of the rafter pair. In a layered system, the lower ends of the rafters are installed directly to the Mauerlat.
Installation of the unit in the ridge part
Let's look at an example of how you can connect rafters to each other in the ridge area.
Step 1. To connect the rafters end-to-end, you need to saw off their upper part in such a way and at such an angle that two opposite elements meet each other above the ridge beam.
How will the rafters be connected?
Step 2. Next you need to make two wooden overlays (the shape is shown in the picture). They are applied on one and the other side of two previously joined rafter legs.
You also need to make two wooden overlays
Step 3. After this, the linings need to be secured with long nails on the rafter legs. You can also connect the rafter legs in the ridge area using a special toothed plate.
Fastening wooden linings
A special plate can also be used
Material for rafters
During the construction of a roof, it is important to approach each stage responsibly. Installing rafters is “serious”. But, if these elements are of poor quality, then little will depend on proper installation. Rafters can quickly fail and then serious repair work cannot be avoided.
Before you begin the DIY installation, you should select the material for these basic elements of the entire roof system. Which option can I use? Here experts will offer the following:
- Reinforced concrete structures. Such rafters are often used in the construction of industrial facilities. They have a lot of disadvantages. Installation of such structures requires the use of special equipment. Plus they weigh a lot. Therefore, reinforced concrete products are not used in private housing construction;
- Metal rafters. This refers to steel products, brands and others. Such designs are light and compact. But their cost can be quite high. Plus, steel elements have high thermal conductivity. Another drawback is installation difficulties. Installation of metal rafters will require special equipment, for example, a welding machine;
- Wood. This is the most common material option for the rafter system. If we talk about the disadvantages, experts note the wood’s tendency to rot and catch fire. But such shortcomings are easily eliminated with the help of special impregnations.
You can install wood rafters with your own hands, using only a regular carpenter's kit. The most commonly used are bars. In some cases, boards can also be used. The most important thing is that the material is of high quality. You should not use boards or beams that have been in use for a long time.
Good advice
It is important to remember a few tips that experienced builders know and give to beginners.
- It is important not to forget to treat wooden elements with protective compounds against insects and moisture. In this case, the tree will live much longer, although in itself it is in any case a fairly reliable and durable material.
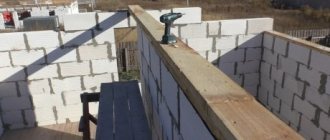
- You should not neglect the Mauerlat, even if a small country house is being built on the site.
- It is important to observe ventilation gaps when roofing. They will provide the correct microclimate for all roof elements and, accordingly, increase its service life.
Roof ventilation
- For the mauerlat and rafters, it is recommended to choose hardwood that is of high quality and without cracks.
- To fix all components, it is important to take those fasteners that can resist moisture, that is, galvanized or having another protective coating.
- You need to make sure in advance that you have all the tools you might need. This is a hammer, an electric jigsaw, drills of the required diameter, a drill, a regular hand saw, squares and rulers, a pencil for marking, and a building level.
Tools required for installing rafters
- All work on the roof must be carried out with insurance. It is better to protect yourself as much as possible from possible falls and injuries.
- The rafters are mounted so that a cornice overhang is formed. It is necessary so that the roof protrudes beyond the level of the walls. Then the house will be better protected from moisture.
- Some of the work (for example, creating heels on rafters) can be done on the ground, and then lift the rafter legs up and fix them.
- It is important not to make mistakes in calculations when designing a rafter system.
Roof rafters
If you do not forget about these tips and use them in practice, the roof will turn out reliable and neat. And this is a guarantee that it will last a long time and will please the eye. Having dealt with all the intricacies, even a novice builder can create a high-quality rafter system on his own.
Prices for the popular range of electric saws
Electric saw
Preparation
Before installing the rafters, you should go through the preparatory stage. First of all, you should make a diagram. Without an accurate drawing, it is impossible to correctly install the rafters. When drawing up a diagram, the following points should be taken into account:
- What rafter system will be used. There are two options - layered and hanging. In each case, the installation of rafters is carried out according to its own rules. This must be taken into account.
- Decide on the angle of inclination of the slope. Various parameters are taken into account here. Firstly, the natural conditions in your region. The smaller the angle of inclination, the more snow accumulates. This reduces the wind load. At a large angle of inclination the opposite is true. Secondly, you should also take into account the recommendations from the manufacturer of the roofing material.
- Loads. Before drawing up a diagram, you should decide what forces will act on the entire structure. Based on this, all parameters of the rafters themselves and the frequency of their installation are calculated. Both variable and constant loads are taken into account. The first include atmospheric influences - precipitation and wind. Constant loads include the weight of all roof components, including installed equipment; read more: calculation of the rafter system.
- Parameters of the rafters themselves. Here you need to calculate their length and cross-section. These values will depend both on the design features of the roof itself and on the loads that it must withstand,