The rafter system is the most complex and one of the most important elements of the house; the comfort and operating time of the building largely depend on the correctness of its construction. Calculation and design of the rafter system should only be done by experienced builders or engineers with special training.
Splicing rafters along the length
Complexity of the rafter system
Designing a wooden rafter system is much more difficult than any metal structures. Why? In nature, there are no two boards with absolutely identical strength indicators; this parameter is influenced by many factors.
- Each board has its own number of knots, among them there are healthy and rotten ones. Some knots have a minimal effect on strength, while others significantly reduce them.
The number of knots on the boards varies
- Depending on the conditions and drying modes, cracks may appear in the boards . Their location and size cannot be predicted or calculated; the exact effect on strength remains unknown.
- Boards can be affected by various fungal diseases, not all of them are visible to the naked eye . Some may appear after the completion of the rafter system. In addition, even lumber that was healthy during construction can be damaged over time by pests and rot.
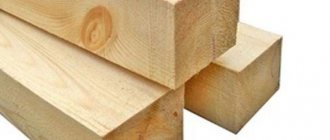
Requirements for the quality of rafter boards
How to choose high-quality smooth boards for rafters
The metal has the same properties, which depend only on the grade of steel. The calculations will be accurate, the error will be minimal. With wood everything is much more complicated. In order to minimize the risk of system destruction, it is necessary to provide a large safety margin. Most decisions are made directly by the builders on site after assessing the condition of the lumber and taking into account the design features. Practical experience is very important.
Joining of rafters. Overlay on 2 sides in the form of a meter board 150x50
Prices for various types of construction boards
Construction boards
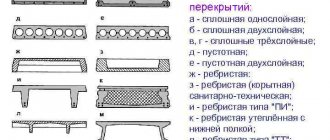
Types of floor beams
- Reinforced concrete.
- Metal.
- Wooden.
Reinforced concrete beams span large spans, but they are installed only with the use of heavy lifting equipment. Metal structures have virtually no restrictions on the span width, but their disadvantage is susceptibility to corrosion and high thermal and sound conductivity. Wooden floor beams do not have these disadvantages, which is why they are widely used.
Return to contents
Why do you need to splice rafters?
There are several reasons why rafters need to be spliced.
- The roof length exceeds the standard lumber length . The standard length of the boards does not exceed six meters. If the slope is large, the boards will have to be lengthened.
- During construction, a lot of good boards 3–4 m long remain . To reduce the estimated cost of the building and reduce the amount of unproductive waste, these pieces can be used to make rafters, having previously spliced them together.
Splicing rafters along the length
Important. It must be remembered that the strength of spliced rafters is always lower than that of whole rafters. You should try to ensure that the splice point is located as close as possible to the vertical stops.
Splicing methods
There are several ways to splice, there is definitely no better or worse. Craftsmen make decisions taking into account their skills and the specific location of the joint.
Table. Methods of splicing rafters.
| Splicing method | Brief description of the technology |
| Oblique cut | It is used on boards with a thickness of at least 35 mm. A rather complex method that requires practical experience in carpentry. In terms of strength, the connection is the weakest of all existing ones. The advantage is saving lumber. In practice, it is used very rarely on construction sites. |
| Butt-butt | The length of the rafter legs is increased with the help of an overlay. The cover can be wooden or metal. If the length of two sections of boards is not sufficient according to the parameters of the rafter system, then this method allows you to increase them. Butt joints have the highest bending strength and are widely used during the construction of various structures. |
| overlap | Overlapping. Two boards are fixed with an overlap. The simplest method is in the middle in terms of strength. Disadvantage - the total length of the two boards must be greater than the design length of the rafter leg. |
Scheme of paired rafters
In this article we will look at the two simplest and most reliable splicing methods: butt and overlap. There is no point in touching the oblique cut; it is almost never used due to a large number of shortcomings.
Types of wooden floors
There are several types of wooden floors according to their main purpose:
- Basement. Designed for laying floors on the ground floor and separating non-residential basement space from living rooms. Therefore, the main requirement that is placed on them is to ensure high-quality heat and sound insulation.
- Interfloor. Used to separate living spaces between floors in cottages and townhouses. Therefore, the requirements for thermal insulation are minimal, but for sound insulation, on the contrary, they are increased, since sound waves inside the building can propagate not only through the air, but also through solid material.
- Attics. They perform almost the same functions as the basement ones. However, due to the location of a cold room above a warm one, additional attention must be paid to installing a vapor barrier to avoid the formation of condensation in the ceilings.
Butt splicing with boards
It is much more convenient to do the work on the ground; prepare a flat area. Place the bars on the ground - the rafters will have to be trimmed, you need clearance for the circular saw. Before splicing, find out exactly the length of the rafters. You need to measure it on the building; use any thin long boards, rope or construction tape. If there is an error of a few centimeters, no problem. When connecting the rafter legs on the roof, this error is eliminated without problems.
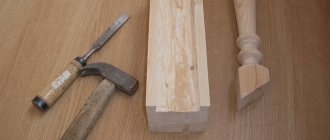
Preparing everything you need
Step 1. Place one board on the bars, cut the end exactly at a right angle. It is better to cut with a hand-held electric circular saw.
Important. Follow the safety rules, this is a high-speed and very dangerous tool. Never remove the saw's factory safety features or turn off the electrical overload relays.
The end of the board is cut off
Rafter boards are quite heavy; when cutting, position them so that they do not pinch the saw blade or break prematurely during cutting. Prepare the second board in the same way. Make sure that the cut is only at a right angle. The ends of the spliced boards should fit tightly against each other over the entire surface; this is necessary to increase the strength of the spliced rafters. The fact is that even if the connection of the studs is loosened, the ends during bending will rest against each other along the entire length of the cut and hold the load . Studs and overhead boards will only keep the structure from creeping along its length.
Step 2. Place two prepared rafter boards side by side. Prepare a board for the overlay. We have already mentioned that its length should be approximately four times the width of the board. If the roof slopes have a slight slope, the distance between the rafters is large, and the roof is insulated with mineral wool, then the bending loads increase significantly. Accordingly, the length of the board for splicing must be increased.
Two boards are installed side by side
Step 3: Place the overlay on two side-by-side joiner boards. Quite often, the thickness and width of boards, even from the same batch, differ by several millimeters. If this is the case, then level the boards on the side to which the sheathing will be nailed.
Practical advice. The science of strength of materials says that the thinner the material, the greater its resistance to bending along a thin plane. This means that, for example, five boards placed next to each other on an edge, each 1 cm thick, can withstand a significantly greater load than one board 5 cm thick. Conclusion - for splicing it is not at all necessary to cut thick expensive materials; you can use several thin pieces of the required length. There are enough such pieces at any construction site.
Cutting boards for jointing
The overlay is laid on the boards
Step 4. Drill holes for the studs in a checkerboard pattern and at standardized distances. To ensure that the individual elements do not move while drilling holes, they need to be temporarily secured to each other. Use long and thin screws for these purposes; nailing is not recommended. They cut or tear the wood fibers, and the strength of the board is slightly reduced. Self-tapping screws do not cut the fibers, but push them apart; after unscrewing, the boards almost completely restore their original strength characteristics.
The boards are tightened with self-tapping screws
Step 5. Drill holes, do not place them on the same line, otherwise the boards may crack during use.
Drilling holes
Holes are ready
You may find recommendations to separate the boards after drilling the holes and lay jute between them to prevent the appearance of cold bridges. This is not only wasted work, but also harmful. Why? Firstly, no cold bridges arise at the splice points; on the contrary, they have the greatest thickness and, accordingly, the lowest thermal conductivity. But even if they appear, there will be no negative consequences; this is a roof truss system, and not an indoor window or door. Secondly, jute reduces the friction force between the splice elements, and this has a very negative effect on their strength. Thirdly, if condensation gets on the material, which is very likely, then it will take a very long time to remove moisture from it. There is no need to tell what consequences long-term contact of wooden structures with moisture leads to.
There is no need to lay jute
Step 6. Insert the studs into the prepared holes, put washers on both sides and tighten firmly with nuts. It is recommended to tighten until the washers are pressed into the wood. The excess length of the studs can be cut off using a cylindrical grinder with a metal disc.
Studs get clogged
The nuts are tightened
The excess length of the studs is cut off
All other rafters are spliced in the same way.
Prices for popular models of electric drills
Electric drills
Overlapping splicing
This connection is easier to make, but under one condition - the total length of the two boards allows it; it must be greater than the length of the rafter leg by the amount of overlap.
Splicing rafters with overlap
If you have low quality lumber, then before starting work it is recommended to lay it out on a flat surface and make an inspection. For long sections of spliced rafters, choose straight ones, and for segments use curves. Although it is highly recommended to purchase only high-quality materials for the rafter system, this is not an architectural element of the building on which you can skimp.
Lumber inspection
Step 1: Select boards and place them on top of the timbers. If you want, you can level the ends with a circular saw; if you don’t want to, don’t level them. The condition of the ends does not in any way affect the strength of the overlap splice.
The ends of the boards are cut off
Step 2. Lay the boards on top of each other, adjust the length of the joint and the overall size of the rafters.
The boards are stacked on top of each other
Practical advice. The boards must lie strictly parallel to each other. Due to the fact that the upper one is raised above the lower one by the thickness of the material, stands made from pieces should be placed under it and the bars. The thickness of the segments should be equal to the thickness of the bottom board.
Step 3. Align the boards along one of the edges and temporarily fasten them with self-tapping screws. Drill holes, install studs, washers and tighten nuts.
Studs get clogged
The boards are connected with pins
The result of the work done
Advantages of wooden floor beams
- Light weight structures. It can easily be supported by walls and foundations, and during installation you can do without lifting mechanisms.
- Easy to install. The work is feasible for people without high construction qualifications.
- High thermal insulation properties.
- Good reliability, strength and durability.
- Lower cost compared to structures made from other materials.
To make beams, you can use both coniferous and deciduous wood. But special attention should be paid to the quality of the wood:
Return to contents
Butt splicing with plywood
Prices for different types of clamps
Clamps
One of the methods of splicing rafters helps to save boards and rationally use waste of various lumber. In this case, cuttings of sheet plywood one centimeter thick are used.
Step 1. Lay the rafter boards evenly on the site, close the ends, pay attention to the parallelism of the side edges. The boards should be extremely equal in thickness, the ends should be cut exactly at right angles.
The ends of the boards are closed
Step 2. Using a brush, generously coat the surface with PVA glue.
PVA glue is applied
Step 3. Place the prepared piece of plywood at the joint, press it firmly with clamps. While fixing, make sure that the plywood does not move from its original location.
Laying a piece of plywood
Clamps are used for fixation
Step 4. Using long, strong self-tapping screws in a checkerboard pattern, screw the plywood to the boards. The length of the screws should be 1–2 times shorter than the total thickness of the boards and plywood; their ends cannot protrude from the reverse side. Be sure to place large diameter washers under the screws. Before tightening the screws, drill holes in the rafters. Their diameter should be 2–3 mm less than the diameter of the threaded part of the hardware.
Drilling holes for self-tapping screws
Screws are tightened
Step 5. Turn the board over with the back side up, place it under the ends of the stand, they should not hang in the air. Carefully remove all installed clamps one by one.
The clamps are removed
Step 6. Spread the surfaces with glue and place the second piece of plywood on them. Clamp it again with clamps.
Surfaces are coated with glue
The workpiece is clamped with clamps
Step 7. Tighten the screws with great force.
Self-tapping screws are tightened with great force
Important. When tightening the screws, make sure that they are not positioned against each other. The displacement must be at least three centimeters.
Step 8: Remove the clamps. To strengthen the splice assembly, tighten it with through pins. They should be placed in the same way as with conventional butt splicing.
Through pins become clogged
Practical advice. The holes for the studs should be 0.5–1.0 mm smaller than the diameter of the stud. There are times when it is impossible to accurately select the diameter of a drill bit for wood. Then it is recommended to use a drill of a slightly smaller diameter, let the pin go in with a fairly large force.
During its hammering, the first few turns of the thread are crushed by strong blows of the hammer, which makes it very difficult to screw on the nut. To avoid problems, tighten the nuts before driving in the stud; now let the thread on the end jam, it is no longer needed. Before installing the rafters in place, check that the glue is dry. In good weather, it takes about 24 hours for it to completely harden.
The final touch is applying glue
Important. If, when splicing the rafters along the length of the boards, the nuts were tightened until the washer was sunk into the wood, then this cannot be done with plywood. Carefully control the pressing force, do not damage the plywood veneer.
How to correctly hammer nails into rafters when splicing
It is not always possible and necessary to splice individual rafter elements using studs; sometimes it is easier to do this with ordinary smooth nails. But you need to be able to hammer them in correctly, otherwise over time the compression force of the boards will decrease significantly. The length of the nail should be 2.5–3 cm greater than the thickness of the rafter at the junction.
We increase the rafters in length
How to correctly drive nails to connect loaded or critical wooden structures?
Step 1. Drive the nail into the boards at a slight angle, but not all the way. It is necessary that the tip protrudes from the back side by about one centimeter.
The nail is not driven in completely
Step 2. On the back side of the rafter, bend the nail at a right angle with a hammer.
The nail is bent at a right angle
Step 3: Hammer the nail in about another centimeter. Bend the end again, the bend angle should now be much less than 90°. The more you bend it, the more secure the final fixation will be.
The nail is driven in another 1 cm (approximately)
The end is bent even more
Step 4. Now you can drive the nail head all the way in. On the reverse side, bend the protruding part until the sharp end is completely inserted into the board. Remember that the point where the body of the nail exits and the point where its tip is driven in should not lie on the same line.
Now the nail is driven in completely
The bent part of the nail is driven into the board
This technology completely eliminates the independent weakening of the pressing force.
Prices for various types of fasteners for rafters
Rafter fasteners
Load capacity calculation
How to calculate wooden floor beams with known span and pitch?
general information
We have already mentioned the maximum span: it is limited by the length of the supplied timber. However, the optimal span for wooden load-bearing structures is considered to be 2.5 - 4 meters. Among other things, a smaller span makes it possible to use timber of a smaller cross-section, which reduces the cost of the floor structure.
It is optimal to use timber with a rectangular cross-section as beams. Its height should be in a ratio of 1.4:1 to its width. In this case, we obtain maximum load-bearing capacity at, again, minimal costs.
However: the actual cross-sections of the wooden beams cause them to deviate somewhat from the optimal proportion of sizes.
The beam must rest on the wall at least 12 centimeters in length from the edge.
The edge resting on the wall is waterproofed on all sides except the end. When sealing the ends with moisture-impermeable material, the ends will sooner or later rot due to lack of natural drying.
The ends of the beams are wrapped with roofing felt. It will prevent the wood from getting wet when in contact with the wall material.
When calculating interfloor slabs, the calculated value of the full load (self-weight of the slab and operational load) of 400 kgf/m2 is usually used. However, for unused attics this value can be reduced.
A cold attic is undemanding in terms of floor strength.
Section tables
Let's start by selecting the cross-section of a rectangular beam for a load of 400 kgf/m2 at different values of the span and pitch between the beams.
When constructing an attic floor under an unused attic, the design load can be in the range of 150 - 350 kgf/m2. With a step between beams of one meter, their sections in centimeters should be as follows:
Another table contains the minimum diameters of round beams (rounded logs) at a load of 400 kgf/m2 and a step of 1 meter.
Practical advice
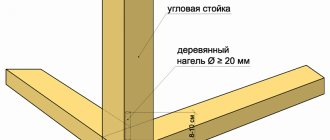
It has already been mentioned that the bending strength of the rafters at the splice is always less than that of the whole element. If possible , try to place this node as close as possible to the ridge, Mauerlat or various spacers . Such precautions minimize the risks of mechanical destruction of the rafter leg. If this possibility is not available for one reason or another, then it is not recommended to place the stop under the splice at a distance of more than 15% of the leg length from either end.
The node is located on the Mauerlat
Never use black self-tapping screws for connections . This metal has two significant drawbacks. The first is that it quickly oxidizes and loses its original strength. Secondly, the manufacturing technology of such self-tapping screws involves hardening. When the permissible load is exceeded, hardened screws do not stretch, but burst. During the operation of the roof, the relative humidity of wooden structures changes, and the thickness of the boards fluctuates accordingly. And this can significantly increase the tensile force of the self-tapping screw; it will not withstand it and will crack.
Black screws should not be used
Do not overdo it with the amount of hardware . If there are too many of them, then the holes will significantly reduce the strength of the parts being connected, as a result you will get the opposite effect, the build-up will not be strengthened, but weakened.
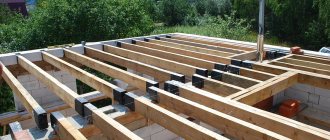
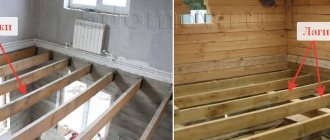
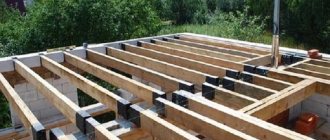
Installation of floors
Installation of floor beams is carried out according to marked beacons to maintain parallelism and spacing. At the initial stage, the installation of the outer beams is carried out. To do this, they are cut to the required length with bevels at the ends at an angle of 60º, thoroughly treated with an antiseptic, and then wrapped in roofing felt with an overlap of 15 cm in length and subjected to thermal heating. This treatment allows you to preserve the integrity of the wood for as long as possible and prevent its damage, especially when in contact with non-natural materials or metal. In some cases, it is allowed to process only the ends that will go into the wall to maintain the aesthetics and decorativeness of the ceilings.
Figure 4. Installation of the attic floor on the trim.
The correct position of the beams is determined using a plumb line and level. In this case, it is highly not recommended to allow distortions, since the load will be distributed unevenly and the estimated service life will be reduced.
Figure 5. Method of installing floor beams with insufficient wall thickness.
The intermediate beams are installed according to a specially made template, and the position is controlled using a long rail. If necessary, cut boards are installed under them to ensure alignment and reliable fixation. It is prohibited to shorten beams to fit the dimensions of the holes in the wall, as well as to cut off the ends or add wood chips. The end parts of the beams are always left open. If the wall thickness is not enough, then the ends of the beams are sealed with cement mortar.
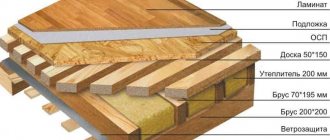
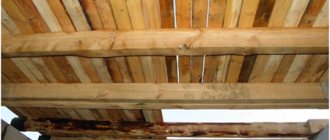
The installation of flooring on wooden beams depends on its type and the need to install insulating layers. To install hydro-, steam- and thermal insulation, it is necessary to cover the beams with chipboard slabs 10-15 mm thick. In this case, they must be positioned relative to the load-bearing parts of the floor so that the joining seams fall on the beams. Then a layer of vapor barrier is laid in the formed niches with an overlap of 15 cm and sizing with tape. Thermal insulation is laid on top of it, which is usually mineral or stone wool. The installation should be as tight as possible without minimal gaps. A waterproofing layer is laid on top and covered with boards with a thickness of at least 25-30 mm.
Figure 6. Laying thermal insulation.
The number of layers is determined by the purpose of the overlap, and in each specific case the installation of one or another layer can be abandoned. But excessive savings in case of non-compliance with operating rules, you need to be prepared for damage to the wood and the need to repair the floors.
Figure 7. Floor sheathing.