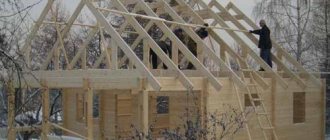
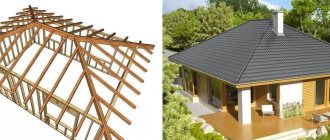
A single-pitched roof type is rarely seen in private housing construction. Although, according to some, this is in vain, because installing a pitched roof is much easier than installing a gable roof. On the other hand, such a roof structure will not be able to retain heat in the room so well. That is why a pitched roof is most often used to build a garage, country house or barn.
True, if the thermal insulation work is done correctly, the structure may well be warm. In this case, a living room is built under a pitched roof. Let's look at the advantages of a pitched roof, what types of rafter systems exist, and how the design is calculated. In addition, we will look at how to install this type of roof.
Pros and cons of a pitched roof for a house
Beginners in the construction business will be pleased that such a lean-to structure is quite simple and can be made with your own hands. True, the work cannot be called the simplest, but with detailed instructions a pitched roof will be created. But before considering the design features of the roof, you need to find out its features and advantages. They are what characterize this type of roof.
Advantages of a pitched roof:
- Economical. To install a roof, you do not need a lot of building materials, on which the bulk of the funds are spent.
- Simplicity of the rafter system and the lean-to structure as a whole. Best for beginners. Installation will be easier than with a gable roof.
- The building will have little weight. This means there is less load on the walls and foundation.
- Thanks to this shape, a pitched roof perfectly resists wind loads, as well as the weight of snow that accumulates on the surface.
- The angle of inclination can be very different, depending on the needs. It varies from 5° to 45°.
- If you make the angle of a pitched roof small, it can be used for various purposes. For example, if this is a barn, then install a tank for heating the liquid. If this is a living space, then on a pitched roof you can create a wonderful place to relax. As an option, install solar panels as an alternative power source.
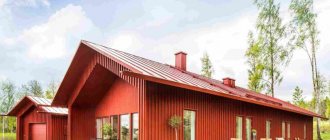
- The versatility of a lean-to building. It is covered with almost any commercially available material. It all depends on the operating conditions and the selected angle of inclination.
Despite all its advantages, a pitched roof also has disadvantages. This is not surprising, since nothing is perfect, but it is better to be aware of the disadvantages and use them advantageously.
Disadvantages of a pitched roof:
- the first concerns insulation. There is no more space with an air gap under the structure, so the issue of insulation should be taken more seriously. If you do not thermally insulate the structure, then in the summer the attic will heat up too much, and in the winter, on the contrary, it will become overcooled. In either case, the temperature (high or low) will be transmitted into the house. Correct calculations and high-quality insulation will help eliminate this;
- when creating a ceiling immediately under the roof, made at a slight angle, the house will not have an upper air gap and an attic space. And in this case, the living space cannot be organized;
- due to the slight slope, which reaches from 5 to 10°, snow and moisture will accumulate on the shed surface.
Despite all the obvious disadvantages, a pitched roof is an ideal option for creating a garage and other buildings on the site.
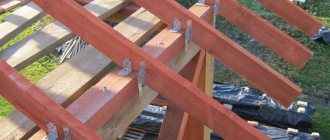
Fastening the rafters of a pitched roof
The fastening scheme is quite simple, as it consists of parallel boards that rest on two walls. To install the legs, special transition elements are used, which are made of wood.
Depending on what material is used, the following can be used as a transition piece:
- Mauerlat . In the above single pitch roof system, there are two wooden beams that lie separately and complete the walls.
- The upper part of the foot , which is made of bars.
- The top trim of the entire frame.
Although the design of this roof is simple, there are some subtleties of fastening the rafters that are important to know about.
The fact is that the units that are used must take into account all the negative aspects of a material such as wood .
When designing, the following tasks should be taken into account:
- The ability to easily move wooden parts from one another
- Adaptation to the consequences that may occur after the subsidence of each wall in order to take a stable position
- Elimination of all possible causes of failure of one or another connection
The triangles are fastened according to the following scheme: the horizontal side is installed on the Mauerlat and fixed. It is very important that it has enough area to fit with other elements.
It is important to install the rafter legs at a certain angle to the supporting elements. It is worth understanding that two points are not enough for strong fastening, so there are methods that are used to avoid negative consequences.
First of all, it is important to increase the total interaction area of the rafters , as well as the supporting part, using:
- Select cuts
- File the upper as well as the lower edges of the legs. With the help of such actions, you can easily create a support platform and increase stability.
Fastening the rafters
Calculation of a single-pitch roof structure
This is the first step before installing the rafter system. It is recommended to draw up a detailed plan or drawing to guide your work. To create this diagram, you need to select the following data:
- the total width of the roof structure, as well as the length of the spans that are formed between the load-bearing walls;
- slope angle, desired or obtained;
- length of a pitched roof;
- selected roofing material;
- what height and width are the load-bearing walls?
Note!
When a shed roof is created for a barn, garage or country house, you can simply raise the front wall of the structure higher than the back one. As a result, the angle of the slope will depend on the height of the rise. The second option involves creating supports on which the purlin will be laid. The second method allows you to save building materials.
For drawings you need to know the following nuances:
- The distance between the walls inside indicates the number of beams and the quality of the reinforcement of the rafters.
- Before drawing a drawing, decide whether you will be making an attic space. It greatly affects the angle of inclination and height of one gable.
- If the room includes a veranda or terrace, then when installing it, it is important to calculate everything so that it covers these elements.
- The listed factors indicate the required length of rafters, and the length of the room affects their number.
- The rafter legs must be laid across the building. In this case, the installation step is from 500 to 750 mm. If the building is wide, then long rafters will be required, longer and more massive. The minimum cross-section is 80x150 mm. For example, if the rafters are fixed over a span of 6–8 m, then the optimal cross-section is 110x200 mm or more.
- The rafters are high-quality, dried lumber without defects, cracks and knots. They are made from timber or boards.
- If the length of the beam is insufficient, since the room is wide, the elements are joined. The junction of the two beams must be located on the support beam. When using boards, the joining is done with an overlap of at least 500 mm.
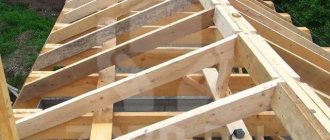
- To ensure that the structure is reliable and that the rafter legs do not sag over time, they are supported and fixed by means of roofing elements. We are talking about struts, crossbars and racks. They are needed when the span width for a pitched roof is 4.5 m or more. Rafter system for a pitched roof:
- As you can see in the photo, if the span is 12 m, a stand is mounted in the middle to support the rafter leg.
- When the span between the walls is 12 m or more, in addition to the rack, rafter legs are mounted. Then the flooring will be tougher.
- When the span between walls is 15 m or more, two racks are needed. They should be installed closer to the center of the span. The distance from one drain to another in the center is one third of the width of the building. At this point, the racks are fastened with a bar called a scrum.
- Regardless of the angle of the roof, the rafter legs must be laid on the mauerlat. This is a support beam that is installed on the wall and gable of the room.
The drawing of the future pitched roof must have all the necessary information about the elements. The dimensions, distances between them, fastening features, etc. are indicated. Below is an example of such a drawing of a pitched roof.
Validity of metal selection
Metal rafters for a gable roof are considered a solid structure with high load resistance. Metal is used when the frame needs high rigidity; a beam of approximately 8 m is used, the slope of the slope is from 1o.
Metal rafters require skills and the necessary tools for installation work. The rafters must be fastened carefully.
The design of metal roofs will be justified from an economic point of view only when the loads are calculated and it reaches at least 450 kg. And the slope is more than 10 m long.
The production material is galvanized metal. This is basically a couples profile. To fasten using:
- welding using beams;
- bolts;
- self-tapping screws
When calculating a metal structure, details are taken into account, the number of welding seams and the number of additional costly materials are calculated.
Profile pipes are the most common choice to organize rafters for private homes. Compared to other systems, this one is better due to its simple installation work. The section size is selected depending on the specific rafter systems, frame size, slope angle, design loads and other characteristics.
Choosing the angle of a pitched roof
The angle of the slope is chosen taking into account the fact that the resulting roof forms a triangle, one corner of which will always be right. The legs are the floor beams and the pediment part of the building, and the rafters are the hypotenuse. This can be clearly seen in this diagram.
The designations are as follows:
- Lс – length of the rafter used;
- Lbс is our leg, indicating the height of the pediment from the floor beam to the roof plane;
- Lсд – width of the building;
- A – selected or desired angle of a pitched roof.
Taking into account the basic values, it is possible to calculate all the parameters of a lean-to structure. There is a formula for this. The first is used when the width of the building and the planned height of the pediment are taken as a basis. In this case, the formula is as follows:
TgA=Lbc÷Lcд
When you have decided on the angle of the pitched roof, then you need to calculate the future height of the pediment. For this the formula is as follows:
Lbc= TgA×Lcd
In this case, the length of the roof rafters is calculated as follows:
Lc=Lcд÷СosA
Note! This rafter length does not take into account the canopy from the rear or facade of the room.
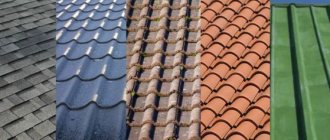
The choice of slope angle is influenced by many criteria. The main one is the choice of roofing material. It is recommended to buy each of them for a particular angle of inclination. Here are recommendations for popular roofing materials:
- To install corrugated sheets, the slope must be at least 8°.
- When using metal tiles, you will need to make a roof with an angle of 30°.
- To install slate, you need indicators from 20° to 30°.
- As for rolled roofing materials (roofing felt, bitumen tiles and soft roofing), the angle of inclination should be 5–7°, no less.
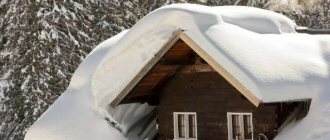
Advice! A roof without a heating system in an area where there is a lot of snow in winter, the ideal solution would be a shed roof with a slope of 40°, regardless of the roofing material. This way all precipitation will quickly disappear from it.
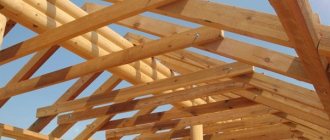
Installation of the rafter system
When deciding to install the rafters of a pitched roof yourself, you should first prepare all the elements and also treat them with special means.
The boards should be laid on both sides of a certain roof and placed in the grooves.
It is recommended to stretch several strings between the beams and carefully evaluate the slope space.
Only after this is it important to attach several outer rafters.
CAREFULLY!
Keep in mind that it is important to hammer one or two nails into each joint . The legs are installed taking into account the previously stretched strings, after which they are nailed in the same way. After this, the sheathing is installed, and the roof is laid.
After calculation and design, there are certain stages of installation:
- Installation of supporting beam . A large beam is laid along the wall of the object. It should first be planed and soaked in antiseptic . It is important to lay roofing material along the end of the wall, and mount the timber on it level using anchor bolts.
- Processing of timber and rafter elements . The board is planned to extend above the roof overhang - a level of about 40 cm on each side, depending on the angle of inclination. It is important to consider that the steeper the angle, the less it costs to overhang . When using metal tiles and corrugated sheets, the step is 120 centimeters. If the width of the roofing material is more than 6 meters, it is recommended to reduce the pitch to 1 meter. The board is embedded into the Mauerlat for strength .
As you can see, the process cannot be called complicated, and if you take into account all the rules, you can mount this object yourself.
Installation of a pitched roof
Alternative installation method
Types of truss system for a pitched roof
There are three options for creating a rafter system. The choice of design depends on the size of the room and its type.
- Hanging rafter system. It is rarely done in cases where there is no permanent partition between the main walls. During work, rough flooring is made from boards for comfort. They are laid on the roof beams. This is where you need to assemble the truss system. To ensure the reliability of the hanging system, parallel walls are made of the same height. It is on them that the floor beams are installed.
- The layered rafter system of a pitched roof is suitable for structures that have partitions inside. They play the role of additional supports on which the beams are installed. In this case, the rafter legs are rigidly fixed to the gable wall with the mauerlat laid on it. As for the lower edge, it can be fixed rigidly or with sliding fasteners. Most often the method is used for buildings made of brick and stone. Additional elements add rigidity to the structure.
- The sliding rafter system is used for log buildings. Thanks to it, it is possible to level out and minimize the deformation of the roof when the building shrinks. To implement this type of roof, you need to rigidly fix the rafters on the gable of the wall, on the mauerlat. But the lower part is attached to the Mauerlat with sliding clamps. Their peculiarity is that when the walls vibrate, the rafters take an optimal position, moving.
Now that we have understood the design of the rafter system and learned its types, we can consider the process of creating a pitched roof.
Shed roof design
So, before starting to manufacture the system, it is very important to know what its main parts are:
- Mauerlat , which can be called the foundation of the system. With the help of this part, the load is distributed evenly and correctly .
- The purlin is an element that confidently holds together all the legs of the rafters . The ridge version is at the top, but the side elements are located on the sides.
- The rafter leg is installed to determine the angle of inclination of the slope , as well as for the reliability of the entire roof and its appearance. It is this product that fixes individual parts of the system.
- The tightening helps the legs stay in place and not move apart. This part connects them at the bottom.
- Racks and braces provide additional stability to the legs .
- The sheathing consists of boards, as well as cut beams. It is packed perpendicularly and transfers the load to the rafter legs .
- The overhang of the entire roof protects against precipitation.
- The ridge is the place where two roof slopes meet. It is along this element that the sheathing is packed, thereby strengthening one or another part of the roof .
- Fillies are used when the leg length is short, causing them to create an overhang .
ATTENTION!
Only by taking into account the described parameters will you get a reliable roof.
A shed roof is characterized by the presence of one slope, which is characterized by an angle of 14 to 26 degrees. In the case when the roof is made for a small house, the span will not exceed 5 cm, so it is recommended to make a layered system.
The support of such a roof is made on external walls , as well as on a wall that exists inside the object. Rafter systems are used in cases of rafter trusses.
Roofing pie , or rather, its design, depends on which final coating option will be chosen. But, regardless of the material, this element maximizes the “life” of the roof and durability.
The lean-to type requires special attention, since it is this stage of construction that has the greatest influence on the climate of the structure.
Rafter system design
Installation work to create a pitched roof
Having the drawings and the selected type of system in hand, you can start working. You will also need the appropriate tools and lumber. Installation of the rafter system is carried out as follows:
- For safety, the building should be covered with beams. They are laid on the wall. To extend their service life, roofing felt is glued to the wall. It will protect the beams from moisture and rotting. You need to arrange the floor sticks in the same way as the rafters. The fastening pitch is 500–800 mm.
- The mauerlat is laid on top of the beams. This is a massive beam that will serve as a support. It is placed on the rear lower wall of the building.
- To safely move on the roof, a deck of wooden planks is laid on the floor beams. It's temporary.
- Now we need to build the gable wall. It is made from the same material as the building itself. You can use lighter material. For example, if the walls are brick, then the pediment is raised using bars or boards.
- The floor beams must be covered with waterproofing and embedded in the wall. The pediment rises to the selected height, according to the drawings.
- You can fix the Mauerlat on the finished pediment. It turns out that the two Mauerlats are parallel to each other.
- Markings are applied to the lower wall for fastening the rafter legs. The fastening elements themselves are fixed.
- To firmly fix the rafter, based on the drawings, grooves are cut out on it. This is a good mounting option. The grooves are in two places, at the top and bottom, to fit into the mauerlat. There are other methods of fixing the rafter leg, as shown in this photo.
- After which the legs are fixed with special corners and fastenings. At the top of the pediment, the legs are screwed tightly. But the lower part is made depending on the selected truss system for a pitched roof. It can be rigidly fixed or made sliding.
- There is a certain sequence for inserting rafter legs. First, the outermost elements of the rafter system are installed. A cord is stretched between them, serving as a guide and level for subsequent rafters. Do not forget that the pitch of the rafters corresponds to the pitch of the floor beams.
- The rafters, which are already installed, are connected to the floor beams through racks, struts and other elements to give them stability. We talked about them above. Fixation is performed with metal corners and brackets.
Advice! If it is necessary to lengthen the rafters and extend them beyond the wall, then “fillies” are attached to the beams. This way you can protect the adjacent part of the structure from precipitation. - When the structure of the pitched roof is ready, you can begin insulation and creating a roofing pie.
The photo shows what layers a proper insulated pitched roof should consist of.
Insulation material is laid between the rafters. He has to hang in there tough. Then a counter-lattice is made on top for ventilation. A waterproofing film is laid on the counter-lattice. It protects the insulation from moisture, which can ruin it.
As for the lathing for laying roofing material, it is selected depending on what kind of roofing material it will be. For example, a continuous sheathing made of boards or plywood is needed when installing soft tiles and other rolled materials. If metal tiles, corrugated sheets, slate, ondulin and other types of rigid roofing are used, then the sheathing is done staggered. The pitch depends on the roofing material.
And to protect the insulation from the inside of a pitched roof, you need to cover it with a vapor barrier film. Now we can say that the pitched roof is completely ready.
Note! If a pitched roof is made for a barn or other non-residential structure, then there is no need to insulate it. It's better to spend it for another purpose.
Design Features
A shed roof is a roof truss structure with one inclined plane (slope) . Its main feature is that both ends of the rafter legs rest on reliable supports, which increases the strength and reliability of the entire system.
Most often, the support is provided by the opposite load-bearing walls of the house, which have different heights to create the desired roof slope. To distribute the load evenly, the rafter elements are connected to the support through a Mauerlat, which is made of 2 beams (beams) laid in parallel.
The roof in question is constructed both on free-standing objects and on extensions. Moreover, in the second case, this design is the most popular. A pitched roof is used in residential and commercial buildings.
It is most widespread in the construction of bathhouses, summer kitchens, sheds, garages, barns, premises for pets and other outbuildings.
The single-pitch design is simple . It has a rafter system installed through mauerlats on load-bearing supports (walls). A sheathing is formed on top of the rafters and roofing material is laid. The coatings most often used are corrugated sheets, slate, soft or metal tiles, ondulin and rolled materials.
What is special about a pitched roof?
Such a system is simpler and more affordable to make with your own hands; it is quite simple to assemble for a garage or warehouse. Often, a pitched roof is the simplest and most effective solution for arranging simple auxiliary or utility rooms, for example, for making a roof on a brick extension to a house.
The advantages of a pitched roof include the following:
- The weight from the rafters and power trusses in the roof frame does not create bursting forces, as is the case with gable options;
- The rafters of a shed roof, even with a large roof span, do not require the use of massive and thick timber, as for more complex two- and four-pitched options. The main part of the load is transferred by the rafter system to the floor beams and walls of the building using struts, racks or load-bearing support trusses made from ordinary 50-gauge boards;
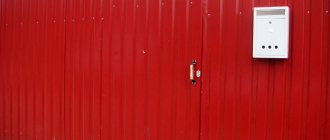
- The use of a pitched roof often becomes the only possible option if it is necessary to make an extension to the main wall of the house, as in the photo, or even to make a roof over the balcony.
For your information!
In some cases, it is possible to avoid problems associated with asymmetry and significant lateral load on the roof that occurs during strong winds from a high gable. To do this, it is enough to install a small, 60-70 cm inclined canopy on the leeward side. Thanks to the minimum requirements for the quality and size of the lumber from which the rafter system of a pitched roof is constructed, and the simple installation of the rafters and roofing package, this method of arranging the roof is practically indispensable for the construction of any ancillary buildings.
Features of using a pitched roof
In addition to the listed advantages and simplicity of the device, the lean-to rafter system has its own specifics, which should be taken into account when planning roof parameters:
- Firstly, for a large shed roof it is very difficult to make a rafter system with a slope slope of more than 26o due to the high height of the pediment. For example, with the maximum permissible slope of the rafters, the difference in the height of two walls on a span of 6 m will be as much as 2.4 m;
- Secondly, the small angle of inclination of the slope leads to ineffective removal of snow and water, which can create a very large load on the rafters and load-bearing elements of the roof with a large layer of snow. Therefore, for a pitched roof, it is recommended to use corrugated sheeting with a smooth surface as a roofing material;
- Thirdly, if a pitched roof is installed on a separate building, the gable on the side of the raised edge of the roof is most often sewn up with a board and sealed with a polymer film with an external finish of plastic lining. This is done in order to avoid rain and melt water from flowing under the roof rafters. You can fill the pediment niche with brick or gypsum block, provided that the height of the high part of the wall over the rest is no more than 60 cm.
Advice! The most preferable way of arranging a pitched roof would be to attach it to the main wall of a finished building.