Are you already at the finish line in building your dream home, and it’s time to understand the intricacies of the rafter system? Let's just say: pleasant worries await you: calculating the angle, weight and safety factor of the rafters, an agreement with a familiar craftsman or company, or preparing all the necessary tools for independent carpentry work.
And so that tomorrow all these worries do not become a headache and you do not worry about whether this or that knot is being done correctly, we have prepared this article for you. So, let's figure out how to make high-quality rafters for a gable roof with your own hands so that it is no worse than purchased ones.
Why is it better to make rafters yourself?
After all, the easiest way is to purchase ready-made rafters, thereby receiving many bonuses:
- Short production times.
- Technological precision of all details.
- Identical, already adjusted dimensions of all structural elements.
But then be prepared for the following disadvantages:
- High cost (at least twice as much as if you planed the rafters yourself).
- Delay in delivery (especially during the season).
- Using low-quality or under-dried wood (and then the roof will “sink”).
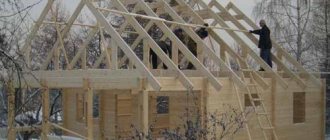
So convenience or quality? If this is not your first time carving or planing something out of wood, feel free to take on making rafters! Here's what it all looks like in real life:
In the construction world, in simple language, rafters are usually divided into the main ones, i.e. load-bearing ones, on which the roof is supported, and auxiliary ones, which are located inside the roof and serve as support for hemming the ceiling and walls of the attic (if one is planned). The strength and reliability of the future roof depends on how accurately and correctly you calculate the rafter system in advance.
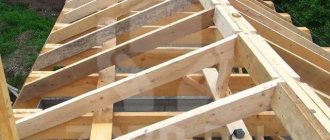
The rafter system of any gable roof itself consists of the following basic elements that you need to make:
- Mauerlat.
- Vertical racks.
- Crossbars.
- Rafter legs.
- Spacers.
- Ridge run.
It is better to entrust complex roofing structures with multiple elements to a professional, but you can handle a small roof of a private house. To do this, you will need these simple formulas that will help you find out how thick the rafters should be, with what slope and what span:
We also invite you to use our free calculator.
Where are horizontal beams and right angles installed ↑
Most often, the use of lying beams is associated with the construction of wooden houses, although this is not their monopoly. After all, a bench is not only the lower or upper frame of a wooden box, but also the mauerlat and the central beam on the ceiling, installed under the ridge. Therefore, such an element can be used in buildings made of any material.
Installation of the beam for the rafter system
In what designs are beds used? ↑
Bottom trim for frame house
So, what a bench is is now clear, all that remains is to figure out the units where it is used. Basically, these are two parts of the building and pedestals for distribution equipment:
- foundation and floor of the building;
- ceiling and roof;
- foundation for industrial equipment.
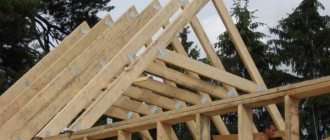
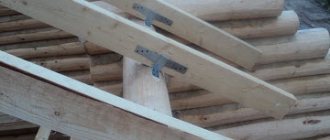
Lying support in the rafter system
The images show the use of a wooden plank for arranging the floor in the attic and the rafter system. Currently, in industrial construction (multi-story buildings), wooden beams for floors and foundations are used extremely rarely - there, reinforced concrete blocks and floors are mainly used. But when installing gable roofs, the rafter system is still made of wooden beams, therefore, horizontal wooden beams are also needed.
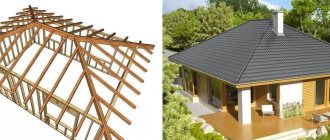
Roofing schemes
It should be noted that gable roofs are now a rarity for industrial construction, so there are virtually no horizontal beams (including concrete) in the building design. Basically, such elements are used in private housing construction for truss roofing systems.
Reinforced concrete beds for transformer substations
For the installation of transformer substations, in order to avoid contact of equipment with the ground, industrial reinforced concrete beds of the LV type are used. These are reinforced concrete beams with a T-shaped section, during installation of which the wide part is laid on the floor, and the leg of the letter serves as a support for the mounted device.
The cross-sectional size of the profile is unified - the width of the heel is 400 mm, and the height of the letter is 500 mm. Only the length can be different, where LV1.6 has 1600 mm, and LV10.4 – 10400 mm. Such beams are installed on reinforced concrete foundations.
Why do you need a right angle and how does this apply to horizontal beams ↑
Laying the foundation determines the weight, dimensions and quality of the entire superior structure - the mass of the building is calculated with the power of the foundation, and the geometric shapes are related to its perimeter. If the corners of the foundation are straight, then the angles between the walls will also be 90ᵒ, and the roof overhangs will be the same width on each side or along the entire perimeter (depending on the project).
Columnar foundation for a wooden house
Therefore, the lower trim (grillage, crown) is made as a quadrangle with angles of 90ᵒ, where the diagonals exactly coincide with each other in length. The Mauerlat meets the same requirements, since the installation of the rafter system directly depends on it. If the top trim has the shape of a parallelogram, then the proportions will be disrupted and it will be impossible to secure the rafter legs evenly.
How to draw up a project for a future roof?
The golden rule in roof construction is to measure seven times and cut only once. And first of all, it is important for you to understand that each rafter leg has its own individual location. Therefore, first, be sure to draw up a detailed project, and preferably in a special program. Only after this, using your 3D model of the future roof, mark exactly where and what kind of connections the rafters will have with the Mauerlat and with each other.
It is important to determine as accurately as possible the angle of inclination of the rafters and at what angle they need to be cut. And don’t worry about how to make all these rafters for a gable roof yourself: all you need is a regular machine.
Determining the angle of inclination of the roof: calculating the loads
The angle of inclination of a gable roof is made from 5° to 90°. But the most proven and standard option is 35°-40°, where loads are distributed most rationally and building materials are consumed.
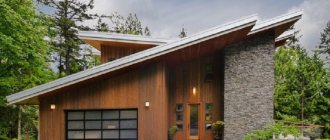
Straight slopes are built when in the future there will be only a non-residential attic under the roof, the main function of which is ventilation and regulation of heat exchange. But when the under-roof space is planned to be residential, attic, they initially plan a so-called sloping gable roof. Its difference is that the slopes in the middle have a kind of kink, which changes their angle to a steeper one. This design is quite suitable both for arranging an attic and for protecting the entire house from bad weather.
Please note that most roofing materials are only suitable for pitches greater than 45°.
Constant and variable roof loads
It is important to calculate as accurately as possible the total load of the future roof, which will consist of permanent, which includes the weight of the rafter system and roofing, and temporary - wind and snow.
The same loads determine what rafter pitch you need for your gable roof. This table will help you choose the right section of rafter legs:
Indicators of rafters for deflection
Even strong-looking rafters may not be suitable for constructing the roof of a residential building due to the fact that they have insufficient deflection properties. There are separate paragraphs in the SNiP section called “Loads and Impacts”.
And the easiest way to increase the deflection strength of rafters is to make the cross-section larger. It’s a little more difficult to strengthen it with a special beam, bringing its edge to the strut.
Reinforcing elements for rafters
The more racks, struts and contractions, the more durability and stability the entire rafter system has.
If you have a suspicion or even an accurate estimate that a simple roof structure will not withstand future loads, make additional reinforcements for it. Such prevention will never hurt, but it will save you from many problems. Note that it is especially offensive when the garage roof falls in - right on top of the car. And such problems are not a joy for a residential building.
The rigidity of the rafter structure is enhanced by struts, additional purlins and support posts. The braces are designed to reduce the span of the rafter legs. Their angle of inclination to the horizontal is usually at least 45°.
A purlin is a horizontal beam that is parallel to the ridge and secured to vertical posts. More details in the video:
Determining the type of roof: cold or warm?
And now about the concept of the attic. If you are building a roof for a bathhouse or a small utility room, it can be done using the most simplified technology - install rafters, connect them at the ridge and cover them with sheets of roofing felt. But for the roof of a residential building, where ventilation is important, this principle cannot be used. There will already be at least three levels:
- The upper or first level of the rafters is about 200 mm.
- The average one is always equal in height to the auxiliary rafters.
- The third one is already on the edge of the wall.
This makes it convenient to install insulation, because the roof of a residential building is characterized by the fact that heat rises upward and, in the absence of thermal insulation, the roof covering is constantly heated.
The result: in winter, the snow melts and slides down, freezing and accumulating even more at the cold cornice. This causes a lot of problems: long dangerous icicles, a clogged drainage system, and the gradual destruction of the entire roof. Decide for yourself!
Determine the type of rafter system: layered or hanging?
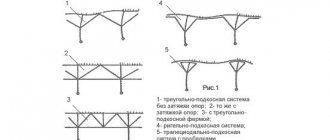
So, now is the time to think about the support bases for future rafters, which also need to be prepared in advance and on which many parameters of the roof itself will depend. Thus, rafters are divided into layered, hanging and hybrid.
Hanging rafters are usually the lot of small and light roofs, the distance between the supports does not exceed 6 meters. But in buildings with a load-bearing middle wall or additional supports, layered rafters are installed to strengthen the roof. Or this combined option:
Another difference is that the hanging rafter system forces the Mauerlat to work in compression, while the layered rafter system works for shear. But the main task of both layered and hanging rafters is to transfer the loads of the entire roof to the walls and foundation as evenly as possible.
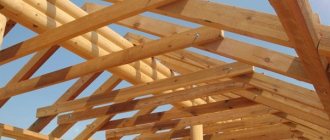
Structural elements of gable roofs
In general, all these elements of gable roofs are boards, bars and beams of various lengths, shapes and sections. Let's look at them all in order.
Mauerlat
This is a coniferous beam with a square cross-section, the size of which is usually 10 or 15 centimeters. It is placed along each of the load-bearing walls, attached to them with threaded rods or anchors. The purpose of this element is to uniformly transfer the load from the legs of the rafters to the load-bearing walls.
Rafter leg
This is a beam with cross-sectional dimensions of 15 centimeters by 5 (or 10) centimeters. It is from these elements that our triangular roof contour is assembled, which bears the brunt of wind, hail, snow and other vicissitudes of the weather. In order to adequately withstand these loads, the rafter legs are positioned in increments of 0.6 to 1.2 meters. The heavier the roof is supposed to be, the shorter this distance. In addition, the pitch of the rafters, in some cases, will depend on the design features of the roofing used.
Sill
The square beam for this element has the same cross-section as for the Mauerlat - 10/10 or 15/15 centimeters. It is placed horizontally on the internal load-bearing wall in order to evenly distribute the load from the roof racks.
Puff
This element is used for hanging rafter systems. It completes the triangle of rafter legs, preventing it from unraveling.
Racks
The timber for them is taken square, the same as for the previous element. The racks are placed vertically, taking the load from the ridge and transferring it to the load-bearing wall inside the house.
Struts
These elements act as a transmission link between the rafter legs and the load-bearing elements. By connecting the tie and struts, you get a truss - a very strong element. Even with a large span, the truss will withstand all loads.
Lathing
Sheathing bars (or boards) are placed perpendicular to the legs of the rafters. By transferring the entire weight of the roof to the rafter legs, this structural element additionally holds them together. It is preferable to take edged bars or boards for arranging the sheathing. But for lack of anything better, an unedged board will do, but with the bark removed. Well, in the case of a soft roofing covering (for example, bitumen-based tiles), the sheathing is made continuous. To do this, take moisture-resistant plywood sheets.
Roof ridge
The ridge is the upper part of the roof connecting two roof slopes. It is formed by connecting the rafter legs at the top of the roof. It is located horizontally.
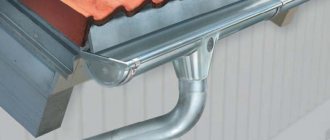
Eaves
This element, protruding from the walls at a distance of approximately 40 centimeters, prevents rain flows from wetting these walls.
fillies
And again the “horse” name. These structural elements of the gable roof truss system are needed to organize the roof overhang. The need for them appears only when the rafter legs are too short and there is not enough for an overhang. Then these legs are lengthened with fillets, which are boards of a slightly smaller cross-section.
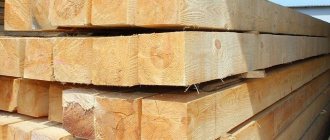
Selecting material for rafters
So, if you have decided on future loads, it’s time to choose the right material. The following are usually used for making rafters:
- Wood. Solid wood, boards or laminated veneer lumber.
- Lightweight metal profile. We are talking about galvanized steel profiles.
- Black metal. These are I-beams and steel channels.
- Heavy reinforced concrete structures for industrial construction.
Dry board: economical option
If large loads are not expected on the rafter system, then make the rafters from dry planed boards with a small cross-section. But if knee-deep snow is not uncommon in your area and the roofing material is not light, then you will have to make some of the component elements glued. That's the whole difference.
It is most convenient to make elongated side rafters and diagonal rafter legs from the board. So, a 40 mm thick board, which is often used for outbuildings, is not suitable for a roof. At least 50 mm! Moreover, the longer the rafter leg is planned, the wider the board itself should be. So, rafters 6 meters long will have to be made from boards 150 mm wide, and even longer ones - from boards 180 mm wide.
For the roof of a frame house, this is truly one of the best options!
And also rafters made from boards are the most economical, and at the same time they are almost as strong as lumber. It is only important to choose the right section and use high-quality material. Therefore, when purchasing material, be sure to take with you a special device for measuring wood moisture content and use it. There is nothing worse than damp rafters. And it’s not just a matter of future mold: such a roof will begin to warp and warp, because this material changes its shape when it dries. The fastenings at the rafters will fly off and even the covering of your gable roof will bounce off in places. In a word, there will be no problems!
But it is most convenient to splice rafters along the length from a regular board:
Durable metal: resists moisture
And, you will be interested to know that rafters can be made not only from wood! Thus, iron rafter systems, which were once used exclusively for industrial construction, are regaining their former popularity today. And, let us note, this roofing material has many advantages, the most valuable of which is the complete absence of fungus from dampness. After all, the space under the roof most often “pleases” with random leaks.
And the work itself with such rafters during installation is no more difficult than with wooden ones - see for yourself:
Beams: the benefits of high-quality wood
The beam is more durable, but the disadvantage is that it has a lot of weight and you have to make cuts in the fastening areas. For a log this is not only a problem, but also some loss of the load-bearing capacity of such a rafter leg. But so far this material is the most popular for making rafters.
Most suitable for the manufacture of rafters is lumber that meets the requirements of GOST 8486-86 or 2695-83. And this:
- Humidity no more than 18%, measured with a moisture meter.
- Cracks that are not through and do not exceed half the length of the board.
- For each linear meter - no more than three knots, and each of them - no more than 30 mm in diameter.
Therefore, when purchasing wood for rafters, be sure to check the documents from the seller, which indicate the quality of the product.
The type of wood is also important. The fewer knots and cracks there are on the beams, the better. Some varieties also boast good moisture resistance and resistance to rot and pests. For the roof this is what you need. Therefore, we recommend making rafters from coniferous wood, which is rich in resin, and resin is a natural barrier against rotting. But special processing is still needed.
And also take into account this fact: when manufacturing a rafter system, you need to purchase 5-7% more material than necessary, because it will not always be possible to make an ideal rafter cut or notch of the required depth. There will still be overspending, so stock up on it in advance so that you have wood of the same moisture content and properties for the entire rafter system.
Otherwise, if you had to purchase some individual roof elements separately, they may take longer to dry (wood always dries), or vice versa. The distortions can be considerable, i.e. the entire roof frame will be constantly exposed to different physical forces of tension and pressure. Any experienced roofer will tell you how bad this is and what it entails. Therefore, take more material for making rafters than you plan. If everything goes smoothly, there will be something from which to make the first bench in front of the new house.
Work process
After the rafters are prepared, we proceed to the installation process itself. All work should be done in a team, preferably consisting of at least three people. In this case, there is less risk of injury and the process itself will occur faster.
Here is an example of how to install rafters when using a layered system:
- To make the work easier and faster, a template is first made. Two pairs of rafters are raised to the roof. Next, their upper end is placed on the ridge girder, and the lower end on the mauerlat. At the same time, the angle of inclination of the slope and the vertical location are verified. The top of the rafters is connected by a transverse jumper. From below, the junction with the Mauerlat is marked and cut out. This work must be carried out correctly and carefully; all further actions depend on it. Instead of rafters, to make the task easier, you can use two boards.
- Next, the template is lowered down and two pairs of rafters are adjusted with its help. First, you should install the end elements of the system. There is no need to secure them “tightly” right away, just bait them. It is best to do this with the help of supports that are installed on both sides of the rafters.
- After this, the evenness of the installation of rafter pairs at the ends of the house is verified and a rope is pulled between them, which will serve as a guide for other components of the system.
- Next, the remaining rafter legs are assembled and put in place. Where to do this? Many home craftsmen face this question. The easiest way is to assemble the rafter pairs on the ground, and then lift them to the roof. But in this case, you cannot do without special equipment. This design can weigh two hundred or more kilograms. Therefore, if there is no crane, it is better to lift everything in parts and carry out assembly on the roof.
- After everything is level, the rafters should be secured with nails or other devices. It's better to enhance this in several ways. In this case, the structure will last longer. Most often, nails are supplemented with staples or metal strips. Some experts recommend additionally strengthening the joints with thick steel wire.
Video on the topic:
Next, they begin to install struts, struts and other additional components of the roof frame. Finally, the sheathing is done and waterproofing, insulation and roofing material are installed.
Treatment with antiseptics and propylents
And at this stage it is already important to protect the future rafter system from biological destruction. You don’t want your roof to collapse after a couple of years of use, do you? Therefore, be sure to treat the wood for the rafters with fire and bioprotection.
The rafters are usually impregnated with an antiseptic and then treated with a fire retardant on top. You can also alternate this processing several times. If you use universal impregnation, be aware that it usually contains products with different service life. For example, fire protection will end before bio.
But the choice of means for processing today is huge. These include universal protective agents, a variety of fire retardants, and antiseptics. It’s easy to decide: if you are building in a fairly hot and dry area, first of all use fireproofing impregnations, which deprive the wood of its natural flammability. And if your house will be located where the air humidity is high almost all year round, protect it from rotting.
You can, of course, use both drugs - but just do not mix, otherwise the whole material will deteriorate. You just need to choose one product as an impregnation, and the second as a protective surface layer. Just try to dilute everything in the concentration indicated by the manufacturer. But do not treat frozen or damp wood with anything: its fibers simply will not absorb anything.
Video tip on the topic of processing rafters:
Note that a brush or spray when processing rafters gives little result - complete immersion and subsequent drying are much better. Just use a regular container, cover it with film from the inside and make a “bathtub” for future rafters. Moreover, it is advisable to do all this on the ground, as soon as you bring the material to the site, because in the finished rafter system it will be difficult to reach the internal elements of the connections. And they are the most defenseless in terms of moisture penetration. After processing, dry the parts so that all sides are ventilated for at least 24 hours.
Do not forget also that wood, like any natural material, is subject to biological destruction. Therefore, in addition to fire-bio-protection, it is important to consider waterproofing in all places where the rafter system adjoins the brick walls of the house, if any.
Making the correct cuts on the rafters
Now let's move on to practice. First of all, you definitely need to make a convenient template according to which you will make even, identical rafters:
And follow these instructions:
You will have to tinker with the rigid mount:
If we are talking about moving units, then follow this principle:
In practice, everything is actually simple:
As you can see, the eyes are afraid, but the hands do!
Mauerlat installation
If the calculations have been completed and the materials have been purchased, you can install the Mauerlat and then create the sheathing. Mauerlat is a kind of foundation for the future roof. Only this structure is not made of concrete, like the foundation for a house, but of pine timber.
Softwood is an ideal material for this, strong and light enough to distribute the weight of the roof evenly around the perimeter of the supporting elements of the house. It is placed along the roof slopes, between the rafters and the top of the wall.
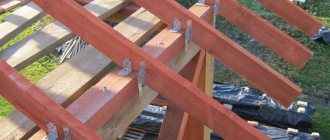
Attaching the rafter legs to the mauerlat
To ensure greater safety of the Mauerlat and a long service life, a layer of waterproofing is laid between it and the wall, which is most often roofing felt. Depending on the material from which the house is built, the installation of the Mauerlat is carried out using various methods.
Do-it-yourself construction involves checking the reliability of the connection. If we are talking about a wooden house, fastenings can be done using pins or bars; in a brick house, metal wire and reinforcement are used; in buildings made of foam blocks, gas silicate, concrete screed is used.
Sequence of work
If there were step-by-step instructions on how to build a gable roof, it would start with how to attach the rafters. Hanging ones should be assembled in advance using metal corners and bolts. The outer structures are installed first, and only then those located inside.
To create a layered system, you must first set up a bed on which the supports will be installed. The assembly can be considered complete after all rafter legs are secured as shown in the drawing. If their length is not enough to create an overhang, it is increased by attaching fillies.
The next stage is installation of the sheathing. Since its purpose is purely practical, the simplest, cheapest material is used, for example, an unedged board or even a slab. However, you should not neglect removing bark from the surface of the tree; this simple operation will increase its service life. Depending on what you plan to cover the roof of the house with, there are two types of sheathing:
- Solid. It is used in cases where the choice fell on soft types of roofing that are experiencing a new wave of popularity, in particular ondulin. Since they do not hold their shapes on their own, they need rigid support to avoid possible deformations from their own gravity or the weight of fallen precipitation. Continuous lathing
- Lattice. In this case, the board is not laid in a continuous layer, but at intervals, the pitch of which is selected depending on the material used for the coating. More often, this scheme is used to create lathing for metal tiles, slate, corrugated sheets. Lattice lathing
How to assemble a rafter system?
Finally, the rafters are ready, and you can start installing them.
Build on the ground or on the roof?
So, in reality, everything is quite simple and somewhat similar to a children's construction set. The easiest and most convenient way is to make trusses directly on the ground, and only then raise them. It is a little more difficult to assemble the rafters directly on the roof, but it is easier to lift them there. This is where you start: if you have the opportunity (a crane, for example) to drag 200 kg of one truss onto the roof - drag it, if not - lift each individual rafter 50 kg using improvised means and do the assembly on the spot.
So, first of all, for convenience, make a template according to which you will assemble the roof trusses, and another template for mounting cuts on the rafters (use plywood). All you have to do is cut out mounting cuts on the rafters, attaching a template, and connect them together at a certain angle. This triangle is called a roof truss.
Attention to strength - rules for increasing length
If the thickness or length of the board is not enough to make a normal rafter leg, extend the rafters. And there are several ways:
- Connect the boards together by folding them with their wide sides and stitching them with nails.
- Lay the boards half the length, resulting in a particularly strong rafter leg that can withstand considerable loads.
- Make an oblique cut at the ends to create a vertical anti-slip stop, and connect with a bolt.
- Lay two overlapping boards a meter long, connecting the rafters with pins or nails.
Also keep in mind when calculating that the roof ridge accounts for about 50% of the load of the entire rafter system. Therefore, always make a ridge beam so that its safety margin is at least 25% greater than originally calculated.
And the most vulnerable parts of the rafter structures are the lower ones, those that rest on the Mauerlat.
Preparing roof trusses
You need to secure the rafters using:
- External straight bracket.
- Metal corner plate.
- Internal metal rod.
You can also connect such rafters with studs - this will even be stronger. To do this, instead of making a cut, we now make a cut into half the tree and connect the rafters with a ledge. Next, drill a hole for a 12-14 mm stud and secure it with nuts and wide washers.
Let's start with a review of proven old-fashioned methods:
If you decide to make roof trusses using a more reliable new technology, you will need the following tool:
Here's how they work:
In details:
When assembling a hanging type truss, you need to connect the upper ends of the rafter legs. To do this, cut the end of each at exactly the same angle at which you are making the roof, connect the beams with cut planes and secure with two nails. Cover the joint with a wooden cover or metal plate.
Another useful master class:
Lifting and installation of finished trusses
Already on the roof, first of all you need to start by installing those rafters that form the two outer trusses of the gable roof (they are also called gable). To further secure them, install temporary struts. Next, stretch a strong cord between the outermost peaks of the trusses, which will become a level for the intermediate rafters.
Now we lift and place all the remaining trusses at a distance of at least 0.6 meters from each other. Again, if some of your structures turn out to be quite cumbersome, support them with the same temporary supports.
The rest is a matter of technique: