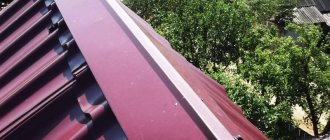
When starting to build a private house, garage or gazebo, it is worth thinking in advance about how the roof of the building will be.
There are many options, each of which deserves close attention. Before you give them preference, you should think about the installation procedure, especially if you plan to do the work yourself.
A hip or hip roof can cause many problems during the installation process. In order not to take risks, you should pay attention to a non-single-slope system. It is easy to implement and has a number of undeniable advantages that you should definitely get acquainted with.
Do-it-yourself pitched roof - design
The system includes:
- Rafter system that takes the main load;
- Hydro- and heat-insulating layers laid between the slings and secured to the sheathing;
- Lathing used to secure roofing material;
- Roofing material.
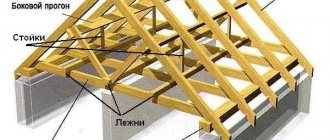
The rafter legs rest on two opposite walls of the building: one on the front, the other on the back. Traditionally, such a system is designed in such a way that the rafters resting on the front wall are higher than those resting on the back wall.
Attention! As a result, the front wall of the building is made higher than the back wall to form the required roof slope. The greater the height difference, the steeper the slope.
Installation sequence
Now we will tell you how to make a pitched roof with your own hands step by step. As a rule, roof installation begins with the installation of a Mauerlat. The rafters will rest on this beam. If your building is made of wood, then the role of the Mauerlat will be played by the last crown. For construction made of brick or concrete, the mauerlat is made of wood (beam 100x100 mm). In this case, it must be isolated from the walls using a layer of roofing material.
Installation of the rafter system
The most economical option is to install rafter legs on two opposite walls of the building that differ in height. For work you will need a minimum amount of lumber. Step-by-step instructions for installing rafters are as follows:
- after laying the mauerlat beam, a board is placed across it, which should protrude 40-50 cm on both sides;
- on the board they mark the groove for the rafters (the width of the groove must exactly match the width of the rafter leg, and the height should not exceed a third of the height of the element);
- after making the template, the cuts are marked on the mauerlat for each rafter leg;
- After cutting and laying the rafters, they are attached to the horizontal beam using nails or self-tapping screws.
In the case of installing rafters on walls of the same height, it is easier to make triangular trusses made of wood, consisting of rafters, racks and horizontal beams. In this case, you do not need to increase one of the load-bearing walls to the required height, but the wood consumption during such installation increases. However, due to the fact that the truss can be assembled on the ground, the installation process is greatly simplified and accelerated. The truss mounted on the ground is lifted onto the house using winches or other lifting equipment. Otherwise, the process of making cuts in the mauerlat and laying trusses on a horizontal beam does not differ from the method described above.
Often, when installing rafters, it is necessary to use additional spacers, struts or supports. The number of additional elements and the location of their installation depends on the following factors:
- weight of the supporting roof frame;
- tilt angle;
- distances between load-bearing walls;
- length of the rafter leg;
- types of roofing;
- choice of thermal insulation material.
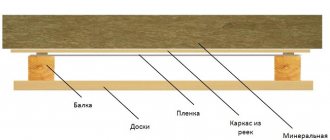
Waterproofing and lathing
Now you can perform waterproofing. To do this, the selected material (roofing felt or polyethylene film) is rolled out across the rafters. The first row is laid along the bottom of the slope, and each subsequent row overlaps the previous one by 0.15 m. The joint of the strips is taped. The waterproofing is attached to the rafters using a construction stapler.
If you decide to make a ventilated roof, then there must be a ventilation gap between the waterproofing layer and the roofing material. To install it, counter battens are placed on the rafters on top of the waterproofing. For these purposes, a beam with a cross section of 0.3x0.4 cm is used.
Let's start doing the sheathing. Depending on the chosen roof covering, it can be continuous or sparse. To make a continuous sheathing, you can use a board, moisture-resistant plywood or OSB. As a rule, such lathing is needed for soft roofing or thin profiled wall sheets. To perform sparse lathing, take a board, which is laid in increments of 0.3-0.4 m. Now you can lay a suitable roofing covering.
Insulation
You can learn how to properly install a pitched roof from the following video:
At the last stage, the roof structure is insulated. The work is being done from the inside of the roof. Thermal insulation material is laid between the rafters so that it fits tightly to them without cracks or gaps. For this purpose, it is better to choose insulation boards with a width slightly larger than the pitch of the rafter system.
It is better to use mineral wool as insulation, since it is denser and will not sag and require additional fixation with ropes. Now we attach a vapor barrier membrane to the rafters on top of the insulation. For fixation we use a stapler. Be sure to overlap the strips and seal the joints with tape.
DIY pitched roof - drawings and photos
A pitched roof can have different designs. Depending on the angle of inclination, it is customary to distinguish:
1. Flat. The formed plane forms an angle of no more than 5 degrees with the horizon;
2. Low slope. Their angle with the horizontal is in the range of 5 – 10 degrees;
3. Steeply inclined. For such structures, the slope forms an angle of more than 30 degrees with the horizontal surface.
The first two types place increased demands on the device process. There must be high-quality surface insulation and water drainage provided.
Considering that the slope of the slope is relatively small, the snow on such a roof is first well retained, forming a thick layer, and then begins to melt from below. The house itself generates heat for this purpose.
Kinds
There are 2 main types of pitched roofs:
- Ventilated option . Such a roof has a slope in the range of 3-6°. In it, a space is formed between the waterproofing and the insulation, in which air flow is circulated. For this purpose, special openings for air intake are equipped in the supporting walls. This variety is most suitable for terraces, gazebos and other buildings for use in the summer.
- Unventilated roof . The angle of inclination of the slope in it can be from 2 to 25°. This option is suitable for year-round use. The design provides reliable hydro- and thermal insulation. The roof is sealed as much as possible to reduce heat loss.
Depending on the size of the structure being covered, the roof is classified according to the type of rafter system:
- Hanging design . Such a system rests only on two load-bearing supports (walls). The maximum roof width is 7.5 m. With a width of up to 4.5 m, direct support on walls without reinforcing elements is allowed. If the span reaches 4.5-7.5 m, then the use of struts, headstocks and tie rods is necessary.
- Sloping design . It can be installed at a distance between walls of up to 15-16 m. To construct a rafter system, additional supports are required in the form of rafter legs (vertical posts) resting on the side load-bearing walls and load-bearing partitions inside the house. Depending on the length of the span, the required number of racks is selected.
The most common version of a pitched roof is a standard roof with a straight, inclined plane . To give it an original appearance, it can also have a non-standard design - a rounded or curved surface. In their manufacture, metal frames are used instead of wooden rafters.
Calculation of the slope angle of a pitched roof
When calculating the angle of inclination, one should take into account the snow and wind load in a particular region, as well as the type of roofing material that is planned to be used during the construction of the building.
For example, it should be taken into account that if the angle of inclination is less than 20 degrees, the snow cover will constantly lie on the slope without sliding. For larger values, the possibility of snow melting depends on the type of roofing material.
As soon as the angle exceeds 50 degrees, the last factor becomes unimportant: the snow cover will not linger. An exception is the special design and formation of ice.
The weight of the formed snow cover is important from the point of view of subsequent strength calculations. When making approximate calculations, you can use reference information.
Wind load is taken into account not only from the point of view of the location of the structure being erected, but also its height. If the house being built is less than 10 m, the value of the wind load can be neglected when performing calculations. However, only if the object is not being built in an open area.
When calculating the optimal value of the roof slope angle, you should remember that:
- A large wind load is the basis for reducing the desired parameter;
- Significant snow cover is a reason to increase, since in this case it will be possible to achieve snow sliding from the surface.
Attention! The calculated value should be optimized in terms of the frequency of cleaning the roof and the likelihood of damage to the roof due to strong gusts of wind.
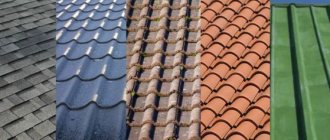
Another important parameter is the type of roofing. If you decide to give preference to a certain variety, you should read the manufacturer’s instructions, which indicate the optimal values.
So, at angle:
- Less than 10 degrees – choose rolled materials;
- From 10 to 20 degrees - corrugated. Installation of slate, ondulin, metal profiles is appropriate;
- From 28 to 35 degrees, metal roofing sheets are suitable; the seam method is used for joining;
- 25 – 35 degrees. The best option for metal and ceramic tiles.
Attention! If you plan to use heavy and fragile material, you should avoid installing steeply sloped roofs.
Having all the above initial data in hand, determine the angle of inclination.
Snow guards for pitched roofs
These devices are necessary for any roofs with a slope angle of less than 45...55 degrees to the horizontal. At the same time, flatter roofs are in greater need of installing snow retainers or snow cutters, since their absence can lead to an avalanche-like meltdown of the snow cover.
More complete information about the types, features of use and the required number of snow guards is presented here.
Rafter system for a pitched roof step by step instructions
The design of a pitched roof depends on the span of the building. If he:
- Less than 4.5 m, the walls of the house are used as supports;
- More than 4.5 m, rafters are provided with supports made of timber or boards located in the middle of the element. It is possible to design with a horizontal purlin (mauerlat), which runs in the middle of the rafters. The racks are mounted under the purlin.
Depending on the selected version, the rafter system is installed.
The first, as a rule, does not cause difficulties.
The second device is performed in the following sequence:
1. Support posts are installed on the side opposite the angle of the roof. Additional supports are installed if they are provided for by the project. Externally, such elements are spacers located at a given distance;
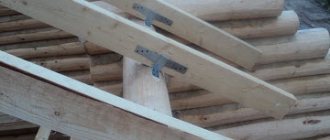
2. Beams are installed in the Mauerlat and secured with special steel fasteners. For this purpose, holes are provided in the beams, the size of which corresponds to the metal support pins. The grooves for fastening must be accurately calculated, since the slope of the roof depends on their inclination. To increase the strength of the rafter system, steel brackets are additionally installed;
3. The rafters are laid at a given pitch. The pitch of the rafter system depends on the type of roofing material that will be used for finishing. For sheet covering the distance is 1.5 m, for metal tiles it is reduced to 1.2 m;
4. The rafters are fixed by screwing to the Mauerlat using metal plates. To ensure sufficient rigidity of the system, racks and struts are provided;
5. Covering material is laid on the rafter system and secured with a stapler. The joints are treated with sealant.
Instructions for performing work
Before making a pitched roof, you need to choose the right lumber for the rafter system and sheathing. In this regard, we will give the following recommendations:
- for a span of up to 4.5 m wide, rafters made of 15 x 5 cm timber are suitable, up to 6 m - from 200 x 50 mm boards, spliced in pairs or lengthwise;
- timber 150 x 50 mm will be used for the wall frame (mauerlat) and the beds;
- cross-section of racks, struts and purlins – 10 x 5 cm;
- the sheathing is made of boards 20-25 mm thick and 10-15 cm wide.
For waterproofing, you will need roofing felt and a superdiffusion membrane, and for laying the finishing coating, metal tiles, corrugated sheets or other roofing material. If we are talking about a residential building, do not forget about insulation: prepare mineral wool of the required thickness (or other insulation) and a vapor barrier film.
Laying the Mauerlat
The strapping beam should be placed on 2 opposite walls, where the rafter legs rest. If it is planned to support the layered system on internal partitions, then a board called a bench is also laid on them. The exception is log and frame houses, whose walls are ready for the installation of rafters.
The technology for laying Mauerlat on walls made of different materials looks like this:
- Studs are pre-embedded into the brickwork, onto which the strapping beam is attached. Before installation, the stone wall is covered with 2 layers of roofing felt. If the studs were not installed, then the Mauerlat is secured with anchor bolts or pulled together with steel strips.
- Before installing the Mauerlat, porous walls built from aerated concrete should be tied with a reinforced concrete belt, as done in the diagram. The studs for fastening are placed into the monolith during pouring.
- In wooden extensions (verandas, terraces) built with your own hands, to support the rafters you need to attach a second board of the same width to the top trim beam of the wall. To install the upper end of the rafter leg, you need to screw a horizontal beam 15 x 5 cm to the wall of the existing building. This operation is demonstrated in more detail in the video below.
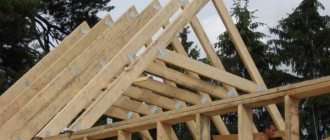
Installation of rafters step by step
Before building the frame, you need to determine the actual length of the rafters, taking into account the extensions beyond the walls that form the eaves overhangs. However, the canopies can be extended after installation by nailing boards cut to size to the rafter legs - the so-called fillies. The minimum length of the roof overhang is 300 mm.
Then proceed in this order:
- To increase the internal partition to the height of the inclined plane of the roof, assemble a frame from vertical supports connected at the bottom by a plank and at the top by a purlin. The location of each rack must coincide with the pitch of the rafters that will rest on them. For stability, secure the frame with struts.
- Try the rafter in place and cut it from below at three support points in order to increase the area of contact with the Mauerlat and the beds, as shown in the photo.
- Install the rafter leg and attach it with self-tapping screws to the steel corners. Repeat the operation at 3 points, then move on to the next beam.
- Trim the legs of the eaves overhangs, and then sew them up from the bottom and sides with clapboard. It is more convenient to do this before the roof covering is laid.
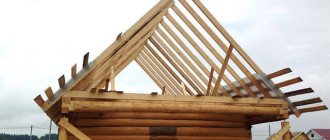
If the side gables are not laid under the slope of the future roof, then they should be covered immediately after assembling the rafter system. Otherwise, you will then have to do this work from ladders or build scaffolding. For installation of a truss system for a pitched roof of a large building, see the next video:
Lathing and finishing coating
Before laying the boards on the roof slope, the rafter system is covered with sheets of super-diffusion membrane, which provides protection from wind and moisture entering the attic space. The canvases must be laid horizontally, starting from the bottom, and secured to the upper plane of the rafters with counter-lattice bars with a cross-section of 5 x 5 cm. The membrane should sag slightly between the rafters to drain water, and adjacent canvases should be glued together (the overlap is 15 cm).
The sheathing boards are nailed to the rafters in increments depending on the type of roofing:
- under metal tiles – 35 cm;
- for corrugated board and slate – 50-60 cm;
- Under shingles, bitumen and ceramic tiles, the sheathing is continuous.
The last step is the installation of coating and insulation (if necessary). Thermal insulation of a pitched roof is best done along the ceiling, leaving the unused attic cold. How to properly insulate ceilings is described in our guide.
Pros and cons of a pitched roof
Like any other roofing structure, a pitched roof has its advantages and disadvantages. Before choosing this option, it is worth comparing the pros and cons. If the latter are not critical, it is worth considering the possibility of installing such a system.
The advantages of a pitched roof include:
- Availability. Compared to designs of other types, this option can safely be called budget. By making a choice in its favor, you can save not only on the amount of materials purchased for roof installation, but also for other structural elements of the building. Requirements for the strength characteristics of walls are reduced due to the lower weight of the roof;
- Ease of design. Not only specialists, but also ordinary consumers can correctly calculate a pitched roof;
- Maintainability. If necessary, you can always quickly repair the rafter system and sheathing due to the simplicity of their implementation;
- Reduced windage if the building is located in an area with a predominance of winds of a certain direction. In this case, you just need to choose the right location for the slope of the slope;
- Possibility of using various roofing materials, subject to compliance with the manufacturers' requirements for the angle of inclination.
Among the disadvantages it is worth noting:
- Impossibility of organizing an attic or attic. If you plan to expand your living space in the future, it is worth considering other options for roofing systems;
- Non-standard appearance. In some cases, departure from traditions is an advantage, as it allows you to emphasize your individuality;
- Low level of thermal insulation.
Features of the construction of a pitched roof
For residential premises, a pitched roof is used very rarely, but if you need to cover a garage, terrace or any utility room, then this is one of the most practical and affordable options.
For a pitched roof, a simple rafter system is created, so even a beginner in construction can handle its installation. The support for the rafter system is a wooden beam, which is fixed on the external walls and is called a mauerlat. This design can have a different angle of inclination; it is usually made due to the difference in the heights of opposite load-bearing walls. If the height of the walls of the building is the same, then a pediment is attached to one of them and, due to it, the required angle is created.
A pitched roof can be erected both on residential buildings and on any utility premises
When covering a span whose length exceeds 13 m, two intermediate supports, the basis of which are racks, must be installed under the rafters. The distance between the racks is usually 1/3 of the span width. Reinforcement is carried out through contractions and fixation to the nearest load-bearing wall.
If we talk about the angle of inclination, it depends on the type of roofing material used and the climatic conditions in which the house is located:
- for roll coverings laid in 3 layers, a slope of 5o is sufficient;
- with a two-layer roof, the angle must be at least 15o;
- under corrugated sheeting and metal tiles you can make a slope of 12–14o;
- slate and natural tiles require steeper slopes, starting from 22o.
If there is a lot of precipitation in the region in winter, then it is better to make the angle of inclination larger - 45o or higher.
Pros and cons of a pitched roof
Most often, when creating a pitched roof, you make a rafter system from wooden elements with your own hands.
The main advantages of pitched roofs:
- significant savings in building materials - usually they are required about 2-3 times less than for a gable structure;
- ease of installation - even people who do not have relevant work experience can erect such roofs;
- light weight - the roof can be installed on buildings with a lightweight foundation;
- versatility - shed roofs can be installed both on residential buildings and on outbuildings;
- high resistance to wind loads - if the construction region often experiences strong and gusty winds, a pitched roof with a slight slope would be a good choice.
The lean-to structure also has its disadvantages, which should not be forgotten:
- if the roof slope is small, it is highly susceptible to snow loads. If the angle of inclination is less than 45o, in winter you will have to clear off the snow, since it will not be able to come off on its own;
- with small slopes, more thorough and high-quality waterproofing is also required to prevent leaks, which means additional time and money;
- as the angle of inclination of the roof increases, its windage increases, so the surface becomes more vulnerable to the effects of wind;
- the lean-to structure does not have the most attractive and respectable appearance.
A shed roof is perfect for a residential building or utility room located in the southern regions, since there is little snow and strong wind loads.
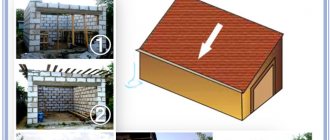
Shed roof for a gazebo or garage
Most often, a similar design is chosen for a garage or gazebo. After the walls are completely erected, installation work begins:
1. A layer of waterproofing and a Mauerlat are laid on the wall;
2. The rafters are installed, and preliminary cuts are made for installing the end board. The elements are fixed using a metal corner;
3. The waterproofing film is stretched. A counter-latt is attached along each rafter. A sheathing is installed across the rafters. Sheathing boards are cut to size;
4. Sheets of corrugated sheets are laid on top of the sheathing. The trim board is installed.
Installation of a lean-to rafter system over an extension
Very often there is a need to make an extension to the main building. To match the additional structure with the overall exterior, it is recommended to make a pitched roof. In addition, this design will not retain precipitation.
The rafter system of the frame house in this case should have a slope of about 20 degrees. The support for the rafter legs will be the load-bearing wall of the house and the opposite wall of the extension. If the extension is more than 4.5 meters long, then it is necessary to install struts that will provide rigidity to the rafter system. It is recommended to install the struts at an angle of no more than 45 degrees.
To make rafter legs, 5*20 cm boards are used, which are installed in increments of 0.7 meters. The struts can be made from boards measuring 5*15 cm, but for lathing it is better to choose boards 2.5*10 cm.
The construction of a rafter system with one slope is as follows:
- Waterproofing material is laid on the brick wall of the extension, and a beam with a cross-section of 10*15 cm is installed on top of it, flush with the inner plane of the wall. The beam is fixed with bolts installed at intervals of 8-10 cm.
- Grooves are made in the load-bearing wall of the house, 12 cm deep and slightly wider than the thickness of the rafters. The distance between the grooves should be about 0.7 meters. Another answer to the question of how to secure rafters on a pitched roof can be the use of U-shaped metal brackets fixed to the wall.
- A rafter template is made from a board measuring 5*20 cm.
- All rafters are made using templates and installed according to the grooves or brackets made. The upper part is attached with metal corners, screwed on one side to the wall and the other to the rafter. At the bottom, fixation is performed with staples or corners.
- Using a scrap of board, make a strut template. It should be remembered that the angle of inclination should not exceed 45 degrees, and the stop at the bottom should be placed below the height of the opposite wall by 0.2-0.3 meters.
- To determine the location of the grooves for the struts, you need to visually draw a vertical line from the top groove and step back 5 cm in any direction. The grooves should also be spaced 0.7 meters apart.
- To install the strut in the groove, you need to cut the lower corner of the strut. In this case, the cut size should be 0.1 m.
- To determine the line of the top cut, the strut is installed in the groove, and the top is applied to the rafter. The place of their intersection is determined by the upper cut.
- Using this template, you need to make the remaining struts and install them using metal toothed plates.
- The cornices are formed using fillies installed on the inclined walls of the extension. Waterproofing must be installed under the fillies.
- Next, the rafter system is sheathed with a wind board along the entire perimeter and the sheathing is hammered on.
According to the above diagram, you can install a single-pitched rafter system over verandas and utility blocks.
How to make a pitched roof for a house or an extension
Installation work is carried out in the following sequence:
1. Boards and beams for the rafter system are being prepared. Using an adhesive composition, the base under the Mauerlat is leveled. To seal the mating surfaces, foamed polyethylene is used, which is attached to the Mauerlat with a stapler;
2. A layer of waterproofing is laid. Roofing material 2 mm thick is used. It is laid on the wall under the Mauerlat. The latter is fixed with anchors. The remaining elements of the rafter system are installed;
3. The membrane is laid with an overlap recommended by the manufacturer. With a slight slope of about 30 cm;
4. Sheathing boards 25 cm thick and 60 cm wide are installed. The boards are fixed at a given pitch. A gap is provided between the membrane and the boards for air circulation by installing a counter-lattice;
5. Roofing material is laid. A vapor barrier is installed from the inside and thermal insulation material is laid.
Attention! In some cases, the installation of thermal insulation material is carried out on waterproofing, and then the counter-lattice and vapor barrier are attached.
Construction of the rafter system
So, in order for the structure to serve for a long period of time, to be strong and also reliable, it is worth thinking not only about the foundation, but also about the roof. The construction system of such an element plays a huge role , because it is the roof that takes on the negative aspects of changes in weather conditions, as well as other situations.
The rafter system of a pitched roof must be characterized by certain requirements, including:
- Rigidity
- Little weight
- High quality material
Such requirements must be taken into account so that the structure lasts a long time.
IMPORTANT!
The width of the rafters for a pitched roof is 20-30 centimeters. You can calculate the rafters using an online calculator.
The rigid characteristics of the element play an important role, because it is with the help of rigid elements that different parts are connected. Such elements should not be subjected to deformation or expansion processes under any circumstances.
The basis of this design is a triangle, which is made using a special reliable frame. Each element of this frame is fixed to one another in parallel, and with the help of strong fixation the stability of the entire structure is ensured.
Rafter system of a pitched roof: diagram
But if such frames are poorly attached and moveable, this will only lead to negative consequences . Such a roof can collapse not only from strong winds, but also on its own.
If we talk about weight, then this roof should not be heavy . That is why this system is made, in most cases, from wood. If the weight is large enough, it is necessary to make a supporting base of metal.
There are cases when coniferous trees are used , the humidity of which is at least 18 percent. Among the mandatory conditions when using trees, we note:
- Antiseptic treatment
- Use of flame retardants
Only in this case, the nodes in the area of which the entire system is precisely fastened will be distinguished by high strength and reliability.
High quality of materials used is one of the main rules . The tree must meet the following characteristics:
- 1-3 different varieties are used . It is important to pay attention to ensure that there are fewer cracks and knots. Per meter of material, 3 knots with a height of no more than 3 centimeters are allowed. Cracks are also allowed in a minimum amount, but not throughout the entire depth.
- It is advisable to make elements of a load-bearing nature from parts whose thickness is at least 5 cm and whose area is at least 40 m2.
- Boards made from coniferous trees can only be used with a length of no more than 6.5 meters, and from deciduous trees - up to 4.5 m.
- It is advisable to make pillows, purlins, and also the Mauerlat from trees that are classified as hard deciduous species . Such material should be pre-treated with one or another high-quality antiseptic.
Shed roof with a small angle of inclination
If the slope angle is relatively small, installation work is performed in the same sequence. However, in this case, close attention should be paid to the level of waterproofing.
The work is carried out as follows:
1. The rafter system is installed. An OSB sheet is laid on top;
2. Primary waterproofing is carried out;
3. Thermal insulation material is laid;
4. The surface is re-waterproofed;
5. Roofing material is laid.
What is the advantage of pitched roof types ↑
As mentioned in the introduction, a shed roof is superior to gable roofs in terms of ease of construction. Such a roof can be erected even alone, and in a shorter time. In addition, there are many other positive aspects that make it worth choosing this option.
1
Significantly lower material consumption:
- Compared to gable analogues, the truss system of a single-pitch roof requires at least 2 times less lumber;
- Costs for roofing will also be reduced, especially if you use sheet options (corrugated sheets, metal tiles, slate and others);
- As a result, the consumption of fasteners and the need for a large number of additional elements will be reduced.
2Easy to install. All the work can be done by one person, because there is no need to assemble rafter pairs, much less lift heavy parts to the site where the rafter frame is assembled. 3Low weight of the structure. Due to the use of a small amount of materials, weight is reduced, which makes it possible to lay a lighter foundation for the entire structure. 4Reduction of wind load. Due to the lower silhouette, the pitched roof is not so susceptible to windage, and this does not create wind resistance. 5Equipment of a residential attic (attic) is allowed. With appropriate design of the structure, it is quite possible to create an attic under a pitched roof. 6Possibility of creating a usable roof.
However, despite a lot of advantages, such structures also have negative qualities that do not always allow the use of these types of roofs. The main negative properties of single-pitch types of roofing structures are as follows:
- Undesirable use in regions with high rainfall in winter. In other areas of the country, an accurate calculation of snow loads is required, with careful selection of the cross-section of lumber.
Advice
It is worth considering that such designs of rafter systems are more appropriate to use in southern regions with low rainfall and constant winds. To the north, you should not build a roof with a slope angle of less than 45 degrees.
- Higher requirements for waterproofing.
- A pitched roof is not always compatible with the chosen style and design of the house.
Despite the disadvantages, pitched roof options are a popular option, especially in low-rise private construction.
Step-by-step instructions for a shed roof
The process of making a roof is similar to those listed above. However, in this case, most often the walls of the barn itself act as a supporting surface for the rafters. The remaining layers are laid in the same way.
A wide selection of roofing materials allows you to choose the appropriate option for a pitched roof.
Explore the available solutions to install the system that best suits your specific building.
How to secure a lean-to rafter system over a barn
Small outbuildings and summer kitchens do not need a powerful roof, so it is better to use a pitched roof for them. As an example, you can consider the diagram of the rafter system of a pitched roof over a shed intended for storing garden tools. This building is made according to the principle of constructing a frame for greenhouses, in which the vertical posts are connected by strapping around the perimeter. The front wall is slightly higher than the rear wall, so the racks are connected by separate crossbars.
The algorithm for installing a rafter system for a pitched roof over a barn involves performing the following actions:
- Make a template for the rafter leg. To do this, apply the board to the end and mark the places where the cuts are made at the top and bottom.
- The rest of the rafters are made using the templates. Make markings on the walls of the shed and fix the rafter legs. When constructing lightweight buildings, it is enough to use nails or self-tapping screws.
- The wind board is nailed after installing the sheathing around the perimeter of the building.
When laying rafters on a flat roof, it is recommended to waterproof such a system, since the structure does not have a steep slope. This will protect not only the objects inside the building, but all wooden elements.
The examples given can be used as a basis for individual designs, so the structure of a single-pitch rafter system must be known in detail.
Installation work to create a pitched roof
Having the drawings and the selected type of system in hand, you can start working. You will also need the appropriate tools and lumber. Installation of the rafter system is carried out as follows:
- For safety, the building should be covered with beams. They are laid on the wall. To extend their service life, roofing felt is glued to the wall. It will protect the beams from moisture and rotting. You need to arrange the floor sticks in the same way as the rafters. The fastening pitch is 500–800 mm.
- The mauerlat is laid on top of the beams. This is a massive beam that will serve as a support. It is placed on the rear lower wall of the building.
- To safely move on the roof, a deck of wooden planks is laid on the floor beams. It's temporary.
- Now we need to build the gable wall. It is made from the same material as the building itself. You can use lighter material. For example, if the walls are brick, then the pediment is raised using bars or boards.
- The floor beams must be covered with waterproofing and embedded in the wall. The pediment rises to the selected height, according to the drawings.
- You can fix the Mauerlat on the finished pediment. It turns out that the two Mauerlats are parallel to each other.
- Markings are applied to the lower wall for fastening the rafter legs. The fastening elements themselves are fixed.
- To firmly fix the rafter, based on the drawings, grooves are cut out on it. This is a good mounting option. The grooves are in two places, at the top and bottom, to fit into the mauerlat. There are other methods of fixing the rafter leg, as shown in this photo.
- After which the legs are fixed with special corners and fastenings. At the top of the pediment, the legs are screwed tightly. But the lower part is made depending on the selected truss system for a pitched roof. It can be rigidly fixed or made sliding.
- There is a certain sequence for inserting rafter legs. First, the outermost elements of the rafter system are installed. A cord is stretched between them, serving as a guide and level for subsequent rafters. Do not forget that the pitch of the rafters corresponds to the pitch of the floor beams.
- The rafters, which are already installed, are connected to the floor beams through racks, struts and other elements to give them stability. We talked about them above. Fixation is performed with metal corners and brackets.
Advice! If it is necessary to lengthen the rafters and extend them beyond the wall, then “fillies” are attached to the beams. This way you can protect the adjacent part of the structure from precipitation. - When the structure of the pitched roof is ready, you can begin insulation and creating a roofing pie.
The photo shows what layers a proper insulated pitched roof should consist of.
Insulation material is laid between the rafters. He has to hang in there tough. Then a counter-lattice is made on top for ventilation. A waterproofing film is laid on the counter-lattice. It protects the insulation from moisture, which can ruin it.
As for the lathing for laying roofing material, it is selected depending on what kind of roofing material it will be. For example, a continuous sheathing made of boards or plywood is needed when installing soft tiles and other rolled materials. If metal tiles, corrugated sheets, slate, ondulin and other types of rigid roofing are used, then the sheathing is done staggered. The pitch depends on the roofing material.
And to protect the insulation from the inside of a pitched roof, you need to cover it with a vapor barrier film. Now we can say that the pitched roof is completely ready.
Note! If a pitched roof is made for a barn or other non-residential structure, then there is no need to insulate it. It's better to spend it for another purpose.
Select an option
Depending on the type and method of fastening the load-bearing supports, the following are distinguished:
- Shed roofs supported by load-bearing walls of different heights.
- Structures assembled from triangular trusses resting on walls of equal height. An alternative is rafters resting with their upper ends on vertical support posts.
The first option is considered more convenient and is more common. In small houses with a wall width of 6-7 m, such rafter systems are installed without additional vertical supports with a minimum of costs for materials.
The second method is implemented less frequently, but it is recommended to choose it if there is a frame house with walls of the same height or if there is uncertainty about the angle of inclination of the future roof at the beginning of construction. The upper edge of triangular trusses in such cases is directed towards strong prevailing winds; the under-roof space is most often not used.
Experience shows that a ventilated insulated roof is best suited for covering a residential building . The slope is selected taking into account the type of roofing materials, snow and wind loads and the budget, with limits ranging from 5 to 60°, optimal - from 10 to 30. With a slope of more than 45°, owners do not have problems clearing snow, but this type of design is more expensive and not always possible.
As already noted, the type of roofing materials can be any, but in the absence of an attic floor, preference is given to types that absorb noise (ondulin, soft bitumen shingles).
Regardless of the angle of inclination and type of coating, shed roofs of residential buildings require reliable drainage systems. Preference is given to metal pipes and gutters with a large diameter and fastenings at least 40 cm apart.