Choosing a location for a shed
To choose the most suitable location for the utility unit, you need to follow the following rules:
- Make a choice in favor of a plot of land that is not intended for growing agricultural plants;
- The place should not be located in a low area, otherwise all the rainwater will constantly flood the barn;
- Utilities could be connected to the site;
- It is advisable that the place be located on the south or southwest side.
Drawing of a barn with a pitched roof
Before proceeding with the purchase of materials, as well as further construction, it is necessary to develop a drawing.
What is the drawing for?
The drawing will be needed for some important data:
- It will give a complete picture of the stages of construction of the necessary resources, with all shapes and sizes. This is a graphic guide to all stages of construction, both for the contractor and for the customer;
- The drawing will allow you to draw up an estimate, as well as purchase the necessary materials. Costs will be under control.
Find a ready-made one or make it yourself?
The solution to this issue depends on several factors:
- Customer requirements that meet his needs;
- The area or configuration of the selected site;
- Design decision.
If there are no specific requirements, and the future utility unit does not pretend to be unique, it is much easier to use a standard ready-made drawing.
For example like below:
Construction works
Once the site has been selected and the drawing is ready, you can begin work directly.
Set of tools
No specific types of tools are required. The set is quite simple, and we also use it quite often in the household:
- Chainsaw;
- Drill;
- Screwdriver;
- Plane;
- Wood hacksaw;
- The chisel is wide;
- Axe;
- The hammer is large;
- The hammer is medium;
- Roulette 10m;
- Level;
- Bayonet shovel.
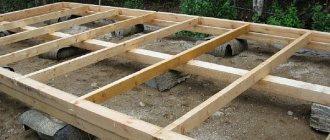
Foundation
It is enough to make the foundation for a frame-type barn with a pitched roof columnar.
To install it, it is advisable to follow the following sequence:
1️⃣ First of all, you need to remove the axes (create markings).
For this:
- take a tape measure, mark the outline by hammering sharpened wooden pegs or steel rods into the ground in the corners with a hammer. And for better tension of the rope, drive another one between them;
- Pull the rope over these pegs;
- Check the diagonals of the resulting rectangle with a tape measure. They must be equal and the angles must be right;
2️⃣ Dig holes near each peg measuring 400*400*500mm ; 3️⃣ Apply bitumen mastic for waterproofing to the side surfaces (pokes and spoons) of each brick. This must be done before laying in the ground, in order to avoid the inconvenience of application during further work when the posts are ready ; 4️⃣ Fill each hole with a sand-gravel mixture of approximately 150-200 mm, which must be compacted; 5️⃣ Now you can start laying brick pillars. It is enough to make it in 1 brick, fastening the bricks together with cement mortar. The posts should protrude above the ground to approximately the height of 2 bricks ; 6️⃣ Check the evenness in height of all the columns with each other using a building level. And evenness along the axes can be achieved using a cord .
Frame assembly
Before starting to make the frame, all lumber must be treated with an antiseptic, as well as a fire retardant.
After impregnation, you can proceed as follows:
- Place 2 layers of roofing felt on brick pillars coated with bitumen mastic on top;
- Install a timber base along the perimeter, including intermediate supports. You should end up with a grid;
- Install pins with a diameter of 12mm into the joints. To do this, drill a hole of the same diameter in the center to the foundation;
- Now you need to drill similar holes in the beams that will become the racks;
- Next, you need to install them on the pins, attaching them to the base with self-tapping screws through steel equal angle angles;
- Level the verticality of the posts on all sides and temporarily fix them using a board 15–20 mm thick, which will serve as a strut;
- Now you need to combine the supports along the long sides at the top. For this purpose, place the beam-beam on top of the racks, strengthening it with self-tapping screws along with the other corners;
- Then you need to connect the supports along the width. Before you begin, it is advisable to attach the corner to the rack on the high side in advance. Thus, the connecting beam will only have to be placed on this corner and tightened with self-tapping screws. Drive a nail 200 - 250 mm long through the stand into the end of the connecting beam.
- The frame is ready.
To continue building the building, it is better to first install the floor:
⭕️ Prepare a treated floorboard of the required size, and then cut holes in them for the racks in the right places; ⭕️ Lay each board lengthwise on the lower base, attaching it to it with nails or screws; ⭕️ Nail a 100*40mm board around the perimeter from the end of the bottom trim to close it, and also to set the evenness of the walls for further cladding.
Roof
The roof was designed to be pitched, so the frame posts were already installed based on this: shorter on one side than on the other.
Slope of a pitched roof
The slope of the roof depends on the type of roofing. Usually for outbuildings it is selected from various types of corrugated materials: asbestos-cement - slate, bitumen - ondulin, metal - profiled sheet. For all of them, the average tilt angle is 20° or 36%.
Namely: divide the width (span) in half and multiply by the value of the tangent of the angle of inclination, which is taken from the Bradis table or calculated with a calculator.
Calculation of materials for a pitched roof
All materials depend on the dimensions of the utility unit:
- Rafters. They are usually made from 100*40mm boards. Their length is calculated as the ratio of the width of the barn to the cosine of the angle of inclination (or you can use the Pythagorean theorem to calculate the hypotenuse of a right triangle) plus the overhang (500mm on the main facade/300mm on the rear). The pitch of the rafters is 500–700mm. Thus, the total quantity in cubes is obtained by multiplying the length by the size and by the pitch;
- Lathing. According to the standards, for it, an unedged board of 100*25mm is taken. Its length is the length of the barn plus an overhang of about 300mm. The sheathing pitch depends on the roofing material, so it is better to follow the manufacturer's recommendations. For example, for ondulin, with an inclination angle of 20°, the pitch is 610 mm. But on the ridge, ribs and overhangs, the sheathing should be continuous, 250 - 300 mm wide;
- Additional racks to strengthen the roof. You can use the boards that were used for the rafters. Their quantity is 2 pcs. One on each side. They will become a kind of continuation of the intermediate supports, approximately 2/3 the height of the ridge;
- Overhang trim. It can also be made from 100*40mm boards. Their number: 1. The length of the barn plus the overhang on one side; 2. The width of the shed plus the overhang on one side.
Roof installation
Installation is carried out as follows:
- Install the rafter boards on edge, connecting them to the beams of the upper trim with self-tapping screws obliquely. Additionally, drive a nail 250mm long from above into the leg from the other rib perpendicular to the beam;
- Lay the sheathing flat on top of the rafters, starting from the overhangs where it is solid. Attach to the rafters with 2 nails or self-tapping screws;
- Next, you need to strengthen the roof structure. For this purpose, place a board 2/3 of the height of the ridge in the place where the intermediate support ends, fastening it obliquely with a self-tapping screw to the beam on one side and the rafter leg on the other;
- Now you need to hem the overhang from below, and also cover the rafters from the end with a board. Fasten each board to the rafters with 2 nails or self-tapping screws in the same way as was done with the sheathing boards;
- The final stage is to cover the roof with the selected roofing material.
Useful tips from builders
- Before assembling the frame, prepare the beams for joining together. The most convenient and simplest half-tree. To do this, mark with a pencil and carefully cut out unnecessary parts. Then remove excess with a chisel;
- In order not to catch splinters, it is better to process the wooden parts with a plane on all sides;
- It is better to fasten the floorboards to the base at an angle. So, then it will be possible to level them with a plane and avoid cuts during operation;
- To work on the roof, use scaffolding/scaffolding rather than a ladder;
- It is better to strengthen the openings with additional boards;
- Use antiseptics with color to see painted areas;
- Before installation, check the rafters individually and cut out holes based on actual data.
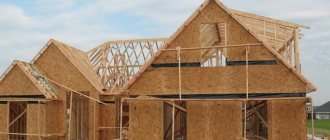
As you can see, the barn is structurally simple and requires only basic carpentry skills. Therefore, having a drawing along with instructions, building a shed will not be difficult, even if you are building it alone.
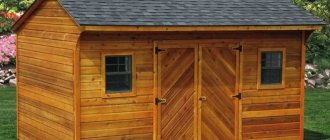
Shed with pitched roof 3x6
The first building that appears on a new summer cottage is, of course, a barn, large and roomy. At first, until the bare territory of the dacha is “overgrown” with full-fledged outbuildings, a house, a summer kitchen and a garage, a simple shed with a pitched roof will long remain the only shelter for equipment, building materials and dacha property.
Design of utility block structures
The design of the utility unit will play an important role in the future, eliminating incorrect calculation of materials and unforeseen costs. If you have a limited budget, the most profitable option would be to build a frame structure made of wood. Such buildings do not require laying deep foundations. On unstable types of soil, it is enough to make a columnar foundation or a pile-screw foundation.
The project of the utility block must contain a drawing indicating all the dimensions of the building, its layout and a detailed image of all components
To design a future outbuilding, you need to choose the right location. It is best to place such a structure on a small hill. This will protect the wooden frame and interior from excess moisture accumulated after melting snow or heavy rains. If there is no area with a hill, then it can be created artificially. To do this, fragments of bricks are poured and covered with earth. If several such layers are made, they will serve as an effective drainage system. To protect the inside of the utility room floor from rodents, you can fill up glass fragments along with broken bricks, which will become a reliable barrier for small animals.
The location of the future building depends on the purpose of its use. If it is planned to attach a poultry house, shower cabin or toilet to the utility block, then the minimum distance from the residential building will be 12 m, and from the border of the neighbors’ territory - 4 m. The best option for combining such utility areas is to arrange them in the following order: shower compartment , utility room, toilet. In this case, the room for household purposes should be located in the middle, since the adjacent buildings will be equipped with water pipes and a cesspool. If the area of the plot does not allow placing several buildings for household needs, then the utility block can be built with several levels. In this case, the ground floor will be occupied by a cellar, and on the ground floor there will be an outbuilding with a summer kitchen and a veranda.
The outbuilding, being a small structure, will not take up much space on the site. However, a well-designed structure will allow it to be rationally placed on the territory of the household, thereby saving precious meters on the site. Sometimes it is convenient to build a corner structure for a utility block, and if it combines a shower and toilet, then you can achieve the maximum arrangement of useful utility areas in a small area.
The corner utility unit is conveniently placed on the site and saves space
At the design stage of the utility block structure, it is necessary to take into account the methods of ventilation and lighting of the premises. To do this, just make a couple of small windows inside. It is also necessary to take into account the fact that the outbuilding should be easy to use. In the drawings and design diagrams, it is necessary to provide entrance doors of such a width that a garden wheelbarrow can easily pass through them.
A large, roomy utility unit will take up less space if you make it corner
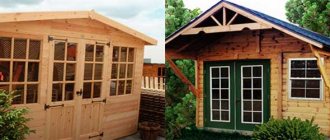
Which type of shed to choose for your summer cottage?
Depending on the plans for the future development of the suburban area, the availability of free time and money, the problem of utility room on a suburban area can be solved in several ways:
- Hire a team and build a permanent shed from brick or foam block, with a pitched roof and a basement;
- Pour a concrete foundation for the future building with your own hands, buy a five-ton railway container and install it on your summer cottage instead of a barn;
- Build an ordinary barn with a pitched roof, 3x6 in size, from timber and boards, as in the photo.
Of course, experienced summer residents with experience will without hesitation cast their votes in favor of the last option; this is the most balanced and thoughtful decision.
In addition, the construction of stone, prefabricated, panel sheds, as well as the purchase of a container, will require an order of magnitude greater investment and time than is necessary for a wooden building with a pitched roof and a simple foundation. The main thing is that, at considerable expense, there are no tangible advantages over a lean-to wooden shed measuring 3x6.
Optimal design of a 3x6 wooden shed
The most difficult element of a homemade shed is its roof. Choose a pitched roof for your shed, you can’t go wrong. Even experienced craftsmen prefer to install pitched roofs on barns; they are not as beautiful, but easier to build and more reliable in operation. Moreover, you can make a shed roof with your own hands step by step even with minimal construction experience.
The only mandatory condition is the correct orientation of the pitched roof and the entire shed building relative to the wind rose in order to reduce the risk of rainwater flowing under the upper overhang and gables of the roof:
- The design of the barn, dimensions 3x6 m, with a pitched roof is shown in the drawing;
- The construction is carried out on a simple columnar foundation of 12 supports. A standard cinder block is used as the material for the pillars, but it is better to cast the supports from concrete in the formwork;
- The basis of a lean-to barn is a frame made of boards and timber, the dimensions of the structure are 3x6 meters, with a ceiling height of 2 m and the highest point of the rafters of 2.7 m;
- The shed roof is made according to the classical scheme, on hanging rafters with stuffed sheathing boards and a flat roof. As a roofing covering, you can use corrugated sheeting, ondulin, or make a two-layer version from rolled material, for example, roofing felt.
The construction will be very simple and easy; if you assemble the foundation correctly, the wooden frame box with a pitched roof can easily withstand winds of 18-25 m/s. If there are no strong winds in the area in which the shed is planned to be installed, then when building walls you can limit yourself to vertical drains from boards and timber, as in the drawing. For open areas, it is recommended to strengthen the vertical load-bearing supports with side struts, as in the photo.
The same applies to the design of a pitched roof. For a quiet area, you can build a pitched roof without using ceiling beams, but in this case, the upper frame of the walls and the mauerlat will need to be supported with additional vertical supports made of timber. For windy areas, a pitched roof must be reinforced with floor beams and supports in the middle of the rafters.
Placement of a utility unit on a built-up site
If you want to install such a structure in an area where other objects are already located, then you should take their presence into account when planning. If a cottage is used as the site for installation, you need to worry about the correct location of this building.
Since such buildings are usually classified as outbuildings, their location should not be noticeable when entering from the street through the main gate. In some cases, they are built behind the main house. Another option for how to get rid of the ugly exterior of a utility unit is to decorate them. By carrying out high-quality finishing, you can achieve a good appearance of the building that will harmoniously fit into your site. In any case, the key role for the location of such a building is played not only by the availability of a level area for the foundation, but also by the purpose of the building itself. Another important factor for choosing the location of a utility building in a dacha area is the presence of a plumbing unit or shower in the cabin. For them, there are special GOST rules that should be taken into account when planning
You should also pay attention to general tips on building and operating a shed. These include the following:
Design option for a welded metal frame made from corners for a utility unit
- The utility unit must be installed on an elevated area of your dacha. This is due to the fact that during rains your structure will not be subject to the negative effects of moisture;
- The passage to the barn should be quite spacious and comfortable;
- It is not recommended to install such buildings close to the fence, as this may negatively affect its operation;
- For greater safety of your family, you should choose a place for the shed that is clearly visible.
These are just some of the generally accepted rules for installing such a room. But the main requirement for a utility block remains the presence of a level place with stable soil, which will serve as a solid foundation for the structure.
We build a barn with a pitched roof with our own hands
You can calculate the amount of material needed for the frame and pitched roof. To build a 3x6 shed, six-meter boards are used:
- For the frame, material with a cross section of 50x150mm - 14 pcs., 25x100 - 23 pcs., 50x100 - 19 pcs.;
- For the floor, boards measuring 25x100 mm - 27 pcs.;
- For the sheathing and roof supports, 43 boards with a section of 25x100 mm are required.
All joints and connections are made with black carpentry screws 50 mm, 70 mm and 110 mm. To reduce the cost of construction, you can use ordinary nails and construction angles, but such savings are not always justified.
Making a foundation for a 3x6 shed
After choosing a site for building a shed, you will need to plan and remove soil on an area of at least 3x6 m in size. It makes no sense to make a larger building area. To prevent vegetation from pestering you, the cleared space can be covered with salt and sand.
After marking the location of the supports, at the installation points of the pillars we dig 12 holes, 15 cm deep and the size of a standard cinder block. At the bottom of the mini-pits we pour a 5 cm layer of a mixture of crushed stone and sand, after which we lay out columnar supports from cinder blocks using masonry mortar with the addition of PVA.
Before laying out, you will need to pull horizontal cords, along which you can control the height of each support, so that the entire supporting surface of the pillars is in the same horizontal plane.
After a day, you can install the strapping beam. All corner joints and T-shaped mortises are made with the ends “half-timbered”, each connection is reinforced with self-tapping screws screwed into the beam at different angles.
Assembling the frame and pitched roof
At the next stage, you will need to install load-bearing vertical posts; they are highlighted in orange in the drawing. Next, we sew up the floor and lay the rafters of the pitched roof.
We make the central load-bearing racks from 50x100 boards, for the rear wall you will need to cut three 220 mm racks, for the front wall - four 250 mm racks. We first fix each support on the lower frame with one self-tapping screw, then set the exact horizontal position according to the building level and additionally fasten it with small half-meter struts, as in the photo.
After all the racks are installed, we strengthen them with additional temporary struts and tie the upper tier of the frame under the future pitched roof. To give the entire structure of the barn additional rigidity, before assembling the elements of the pitched roof, it is necessary to cover the floor with a tongue-and-groove board.
Next, all installed elements, floor boards, rafters, sheathing material, side posts, lower and upper trim must be treated with an antiseptic and preservative. During the time it takes to assemble the rafters and roof of the pitched roof, the procedure must be repeated twice.
For the upper overhang of a pitched roof, installation of rafters and sheathing, you will need to secure an additional horizontal beam of the mauerlat, as in the diagram.
The cutting of the seat on the rafter beam is carried out according to the markings or according to a prepared template. After installing and leveling the position of each beam, it is recommended to fill the space between the beams with short boards; they will fix the rafter from horizontal displacement and at the same time strengthen the base of the pitched roof.
Roofing and finishing works
At the final stage, we sew up the rafters of the pitched roof with a sheathing board. If bituminous materials - flexible tiles and roofing felt - are used for the roof of the barn, additional OSB sheets will need to be laid on the boards or the sheathing will need to be completely hammered in with wooden clapboard.
The easiest way to cover a pitched roof is with corrugated sheeting. The metal surface will withstand any disasters that may occur in a summer cottage, and laying and fastening roofing material is much easier and faster than euro-slate or roofing felt. A polyethylene film is laid as waterproofing, the edges of which will be released from under the awnings and nailed to the top edge of the wooden walls of the barn.
Laying the roof on a pitched roof begins with the bottom left sheet, as in the diagram. Each element is joined to the previous one in a row in an overlap of two waves, an overlap of 15-20 cm is made on the bottom sheet. The overlap areas, the lower and upper edges must be pierced with roofing nails with a silicone washer.
Installation of a barn roof
Assembling a shed roof with your own hands step by step consists of the following steps:
- Installation of the mauerlat - a load-bearing beam that serves as the top frame for the walls, as well as support for the roof rafters.
- Making patterns for rafter legs. All rafters for a pitched roof are the same, so first one piece is made, which serves as a template for cutting out the rest. For a 3x6 shed roof, eight rafter legs will be enough. They are cut from 50x150 mm timber. The length of the rafters should be equal to the width of the barn plus two eaves overhangs. To prevent the walls of the barn from getting wet, the overhangs should be 40-50 cm. In accordance with these data, the beams are cut to the required length. Where the rafter rests on the mauerlat, a recess must be cut in the beam.
- The rafters are secured to the mauerlat with nails or metal staples.
- Lay waterproofing material, starting from the lowest point of the roof. This way, draining moisture will not get into the joints. The overlaps between adjacent strips must be at least 15 cm.
- Depending on the chosen roofing material, sheathing is installed on the roof of the barn. The step directly depends on what the roof will be covered with later.
- Roofing material is mounted on the sheathing. Most often, slate, flat or shaped galvanized sheets, metal profiles are used for sheds - the cost of these materials is lower than others.
Photos of finished sheds will help you decide on the type of construction and size of the utility room. But most owners of suburban areas and summer cottages choose small outbuildings, with parameters of 3x6 meters. And the roofs are made pitched; this design is easier to implement, cheaper and performs well in operation.
In what cases is a pitched roof optimal?
The roof from a single slope has a clearly expressed asymmetry and structural originality. Let's be honest, compared to a two- or four-slope roof, it does not look so impressive, and the attic space will be of little use. In addition, a pitched roof requires different wall heights or the use of special “raising” frames, which significantly complicates construction.
On the other hand, a do-it-yourself shed roof is calculated and erected much easier than its multi-pitched counterparts . It requires a minimum of construction and auxiliary materials, including heat insulation and noise protection. The reliability of a pitched roof against exposure to bad weather is very high, as is its suitability for repair in the event of accidental damage or under the influence of inexorable time.
Other construction advantages of a simple pitched roof include the speed of construction and the safe nature of all stages of work. Tall stepladders or scaffolding will not be needed in the installation procedures; all work is performed from the ceilings of the upper floors. But a reliable mounting belt is a must when performing roofing manipulations - it’s better to fasten yourself with a carabiner to a thick beam than with a dropper to a hospital bed...
The correct orientation of such a roof relative to the prevailing wind directions is very important. If a roof with one slope has a significant steepness, if strong wind currents constantly influence it from the “front”, comfort under such a roof will be minimal, as will its durability. A house with a steep pitched roof should be oriented on the terrain in such a way that the wind load falls on its high façade wall. Already when pouring the foundation, you need to think about what the roof structure will be, and take these thoughts into account at the initial stage of construction.
The same circumstances should be taken into account when roofing work on sheds, garages and other outbuildings. The “elevation angle” of such a roof depends on proper consideration of wind load; it should be done on a certain side of the garage or shed. In addition, it is necessary to take care in advance about the drainage of water flowing from the roof - by arranging drainage ditches, constructing a drainage system, etc.
What's first?
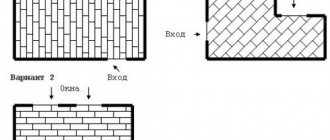
We get our bearings and talk to our neighbors. The goal is to find the best place for the shed: so that it is not very far away, but also does not stick out in front of your eyes and fits into sanitary standards for distances to water sources and other objects susceptible to contamination (residential buildings, plantings of agricultural crops, especially root crops); Suddenly there is no clarity on point 1, we are building either a mobile shed or a temporary shed from cheap waste material. However, it is possible to build a shed at the dacha from slabs or used boards that is quite durable, inexpensive and easy to refine until it gives it a quite attractive appearance, see below; If you have decided on a place for a barn right away, we choose the type of upper structure, taking into account the possibility of having pets; We select the roof for the “box”; Determine the type of foundation; Designing a shed based on the terrain
The latter is especially important, because supervisory authorities do not stand on ceremony with sources of pollution; We reduce (compile) estimates for construction and decoration; We may adjust the project if the barn does not fit into the budget; Also, perhaps, we are considering the option of self-building with subsequent legalization
If the shed obviously complies with SanPiNs (Sanitary Rules and Norms), then it will be cheaper and easier than building it initially according to the project; We buy materials and build.
What to do with the project?
A barn is a lightweight, pre-fabricated, unheated non-residential structure, from which important consequences that make things easier follow. We will talk about them for construction later, but for now you need to know that when registering/legitimizing the greatest quibbles and difficulties should be expected in relation to the location on the ground in accordance with SanPiNs. The actual design of the barn should include sheets with facades, a plan with sections, see track 2 in Fig. and a plan diagram of the foundation with a specification of materials for it, as in Fig. with plan sections.
Sheet of facades from the barn project
As a rule, free shed projects from the RuNet are approved without anything and then no one ever thoroughly checks what is actually built there. It looks like a project, and ok. Deviations from the project in construction are acceptable, but in “small-scale construction” you can do without approval. But the layout plan for the site is studied very carefully, as are the plans of neighboring sites and their consent to construction. So make sure to collect these papers in advance, they are valid for 3 years.
Sheet of plan sections from the barn project
Perhaps the corrosive bureaucrat will require another sheet with the frame structure, because... It’s not residential, it’s not residential, but people go there. In such a case, for a sample, see the drawings in Fig. By the way, this is not a bad shed for a 6-acre dacha. In extreme cases, you can sleep there, lying down diagonally.
Mini-shed frame for a small area
Calculation of a pitched roof - taking into account all factors
The exact calculation of a pitched roof depends on several obvious circumstances. Firstly, it depends on the length of the rafters, their cross-section and the angle of the roof. These values are interrelated for specific buildings and are calculated as follows:
- With a horizontal span of up to 4.5 meters, layered rafters are sufficient for laying corrugated sheets or metal tiles - that is, without strengthening the structure, resting only on the walls;
- For spans up to 6.5 meters, the rafters will need to be reinforced with triangular struts on the low side of the roof;
- If it is necessary to block an opening larger than 6.5 meters, the installation of permanent vertical beams in the middle part of the attic space will be required.
The permissible linear dimension for rafters of a pitched roof is 12 meters. If the building or structure is larger, a roof with two or four slopes, composite or complex, will be required.
Another important aspect when planning our "single-pitch efforts" will be the angle of the entire roof. It directly depends on the chosen type of finish:
- Roofing felt is like a classic material with a low price and modest durability. The permissible angle of inclination of the rafters when laying roofing material is limited to 15˚; rafter legs will need to be installed frequently, from bars of small cross-section. For example, for a span of 6 meters, 40x40 mm bars laid at half-meter intervals are suitable;
- Slate is cheap, but heavy, it requires an inclination angle of up to 25˚. Beams from 60x60 mm are used as rafters - the larger the size of the opening, the thicker the rafters. Lifting, storing and installing heavy slate sheets must be thought out in advance. As well as drilling mounting holes before installing slate on the rafters;
- It is most convenient to construct a rafter system for a pitched roof under a profiled sheet or metal tile. These sheet materials require a small number of rafter legs - installation at intervals of 1-1.5 meters is acceptable. For corrugated sheeting, the same bars are used as for roofing felt (from 40x40 mm), for heavy metal tiles - a bar with an end of 70 mm.
Due to the widespread popularity of metal tiles and profiled sheets as roofing materials, we will describe the installation of rafters specifically for them.
How to build a truss system for a pitched roof - step-by-step diagram
Step 1: Installation of the supporting beam
On the extended walls of the building - which will serve as support for the rafter structure - it is necessary to lay a massive beam, called Mauerlat. There is a direct dependence on the angle of inclination of the rafters: the steeper it is, the more massive the Mauerlat should be. For ordinary and metallized tiles, a load-bearing beam with dimensions of 100x100 mm is required as a roofing finish. There are rafter structures made of beams with a cross-section of 200x200 mm and larger. For corrugated sheeting, it is allowed to use Mauerlat timber from 80x80 mm.
The supporting beam is carefully planed (it’s even better to immediately buy a high-quality, even and dry mauerlat) and impregnated with an antiseptic. Roofing felt is laid along the entire end of the load-bearing wall, then the timber itself is mounted on it. Installation is carried out strictly according to the level, using long (from 200 mm) anchor bolts, with a pitch of 80-100 cm between the bolts. Precisely laid and firmly fixed to the load-bearing wall, Mauerlat timber is the basis for a high-quality roof.
Step 2: Processing the supporting beam and rafter blanks
The overhang of the rafter board over the roof overhang is planned at 30-40 cm on each side, depending on the angle of inclination (the steeper the angle, the less overhang on the lower side of the roof and the greater on the upper). For metal tiles and corrugated sheets, the optimal pitch between the rafters is 120 cm. If the roof width exceeds 6 meters, then this step is reduced to 1 meter.
Floors
To insulate the floor, you need to prepare a “subfloor”. The easiest way is to fill bars with a cross-section of 40x40 mm and lay plywood or boards on them.
After insulation, we lay the floor from planed boards 30-40 mm thick.
It is important to use only dry lumber for the floor. Otherwise, there is a possibility of deformation of the boards. Alternatively, you can fix the boards with temporary transverse strips in increments of 50-100 cm
Removal of the planks should be carried out no earlier than the complete shrinkage of the board, and this process will take up to one year.
As an option, you can fix the boards with temporary transverse strips in increments of 50-100 cm. Removal of the planks should be carried out no earlier than the complete shrinkage of the board, and this process will take up to one year.
The main types of work have been completed. Next we install doors and windows. We carry out decorative finishing. But this is at your discretion. And we end here and wish you long service for your outbuilding at the dacha, which you built with your own hands. We hope you found our dimensional drawings helpful.
How to build a shed with a pitched roof
The site of a country house or cottage always provides for the presence of utility rooms for storing garden tools, firewood, or simply any things that do not need to be stored in a residential area. In this regard, we will look at how to build a barn with your own hands with a pitched roof made of lumber on a columnar or pile foundation. Below is a step-by-step description of each step you will have to take to build such a structure.
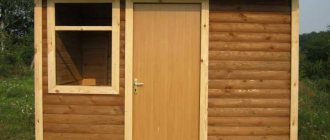
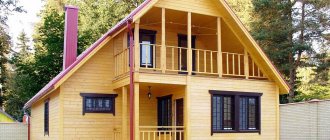
Wooden barn with pitched roof
Cost calculation for self-construction of a utility block
It’s worth noting right away that the price of a do-it-yourself utility unit is much lower than a finished structure made in a factory. Not only will you be able to save on assembly work, but you will also significantly reduce costs due to the material used to build the shed. Many owners of dachas and private plots have a lot of excess building material, which can easily be used to install the frame of such a building.
Location and exterior of the utility block on the site
The cost of the building is also influenced by its size, the type of utility unit chosen and the material from which it is planned to be made. If you need a collapsible structure that can be easily dismantled and transported, then you should be prepared for additional costs.
The walls themselves are also sheathed with metal material - corrugated sheets. Although such a structure requires additional costs, the money spent is compensated by the simplicity and ease of assembly.
An example of covering a utility room with corrugated sheets
Of course, if you are a person far from construction work and do not want to waste your time and effort on it, then the best option for you is to buy a ready-made block that does not require assembly. It will be enough to install such a structure on a prepared strip foundation and secure it with fasteners.
Stages of building a barn. Foundation and walls
Video: Construction of a lean-to wooden shed
If you already have a ready-made sketch or even a drawing of the future shed, then you can get to work. It’s just advisable to purchase all the necessary materials ahead of time, so as not to run around to warehouses and stores during the process. So, now we will figure out step by step how to build a barn with your own hands with a pitched roof.
Laying the foundation
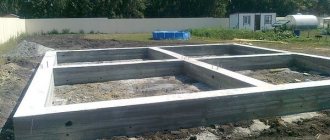
Columnar foundation for a barn with a wooden grillage
To make a light architectural structure, you need a foundation, despite its low weight, and in this case we use a prefabricated columnar foundation. This is a simple design, but it must be horizontally level, and the pitch of the supports must correspond to the expected load.
In the photo above, the pillars are assembled from sand-lime brick, but ordinary or double building brick is also suitable here, but in order for it to last longer, the finished supports will have to be plastered. For stable soil, it is enough to make holes 30 cm deep, pour a layer of pitch up to 5 cm and pour a concrete pad of the same thickness. While the concrete is still wet (the next day), build brick pillars so that they rise 10-15 cm above ground level. Check that all masonry matches the water level. Height adjustment can be done by adding or removing mortar.
The step between the pillars is no more than 2 m - heavy objects can be stored in the barn, so the base must withstand the load. There should be a support at each corner, as well as under the lintel if you have to install long floorboards. If you have to sew together timber for the grillage, then you must also install a pole at the joining point.
In about a week, when the masonry and the cushion have set well (this is only the initial stage - the full cycle takes 28 days), it will be possible to install a grillage made of 100×100 100×150 mm timber. Do not rush to fix it to the foundation: first fasten the frame with nails and check the diagonals - the permissible discrepancy in the parameters is ±2 mm, but it is better without it at all. Do not neglect these instructions - otherwise you will have problems with installing the rafter system due to the lack of right angles.
After this, attach the grillage and lintel (if provided) to the posts using anchors - these are plastic dowels with long bolts with coarse threads, like a screw.
Drawings of utility units for a summer residence
The drawings are applied to paper with the required dimensions corresponding to your choice.
If the dacha plot has a large agricultural area, it is quite possible to build a utility block on it for storing equipment and garden supplies.
In this case, you will need a utility unit combined with a pantry.
You should use this drawing.
To build a utility block with your own hands at the dacha with a toilet and shower, you should use this drawing.
For an outbuilding with only a toilet, take note of the project below
How to build a wooden outbuilding with your own hands?
We will tell you how to build a small building 6x3x3 meters.
For it you should purchase the following materials:
- beam;
- board;
- plywood;
- roofing felt;
- gravel;
- sand;
- cement;
- asbestos cement pipe with a diameter of 15 cm.
Gravel, cement and sand will be needed to prepare concrete.
Foundation for a wooden outbuilding at the dacha
You should start with markings. The foundation is installed on columns, which are placed in the corners and in the center of the walls at 6 meters.
Next, we begin preparing for the construction of the soil. To do this, remove the turf and soil 20 centimeters deep.
We form a sand cushion with a layer of 10 cm and compact it well.
The tables are buried to a depth of one meter, first covering the hole with a layer of gravel.
Sand is poured into the foundation columns for the utility block at the dacha, after first checking the verticality of the installation with a building level.
Inside the pillars, cement is poured into a third of the pillars and raised and completely filled with cement.
The resulting foundation will be strong and reliable, so you can proceed to the foundation itself.
If desired, you can use anchors or fittings, but for a utility block in a country house this element is considered superfluous.
How to make a frame for a utility room out of wood with your own hands
We install 15x15 timber in the shape of a rectangle so that they correspond to our 6x3 dimensions.
The corners must be fastened with self-tapping screws using the half-timber technique.
It is necessary to lay roofing material between the frame and the foundation column. Its ends are bent down so that water can flow freely.
Do not forget about treating the wood against pests, which is possible when applying two layers of olive.
Reinforce the frame with 3 transverse 10x10 timber beams, placing them at equal intervals.
Wooden outbuilding frame for a summer residence
To create a frame, use a beam with a small diameter. When assembling the ends, remember the presence of windows.
It is better to secure the racks for the frame with self-tapping screws with steel corners.
The racks in the middle are installed at intervals of 1.80 cm. To build a utility block with your own hands with two rooms, you should make two openings for the doors.
Do-it-yourself roof for a wooden outbuilding
It is recommended to assemble the rafters on the ground, maintaining an inclination angle of 10 degrees.
The rafters should also be fastened with self-tapping screws, covering the overhangs and cornices with boards.
Then you can lay the roof using tiles or slate.
Household block for a dacha made of foam blocks
A good material that is perfect for creating a country house. It is easy and quick to work with foam blocks, and their service life is more than 25 years.
In order to build a utility block with your own hands from foam blocks, you need to remove 50 centimeters of soil.
Next we need:
- pour the strip foundation (it will dry up to 7 days, and in hot weather it is better to water it with water so that it does not crack);
- after drying, it creates a waterproofing layer using roofing material;
- prepare a cement-sand mortar for laying foam blocks (1 to 4);
- Laying foam blocks for the construction of a utility block at the dacha should start from the corners, and then you can begin building the walls.
When laying, take care of the space for window and door openings.
When starting the roofing, choose the appropriate material and create a single-pitch or gable roof.
When the household block made from foam blocks, made by yourself, is ready, you can begin installing windows and doors.
Only after this do the interior decoration. You can insulate the floor, plaster the walls and decorate the room to your taste.
On our construction forum, you can ask any question and get an answer from professional builders and just amateurs.