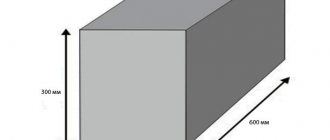
In modern construction, such a lightweight and, at the same time, durable material as aerated concrete is often used. It is a concrete mixture into which air bubbles have been “mixed.” The result of this interesting technology is a reliable, durable, inexpensive and lightweight material from which residential buildings and any other buildings can be built.
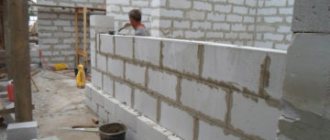
Many people are interested in aerated concrete as a building material because of its undeniable advantages, and at the same time, a lot of questions arise regarding construction technology. Thus, one of the most frequently encountered issues is the problem of interfloor ceilings in buildings made of aerated concrete.
These ceilings can be made of different materials - we will discuss this issue in more detail in the article. We will also determine which material is best suited to perform the function of floors in an aerated concrete house.
Construction and classification of floors
The floors are both prefabricated - from load-bearing beam elements and enclosing structures - and solid. Regardless of the design, it is the load-bearing and enclosing part of the house, subject to increased loads. The requirements for floors vary depending on the type.
- Basement.
- Attics.
- Interfloor.
The basement floor must withstand 200 kg/m², and for the attic floor 100 kg/m² is usually sufficient, since the load on it is less. In addition, basement, basement and attic floors meet the scope of application - coupled with strength and rigidity, high thermal insulation parameters. This is achieved by using specialized insulating materials (insulation, membranes) in the “pie”.
For interfloor ceilings, temperature and humidity conditions are not as critical as resistance to static and dynamic loads, especially when it comes to wooden beam structures. Miscalculations in the design and installation of wooden interfloor ceilings lead to the “trampoline” effect. The thermal insulation layer maintains a uniform, comfortable temperature on each floor. Thermal insulation combines minimal thermal conductivity with soundproofing properties - one material both retains heat and dampens sound. Of course, silence cannot be achieved only with thermal insulation; complex solutions are used for these purposes, but it is possible to achieve a sufficient level of comfort.
Types of floors
Floors are classified according to the specific application and other parameters.
- Based on the materials of the supporting base.
- According to the device method.
Based on materials, the base of the floor is wooden, metal and reinforced concrete. Wooden floors are assembled from solid timber and spliced boards; if the span or load exceeds the permissible value, either factory-made I-beams or home-made glued structures are used. As for metal, steel I-beams and reinforced concrete beams are used less frequently in the private sector.
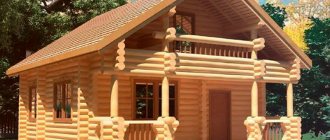
According to the method of installation, floors are divided into three groups: prefabricated (beams, slabs), monolithic (simple, lightweight) and prefabricated monolithic. When constructing country houses using frame technology or log buildings from timber or logs, the floors are predominantly prefabricated, made of wooden beams. In stone houses there are slabs, reinforced concrete or prefabricated monolith in the basement/basement and interfloor ceilings and wooden beams in the attic.
Beam structures
Beams can be metal (channels), wood (softwood) or reinforced concrete.
This type of interfloor ceiling can be made of metal, reinforced concrete and wood. To make them more dense (and to improve sound insulation and thermal insulation), special filling is placed between the beams. For wooden partitions, it is recommended to take only coniferous trees and at least 1 year old, and it will be ideal if the beams are dried for 3 years.
To make a wooden interfloor partition, the following materials are taken:
- wooden beams of coniferous species (height from 140 to 240 mm and width from 50 to 160 mm);
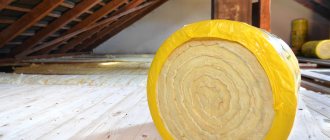
- insulation (for attic floors);
- antiseptic solution;
- roofing felt
For convenience, it is better to use rectangular beams, but an option with round beams - logs - is possible if you are planning a village one-story house.
The material is treated with an antiseptic to prevent rot and damage from insect pests.
After processing, both ends of the beams are wrapped in roofing felt, tarred or simply burned (you should know that the beams at the ends need to be made slightly beveled). If desired, such beams can be laid manually, due to their not very heavy weight.
During the further construction of the flooring, insulation is done if this is an attic floor, but if it is between floors, the floor is not insulated.
Prefabricated floors
Prefabricated floors are divided into beam and slab; in the first case, the load-bearing beams are assembled with enclosing structures; in the second, ready-made reinforced concrete slabs are used.
Prefabricated wooden floor
A typical wooden floor includes several layers.
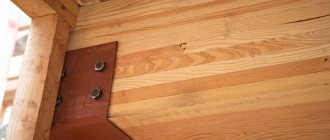
- Logs (beams) are load-bearing, usually made of softwood timber of at least second grade, with a rectangular cross-section. The height is one and a half to two times the width; the specific section depends on the span length and the expected load. Like other wooden elements, logs are impregnated with a universal composition (fire and bioprotection) or separately with an antiseptic and fire protection. Supporting the ends of the logs on stone walls is possible with a blind or open seal, but in both cases the supporting part is waterproofed. The distance between the lags is predominantly 600 mm, for ease of use of slab insulation and subfloors.
YuryFORUMHOUSE Member
Typically, the pitch between the lags is taken based on the width of the insulation (600mm). The same step is considered normal for working with 36-38 mm floor boards. Well, the height is adjusted to the span. In addition to the maximum deflection in the middle of the span, there is also instability of the ceiling. Typically, beams of 50x200 mm, 100x150 mm, 100x200 mm are used. When it comes to the basement floor and the loads are higher and the humidity is higher, it is worth choosing more reliable beams.
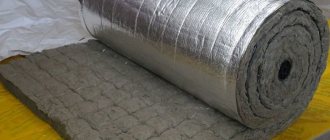
- Thermal insulation – slab, roll, backfill, sprayed (stone wool, expanded clay, ecowool, polyurethane foam, etc.). The thickness of the insulation layer depends on the selected material and thermal resistance standards in the region of construction, on average it is 200 mm for a basement floor. There is a gap between the insulation and the subfloor for ventilation. If the height of the logs is not enough, a wooden block of the required thickness is placed under the flooring.
- Waterproofing.
- Vapor barrier.
- Flooring - to lay the insulation, a skull block is stuffed onto the joists, on top of which the flooring is assembled from a rough board without the use of fasteners.
- Subfloor - not only tongue-and-groove boards laid directly on the joists are used as a finishing coating, but various composites that require a plank or slab base.
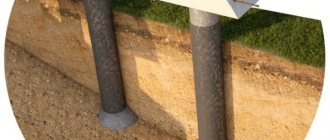
The lower wooden floor is combined with lightweight, columnar or pile foundations, less often with strip foundations. In some cases, floors on wooden joists are laid on top of monolithic bases for additional insulation.
Prefabricated slab floor
In brick, stone and monolithic houses, mainly monolithic or large-format prefabricated floors are made from factory-made hollow-core reinforced concrete slabs. The standard slab thickness is 220 mm, length 2.4-6.8 m, width 1.2-1.5 m, weight 0.9-2.5 tons. This type of flooring is one of the most popular, especially in houses with basements or large basements.
The installation algorithm is as follows.
- Preparation of the base - the plane of the foundation for the slab floor needs to be level, small differences, up to 50 mm, are leveled with a layer of cement-sand mortar. The base and slabs must be separated by a layer of waterproofing, or mastic or a weld coating is used. When laying interfloor ceilings, sometimes an armored belt is needed (if the walls are made of fragile masonry materials).
- Preparing the slabs - to prevent moisture from getting into the slabs themselves, the voids at the ends are sealed to a small (10-15 cm) depth with either rubble and thick cement mortar, or insulation and mortar.
- Laying slabs - the slabs rest on the foundation or walls with two short sides, the long side remains hanging. The depth of support of the slabs depends on the type of base: on a brick it goes at least 125 mm, on concrete 60-70 mm is enough, on porous blocks based on concrete the slabs go 12-15 cm. And this is not the case when the deeper, the more reliable , maximum is 20 cm. Mounting lugs (if any) are tied or welded using reinforcement. It is better to lay it on a layer of TsPS M100, it will act as a kind of lubricant, and it will be easier to turn the slabs.
- Sealing seams - thin seams are sealed with a DSP solution; fine crushed stone is added to the solution for sealing thick ones.
Nikolay_KurkinForumHouse Member
Sealing of joints between slabs must be done with high-quality concrete to prevent their warping (work according to the key scheme), for which recesses are usually provided in the slabs for the formation of dowels.
- Preparation for the finished floor - if the surface of the slabs is relatively flat, and there is no plan for an underfloor heating system or a finishing coating that requires an ideal plane, you can do without pouring a rough screed. Thick preparation is replaced with a thin-layer self-leveling mixture or a specialized substrate.
Laying such massive structures requires the use of special equipment, which somewhat limits the application, since not every house under construction will have access to special equipment.
A brief educational program, or What kind of floor screed do you need?
Before raising the question of how to make a floor screed, it is necessary to agree on terms.
A screed is usually called a layer of construction mixture laid between the base of the floor and the finishing floor covering. This layer performs such important functions as:
Depending on the composition of the mixture and the installation method, there are several types of screed.
Cement-sand mortar is most often used as a floor leveling material. Industrially produced dry mixes are most common in construction. They are made on the basis of cement and sand with the addition of plasticizers - agents that impart elasticity and plasticity, fiber fiber and other components that improve the properties of the screed.
According to the method of laying the floor screed, there are
- wet,
- dry,
- semi-dry.
The classic method - wet - consists of filling the base with screed mortar and then allowing it to harden.
The mixture is laid directly on the floor slab or on a layer of hydro- or thermal insulation. The last requirement is mandatory when installing the screed directly on the ground (for example, structures like a garden gazebo). A waterproofing layer is necessary for rooms with high humidity (bathhouse, bathroom).
Currently, wet screed is used less and less because it has many disadvantages:
A dry screed is made of sheet material, which is laid on the base on top of an insulating layer (expanded clay, sand, etc.). The advantages of this method are speed and ease of installation, low weight of the structure. The main disadvantages of dry screed are that the sheet material is afraid of water, so it cannot be used in rooms with high humidity, as well as its high cost.
Semi-dry screed can be called an improved version of the wet method. The composition is prepared on the basis of cement-sand mortar with the addition of fiber fiber and plasticizers. When laying, a pneumatic blower is used, which mixes the components and delivers the mixture to the object.
Note: A pneumatic blower is a special compressor machine for preparing, mixing and transporting various building compounds.
This method is called semi-dry because the additives significantly reduce the moisture content in the solution. Thanks to this, the screed becomes light, strong, and elastic.
It takes only 12 hours for the solution to dry. After a few days, the final decorative coating can be laid on the screed. This method has, perhaps, only one drawback - the need to use special equipment.
Monolithic floors
Unlike prefabricated reinforced concrete slabs, monolithic floors do not have seams and do not require the use of lifting equipment. Monolithic floors in houses without a basement are usually interfloor, since it is not practical to cast the floor itself - it is more logical to either build a slab foundation, immediately obtaining a subfloor, or to pour the floors over the ground during the process of finishing the house.
Monolithic type ceiling - a solid reinforced concrete slab, supported by load-bearing walls and partitions; if necessary, support columns are also cast or laid out. All characteristics of the monolith are calculated during the design process of the house. The thickness of the floor is determined based on the size of the largest span (typical ratio 1:30), but not less than 15 cm. For spans up to 6 meters in length, the average thickness is about 20 cm; if it is necessary to fill a floor with spans larger than this value, reinforcement with stiffeners will be required. Pouring the slab is carried out in several stages.
- Preparation - assembling formwork from panels and supports, homemade formwork is usually made of thick (from 20 mm) moisture-resistant plywood, but it can also be plastic or metal. If a suspended ceiling is not planned, in which a flat plane is not necessary, the surface of the boards should be smooth. Supports can be specialized (metal, telescopic) or homemade (logs, beams with supports). Homemade formwork is assembled using hardware and timber; ready-made collapsible structures have factory fastenings. To seal homemade formwork, it is covered with thick plastic film; the prefabricated form is airtight, but to simplify the removal of formwork it must be lubricated. The assembled form is checked for compliance with the level so that it does not warp.
- Reinforcement - a spatial reinforcement frame is knitted from steel reinforcement, the diameter and mesh cell are calculated during design. To knit the reinforcement, use wire 1.2-1.5 mm thick; rigid fixation (welding) is unacceptable. To maintain the protective layer when pouring, the frame is installed on special clamps. During the assembly of the reinforcement frame, mortgages for communications are also installed.
- Pouring - the use of self-mixing mortar for concreting a monolith is rare; it is a necessary measure if it is not possible to order a ready-made mortar. Basically, the slab is filled with factory-made mortar (from M200), in one go, using a concrete pump: the mass is evenly distributed over the entire area and compacted with a vibrator.
- Caring for the slab - until the monolith reaches brand strength, it is cared for like other concrete surfaces, with the difference that instead of abundant watering, wetting.
Proper floor screed using the semi-dry method
If the question of how to make a cement floor screed using dry and wet methods is not new to you, then a semi-dry screed will seem almost an ideal option. The method allows you to obtain an equally smooth, strong and moisture-resistant base, but at the same time significantly saves hardening time and eliminates leaks and cracks.
Correct filling of floor screed using this technology requires the use of a pneumatic blower and other automatic devices. In a small area you can do without them, but due to the properties of the mixture, such installation will be extremely labor-intensive. In addition, thanks to special equipment, the solution is mixed evenly, and the surface is perfectly smooth, which is very difficult to achieve manually.
Necessary materials
When installing a semi-dry screed, M500 cement and washed coarse sand with a fineness modulus of 2–3 mm are most often used. A mandatory element of a semi-dry screed is waterproofing (polyethylene film) and polypropylene fiber, which replaces metal mesh.
Approximate costs
The consumption of cement and sand for preparing the mortar is calculated in the same way as when installing a wet screed. The recommended amount of polypropylene fiber is 600 g per 1 m 3 of solution [8].
Laying time
A team of specialists usually completes the installation of semi-dry screed in 1 day (for an area of up to 250 m2). Self-installation without a pneumatic supercharger will take much longer.
Laying stages
The stages of manual installation of a semi-dry screed are almost no different from those with the wet method. There are just a few nuances that we will focus on.
After determining the horizontal, upper and lower levels, and calculating the thickness of the screed, a plastic film must be laid on the prepared base.
The sheets are arranged overlapping, with an overlap on the walls. An edge strip needs to be laid around the perimeter of the room. The composition for the screed is prepared in such a way that the lump of the finished mixture does not disintegrate when squeezed in a fist.
A small amount of moisture may be released, but the solution should not be liquid under any circumstances. When installing without special equipment, the mixture must be evenly distributed in the space between the beacons and compacted with feet. Next, you should level the surface using the rule.
The final stage of laying semi-dry screed is sanding. This operation is most conveniently performed using a special trowel. You can step on the screed 12 hours after completion of work.
There is no need to remove the beacons from the screed. The use of a self-leveling mixture with the semi-dry method is not required: the surface will be smooth and even without it. Laying the decorative coating on the screed is possible already on the 4th–5th day after completion of installation.
Of all types of screeds, semi-dry screeds are the most popular.
And this is not surprising, because it has a number of advantages over other methods. Unlike classic wet screed, the technology reduces the hardening time of the solution, eliminates the risk of cracks and moisture seepage, and does not involve “dirty” processes. Compared to prefabricated structures made from gypsum fiber board sheets, semi-dry screed is much more durable.
Floor screed
Floor screed is a significant part of the cost of renovation. However, it is necessary - if the base is not prepared properly, no decorative coating will look good and will not last long.
It is necessary to make a floor screed if you need to level the concrete base in the room. The screed also improves the hydro- and thermal insulation characteristics; it allows you to create the required slope angle if a water drain is to be placed in the room; it also increases the rigidity of the floor.
What are the current prices for floor screed and what determines the final cost of the work?
Lightweight monolithic floors
While there are many advantages, the disadvantages of monolithic floors include heavy weight and the need to assemble and dismantle sealed formwork with a smooth surface. A lightweight type of monolithic ceiling, poured over a profiled sheet, is free from these disadvantages. Initially, this type of flooring was developed for industrial facilities, but is now used in private homes. The profiled sheet is a permanent formwork, which somewhat simplifies the process of installing the ceiling. For a support-free lightweight monolithic floor, a load-bearing profile sheet with a tongue of 60 mm or more, 0.7 mm thick or more, and a reinforcement frame are used. The corrugated sheet is laid with the narrow part of the corrugation down, in waves against the length of the span, the reinforcement frame consists of longitudinal reinforcement, transverse reinforcement and mesh. In fact, it turns out to be a type of ribbed monolithic floor, less thick than a conventional monolithic slab. This variety is also used as a basement floor.
BarmenFORUMHOUSE Member
Floor of the first floor: clear span 3.5 m, profile sheet H 60, galvanized 0.7 mm, bottom reinforcement 14, top 8, mesh with mesh 50×50 mm, thickness 4 mm, transverse reinforcement 8, bent in three waves. The height of the monolith is 145 mm, then EPPS 50 mm, then mesh and screed 65 mm.
Lightweight ribbed monolith is an alternative to other types of floors during reconstruction.
SorelliForumHouse Member
Mice have taken up residence in the wooden floors of the house. It was decided to replace them with concrete ones. Foundation grillage according to TISE. Foam block walls. The maximum span length is 3 m. I used 114 profile 1 mm, double reinforcement 10 inside, welded mesh 100x100x3 mm on top. Everything worked out great! I recommend it to everyone. Better than wood floors, and the cost is low.