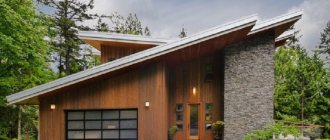
Shed roofs have the simplest design and are most often used in projects for outbuildings, garages, country houses, and for adjoining buildings.
The shed roof system is a rectangular or square-shaped plane , the opposite parts of which are inclined.
This arrangement occurs due to the different heights of the opposite walls of the building. It is not difficult to build a pitched roof yourself.
In this article you will learn how to make a pitched roof with your own hands - step by step.
Roofing material for pitched roof
The angle of inclination of the lean-to structure is determined by what type of roofing is provided for the external finishing of the roof . The slope is different for different surfaces.
Most often for this type of roof they use:
- Ondulin;
- Asbestos cement slate;
- Metal tiles;
- Bituminous shingles;
- Ceramic tiles;
- Cement-sand tiles;
- Copper, galvanized sheets;
- Profiled sheeting.
In addition, when choosing a covering for a roof with one slope, one should take into account natural phenomena (wind loads, snow precipitation, direction of wind gusts).
Roofing material
Step-by-step instructions for a shed roof
The process of making a roof is similar to those listed above. However, in this case, most often the walls of the barn itself act as a supporting surface for the rafters. The remaining layers are laid in the same way.
A wide selection of roofing materials allows you to choose the appropriate option for a pitched roof.
Explore the available solutions to install the system that best suits your specific building.
How to calculate the amount of material for a pitched roof
To correctly calculate consumables for a roof with one slope, you need to know the dimensions of the slope .
Rafter dimensions
The length of the rafter board depends on the outer covering , the pitch of laying the rafter boards or beams. So, for metal tiles the recommended pitch is 30 cm, for slate – 44 cm, for roofing with a flexible coating – arbitrary. In addition, for a roof with one slope, the distance between the rafters of the structure should not exceed one meter . If the timber is thin, the distance between such boards should be less.
IMPORTANT!
When calculating the number of rafter boards for a pitched roof, it is important to take into account the material that will be the final covering of the roof.
For each coating, its own characteristics of the rafter system are determined.
Rafter dimensions
Amount of material for wind board
Calculation of blanks for the wind board is made by determining the difference between the perimeter of the entire slope and the lower part , which refers to the cornice. This indicator will be the size of the wind board.
Wind board installation
Number of materials for insulation, waterproofing, vapor barrier
The amount of consumables for arranging a pie with a lean-to structure is calculated based on the perimeter of the slope . If it is necessary to lay the base in two or more layers, then, accordingly, the quantity is multiplied by the number of layers. Depending on the features of laying one or another material, a small supply is taken.
In addition, it is necessary to stock up on boards for additional elements to ensure ventilation, drainage, and snow-retaining elements.
Waterproofing
Main advantages and disadvantages of the design
The advantages of this design include the following:
- Saving money on the purchase of building materials.
- Simplicity of design, and therefore installation.
- Light weight compared to the gable option - less load is placed on the walls.
- High resistance to wind and loads from snow accumulated on the roof.
- The structure can be erected in different angular ranges - from 5 to 45º.
- The pitched roof, made at a slight angle, allows you to install a hot water tank or solar panels on it, as well as create a place to relax.
- Such a structure can be covered with any of the existing roofing materials, of course, taking into account the conditions of its operation and the angle of inclination.
Snow retainer
Naturally, like any structure, a pitched roof has its drawbacks, which you also need to know when choosing this option:
- A roof with one slope requires more serious insulation than a gable roof, since there is not such a large space under it that creates an air gap. Without reliable thermal insulation, the attic space will become very hot in the summer months and cool down in the winter months, in both cases transferring the temperature into the house. However, if you correctly calculate and install all the elements, this drawback can be avoided.
- If the ceiling is made immediately under the roof, arranged at a small angle, then the house loses not only the upper air gap, but also the attic, and therefore the opportunity to arrange an additional room - this can be considered the second design flaw. But, if the attic space is planned a little differently, then this drawback can be overcome.
One of the disadvantages of a pitched roof is the accumulation of snow masses on it.
- Another disadvantage of a pitched roof applies only to a structure that has a slight slope of 5-10º - this is poor shedding of snow masses from it. So, if there is a large accumulation of snow, the roof will have to be cleared manually or a heated roof system can be made using a heating cable.
Installing roof heating will help solve this problem.
Prices for heating cable and components
Heating cable and accessories
Video: small country house with a pitched roof
Construction of the rafter system
The rafter system of a pitched roof implies the presence of a minimum of elements necessary for its installation.
The system can be installed with or without additionally installed supports.
Support system
If the span between the outer walls is more than 4.5 m , then it is advisable to install additional elements (struts, racks, purlins) to distribute the load along the perimeter.
If the span is more than 6.5 meters , then additional supports must be installed in the center of the room. A single-pitch system with such a device is more reliable and durable .
Support system
System without additional supports
If the span is less than 4 meters , then layered rafter boards are installed, which are supported only by the opposite walls. This design is hanging and is supported by beams laid on the mauerlat.
Support-free system
Sliding system
A system in which the main load falls on the mauerlat . In this case, the beams are attached to the walls using sliding elements, allowing temporary subsidence of the building without changing the roof structure. This system is most common for log structures .
Sliding system
Features of the roof design with one slope
The structure includes one slope plane, which is formed by an independent rafter system. The extreme parts of the rafter legs are built on reliable supports, so they are classified as layered. The rafter system consists of individual elements that rest with their ends on the opposite walls of the building.
The rafter system of a pitched roof usually has several vertical supports
You can use 1 or 2 rows of pillars as supporting parts. A prerequisite for installing rafter legs is the presence of support under the ridge end of the rafter.
The parts must be mounted separately. They are installed on walls of different heights, to which they are fastened through a Mauerlat. The latter differs from an ordinary wooden frame. The structure consists of two beams, which are laid parallel on walls made of stones, the last crown of a log house or on the frame of a frame structure.
The overlying part of the mauerlat is usually called the ridge beam. However, the structure will not create a ridge fracture; it is used as a support. Supports for a roof of this type can be made:
- Made of brick, concrete or wooden slats.
- Using a series of supports, which are intended for further finishing.
Types of pitched roofs
The design of a pitched roof is simple, but it can be erected in different ways.
- The roof can be insulated or cold.
- You can arrange an attic space under the roof. In their pure form, attics are quite rare, since fire safety standards do not allow an attic height of less than 1.6 m. For a pitched roof, it is advisable to create an attic space only if a residential attic or a small room for domestic purposes is installed between the roof structure and the upper floor .
- In most cases, pitched roofs are made flat. Mostly there are structures with a slope of 5–15°. Although there are also steeper roofs with a slope of up to 60°. It all depends on the wind and snow load in the construction region.
A pitched roof can be built:
- above a separate household or residential building;
- above the terrace, bathhouse, entrance lobby, garage, etc. attached to the main building.
The removal of sediment from the slope will occur automatically. This is achieved thanks to the difference in the height of the walls, which are used as supports. Accordingly, there is no need to install an internal drain. Quite often a gutter is attached to the low side, which does an excellent job of draining water in the summer. In winter, snow sometimes collects on the gentle slope
In this case, the roof can be cleaned, taking the necessary precautions
Drainage systems on pitched roofs
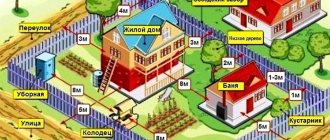
A pitched roof must have a slope. A drain for such a building can be:
- organized;
- unorganized.
Organized drainage presupposes the presence of gutters and pipes that drain precipitation to specially designated places.
The drainage system in such houses is made external, there is no need to arrange an internal one. Drain gutters should be installed from the side of the low wall “in a cross” towards the drain.
The gutter must be mounted on the side of the low wall perpendicular to the direction of drainage
Wastewater should be discharged into the drainage system.
The tilt of the building can be ensured:
- partitions or rows of supports that differ in height;
- supporting parts fixed to the wall of the main building, which are located above the level of the opposite wall;
- half truss, which is installed on walls or supports of the same height.
Materials for covering roofs with one slope
You can cover a lean-to structure with one of the following materials:
- tin for roofing;
- rolled materials;
- slate;
- corrugated sheeting;
- metal tiles.
If you want to make a beautiful building that matches the general style of other buildings, you can use plastic, slate tiles or tiles.
Installation of artificial roofing is carried out only if the angle of inclination is allowed by the manufacturers of the material. Pitched structures with a slight slope cannot be covered with straw and other similar materials, as they can quickly rot.
Construction of a pitched roof
Roofing pie - the inner layers of the roofing covering, which ensure the reliability of the roof itself, warmth in the building, dryness and comfort . The determining factors in the arrangement of the roofing pie are the purpose of the structure and the external covering material of the roof.
You can read more about roofing calculations here.
For a classic cold pitched roof, the roofing pie consists of the following layers:
- Rafter system;
- Waterproofing;
- Counter grille;
- Finish coating.
If the project provides for a warm room , then the roofing pie diagram looks like this:
- Rafter system;
- Waterproofing layer;
- Insulation;
- Vapor barrier;
- Final roof covering.
Depending on what the roof will be covered with, the counter-lattice is laid on the vapor barrier layer.
Roofing pie device
Pros and cons of a pitched roof
Like any other roofing structure, a pitched roof has its advantages and disadvantages. Before choosing this option, it is worth comparing the pros and cons. If the latter are not critical, it is worth considering the possibility of installing such a system.
The advantages of a pitched roof include:
- Availability. Compared to designs of other types, this option can safely be called budget. By making a choice in its favor, you can save not only on the amount of materials purchased for roof installation, but also for other structural elements of the building. Requirements for the strength characteristics of walls are reduced due to the lower weight of the roof;
- Ease of design. Not only specialists, but also ordinary consumers can correctly calculate a pitched roof;
- Maintainability. If necessary, you can always quickly repair the rafter system and sheathing due to the simplicity of their implementation;
- Reduced windage if the building is located in an area with a predominance of winds of a certain direction. In this case, you just need to choose the right location for the slope of the slope;
- Possibility of using various roofing materials, subject to compliance with the manufacturers' requirements for the angle of inclination.
Among the disadvantages it is worth noting:
- Impossibility of organizing an attic or attic. If you plan to expand your living space in the future, it is worth considering other options for roofing systems;
- Non-standard appearance. In some cases, departure from traditions is an advantage, as it allows you to emphasize your individuality;
- Low level of thermal insulation.
Do-it-yourself pitched roof: step-by-step installation
How to make a pitched roof? To properly install a single-pitch structure, you should make a design that includes all the dimensions of the consumable elements.
It is also important to decide how the roof will be equipped : with ventilation (for baths and living quarters) or without it. When arranging ventilation , provide ventilation gaps between the insulation layers and side openings on the sides of the roof.
If there is no need for ventilation (when building garages, terraces), then the slope of such a roof is minimal and its arrangement requires a minimum of effort .
Preparation of roof installation work includes the availability of the necessary materials and tools.
Frame house with pitched roof
Materials required for installation
Basic materials for equipping a pitched roof:
- Logs (beams) . Necessary for installation of the rafter system and Mauerlat. It is very important to have coniferous or deciduous wood and that it does not have a moisture content of more than 20%, and it is preferable to choose laminated timber. The diameter of the beam is not less than 10 cm, and the log should not have a cross-section of no less than 12x12 cm. All wooden elements must be treated with special antiseptic preparations;
- Board or timber for sheathing . It is desirable that the material does not have knots and has good quality characteristics . The cross-section of the timber or the width of the board determines the finishing covering of the roof;
- Edged boards . Necessary for creating an end strip. If metal tiles are used for covering, then additional elements can be used ;
- Elements for fastening . Self-tapping screws, nails or anchor bolts are used to secure all frame elements. For each type of material, different fasteners or a combination of different fasteners are used to increase strength.
In addition, to equip a warm roof pie, you should purchase vapor barrier material, waterproofing, insulation, as well as roofing material with additional elements (if necessary).
Work order
Work on installing a pitched roof is carried out in the following order:
- Installation of the Mauerlat;
- Installation of floor beams and rafter legs;
- Rafter system equipment;
- Installation of sheathing;
- Consecutive installation of layers of roofing pie;
- External covering.
CAREFULLY!
When installing the roof, you should take each stage of the work seriously, since the functionality of the roof will depend .
You should not skimp on materials, since a pitched roof should last for decades and retain all its characteristics.
DIY pitched roof: drawings and photos.
How to build a pitched roof step by step
Drawing
Calculation of the slope angle of a pitched roof
When calculating the angle of inclination, one should take into account the snow and wind load in a particular region, as well as the type of roofing material that is planned to be used during the construction of the building.
For example, it should be taken into account that if the angle of inclination is less than 20 degrees, the snow cover will constantly lie on the slope without sliding. For larger values, the possibility of snow melting depends on the type of roofing material.
As soon as the angle exceeds 50 degrees, the last factor becomes unimportant: the snow cover will not linger. An exception is the special design and formation of ice.
The weight of the formed snow cover is important from the point of view of subsequent strength calculations. When making approximate calculations, you can use reference information.
Wind load is taken into account not only from the point of view of the location of the structure being erected, but also its height. If the house being built is less than 10 m, the value of the wind load can be neglected when performing calculations. However, only if the object is not being built in an open area.
When calculating the optimal value of the roof slope angle, you should remember that:
- A large wind load is the basis for reducing the desired parameter;
- Significant snow cover is a reason to increase, since in this case it will be possible to achieve snow sliding from the surface.
Attention! The calculated value should be optimized in terms of the frequency of cleaning the roof and the likelihood of damage to the roof due to strong gusts of wind.
Another important parameter is the type of roofing. If you decide to give preference to a certain variety, you should read the manufacturer’s instructions, which indicate the optimal values.
So, at angle:
- Less than 10 degrees – choose rolled materials;
- From 10 to 20 degrees - corrugated. Installation of slate, ondulin, metal profiles is appropriate;
- From 28 to 35 degrees, metal roofing sheets are suitable; the seam method is used for joining;
- 25 – 35 degrees. The best option for metal and ceramic tiles.
Attention! If you plan to use heavy and fragile material, you should avoid installing steeply sloped roofs.
Having all the above initial data in hand, determine the angle of inclination.
Rafter system
Installation of a rafter system for a pitched roof with a small span involves laying beams on opposite walls at a distance of about 80 cm.
The beams are attached to a pre-installed Mauerlat.
Rafters are installed on the fixed beams, the number of which should be equal to the number of beams.
Next, inclined beams are installed, which are attached with nails to the Mauerlat.
Thus, the finished rafter system is supported on the rear wall of the building . In this case, the slope angle depends on what type of coating the structure has.
Rafter system
Shed roof with a small angle of inclination
If the slope angle is relatively small, installation work is performed in the same sequence. However, in this case, close attention should be paid to the level of waterproofing.
The work is carried out as follows:
1. The rafter system is installed. An OSB sheet is laid on top;
2. Primary waterproofing is carried out;
3. Thermal insulation material is laid;
4. The surface is re-waterproofed;
5. Roofing material is laid.
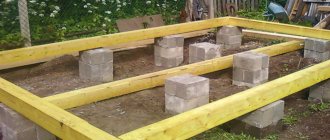
Mounting the Mauerlat
Mauerlat refers to a roofing element that is installed on a load-bearing wall or installed between floor beams. The Mauerlat is a support for the rafter legs and transfers the load from the roof structure to the walls of the building .
For a pitched roof, the mauerlat is made of beams that are secured with anchor bolts. When pouring the wall, it is necessary to screw in the anchors in advance for mounting the Mauerlat . Before laying the beams, it is necessary to lay a layer of waterproofing.
It should be noted that the Mauerlat can be made of different materials , depending on what the walls are made of. Thus, anchor bolts are suitable for a wooden structure, reinforcement is suitable for foam blocks, and annealed wire is suitable for a brick wall.
Mauerlat
Shed roof for a gazebo or garage
Most often, a similar design is chosen for a garage or gazebo. After the walls are completely erected, installation work begins:
1. A layer of waterproofing and a Mauerlat are laid on the wall;
2. The rafters are installed, and preliminary cuts are made for installing the end board. The elements are fixed using a metal corner;
3. The waterproofing film is stretched. A counter-latt is attached along each rafter. A sheathing is installed across the rafters. Sheathing boards are cut to size;
4. Sheets of corrugated sheets are laid on top of the sheathing. The trim board is installed.
Installation of sheathing
The sheathing is the supporting element on which all layers of the roofing pie are laid, so it is necessary to choose the right material and calculate the laying step.
The cross-section of the beams should be approximately 5x5 cm. The beams are laid across the rafter leg .
The rafter board should extend half a meter beyond the wall line.
Depending on what type of roofing needs to be laid, the pitch of the sheathing is determined:
- If the coating is sheet, then a step of 1.5 meters is sufficient;
- For slate, the step should be about 1 meter;
- A continuous sheathing is laid under the corrugated sheeting.
The rafters are attached to the mauerlat by cutting into the board at an angle.
Lathing
Instructions for performing work
Before making a pitched roof, you need to choose the right lumber for the rafter system and sheathing. In this regard, we will give the following recommendations:
- for a span of up to 4.5 m wide, rafters made of 15 x 5 cm timber are suitable, up to 6 m - from 200 x 50 mm boards, spliced in pairs or lengthwise;
- timber 150 x 50 mm will be used for the wall frame (mauerlat) and the beds;
- cross-section of racks, struts and purlins – 10 x 5 cm;
- the sheathing is made of boards 20-25 mm thick and 10-15 cm wide.
For waterproofing, you will need roofing felt and a superdiffusion membrane, and for laying the finishing coating, metal tiles, corrugated sheets or other roofing material. If we are talking about a residential building, do not forget about insulation: prepare mineral wool of the required thickness (or other insulation) and a vapor barrier film.
Laying the Mauerlat
The strapping beam should be placed on 2 opposite walls, where the rafter legs rest. If it is planned to support the layered system on internal partitions, then a board called a bench is also laid on them. The exception is log and frame houses, whose walls are ready for the installation of rafters.
The technology for laying Mauerlat on walls made of different materials looks like this:
- Studs are pre-embedded into the brickwork, onto which the strapping beam is attached. Before installation, the stone wall is covered with 2 layers of roofing felt. If the studs were not installed, then the Mauerlat is secured with anchor bolts or pulled together with steel strips.
- Before installing the Mauerlat, porous walls built from aerated concrete should be tied with a reinforced concrete belt, as done in the diagram. The studs for fastening are placed into the monolith during pouring.
- In wooden extensions (verandas, terraces) built with your own hands, to support the rafters you need to attach a second board of the same width to the top trim beam of the wall. To install the upper end of the rafter leg, you need to screw a horizontal beam 15 x 5 cm to the wall of the existing building. This operation is demonstrated in more detail in the video below.
Installation of rafters step by step
Before building the frame, you need to determine the actual length of the rafters, taking into account the extensions beyond the walls that form the eaves overhangs. However, the canopies can be extended after installation by nailing boards cut to size to the rafter legs - the so-called fillies. The minimum length of the roof overhang is 300 mm.
Then proceed in this order:
- To increase the internal partition to the height of the inclined plane of the roof, assemble a frame from vertical supports connected at the bottom by a plank and at the top by a purlin. The location of each rack must coincide with the pitch of the rafters that will rest on them. For stability, secure the frame with struts.
- Try the rafter in place and cut it from below at three support points in order to increase the area of contact with the Mauerlat and the beds, as shown in the photo.
- Install the rafter leg and attach it with self-tapping screws to the steel corners. Repeat the operation at 3 points, then move on to the next beam.
- Trim the legs of the eaves overhangs, and then sew them up from the bottom and sides with clapboard. It is more convenient to do this before the roof covering is laid.
If the side gables are not laid under the slope of the future roof, then they should be covered immediately after assembling the rafter system. Otherwise, you will then have to do this work from ladders or build scaffolding. For installation of a truss system for a pitched roof of a large building, see the next video:
Lathing and finishing coating
Before laying the boards on the roof slope, the rafter system is covered with sheets of super-diffusion membrane, which provides protection from wind and moisture entering the attic space. The canvases must be laid horizontally, starting from the bottom, and secured to the upper plane of the rafters with counter-lattice bars with a cross-section of 5 x 5 cm. The membrane should sag slightly between the rafters to drain water, and adjacent canvases should be glued together (the overlap is 15 cm).
The sheathing boards are nailed to the rafters in increments depending on the type of roofing:
- under metal tiles – 35 cm;
- for corrugated board and slate – 50-60 cm;
- Under shingles, bitumen and ceramic tiles, the sheathing is continuous.
The last step is the installation of coating and insulation (if necessary). Thermal insulation of a pitched roof is best done along the ceiling, leaving the unused attic cold. How to properly insulate ceilings is described in our guide.
Fastening insulation, vapor barrier, waterproofing
After the sheathing is ready, it is necessary to insulate the roof. To do this, lay the layers in the following sequence:
- Waterproofing layer;
- Insulation;
- Vapor barrier.
The waterproofing is secured with a stapler and overlapped to the sheathing . In this case, the material should not be pulled, it should sag slightly.
Next, the thermal insulation layer is laid so that there are no air gaps .
The vapor barrier is installed at the final stage before laying the covering material .
ATTENTION!
If the slope has a minimal slope, then expanded clay or sawdust can be laid as insulation.
Vapor barrier and waterproofing
Installation sequence
Now we will tell you how to make a pitched roof with your own hands step by step. As a rule, roof installation begins with the installation of a Mauerlat. The rafters will rest on this beam. If your building is made of wood, then the role of the Mauerlat will be played by the last crown. For construction made of brick or concrete, the mauerlat is made of wood (beam 100x100 mm). In this case, it must be isolated from the walls using a layer of roofing material.
Installation of the rafter system
The most economical option is to install rafter legs on two opposite walls of the building that differ in height. For work you will need a minimum amount of lumber. Step-by-step instructions for installing rafters are as follows:
- after laying the mauerlat beam, a board is placed across it, which should protrude 40-50 cm on both sides;
- on the board they mark the groove for the rafters (the width of the groove must exactly match the width of the rafter leg, and the height should not exceed a third of the height of the element);
- after making the template, the cuts are marked on the mauerlat for each rafter leg;
- After cutting and laying the rafters, they are attached to the horizontal beam using nails or self-tapping screws.
In the case of installing rafters on walls of the same height, it is easier to make triangular trusses made of wood, consisting of rafters, racks and horizontal beams. In this case, you do not need to increase one of the load-bearing walls to the required height, but the wood consumption during such installation increases. However, due to the fact that the truss can be assembled on the ground, the installation process is greatly simplified and accelerated. The truss mounted on the ground is lifted onto the house using winches or other lifting equipment. Otherwise, the process of making cuts in the mauerlat and laying trusses on a horizontal beam does not differ from the method described above.
Often, when installing rafters, it is necessary to use additional spacers, struts or supports. The number of additional elements and the location of their installation depends on the following factors:
- weight of the supporting roof frame;
- tilt angle;
- distances between load-bearing walls;
- length of the rafter leg;
- types of roofing;
- choice of thermal insulation material.
Waterproofing and lathing
Now you can perform waterproofing. To do this, the selected material (roofing felt or polyethylene film) is rolled out across the rafters. The first row is laid along the bottom of the slope, and each subsequent row overlaps the previous one by 0.15 m. The joint of the strips is taped. The waterproofing is attached to the rafters using a construction stapler.
If you decide to make a ventilated roof, then there must be a ventilation gap between the waterproofing layer and the roofing material. To install it, counter battens are placed on the rafters on top of the waterproofing. For these purposes, a beam with a cross section of 0.3x0.4 cm is used.
Let's start doing the sheathing. Depending on the chosen roof covering, it can be continuous or sparse. To make a continuous sheathing, you can use a board, moisture-resistant plywood or OSB. As a rule, such lathing is needed for soft roofing or thin profiled wall sheets. To perform sparse lathing, take a board, which is laid in increments of 0.3-0.4 m. Now you can lay a suitable roofing covering.
Insulation
You can learn how to properly install a pitched roof from the following video:
At the last stage, the roof structure is insulated. The work is being done from the inside of the roof. Thermal insulation material is laid between the rafters so that it fits tightly to them without cracks or gaps. For this purpose, it is better to choose insulation boards with a width slightly larger than the pitch of the rafter system.
It is better to use mineral wool as insulation, since it is denser and will not sag and require additional fixation with ropes. Now we attach a vapor barrier membrane to the rafters on top of the insulation. For fixation we use a stapler. Be sure to overlap the strips and seal the joints with tape.
Fastening roofing material
Roofing material is the final covering of the roof.
It is a defining indicator of all work on the arrangement of a pitched roof.
The order of work and the characteristics of the materials used depend on the type of roof.
The roof covering is installed in accordance with the instructions and installation specifications.
Different manufacturers give an example of installation in accordance with the base.
In addition, after laying the covering, additional elements should be installed.
Types of additional elements
Additional elements play a significant role in roofing equipment , so they should not be neglected. Elements for gutters, strips, weather vanes, elements for retaining snow must be installed in order to maintain the functionality of the roof .
Thus, the installation of a pitched roof can be done with your own hands quite efficiently.
You should not omit such indicators as the direction of the wind in the region, the amount of precipitation when calculating the design of the structure, since the frame bears the main load of the roof. In addition, you should not skimp on components .
Additional elements