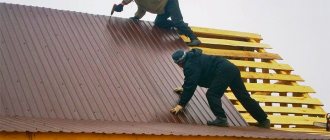
The roof sheathing plays the role of a frame for fastening the roofing material. The quality of installation work and the tightness of the roof depend on how correctly it is done.
To make lathing for metal tiles, grade 1 coniferous wood is used: spruce or pine. To save money, you can choose grade 2 material, but all boards must be smooth and dry. Wood defects such as rot, wormholes, and cracks are not allowed.
All lumber is treated with special compounds. To increase fire resistance, wood is impregnated with fire retardants. Antiseptics are used to protect against rotting, mold or mildew.
depositphotos
What is the lathing used for?
To lay roofing materials, a deck is installed, which is attached to the rafters and gives the roof frame additional rigidity. It can be made from boards, bars or sheet materials - OSB, moisture-resistant plywood. If the roof is made of metal structures, then the sheathing is often also metal.
The design of the deck is selected according to the loads, the characteristics of the roofing material and the technological requirements for installation. The necessary load-bearing capacity, stability, fire safety and service life must be ensured.
Installation of additional elements
The installation of a metal roof does not end with laying the roofing material. To make the structure more durable, protected from atmospheric moisture and complete, it is necessary to install valleys, a ridge profile and cornice strips. The work is performed in the following order:
- Install the ridge profile. It is attached to the sheathing along the ridge connection with roofing screws. To protect the ends of the profile from water ingress, a special seal is used.
- Fix valleys and other valley elements. To protect the joints between the slopes and the junctions with vertical surfaces, special strips are installed.
- Eaves and gable overhangs are equipped with special strips that protect from moisture and wind.
- The eaves and gable overhangs are covered with soffits. These perforated panels protect the lower surface of the slope, not protected by waterproofing, from contact with water.
- Install drainage, snow barriers and lightning protection.
Remember! Valleys, ridges, junction strips and gutters are not decorative elements of the roof. They perform the function of protecting the canvas from leaks, sealing it. Provided the roofing pie is properly equipped and auxiliary components are used, a metal tile roof will last 20-30 years.
Additional roofing elements for metal tiles
Features of fastening metal tiles
Roofing sheets are produced by cold stamping, resulting in a characteristic profile reminiscent of natural tiles. In addition to being decorative, such a relief imparts rigidity to thin rolled products. To ensure that the covering fits tightly to the flooring, the fastening is made to the bottom of the wave. Special roofing screws with elastic gaskets are used to prevent water from flowing into the joint.
Metal tiles are a barrier between warm and cold air, so when temperatures fluctuate, condensation forms on its lower surface. Drops of water falling into the under-roof space create a danger for the wooden rafter system and insulation. Therefore, hydro-windproof films or membranes are laid under metal coatings.
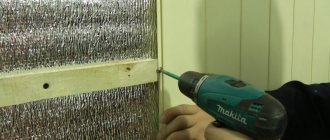
To prevent contact of the sheathing with wet waterproofing material, and also to improve air circulation, a counter-lattice is attached over the rafter legs. It consists of bars with a cross section of 30x50-50x50 mm, installed along each rafter.
The ventilation gap formed by the counter beam promotes faster weathering of condensate, and the hydro-wind protection forms a water-impermeable coating. In addition, the counter-lattice additionally presses the films against the rafter system.
The sheathing is nailed to the rafters through the bars. Metal tiles are mounted on top. Self-tapping screws must be positioned according to a certain pattern to ensure the strength of the sheets during gusts of wind. Joints and abutments are covered with profile elements.
Waterproofing under metal tiles
During the operation of the house, condensation forms under the roofing material, which leads to rotting of the elements of the wooden structure and wetness of the thermal insulation. Moisture has a negative impact on wood and leads to its gradual destruction, which may require significant costs for repair work. To protect wooden products and insulation from condensation, waterproofing is used. The choice of material for waterproofing depends on what type of roof is planned - a cold attic or an insulated attic.
- Cold roof waterproofing is carried out using diffusion membranes and waterproofing films. The latter are laid on top of the rafters with a sag of about 2 cm between them. The flooring is carried out in strips, starting from the bottom of the roof slope with an overlap between layers of 50–100 mm. The joints are sealed with a special tape.
To waterproof a cold roof, polymer films are used, which must be laid with a slight sag. - Protecting a warm roof from moisture is more expensive and requires more labor. Waterproofing in this case is performed differently and depends on the material used:
- if a film with low vapor permeability is used, you will need to build two gaps for ventilation - between the insulation and the film and between the film and the sheathing. Basically, thermal insulation is placed between the rafter legs at the same level as their upper plane. To create one gap, you need to fill the rafters with counter-lattice bars, and lay the film on top without sagging. After this, strips are nailed on top of the film to the counter-bars, which will provide a second gap, and the sheathing is already attached to them;
If a film with low vapor permeability is used for waterproofing, a ventilation gap must be provided between it and the insulation.
A more appropriate option is to install waterproofing with one ventilation gap. The method involves creating a gap only between the sheathing and the film, which allows steam to pass through well even when laid without a gap, i.e. directly on the heat insulator. The membrane is fastened to the rafter structure by overlapping the upper strips onto the lower strips, with the seams necessarily sealed using adhesive tape.
- if a film with low vapor permeability is used, you will need to build two gaps for ventilation - between the insulation and the film and between the film and the sheathing. Basically, thermal insulation is placed between the rafter legs at the same level as their upper plane. To create one gap, you need to fill the rafters with counter-lattice bars, and lay the film on top without sagging. After this, strips are nailed on top of the film to the counter-bars, which will provide a second gap, and the sheathing is already attached to them;
Even if a breathable membrane is used, the use of a counter batten is necessary.
Instead of modern materials, you can use the well-known roofing felt. However, it is in many ways inferior to new waterproofing products. Ruberoid is characterized by a short service life, burns well and emits a pungent odor when heated. If you listen to the opinion of experts, then you should not use roofing felt as waterproofing under metal tiles.
Types of lathing for installation of metal tiles
For fastening materials, 2 types of lathing are used - sparse and solid. Let's consider in what cases it is advisable to use one or another option.
Sparse
It consists of individual elements - edged boards, bars. Placed under metal tiles parallel to the eaves. Used at an inclination angle of 20°.
The distance between the boards is taken to be equal to the wavelength, which, depending on the relief of the tiles, is 30-40 cm. In places where valleys are installed, along the eaves around roof windows and chimney pipes, continuous sheathing is provided.
Solid
It is most often installed under bitumen shingles, as well as corrugated bitumen sheets or corrugated sheets at a small angle of inclination - up to 20°. In roofing, metal tiles are used to strengthen rafter structures in areas of high loads and the location of protruding elements.
If the sheathing is plank, then individual boards are packed with a gap of 2-3 cm. This is necessary to compensate for the swelling of the wood when humidity changes. When using OSB boards or plywood, leave a gap of about 3 mm.
The advantages of continuous sheathing are high rigidity and load-bearing capacity of the deck, additional thermal insulation of the roof. Disadvantages: heavy weight, high material consumption and high price. It is rarely used for metal tile roofs, since for the required coating rigidity it is enough to install slats under the fastening points. In addition, with a continuous flooring, the ventilation of the under-roof space is much worse than with a sparse one.
Types of metal roofing
The purpose of the lathing is to ensure long-term and safe operation of the roof; based on these tasks, the right solution is selected. The design features of the roof are especially taken into account, and they have two options.
- Warm roof. Currently found very often, it allows developers to significantly increase living space with a minimum cost per square meter. The use of modern technologies and building materials makes it possible to create a favorable microclimate and beautiful interior in the premises. These are so-called attic buildings, for which it is necessary to construct a warm roof - a complex cake consisting of several layers. For such a roof, a counter-lattice is constructed; it provides effective natural ventilation. Without ventilation, loaded wooden elements of the rafter system quickly lose their original load-bearing capabilities.
For a warm roof, counter battens are required.
- Cold roof. The simplest design, rarely used in residential buildings. But this is the only option for arranging the roof over outbuildings, industrial buildings and other objects that do not require warm attic spaces. Accordingly, it does not have insulation; the surface of the metal sheets on the attic side is not covered with additional layers. The condensate evaporates naturally; there is no need to make a counter-lattice.
For a cold roof, one batten is enough
There are cases when counter-lattice is also built for cold types of roofs, but this has nothing to do with technological necessity. This is done in two cases: if hired builders want to earn more and if they lack knowledge.
Prices for metal tiles
Metal tiles
Lathing requirements
For the manufacture of lattice structures, as a rule, edged boards or bars from coniferous trees are used in accordance with GOST 8486-86. Due to their increased resin content, they resist rotting quite well. Nevertheless, treatment with antiseptics and fire retardants is desirable, which increases the fire resistance of structures and extends the service life of wood several times.
For the construction of the sheathing, grade 2-3 lumber is used. The tree must be free of rot, blue stains, falling knots and other serious defects. You cannot use a board with wane, where wood-boring beetles live under the bark. They quickly render the forest unusable.
The thickness should be the same along the entire length of the board. Bends, torsions and other geometry violations are undesirable.
The recommended board width is 100-150 mm. The thickness is selected based on the pitch of the rafters and the weight of the coating:
- 25 mm - if ordinary metal tiles are used, and the distance between the rafters is 600 mm;
- 32 mm - for reinforced roofing material with a thickness of 0.5 mm and a pitch of 700-900 mm;
- if the step is even larger, you can use lumber with a thickness of 40-50 mm.
The required humidity is no more than 18%. Raw lumber is prone to severe shrinkage and deformation, so before use it must be kept in stacks to the desired humidity.
Solid lathing in places that require reinforcement is made from the same board as the sparse one. For fastening, galvanized nails or long self-tapping screws are used.
Installation and fastening of sheathing
Step 1. Laying waterproofing
A waterproofing film or membrane is rolled out onto the rafters over the entire surface of the roof. It is fastened using a construction stapler, the joints are taped with butyl rubber tape. Overlap between adjacent sheets: horizontal 150 mm, vertical 100 mm.
Step 2. Installation of the counter-lattice
Counter-lattice bars are nailed onto the rafters (vertically) on top of the waterproofing. This element of the roofing pie forms an air gap of 50 mm to ventilate the roof, remove moisture and condensation.
To protect the mounting points from leaks, reduce vibrations and noise levels, use DELTA SHAUM-Band SB60 or D-TACK NAGELDICHT sealing tape. The tape must be glued between the waterproofing and the bars of the counter-lattice.
Step 3. Installing the sheathing
The lathing for metal tiles is mounted horizontally on top of the counter-lattice, with a given step, starting from the edge of the eaves and to the ridge. The boards are nailed to two nails at each fastening point.
The first board is aligned with the rafters. The distance from the edge to the center of the second board is 300 mm, the next 350 mm from center to center. If you need to join two boards, you need to do this in a run on different rafters (so as not to reduce the strength of the structure).
At the ridge on each slope, in the valleys and around the chimney, additional boards are stuffed to strengthen the structure.
Lathing calculation
To determine the amount of lumber needed, you will need to take some measurements or take information from the construction project.
The following are included in the calculation:
- total roof area;
- longitudinal wave pitch of metal tiles;
- the length of all eaves overhangs;
- length of valleys;
- cross-section of a board or timber for sheathing.
Lumber is sold in cubic meters, but you can convert it into pieces. To do this, the total volume must be divided by the volume of 1 board, which is equal to the product of its cross-sectional area and the standard length (usually 6 m).
First step. Find the volume of the sheathing for the slopes. To do this, divide the roof area by the wave pitch and multiply by the cross-sectional area of one board. All calculations must be done in the same units, for example, meters.
Second step. It is necessary to add additional lumber for the construction of cornices, valleys and ridge. Add up their length, multiply by the cross-sectional area of 1 board.
Third step. We sum everything up and get the volume of wood for the sheathing. To convert to pieces, divide by the volume of one board.
It is necessary to create a reserve of at least 10% for possible defects, pruning, etc. We multiply the volume (or number) of boards by a safety factor of 1.1. It is very convenient to use the online calculator.
With the result obtained, you can go to purchase lumber.
Smooth, rough or screw nails and self-tapping screws are used as fasteners. The quantity is calculated based on the consumption of 2 pieces per connection, that is, for every 6-meter board with a rafter pitch of 0.6 m, this is at least 22 hardware.
Design of security elements and their purpose
Ladder
To climb to the roof, you need a stable ladder. It consists of wall and roof ladders with brackets. 4 brackets are required per section; they are placed in the place of the lower wave bend, where the sheathing is solid. Both the brackets and the top of the roof ladder are secured with bolt screws. The wall staircase is installed so that the topmost step is opposite the edge of the cornice. In this case, the wall staircase itself must be aligned with the roof staircase.
Roof fencing
These metal elements are a necessary condition when working on the roof. They are secured using special supports to the continuous sheathing through the lower part of the wave, sealing with a rubber gasket. See photo above.
Transition bridge
Walking bridges are needed for safe walking on the roof from an attic window, hatch or staircase. They are fastened in the same way as fences, only continuous sheathing is not necessary.
Snow guards
Snow guards have a tubular design and are made of metal painted black, brown, red or green. They are installed along the entire perimeter of the roof, above the eaves overhang. In addition, they must be placed above the entrance to the house, attic windows, as well as above each level of a multi-tiered roof.
Nails or screws: which fastener is preferable?
Many people assume that self-tapping screws hold wooden structures together much more firmly than nails. And this is partly true. But the impacts on the roof have different directions, and with lateral loads, the self-tapping screws have no way to withstand them. They break, the connection is destroyed.
Nails are less resistant to pullout, but resist shear forces without breaking. They are more flexible than self-tapping screws and better withstand dynamic loads. Therefore, for the reliability and durability of fastenings of wooden structures, it is preferable to use nails.
Installation of ventilation and passage elements
The additional components of a metal tile roof listed below are needed for ease of installation of air ducts, antennas and other elements.
Ventilation outlet
Ventilation outlets are needed in each span of rafters, otherwise there will be no good air exchange. But if there is an uninsulated “cold triangle” under the roof itself, one exit for every 60 square meters of roof will be enough. A hole is made in the metal tile, and then the element is secured with self-tapping screws to the edges of this hole. If the outlet kit does not include silicone sealant, it must be applied additionally.
Sewer outlet
The sewer outlet is connected to the riser. A corrugated pipe is used for this. A piece of metal tile is cut out on the roof to install the passage element. After installing the waterproofing, sealant and sealant, the sewer outlet is inserted into the passage element (which is attached to the metal tile with self-tapping screws).
Output for antennas and electrical cables
To seal the junctions of antennas, cables and sandwich chimneys with roofing, special so-called antenna outlets are used. The rubber top of the antenna output is cut off and made 20% smaller than the diameter of the passing pipe and pulled onto the pipe. The base of the antenna output is given the shape of a metal tile profile and coated with silicone sealant, screwed to the metal tile with self-tapping screws.
In the photo (from left to right): 1. Ventilation outlet; 2. Sewage and exhaust outlet; 3. Antenna output.
How to make a sheathing for Monterrey metal tiles: step-by-step instructions
Monterrey metal tiles are a popular material for roofing. The sheets have a classic profile with a low-height incoming wave. The longitudinal step of the steps is 35 cm, so the sheathing boards are installed with the same distance in relation to each other.
Installation is done from bottom to top. Before starting work, control measurements of the slopes are carried out to determine their flatness and perpendicularity to the lines of the ridge and cornice. The boards must first be antiseptic and dried. If you purchase already processed lumber, they have a greenish or pinkish tint.
Installation of waterproofing
Waterproofing material is laid between the rafters so that the air flow can pass freely from the eaves to the ridge. A slight sag is provided to drain the draining condensate.
It is necessary to ensure that there are no obstacles in the path of air movement, and that moisture does not accumulate on wooden structures, for example, on slanting rafters on roof slopes or sheathing around the chimney. The waterproofing carpet is placed on top of the bottom board, and then onto the eaves strip, so this edge is secured after installing the sheathing.
When laid over insulation, waterproofing must be vapor permeable. This promotes the free evaporation of moisture from the material and the preservation of thermal insulation properties.
Waterproofing is not installed on the roofs of canopies, gazebos or unheated buildings. Since there is no temperature difference or the material communicates freely with the atmosphere, condensation either does not form or evaporates immediately. Accordingly, a counter-lattice is not needed.
Installation of counter beam
To install the counter-lattice, it is recommended to use dry planed timber, which retains its geometry well even with fluctuations in humidity. The waterproofing strips are fixed to the rafters with a stapler, and pressed against the top with a counter-lattice. Nails are nailed in increments of 30-35 cm.
When installing a counter-lattice under a metal tile, a gap must be left between the bars along the length. This allows you to create an open system of air channels under the metal tiles and provide additional ventilation of the under-roof space.
Markings for the sheathing are applied to the surface of the counter beam using a dye cord. If the boards are calibrated and have the same width, you can use templates instead of markings. They are made from pieces of bars according to the calculated step and, before fastening, are placed under both ends of the lathing. Galvanized nails or self-tapping screws are used to fasten the counterbeam.
Laying the sheathing
The first board is aligned with the cornice. A second one is attached nearby if long hooks are provided for the gutters.
You need to retreat 30 cm from the first board, this will be the axis for the 3rd guide. The rest are installed in increments of 35 cm, which are measured either between the centers or edges of the battens.
The length of the joint of the boards should be on the counter beam. Each end is nailed with two nails. The ends are not allowed to hang in the air. When laying, you need to control the flatness of the sheathing and, if necessary, adjust its position using pads.
An additional board is laid along the ridge line. It creates a rigid base not only for fastening metal tiles, but also profile parts.
Lathing for the valley
At the junction of the slopes, where an internal angle is formed, the loads are more intense. Snow accumulates in this area, and precipitation from a large part of the roof flows there. To arrange the recesses, double gutters are used - one is laid from below and attached to the sheathing, the second is placed on top and screwed to the metal tile. The joint is carefully sealed in the area of possible leaks.
A thickened or continuous sheathing is installed around the recess. The boards can be laid either across the slopes or along the rafters. Between them it is necessary to maintain a deformation gap of 20-30 mm. The reinforced platform must have a width of at least 300 mm on both sides of the valley axis. The lower additional profile is attached to the sheathing before installing the metal tile sheets, the upper one - after completion.
General principles of sheathing design
The lathing for metal tiles can be created solid or sparse.
Continuous sheathing
A continuous sheathing is mounted from sheets of moisture-resistant plywood or OSB, at least 10 mm thick, or from boards, however, laying them not completely solidly, but at intervals of about 10 mm. Both options have their drawbacks.
- A continuous sheathing made from sheet materials is, of course, very smooth, without any level differences, which sometimes happens when using poorly calibrated boards. However, in the context of the topic under consideration, this is where all its advantages end. But there are shortcomings, and very significant ones.
A continuous sheathing of sheet materials is required for flexible bitumen shingles.
For metal tiles, it will most likely cause more harm - Firstly, this is a very expensive business, since both OSB and, in particular, plywood will cost much more than ordinary lumber.
— Secondly, the tightest possible fit of metal tiles in the base over the entire area is by no means a good thing. The high thermal conductivity of the coating will necessarily lead to the formation of condensation even with daily temperature fluctuations. But a ventilated gap for the free evaporation of moisture and the release of water vapor is not provided for this installation. That is, moisture will begin to accumulate under the roofing with all the ensuing (sometimes this even has to be taken literally) consequences.
- Thirdly, if you look again at the diagram, which shows how the metal tile modules rest against the base, it becomes clear that such a sheathing, in general, is not required at all.
For flexible bitumen shingles - yes, this becomes the best base. But for sheets of metal tiles, it is quite possible to use cheaper and more practical solutions.
Prices for ceramic tiles
ceramic tiles
- A continuous sheathing of boards, which are located with a small gap from one another. This design is recommended for small roof slope angles when installing a roof made of corrugated sheets, slate or, for example, ondulin.
Solid plank sheathing.
Recommended for some roofing coverings with small slope angles. But for metal tiles, its necessity is doubtful... But metal tiles are fundamentally different from the roofing coverings mentioned above in that they do not rest on the surface along the entire length in the direction of the slope, but only along the line of steps between the modules.
Let's look at a similar diagram again:
A diagram explaining the doubtfulness of the feasibility of using continuous plank sheathing for metal tiles
As you can see, some of the guides, which are quite impressive, do not perform any load-bearing role at all, since the profiled sheet simply does not rest on them (circled as an example with a large ellipse). In addition, we cannot exclude the possibility that when installing sheets of metal tiles, a self-tapping screw will fall either between the sheathing boards or into the edge of the board, thereby causing a chip or not ensuring reliable fastening at a given point.
In other words, there is no technological need for a continuous plank sheathing, and in terms of the cost-effectiveness of using materials, it will be much inferior to a sparse one. This can be clearly seen below when we talk about materials.
Sparse lathing for metal tiles
This option seems to be the most optimal. As has probably already become clear, it is necessary to place the guide battens in such a way that the bottom of each horizontal row of metal tile modules has both reliable support at the bottom and a sufficient width of material for screwing in a roofing screw.
For a reliable metal roof, a sparse sheathing is sufficient
It is easy to assume that the step between the axes of the horizontal guides should exactly correspond to the longitudinal length of the metal tile modules, that is, exactly the parameter that was emphasized above.
An approximate diagram of a sparse lathing is shown in the illustration below:
Approximate diagram of the structure of a sparse sheathing for metal tiles
So, let's look at the structure of the structure:
The basis for installing the sheathing will be the rafter legs (item 1). However, it would be a mistake to attach guides directly to them - we have already mentioned above the danger of condensation accumulation under the metal coating. And waterlogging of wood, especially such load-bearing parts as rafters, leads to loss of durability of the roof structure. Therefore, the waterproofing membrane sheets (item 2) are first secured to the rafters with staples, which are then finally fixed to them with counter-lattice bars (item 3), which are attached along the length of the rafter legs.
A waterproofing membrane is laid along the rafters in horizontal rows from bottom to top, which is then fixed to them with counter-lattice bars.
For the counter-lattice, bars with a cross-section of 50×50 mm or planks of 30×50 mm are suitable. The counter-lattice not only fixes the waterproofing and becomes the basis for attaching the sheathing guides. It sets the very necessary ventilation gap between the roofing covering and the rafter system, thanks to which the back side of the metal tile will be effectively ventilated and remain dry.
Any durable film that does not allow water to pass through can be used as a membrane. But if the roof is made insulated, then it is necessary to use a special diffuse membrane that does not delay the release of water vapor from the thermal insulation layer.
Guide battens are mounted to the counter battens, strictly perpendicular to the rafter legs. They use either a board or timber. There are no strict rules for choosing material, but there are practice-tested recommendations.
For guides, sheathing is usually used, depending on the design features of the rafter system, either boards with a thickness of 25 and 32 mm, or timber 50x50 mm.
- If the pitch between the rafters does not exceed 600 mm, and ordinary sheets of metal tiles are used for the roof, then a board 25 mm thick and 100 or 150 mm wide will be sufficient.
- With a rafter pitch of 600 to 800 mm, as well as with a smaller one, but when metal tiles are laid from a thick steel sheet (more than 0.5 mm), or have a reinforced galvanized coating, it is recommended to make guides from boards 32 mm thick.
- If the distance between the rafters exceeds 800 mm, it will be more reliable to use timber, for example, 50x50 mm.
Installation begins from the bottom, with the starting guide (item 4). There are some nuances to take into account in this area:
— Firstly, the guide is attached along the edge of the rafter legs (or fillets, if it is with their help that the eaves overhang of the roof is created).
— Secondly, the thickness of the first guide should be greater than the others. This is explained by the need to compensate for the difference-step, which on this line extends beyond the sheathing to the outside. The amount of thickening of this guide is usually equal to the height of the step of the selected metal tile model.
— Thirdly, the sheet of metal tiles should extend outward by 50 mm to form a cornice overhang. In addition, it is in this area that the cornice board is also nailed to the rafter legs. That is, the distance between the first and second guides (shown as “a” in the diagram) should be reduced. Usually it is assumed that this step is 70 mm less than that established for all other sheathing.
Other variations are also possible here. For example, they use a board with a trapezoidal edge to facilitate the drainage of water from the waterproofing membrane.
Prices for popular models of screwdrivers
One of the possible options for arranging the eaves unit of the sheathing for metal tiles.
In addition, it is recommended not to spare an additional board and attach it close to the starting one. This measure will strengthen this unit, which is quite vulnerable to loads, and will make it easier in the future to attach wind boards along the gable overhangs.
So, after the starting one, the second guide is mounted with a specific step, and from it - all subsequent ones (item 5) up to the ridge. The pitch between them is kept uniform (indicated in the diagram by the letter “b”), in accordance with the length of the module of a particular roofing model.
There are also some features in the ridge area. Regardless of the set step, a finishing guide is attached along the ridge line (item 6). That is, the distance between it and the previous board or beam is determined locally, but it is necessarily less than the established step. It is into this guide that the upper edge of the roofing will be attached, simultaneously with the installation of the ridge elements. The thickness of the board is also selected locally - depending on which section of the module along its length the cut line of the metal tile will fall on. By the way, often, by analogy with a cornice assembly, reinforcement is also made in the area of the ridge by installing an additional board.
In addition, valleys are a special unit, that is, the intersection of roof slopes with the formation of an internal corner. This is perhaps one of the most vulnerable areas in terms of possible leakage, so special care is required here both with waterproofing and with the installation of additional elements that ensure the free flow of rain and melt water.
As a rule, along the valley line, the sheathing on both sides is made continuous
Usually along the valley line the sheathing is continuous. This can be implemented in different ways, for example, two or even three boards are packed along the valley on both sides.
There are nuances in the design of the sheathing even if a brick chimney pipe passes through the roof. How this area is developed is clearly shown in the diagram below.
Framing the opening for the passage of a brick pipe with sheathing
A similar approach is practiced (only without leaving a fire clearance) if it is necessary to frame future roof windows, brick ventilation ducts, etc.
The most common mistakes
Although laying the sheathing is not super complicated, gross violations are often committed during its installation:
- the use of low-quality lumber having different thicknesses and incorrect geometry;
- the pitch of the sheathing is uneven or does not correspond to the profile of the metal tile;
- lack of counter-lattice, which does not directly affect the quality of installation, but subsequently leads to rapid rotting of wooden structures.
You cannot lay metal tiles over old slate flooring. It is necessary to dismantle it and reinstall the boards with a different step. It is also advisable to use nails rather than self-tapping screws, which can quickly break.
Installation of sheathing as an important element of a metal roof
Before laying metal tiles, you should properly arrange the base for it. Forming the sheathing is one of the most important stages in installing a metal roof. It is a kind of frame for the future roof. A layer of waterproofing is attached to it on the inside, and metal tiles are attached to the outside. The performance characteristics of the entire roof structure will depend on the correctness of the work.
There are two options for lathing: solid and sparse. The first type of design involves joining all the boards close to each other. This technology will provide increased strength of the frame, but will increase material costs. In a sparse lathing, all wooden elements are located at a certain distance from each other. This value is determined by the interval between the waves of the metal tile, since the depressions of the elements are the strongest sections of the profile.
Important! When installing metal tiles, sparse lathing is predominantly used, which is due to the sufficient strength of the facing material, which does not require additional strengthening of the frame.
To install the sheathing under the metal tiles, a 50x50 mm beam and an edged board with a section of 32x100 mm and 50x100 mm are used. Along the eaves overhang in the lower part of the roof slope, two 50x100 mm boards are attached, acting as a base. Their height should correspond to the height of the counter-lattice.
When installing metal tiles, sparse lathing is predominantly used.
Before covering the roof with metal tiles, a counter-lattice is placed on top of the waterproofing layer along the rafters, repeating their location, from the ridge to the bottom of the roof, which is the basis for the lathing. For this, 50x50 mm bars are used. The distance between vertical elements is usually 60-90 cm.
Sheathing boards are mounted horizontally on top of this structure with a certain pitch using 50x50 or 32x100 mm timber. Wooden elements must be treated with an antiseptic composition to protect the wood from rotting, the formation of fungus and mold.
At the location of the ridge, it is necessary to ensure reinforcement of the sheathing, which is done by attaching two boards on each side of the ridge strip. The sheathing is also carried out under the valley, due to which an internal joint is formed between the two slopes. Where it is placed, the sheathing is continuous.
Preparatory work before installation
Tools for installing metal tiles.
Since the roof is the most important element of a building’s structure, its construction must be approached carefully and competently. It is important to remember that when performing such work it is necessary to pay attention to any small details. Before installing the roof covering, you must first calculate the required quantity. To do this, a drawing is drawn up that shows the actual dimensions and angles of the roof slopes.
Based on the drawing, it is quite easy to calculate the amount of required tiles, material for sheathing and other necessary “little things” (ventilation, cornices, eaves strips, chimney outlets and ventilation shafts). When calculating loads, it is necessary to take into account not only the weight of the metal tile, but also the weight of the entire “pie” - insulation, insulating materials and counter-lattice. The required quantity of all the listed additional materials is also calculated when drawing up the drawing. Among other things, the walls should be prepared for the installation of the roof.
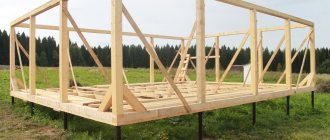
In order for the walls to withstand the weight of the roof with load (wind, precipitation and ice), it is necessary to make a concrete screed around the entire perimeter. If the area of the last floor is large, a screed is made for all load-bearing walls (and not just under the perimeter walls), concrete columns can be cast to strengthen the structure (they should be removed from the foundation, not the attic), supports are placed under the load-bearing beams of the rafters etc.
Next comes the construction of the rafters. For their construction, a massive wooden beam is used, which is treated with special impregnations to protect it from rotting, getting wet and drying out.
Lathing for metal tiles.
In this case, a very important point is the need to perfectly level the planes of the slopes.
If this is not done, the tiles may become deformed, which will lead to damage to the coating and its failure. If irregularities are detected on the slope planes, they should be eliminated. For example, you can trim the rafters with a plane or (in critical cases) replace them.
During the construction of rafters, their geometric shape should be constantly monitored. To do this, control the diagonals of each slope. If distortions are detected, they should be hidden with additional elements.
In this case, the minimum slope of the roof (with laid metal tiles) should not exceed 15º, while the length of the slope from the ridge beam to the eaves should not exceed 6 m. If the slope is longer than 6 m, then the sheets should be broken into several pieces and overlapped.
If the old roof covering remains on the rafters, then it must be dismantled, and after dismantling, check the integrity of the rafters and sheathing.
In the process of preparing for roofing work and when laying metal tiles, it is strictly forbidden to carry out other work on cladding facades, closing the pediment, etc.
Installation diagram of metal tiles.
Such work is carried out only after laying the tiles, otherwise the roofing material may be deformed.
To carry out the work you will need:
- timber or boards;
- roulette;
- self-tapping screws;
- screwdriver;
- level;
- scotch;
- marker;
- cornice strips;
- drainage system;
- membrane and vapor barrier films;
- insulation.
You may be interested in: Site about the foundation.