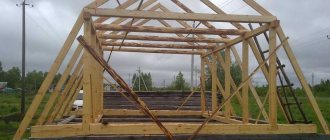
The rafter structure is the basis of any roof. Therefore, its creation must be treated with special attention. When installing a roof, most people turn to professionals, fearing that they will not be able to cope with the task on their own.
The rafter structure is the basis for the pitched roof.
But if the total area of the building does not exceed 100 m2, then the roof frame can be made independently.
The main difficulty that novice craftsmen face is attaching the rafters and ridge girder. But if you choose the right ridge beam and plan all stages of work in advance, then no difficulties usually arise during installation.
Preparatory stage of work
Types of rafter systems.
A ridge girder is a horizontal beam that is located in the upper part of the roof at the junction of 2 slopes. Typically, ridge beams are used as a beam. This type of lumber is specially designed for heavy loads. But before purchasing material, it is necessary to calculate the angles of inclination of the roof slopes. It is generally accepted that the smaller this angle, the cheaper it will cost to build a roof. Calculations should be based not on economic benefits, but on technical characteristics. It is necessary to take into account the load on the rafters and the estimated weight of precipitation (especially in winter). That is why in central Russia the fastening of the rafters is positioned so that the slopes are located at an angle of 45°. This type of roofing is considered optimal.
Next, you should select the required building material. A truly reliable roof can only be provided by a lightweight but sufficiently strong structure. Therefore, it is wiser to opt for lumber made from pine. For the roof frame, a board is usually used, the dimensions of which do not exceed 20x5x600 cm. In addition, it is necessary to purchase a ridge beam with a section of 20x20 cm.
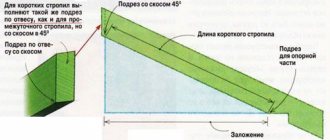
Figure 1. Roof ridge diagram.
When choosing materials, it is necessary to consider not only their size. You need to pay attention to quality. Never buy unseasoned lumber. After some time, the fastening of the rafters, assembled from such boards, will certainly fail. Accordingly, the entire roof is deformed. Remember that wood is considered ideal if its moisture content does not exceed 20%.
Before constructing the roof, all materials must be carefully prepared. They are checked to exclude the presence of rot or parasites and treated with antiseptics. This will ensure the durability of the rafters. If you are not going to install the fastening immediately, then prepare the materials for storage. To do this, select a dry and well-ventilated area. Do not place boards and timber on the floor. Place slats under them. The same base should be between each row of boards. The distance between them should be at least 1.5-2 cm. This is the only way to ensure free air circulation. Otherwise, moisture may accumulate in the wood and mold fungi will begin to multiply.
Installation of roof ridge
Before starting work, draw up a diagram for fastening all roof elements. An example of such a scheme is shown in Fig. 1.
Roof rafters.
Only with the help of such a drawing will you be able to correctly determine the required dimensions and think through the fastening of the rafters, which will be most effective for the selected roofing material.
A ridge beam is usually a crossbar located at the top of the roof structure. It is necessary in order to evenly redistribute the pressure of the roof onto the walls of the house. Installing such timber yourself is not the easiest job. And it must be approached with full responsibility.
First of all, you need to calculate the length of the timber you will need. Usually, when building traditional Russian houses, there are small protrusions on the sides of the roof. As a rule, their width does not exceed 1.5 m. The entire structure must be calculated so that the fastening of the ridge beam covers the entire length of the canopies.
Waterproofing is laid on the base of the roof (usually roofing felt is used for it) and the edges of the insulation are folded around the beam. Next, the structure is strengthened with reinforcement. To do this, take 2 rods of 40 cm each and fix them on the sides of the beam. It is wiser not to drill out the beam itself, otherwise cracks may appear on it.
Ridge beam extension
To carry out further work you will need the following tools:
- saw (if the lumber you choose has a significant thickness, then it is wiser to use electric or gas-powered tools);
- electric plane;
- perforator;
- hammer;
- building level and plumb line.
The roofing plate is installed using anchor bolts.
Sometimes the beam needs to be increased, since the standard 6 m is not enough for the roof ridge. It is more convenient to carry out this procedure directly at the construction site, because the extended structure can be quite difficult to transport to the roof.
The place where the beam fastening seam will go must be selected so that it lies on the ceiling (for example, a wall). Remember that a long beam needs additional support.
To provide vertical support, a sufficiently thick board is taken, to which 2 pieces of timber are attached to the sides. As a result, you should have an open frame in which the bars will serve as vertical supports for the beam. The junction of 2 bars on the ridge should be on this frame.
The sections of timber that will form the ridge are fastened together with sufficiently long (at least 2 m) boards. To do this, the ends of the beam are laid in the place provided for them, their correct location is checked using a level and they are sewn together with boards on the sides. With this method of fastening, the dimensions of the ridge beam are unimportant. The whole structure turns out to be quite reliable.
Installation of roofing mauerlat
Scheme of preparation of the truss structure and counter-lattice.
Mauerlat is a roofing element that is necessary to connect the rafters to the load-bearing wall of the building and properly redistribute the total load. To form such a structure, it is necessary to choose even boards, since they must fit tightly to the wall surface. Therefore, all bulges on the lumber must be removed in advance.
Installation of the Mauerlat begins with a waterproofing layer. All nodes are secured with anchor bolts no less than 20 cm long. Sockets for them must be formed in advance, calculating their location so that the heads of the bolts are between the fastening elements of the rafters and do not interfere with further installation. Sometimes the standard length of boards for the mauerlat is not enough. But they can also be increased.
Next they move on to the installation of rafters. But first you need to determine the required number of frame ribs. To do this, calculate the total length of the roof and divide it by 1.3 (the approximate distance between the rafters). The length of the roof is divided by the resulting number and the number of rafters is determined. For example:
8 m/1.3=6 pcs.
When calculating, fractional numbers must be rounded up. Thus, you will need 12 ribs (6 on each side). Once the required number of rafters has been determined, you can get the exact size between them:
8/6=1.3 m.
The rafters must be fastened at 2 levels: on the ridge beam and the mauerlat.
Section calculation
To select the cross-section of a ridge beam, it is necessary to carry out a calculation based on two indicators:
- for deflection;
- and calculate the fracture strength.
To calculate the ridge girder for deflection and strength, you must use the following formulas:
- First, you need to determine the internal stress that occurs in the beam when bending under the influence of an external load. This value should not be greater than the calculated bending resistance of the material, which can be found in the table or in SNiP number II-25-80. We find the internal stress using the formula: Σ = M:W, where:
- Σ is the desired value, which is determined in kg per cm²;
- M – maximum bending moment (kg X m);
- W is the moment of resistance to deflection at the selected rafter section (found by the formula bh²: 6).
- The deflection of the purlin must be compared with the normalized value, which is equal to L/200. He should not exceed it. The deflection of the beam is found by the formula f = 5qL³L:384EJ, where:
- J is the moment of inertia, which is determined by the formula bh³:12, where h and b are the dimensions of the purlin section;
- E – the value of the elastic modulus (for coniferous wood it is equal to 100 thousand kg/cm²).
First you need to calculate the bending moment. If there are several of them on the beam diagram, then after the calculation the largest one is selected. Next, to determine the dimensions of the beam section, we can arbitrarily set the beam width parameter and then determine its required height using the formula: h = √¯(6W:b), where:
- b is the beam width we set in cm;
- W is the bending resistance of the run, the value is determined by the formula: W = M/130, where M is the largest bending moment.
https://youtube.com/watch?v=kRfA63cin-4
You can do the opposite, set an arbitrary width of the purlin and calculate its height using the formula b = 6W:h². After you calculate the dimensions of the purlin section, it must be checked for deflection using the formula from point 2.
When the ridge beam is designed for deflection, it is necessary to compare this value with the value L:200. If the deflection in the longest section does not exceed this value, then the section of the beam is left as it turned out. Otherwise, it is necessary to increase the height of the run or use additional supports from below. In the latter case, the resulting section must be double-checked by again performing the calculation taking into account the supports used.
The resulting values for the width and height of the ridge must be rounded up. In principle, this calculation is not difficult to perform. The most important thing is to indicate the values in the required units of measurement, that is, do not get confused when converting meters to centimeters and back.
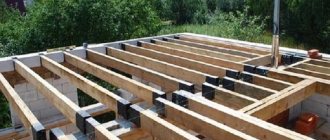
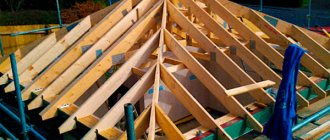
Installation of roof rafters
Roof insulation and installation of tiles.
Markings for the ribs must be done in advance. Moreover, the marks should be located both on the ridge and at the attachment point at the pediment. The middle of the edge formed by 2 boards will fall on these lines. The distance between them should be no more than 0.5 cm.
The basis for fastening the rafters to the ridge beam should be scraps of timber 25-35 cm long. Using self-tapping screws, they are fixed to the ridge so that the rafter supports are positioned exactly perpendicular to the beam. The same bases are formed on the Mauerlat. But in this case, the length of the bar should not exceed 20-22 cm.
The rafters are laid, grabbing them on each side with 1 nail, and checking the accuracy of their location, and then fixing them rigidly. First, install the frame ribs on one side of the slope, then on the other. The rafters are installed first from the edges of the roof. Using the resulting triangles, the correct installation of other ties is checked. To do this, a cord is pulled between them along the entire structure. It will serve as a guide for installing the remaining rafters.
After the fastening of the rafters located on the edge is completed, you need to fix the central ribs. Next, the support, which is located at the junction of the ridge beam, can be removed. The necessary rigidity and stability of the entire truss structure has already been provided, and it does not require additional support.
The remaining ribs are installed in pairs. That is, first they install a couple of ribs from the end of the house, then move on to its pediment. This installation method will ensure proper load redistribution.
Lathing
Where I ordered the boards, I asked them to cut me into 5x5 cm bars, 300 rubles. they took it for it. In general, for the future, it would be nice to have a good circular saw, but it is 3-5 thousand more expensive than my jigsaw. However, this was quite enough for me, since I’m not building.
I sorted the bars, because... By any means, they are not all ideal, the width ranges from 4.5 cm to 5.5 cm. Those that are the widest go to the first and last rows, and the rest to the middle, so that there is no bump.
READ ALSO: Flexible tiles - what are they and features, what types are there
Well, then I screwed it on with black self-tapping screws 4.5 x 100 mm in increments of 38 cm, connecting the bars on the joists, spaced apart. The first and last rows were reinforced with additional bars and boards to prevent them from being torn off by strong winds. I chose self-tapping screws because... they can be twisted if necessary, and they feel quite strong and even flexible, I thought “the devil is not as scary as he is painted.” But to be sure, I still screwed in 2 self-tapping screws per fastening point, with a distance of 2-3 cm between them (as required), on a beam of 5 cm, this is difficult to maintain, so I twisted 1 obliquely.
Having screwed the sheathing on, I took a break for three weeks, obviously not in vain, because... They were moved in some places, noticeably to the eye. So I sawed it somewhere, trimmed it, trimmed it.
The final stage of installation
The upper edge of the rafters must be additionally fixed. To do this, the opposite ribs are pulled together using metal plates, securing them with self-tapping screws. After the entire rafter structure is installed and securely fastened, the protruding parts of the boards must be sawed off. For this work it is more convenient to use a hand saw. Particular attention should be paid to the corners of the ribs, which are located on the ridge beam. If you leave protruding parts of the ribs, it will be difficult to install the roof covering correctly.
The last thing you need to do is mount the bows. Bows are boards located approximately in the middle of the triangle formed by the rafters. Such a jumper is necessary in order to remove excess load from the roof slopes. Bows reduce the deflection of the roof covering and the entire rafter structure under the weight of snow in winter or their deformation during strong winds.
The location of the bows depends on the height of the ridge beam. When constructing one-story houses, the ridge is raised to a height of 3.8-4.3 m. In this case, the bow must be secured exactly in the middle of the rafter triangle. This arrangement will help take the load off the roof, but at the same time the attic space will be spacious enough for a person of average height to move freely in it. The entire installation of the roof frame requires approximately 2 working days.
Drainage system
Proper installation of a roof under metal tiles necessarily requires a reliable drainage system. It consists of various elements.
Gutter
According to the rules, for one drainpipe there is 10 meters of gutter, no more. A V-shaped hole 10 centimeters wide is cut out on this gutter - the outlet funnel will be inserted there. It must be secured 15 centimeters from the edge of the gutter.
Gutter holders
They must be installed before the roof eaves and metal tiles are installed. Install holders every 0.4 - 0.5 meters. They need to be marked to create a slope of up to 5 millimeters per meter, and then bent with a bender. Or you can bend the already attached holders by marking them with a stretched cord.
Outlet funnel
Its front edge is brought under the outer bent edge of the gutter. We fix the funnel with a carved flange, bending it to the rear edge of the gutter.
Connectors
When it is necessary to fasten gutters or their corners together, an overlap of 2.5 to 3 centimeters must be made. For this purpose, special parts are used - connectors. They have rubber gaskets and a lock consisting of a rear flange and a tongue at the front. With this lock, the gutters can be easily connected - either in a row or at an angle.
This part is placed in the funnel of the drainpipe, preventing debris and autumn leaves from entering. The spider must be cleaned at least once a year, otherwise it will cease to perform its functions.
Pipe for connection and its elbow
To move from the funnel to the drainpipe, two elbows and a connecting pipe are used. They are sawed off on site, determining the required size.
Drainpipe and its holders
Holders are available in two types. These elements are universal - suitable for all surfaces and all materials. These elements are attached to the wall every meter. In addition, fastenings at pipe joints are required. During installation, pieces of the required length are cut from the pipe blank, which are inserted into holders, tightly latched with locks. At the bottom of the drainpipe, stepping back 30 centimeters from the blind area, attach an elbow to drain the water.
Drain pipe tee
It is needed when there is one drain for two funnels. The tee is crimped from below. From the side, the bell of this element is quite wide, which is very convenient. This allows you to change the entry angle of the side pipe.
Funnel for collecting water
If the roof is seam or belongs to one of the complex types, then the gutter is replaced with a funnel. This funnel is simply inserted into a pipe secured to the eaves with a clamp. It is made from a metal strip and connected with a self-tapping screw.
Limiter to prevent overflow
It is needed where water flows constantly, and sometimes in large quantities (under the valley, for example). Place it on the corner of the gutter or on the gutter.
Here, perhaps, are listed all the main elements that the technology of installing a metal roofing provides. And if they are all installed correctly, you will get a strong, beautiful and waterproof roof.