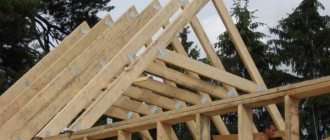
Why do you need a Mauerlat?
The rafter system absorbs the load from external forces and transfers it to the walls through the support beam - the Mauerlat. Its functions are to create a flat plane for attaching rafters and distribute evenly point forces on supporting structures.
As a rule, in private construction the mauerlat is made from softwood lumber - timber or boards. The size of the section and the method of attachment to the walls depends on the type of rafter system:
- With layered rafters, large bursting forces are transferred to the walls. The cross-section of the Mauerlat is powerful enough - 150x150-200x200 mm - to ensure load absorption. It is attached to the walls as firmly as possible.
- In hanging systems, the rafter legs are rigidly connected to a horizontal tie, forming a geometrically stable truss. Only vertical load is transferred to the walls, so the Mauerlat acts as a support pad. In this case, timber or boards are laid either on the entire surface of the walls, or in sections for each truss.
Lumber for the Mauerlat must be at least grade 2, dried to a moisture content of no more than 15%, and treated with antiseptics and fire retardants. To prevent wood from rotting, waterproofing is installed when laying on brick or concrete walls.
Joint location of the support beam
Methods for fixing the Mauerlat to a brick wall
In construction practice, various methods are used to attach the Mauerlat to the wall of buildings. Before carrying out work, it is necessary to prepare equipment and purchase the required amount of building materials:
- wooden beam of the required size with a section of 150 * 150;
- construction hydraulic level;
- waterproofing material (roofing felt);
- hammer, electric drill, adjustable wrench, fastening hardware.
The Mauerlat can be fastened:
- Thick steel wire.
- Construction studs.
- Wooden plugs.
- Anchor hardware and armored belt.
The method of fixing the matrix to a brick wall depends on:
- technical, quality and operational parameters of building materials;
- building area;
- structural features of the structure, installation of the roofing system.
It is worth noting that any types of sliding fasteners are not used for this element of the roof structure. The roof base must be installed in a strictly horizontal plane. To avoid weakening of the rafter system, thrust slots are made only on the side of the rafter legs.
When performing calculations, take into account the methods of installation and fastening of rafter legs to the support beam, namely:
- The sliding method, in which the rafters rest against the beam, have a certain degree of freedom. The strength of the structure is ensured by the installation of additional crossbars, which can be secured to the beam by fixing the boards of the rafter system.
- Thrust installation. In this case, the thrust element for the rafters is teeth cut into them or additional wooden blocks.
Depending on the method of fastening, you will also need several wooden blocks and steel construction brackets measuring 250 mm. If the installation and connection of the matrix is carried out with overhead pins, you will need L-shaped pins with threads with a diameter of 12-14 mm, threaded nuts, metal washers, concrete mixture M 250.
Fasteners
Metal products are used to attach the rafters to the Mauerlat:
- nails 150 mm long;
- self-tapping screws;
- rafter corners;
- beam holders;
- sliding supports;
- serrated plates;
- perforated pads;
- staples;
- bolts, studs with nuts.
It is desirable that the fasteners be galvanized or stainless. Regular one quickly corrodes and breaks down, causing loose connections.
For nails up to 6 mm in diameter, pre-drilling of holes is not required. With a larger cross-section, to prevent the formation of cracks, you need to drill a socket with a size equal to 0.9 of the diameter of the nail. In wooden buildings, as well as in small brick buildings, brackets are used to secure the mauerlat and rafters. Wood is prone to splitting, so it is recommended to pre-drill the holes.
Mauerlat functions
The main task of the Mauerlat is to take the point load from the rafter legs and distribute it evenly across the load-bearing elements of the structure. That is, the Mauerlat beam is necessary to compensate for the thrusting force from the rafters. The roof itself has quite a lot of weight, and if you add to this value the mass of snow cover that accumulates in winter, it becomes clear what enormous pressure the rafter system experiences. Moreover, due to the fact that the slopes are located at an angle, the force does not act vertically, but diverges in the lateral direction, exerting a bursting force. Such pressure may well destroy masonry made of aerated blocks or bricks. That is why the Mauerlat should be firmly fixed to the wall and only to it.
Also, it is the Mauerlat beam that allows you to connect the load-bearing walls and roof of the building into a single system. This function is especially important in regions with large amounts of snowfall and prevailing storm winds. After all, if the windage of the roof is increased, then with a strong gust of wind the roof can fly off its place, which will lead not only to high repair costs, but, often, to more disastrous consequences. For reliable fixation, the Mauerlat must not only be laid on the walls, but also secured using a special technology. When planning to build a house on your own, it is worth keeping in mind that the methods of fixation to the walls may be different. The specific option will depend mainly on the material used to construct the walls. That is, the methods for attaching the Mauerlat to a brick wall will differ from the options for installing a beam in a wooden structure. However, there are general requirements relating to the installation of a mauerlat beam.
Fastening depending on wall material
The rafter legs are secured to the mauerlat with a notch and auxiliary connections - metal fasteners or wooden plates. The support on the beam can be rigid or sliding depending on the material of the walls.
Wooden
In timber, log or frame buildings, the upper crown or frame serves as the mauerlat. To absorb loads and maintain stability, the upper crowns must be firmly fixed to the lower parts of the wall using dowels and brackets. In frame buildings, the rafters are installed exactly above the posts and, together with other structural elements, form a rigid frame.
Wooden buildings are prone to shrinkage, especially in the first few months. The fastening of the rafter system should not be rigid and motionless, so that uneven stresses do not arise in different parts of the structure, and the possibility of deformation of structures relative to each other remains.
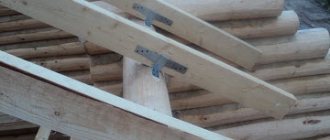
To ensure the mobility of the support unit, sliding joints are used. They consist of 2 steel elements - a bracket that is attached to the rafters, and a corner mounted on the upper crown.
When the house shrinks, the structures shift, but the rafter system remains stable and retains its geometry. After the movement is completed, the sliding supports can be replaced with rigid connections.
Brick
Such buildings are strong and stable and can withstand heavy loads. When installing a rafter system, the mauerlat is laid on a layer of double waterproofing. It is placed as close as possible to the inner surface of the wall to increase the resistance of the structure to wind loads.
Waterproofing Mauerlat
The support beam itself is fixed with staples to wooden plugs in the brickwork or mounted on studs walled up in the wall.
The attachment point of the rafters to the Mauerlat is rigid, which eliminates movement. To do this, grooves are cut in the lower part of the beams in the shape of the support beam, which prevent them from moving along the axis. When installing, the parts are fastened with corners, nails or holders. If it is not possible to select a recess, bars are sewn to the bottom of the rafters to act as a stop.
Aerated concrete or foam concrete
Such walls are not prone to shrinkage, but, like any masonry made from piece materials, they are not sufficiently resistant to bending and stretching. In addition, aerated concrete does not hold fasteners well and is quite fragile.
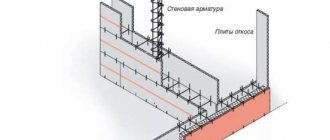
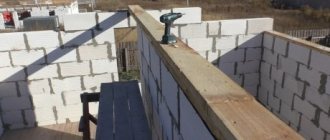
To create a solid foundation, a reinforced concrete belt is poured under the rafter system. To secure the Mauerlat to its surface, it is necessary to provide in advance for the installation of vertical studs with nuts.
After the concrete has hardened, waterproofing is laid on top of the reinforced belt, then the Mauerlat. The washers on the studs are twisted and slightly recessed into the surface of the beam.
Installation is carried out in the same way as in the case of brick walls. A groove is cut in the rafters so that its walls fit snugly against the Mauerlat. To strengthen the fastening, corners, holders, and nails are used. For large spans in brick buildings, it is also recommended to install an armored belt. It creates a rigid frame and increases resistance to wind, snow and seismic loads.
Mauerlat - roof support element
Before talking about how to install rafters on a brick wall, you should pay attention to the installation of the mauerlat beam, since it is the main load-bearing element of the rafter system. Accordingly, the installation of the roof begins with it.
So:
- It is necessary to think about fixing the Mauerlat to the brickwork at the stage of wall construction . Completing the wall is done in two different ways. Most often, this is simply a horizontal and even cut of the masonry, on the inside of which the strapping beam is laid.
- In the second case, the masonry is finished with a ledge, which from the outside forms a cornice along the perimeter of the walls. The outer part of the ledge is higher than the inner one, due to which a niche is formed in the wall into which the Mauerlat will be laid. This option is very good from all points of view, since in this case the structure is better isolated from external influences.
In addition, the protrusion of the masonry is an additional barrier to the influence of expansion forces. Therefore, this option is most preferable when building a house. But not everyone can complete such a completion, especially if the owner, without the skills of a mason, builds the house with his own hands.
Fastening the harness: methods
In the first case, long threaded rods are embedded into the masonry to secure the mauerlat. But before putting beams with holes drilled for anchors on them, the horizontal surface of the wall is coated with bitumen mastic and a strip of any rolled waterproofing material is laid on it.
So:
- After installing the Mauerlat, put washers and nuts on the studs and tighten them with force. When the wall ends with a ledge, it is impossible to attach the strapping to studs. But there are other options.
Preparing masonry trim for installation of the Mauerlat
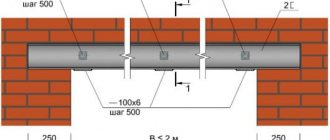
- For example: three rows before the end of the masonry, rolled steel wire with a diameter of 6 mm is placed in it, with outlets on the sides, the length of which should be enough to thread it through the holes in the beam and twist it. In this case, the distance between the fastenings must correspond to the pitch of the rafters.
In another option, the Mauerlat can be attached to wooden inserts in the masonry, which are cut to the size of the brick and carefully waterproofed. During the process of laying the edge of the wall, the working bricks in the places where the rafters are installed are replaced with wooden plugs. The rafter legs are attached to them with metal brackets.
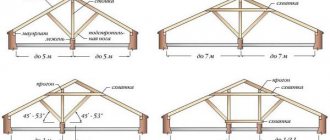
The design of the support unit depending on the type of rafter system
In order for the connection to work correctly, you first need to consider the way the rafters are supported. With layered or hanging systems, these nodes are solved differently.
Layered systems
In such structures, the rafters rest on the mauerlat and ridge. The entire load from the roof, wind and snow is transmitted through the support beam, so the Mauerlat is spacer. To prevent deformation, the rafter legs are rigidly attached to it.
How to attach rafters to the mauerlat in spacer systems:
- A groove is selected at the ends of the rafter legs, with which it is placed on the support beam. On the sides they are additionally connected by corners or beam holders.
- Instead of corners, nail connections can be used - 2 nails are nailed obliquely through the rafter, and 1 vertically through it.
- On small roofs, brackets are used, one end of which is driven into the beam and the other into the rafters.
- The end of the rafter is sawn horizontally without any saddle, and a support block is nailed along the lower edge. This simplifies and speeds up installation, eliminating the need to make a groove. But the load-bearing capacity of the unit is less than with cutting.
Such support units are rigid and reliably ensure the transfer of forces between structures.
Hanging system
In rigid trusses, thrust forces are transferred to tightening. The truss itself is static and does not create lateral loads on the walls. The main attention should be paid to attaching the rafters to the horizontal beam, since this unit is the most critical.
The ties can be located in the lower or middle belt, or immediately below and above, depending on the loads and design. They serve simultaneously as floor beams and as a base for the ceiling/floor cladding.
The rafters are fastened to the tie using a frontal notch with a single or double tooth:
- A groove is selected in the timber, and a spike of the appropriate shape is selected in the rafters.
- The parts are additionally tightened with 1-2 bolts and clamps through a sub-beam - a horizontal beam or board, which is installed to evenly distribute the forces from the fasteners and prevent the wood from collapsing.
From the end of the tightening to the insertion point there must be at least 1.5 times the depth of the groove, and its height - no more than 1/3 of the section of the load-bearing element.
You can join parts without cutting, then the connections are reinforced with the help of wooden or metal plates. The number of fastening elements is taken based on load calculations. In some cases, the rafters are made double. Then the tie is not cut in, but is firmly pinched between two boards. The unit is tightened with 2 bolts.
The extension of wooden structures beyond the external walls must be at least 40 cm to form a cornice overhang. The trusses rest on backing boards or beams and are secured with corners and holders.
Mauerlat - what is it?
Mauerlat is made in the form of a wooden beam, which is mounted on the walls of the house. Carries the functions of transmitting and distributing the load from the weight of the roof, snow and wind, rafters and floor beams onto the walls of the building. Among builders, this element of the house, due to the difficulty of pronunciation, is often called matitsa, murlat, etc.
The first stage of installing any roof is the installation of the Mauerlat. The exception is the construction of wooden structures from timber, logs, frame-panel buildings, when the uppermost crown of the timber or logs acts as the Mauerlat.
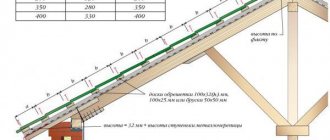
To install the Mauerlat, a wooden beam with a section of 150x150 mm or 150x100 mm is most often used. It is recommended to pre-treat the timber with antiseptic compounds that will extend the service life of the element. They protect against moisture and wood-boring insects. It is also necessary to provide a layer of waterproofing. To do this, you can use roofing felt in two layers.
It is best to lay the Mauerlat flush on the inside of the wall of the building, and on the outside it is worth making a protective barrier in the form of brickwork.
It should be noted that it is imperative to provide a Mauerlat, since it not only provides a uniform load, but also gives the entire roof structure additional strength and reliability.
Fastening the rafters in the ridge
Enclosing structures experience large fluctuations in temperature and humidity, so the rafter system must be able to compensate for deformations. If all the parts are rigidly connected to each other, changes in their dimensions can lead to geometry violations and negative impacts on other parts of the building.
To correctly connect the rafters and the Mauerlat, you need to take into account all the factors and select the optimal design of the ridge assembly:
- If the rafters are rigidly fixed in the lower part, then a certain degree of freedom should remain in the ridge. To do this, the beams are not fixed to the ridge girder, but are, as it were, layered. They can be attached to each other in various ways - by cutting, nails, overlays.
- When the lower connection is movable, the ridge should firmly hold all the parts together. In this case, a rigid pinching is created at the top point, eliminating displacement in the node.
In hanging systems there is no ridge support girder. All components of the trusses are connected as rigidly as possible.
Attaching the Mauerlat to a brick wall
Brick walls have a fairly high vertical strength, but as for lateral loads, this indicator is low. The rafter system exerts a huge bursting force, which can ultimately lead to the destruction of part of the wall. Correctly mounted mauerlat beams help redistribute the load. In this case, the Mauerlat is fastened closer to the inside of the wall, unloading the outer decorative edge. You can create a rigid connection with the walls using 4 main methods.
1. Armored belt. This design consists of a reinforced concrete layer around the perimeter of each wall. A reinforced belt is considered ideal for buildings of more than two floors, where the load on the walls is greatest. To perform, it is necessary to install formwork, inside which a structure made of reinforcement or strong wire is mounted, and special anchor bolts are welded to the reinforcement. Next, a high-quality concrete solution is poured. It is on the anchor that the beam will be fixed after the concrete layer has hardened. The armored belt is considered the most reliable method of installing the Mauerlat, however, it is also one of the most labor-intensive processes.
Attaching rafters to the mauerlat of a gable roof
A “live” example of installing a gable roof rafter system will help you better understand all the nuances. This is the most common design in private construction.
A brick house with an internal load-bearing wall. It is rational to use a layered scheme with the rafters supported on the mauerlat and ridge girder.
For rafter legs, 50x150 mm boards are used. A mauerlat with a cross-section of 200x200 mm is laid around the perimeter of the house, and a wall of 150x150 mm is laid along the inner wall.
The Mauerlat is connected along its length by an oblique notch, and in the corners it is joined “in half a tree”. Attached to the armored belt with studs and nuts.
In buildings with brick walls, unlike wooden houses, the Mauerlat is rigidly connected to the rafters. A notch is used - a groove is cut in the lower part according to the configuration of the support beam. Additionally, the parts are fixed with metal fasteners.
How to make a gash
Cutting a groove is the most critical moment when preparing rafters for installation. Various methods are used:
- The whole board is aligned with one end along the mauerlat, the other along the ridge girder. Based on actual measurements, markings and cuts are made. The next rafters are cut according to the first blank.
- The slope angle of the slope is calculated using trigonometric formulas and sawed using a miter saw with a protractor. This method is most often used in factory settings when many rafters need to be prepared.
- You can mark the corners with a square with a built-in protractor. It is inexpensive and easy to use. Professional builders use the Swanson Speed Square. This device allows you to quickly measure and mark angles in spatial structures - roofs or stairs.
- The easiest and fastest option is to cut out a template. Even if you only have a tape measure and a pencil, you can easily make it from scraps of a board or sheet of rigid material - fiberboard, OSB, chipboard. Trigonometric calculations or protractors are used, with the help of which the contour of the groove with the desired characteristics is drawn. After cutting with a circular saw, the template is ready.
To install a gable roof, you will need 2 templates - for the support and ridge assembly. For convenience, a block is placed on the lower edge of the pattern, which will serve as a stop when marking.
Rafter preparation and installation
In gable roofs, the rafter legs can rest not only on the ridge and mauerlat, but also on intermediate posts. To avoid errors in measurements, you need to take the highest point as a basis and control the distance only from it.
This template is needed for making rafters
Preparation begins with trimming the ridge end using a circular saw. The Svenson square or template is set at the desired angle and the cut is made.
If a notch is provided for attachment to the ridge girder, a seat is selected in the upper part of the rafters according to the markings.
From the junction point of the rafters on the ridge (along the axis of the purlin), the estimated length to the mauerlat is measured. Using a template or Swenson's triangle, the seat is marked and carefully cut out with a circular saw or chain saw. For convenience, the sawing depth is set equal to the thickness of the board plus 1 mm.
It is recommended not to finish marking lines to the end, so that later they can be modified with a hacksaw. This will allow you not to reduce the working height of the section if the saw goes too deep into the board.
The depth of the “saddle” should not exceed one third of the width of the rafter
The eaves overhang is sawed off along the already mounted rafters along the cord. All that remains is to try on the rafter leg in place, adjust the landing grooves until they fit tightly and secure the connections with metal corners.
The cuts must be made very carefully to ensure maximum fit. Gaps of no more than 2-3 mm are allowed. It is forbidden to place wooden wedges in curved, loose joints. Over time, they dry out and fall out, and the attachment becomes unstable.
Types of rafter systems
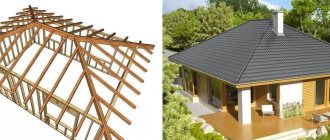
For a standard gable roof without valley and additional ribs, mainly two types of rafter structures :
- Hanging . They have a corner connection at the top and two points of support on the load-bearing walls of the building at the bottom. They are used mainly where it is intended to create a residential attic under the roof, and the ceiling of the lower floor is not part of the rafter system. In the triangle of forces acting on the upper part of the walls of the building, there is a significant lateral component, creating a large expansion and deforming force. Its compensation is the main task when calculating this type of roof.
- Layered . They are a single truss structure in which the lateral components are largely compensated by the racks, purlins and crossbars of the rafter system, and the walls of the building bear mainly the vertical component of the weight of the roof itself. In the upper part, the rafter legs rest on a ridge beam, which, taking part of the load, distributes it through the racks and transfers it to the lower supporting elements. Floor beams can also be included in the structure of the rafter system, creating a triangle of rigidity and an additional lower connection.
Such a roofing arrangement can significantly reduce the lateral components of the load on the walls of the building, but at the same time it has a significant dead weight and, with a large span, requires a central support, which can be the internal wall of the building.
In wooden log houses, for this purpose a central support beam was always used - “matitsa” , the installation of which was given special, ritual significance during construction.
Complex roofs
Multi-gable, hip, half-hip or dome roofs are more difficult to calculate and build. The frame is a complex system consisting of parts:
- Mauerlat;
- main, slanted (diagonal), shortened rafters;
- racks;
- struts;
- runs;
- trusses.
In half-hip roofs, the gable section rests on a horizontal reinforced board. If the slopes are connected at an internal angle, there are grooves or valleys. The structural elements are fastened together with a notch and additionally with hardware. If you don’t have enough experience, you shouldn’t take on the installation of such roofs, even if you have a detailed project on hand.
Fastening the Mauerlat using a chemical anchor
This technology appeared on the construction market relatively recently and makes it possible to reliably fix various architectural elements to fragile surfaces. A chemical anchor can be used to attach the Mauerlat to a façade wall made of hollow bricks.
The adhesive composition in capsules is intended for installation of one anchor
Working with chemical anchors is much easier and faster than installing metal studs into the wall. In addition, the location of the Mauerlat fixation points can be selected after assembling the rafter system, which eliminates errors during marking.
A chemical anchor consists of a special adhesive composition, a metal sleeve with an internal thread and a pin.
Advantages of a chemical anchor compared to an expansion dowel in hollow building materials
How to install a chemical anchor?
First, the Mauerlat is put in place and the dowel installation locations are marked. Then holes are drilled in the timber, and then holes are punched in the wall.
Important. Drill holes in the wooden beam very carefully, do not dull the drills on the brick. Wood is drilled using ordinary drills; they cannot work with brick; it requires tools with pobedit tips.
The finished holes in the brickwork are filled with adhesive and a dowel is inserted into it. After completion of the polymerization processes, reliable fixation of the fasteners in the hollow brick wall is ensured.
You need to know that polymer glue is an expensive material. In order to save money, it is recommended to determine in advance the required amount of glue. This is done according to the formula.
The approximate consumption of the adhesive composition can be determined in advance
Before using a chemical anchor, you must carefully read the manufacturer's instructions and follow all its recommendations. The relatively high cost of chemical anchors is always paid off by saving time during the installation of the roof truss system of a house.
Video – Chemical anchors
After installing the Mauerlat, construction does not end. On the contrary, the most difficult and important stage of work lies ahead - the calculation of the roof truss system and the installation of rafters. We recommend reading the article on our website about how to independently calculate the rafter system of a gable roof.
Stepan Rusov chief editor
Author of publication 08/25/2018
Did you like the article? Save so you don't lose!
To prevent the roof of your house from being blown away by a strong wind one day, it is very important to correctly install its frame. In particular, we will talk about how rafters are attached to a brick wall.
Do you need any devices for this, what is the procedure for performing technological operations, and what kind of fasteners should be used? Not only the instructions, but also the video in this article will help you deal with these issues.
How to attach frame systems?
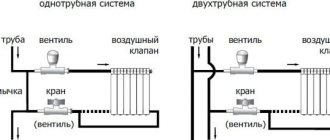
The fastening of rafter systems begins with the installation of mauerlat beams. It is installed on the external walls of the house, having previously covered the mounting surface with a material with waterproofing properties. There are three mounting methods:
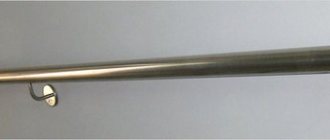
After installing the mauerlat beam, rafters are attached to it. For this purpose, rigid or sliding fastenings are used. In addition, the rafter legs are screwed with wire to the inside of the wall. The twisted wire is mounted on a crutch driven into the wall. The distance between it and the Mauerlat should be 250-300 mm.
Sources:
https://iz-kirpicha.su/postrojka-doma/kreplenie-stropil-k-kirpichnoj-stene-666 https://dekormyhome.ru/remont-i-oformlenie/kachestvennoe-kreplenie-stropil-k-kirpichnoi-stene .html https://etokirpichi.ru/zdania/stenka/kreplenie-stropil-k-kirpichnoj-stene.html https://etokirpichi.ru/zdania/stenka/kreplenie-stropil-k-kirpichnoj-stene.html
Mauerlat and methods of its installation
Tools and materials:
- roulette;
- timber 100*100;
- perforator;
- waterproofing;
- studs, steel rods or wooden wedges.
The entire structure fastening scheme can be seen in Fig. 1:
Figure 1. Scheme for attaching rafters to a brick wall: 1 - Strapping; 2 - Mauerlat; 3 - Waterproofing; 4 - Rafters; 5 - Wire; 6 - Fixing anchor.
- Strapping. This method of fastening is carried out most often, but there are exceptions for studs.
- Mauerlat.
- Waterproofing.
- Rafters.
- Wire.
- Fixing anchor.
At the very beginning you need to install the Mauerlat, because... the design begins with it. Before installing it, a cut brick is laid on the front side in order to cover it later. Some craftsmen place the brick after finishing the work, which is also effective, but takes a little more time. It is better to use penetrating options as waterproofing, but if it is not possible to get them or the price is prohibitive, it is quite possible to get by with roofing felt. After the roofing material is rolled out at its location, you need to burn it with a gas burner.
There are 3 ways to attach the Mauerlat:
- Hairpin. This method is the simplest, because... you need to make a vertical hole in the wall to the depth of 1/2 a stud, pour a little non-hardening mastic into the bottom and immerse a metal rod there. A beam with holes made in the right places is installed on top. The fastening pitch is usually 30-40 cm, because the increase will affect the strength indicators.
- Wooden wedges. Everything is much simpler here, because... When laying bricks, special gaps are left where wedges of the required length will be installed. All that remains is to simply make holes in the timber in the selected places with a drill and fasten them together. The wedges should be made of softwood or more expensive varieties in order to last as long as possible.
- Steel rods. The installation step is 30-40 cm, and the method is identical to wooden analogues. Such rods are much cheaper than wood, and their installation is easier. The only negative is the need to deepen 3 rows of masonry so that lateral pressure does not cause cracks in the roof to appear in the house (working with lightweight materials does not require such precautions, but it is better to be on the safe side).
Basic installation work
Tools and materials:
Gable roof structure: 1 - Rafters; 2 - Screed; 3 - Mauerlat; 4 - Ridge beam.
- timber 80*200;
- steel corner;
- roulette;
- a circular saw;
- pencil and cardboard;
- wire;
- anchors;
- hammer drill
Now the installation of rafters on the walls begins. The rafter system depends on the type of roof chosen, but most often a gable roof is used:
This option is quite easy to install, and there is no need to make additional partitions under the roof. At the very beginning, screed beams are installed in increments of 0.8-1.2 m, depending on the weight of the roofing materials (for ondulin or reeds, 1.2 m is enough, while for slate - 0.8 m and no more). Fastening to the Mauerlat is carried out using special corners made of galvanized steel. Only now is the wall ready to begin attaching the rafters.
Their length is calculated in such a way that the wall does not limit their length, and the beam extends 50 cm beyond its limits. At the junction of the wood and the wall, you need to cut out triangles that clearly follow the contours of the corner at which the joint occurs. Here it is best to make a cardboard model, from which measurements will be taken, and use a circular saw to cut it.
At the very beginning, 3 beams are grabbed together, 2 are guides, and 1 is a ridge beam. There is no need to grab the ridge beam immediately, so as not to strain the material. You need to lift it in such a way that the corners match perfectly. After one side has been lifted, you need to lift the opposite side and only then fix them tightly using steel corners.
Each raised beam is immediately wrapped with galvanized wire, after which the wire is intertwined and taken down. At a distance of 5 rows of masonry, you need to make a hole with a puncher, then string the wire onto the anchor and screw it in until it is completely fixed.
Dimensions of rafter legs.
The fastening of the rafters is completed here, but you need to remember a number of factors:
- When working with a hammer drill, only drills and bits with diamond attachments are used. Any other options will most likely split the material.
- All metal is strictly galvanized. If you attach the rafters to simple steel, then over time it will rust, and along with it the wood will become unusable.
- All wood is carefully treated with an antiseptic against moisture and insects. This step will add up to 20 years of service life.
Summarizing
Before fastening the rafters with your own hands, you need to carefully prepare for this process. The wood chosen is predominantly coniferous, the metal is galvanized, and the tools are reliable.
Usually, fastening rafters on an area of 100 m² without assistants takes up to 1 week, so you need to check the weather forecast in advance to avoid getting caught in the rain.
If rains are expected, and the work must be completed ahead of schedule, then during the rainfall the work is stopped and covered with polyethylene, and immediately after its completion, work can continue.