The main problem during construction is the interior decoration, and specifically the walls. What are the walls of the cellar made of? This question is primarily of interest to those who are planning to engage in construction on their own. After all, the safety of stocks and the harvest as a whole depends on the interior decoration.
In any vegetable storage, temperature conditions, humidity levels and other parameters must be observed. Therefore, it is important to choose exactly the composition of the material that suits best. During construction, it is necessary to take into account the climatic conditions of the region and specific area.
Types of cellars
The oldest way to preserve food is to keep it in a cool, dark place. For this purpose, holes were used, dug in the ground and covered with a lid. The walls were made of logs impregnated with hot resin. Such storage facilities served for many years.
Nowadays, a cellar can be not only earthen, but also above ground. And in order to maintain the necessary conditions - a favorable temperature of about 2-5° and a humidity of 85-90% - modern building materials are used.
Zemlyanoy
This is a traditional type of cellar, where earth is used as a temperature-holding layer. The storage pit is dug to a depth below the soil freezing level - approximately 1.8-2.5 m.
The walls are laid out from bricks or blocks, poured from monolithic concrete or sheathed with boards on a frame made of logs. The roof and door (hatch) must be reliably insulated. Foam plastic, expanded clay, moss, earth or other materials with low thermal conductivity that are resistant to high humidity and frost are used as thermal insulation.
The main condition for constructing an underground cellar is dry soil and a low groundwater level. During the snow melting season, the groundwater level should not rise above 3 m to the ground surface. In all other cases, it is advisable to make the basement semi-buried or above ground. If the layout of the site allows, the cellar can be attached to the wall of a barn, garage or house.
Semi-recessed
The basement of this structure is half or one third of the height submerged in the ground. Moreover, the floors must be at least 50 cm above the ground water level.
A separate semi-buried cellar is completely filled with soil, and a hill is formed on the surface of the earth. If it is cultivated, it can be used as a decoration for the site, for example, an alpine slide.
A convenient option is a cellar in the basement of a residential building. It is necessary to isolate the rooms from each other as much as possible in order to protect the underground part from excess heat, and the house from cold and humidity.
Ground
How to make a cellar with your own hands if the water supply is very close to the surface of the earth? The only way out is construction without deepening. Its advantages:
- the room will always be dry, water will not penetrate there when snow melts or groundwater fills;
- there is no need to carry out a large amount of excavation work.
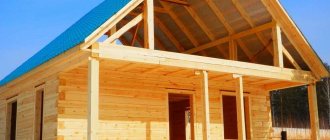
The disadvantages of this method of construction are the high need for building materials, because in essence this is a permanent structure with walls and a roof, and good insulation. The decoration of the above-ground cellar can be in the style of neighboring buildings, then it will not stand out from the general ensemble.
The second option is embankment with earth or peat in the form of a bulk hill. To do this, you will need to import a large volume of soil.
For thermal insulation of above-ground and semi-buried structures, clay, foam plastic, expanded clay, and dry earth are used. The total thickness of insulation should be at least 0.7-1.2 m.
Wall-mounted
In this design, the cellar is more economical in terms of material consumption and labor costs - one wall is already there. The pit can be dug no deeper than 0.5 m, since loosening the soil close to the main building is not recommended. This can cause uneven soil deformations and the formation of cracks in building structures.
The outside walls and roof of the basement are well insulated; you can use synthetic materials and embankment with earth. Decorative finishing upon request - plaster, siding, tiles.
Caisson
If the groundwater level in the area is very high, and a deep cellar is needed, special sealed containers are used - caissons. They are made of thick metal or durable plastic and can withstand high lateral soil pressure.
To prevent the caisson from being squeezed out when the water rises, it is strengthened in the ground with the help of anchors. The liquid accumulated under the bottom is periodically pumped out with a pump.
Compared to other types of cellars, the caisson is more reliable in terms of the absence of leaks, but is more expensive. However, in areas near water bodies, marshy soils, and low-lying areas, this is the optimal way to store supplies.
What insulation is suitable for basement walls?
Basement walls must be insulated from the inside and outside. The correct choice of insulation is half the success when finishing the walls of such a room.
When purchasing material, it is necessary that it meets certain requirements:
- It was resistant to moisture penetration and retained its excellent properties under adverse environmental influences.
- Had the ability to withstand compression and pressure arising from the thickness of the soil masses.
- It was quite strong and durable.
These requirements are met:
- Extruded polystyrene foam or special foam . Its peculiarity is hermetically sealed pores, which creates high strength, high thermal conductivity, and increases hydrophobicity. Today this is the most popular material, which:
- has low weight;
- does not rot;
- not subject to crumbling;
- environmentally friendly;
- with excellent thermal insulation characteristics;
- has a long service life if waterproofing is carried out correctly;
- easy to trim, which allows you to give it the desired shape and required dimensions.
Disadvantage: it burns easily, and when heated, it emits an unpleasant odor.
- Foamed polystyrene foam or regular polystyrene foam (see Insulating the basement with foam plastic: features and nuances of the work). Its characteristics are similar to extruded foam, but due to moisture absorption, it requires additional waterproofing. The strength of the material is almost three times lower; rodents love it, which requires deratization of the premises. Its low price allows it to be widely used for finishing basements.
- Penofol . This is foamed polyethylene with the inclusion of aluminum foil. Sometimes it is used as an additional layer for wall insulation, which is placed on foam plastic.
- Polyurethane foam . It is applied in several layers using the fine spray method, which is very convenient for finishing walls, ceilings and floors. It hardens in 20 seconds and creates a fairly even, durable coating with no voids, seams or joints. The solution penetrates into the most difficult to reach places. When installing such insulation, there is no need to carry out moisture-proofing measures.
A serious drawback of the material is its high cost. And to apply it you will need special equipment and a master who performs such operations efficiently.
Internal wall insulation with polyurethane foam
- Glass wool . The material contains small fibers from glass production waste. It has a low thermal conductivity and low price.
Flaws:
- loss of thermal insulation properties when wet, which requires additional reinforced insulation;
- highly flammable.
Advice: When working with glass wool, special attention should be paid to protecting the respiratory tract and eyes from small glass fibers getting into them. You should not use the material for external basement insulation.
- Mineral wool . Visually it resembles glass wool, but it is produced using a different method. This is a complex technology for melting basalt rocks. Its main characteristics are the same as glass wool.
After purchasing the material, it is necessary to prepare for the thermal insulation of the walls. For this:
- The condition of the walls is carefully examined.
- The surface is cleaned of dirt.
- All cracks and chips are sealed with sealant.
- Unevenness is smoothed out.
How to insulate basement walls from the inside
Insulating the basement from the inside makes it possible to increase the thermal insulation of the entire house. But this technology is not very common due to the presence of dampness in the room, which, if there is thermal insulation inside the basement, can lead to condensation and additional exposure to fumes from it on the material.
The insulation may lose its positive properties and become deformed.
The process of internal basement insulation consists of two stages:
- Waterproofing (see Waterproofing the basement from the inside: we do it in stages). This process allows you to reduce indoor humidity. For this we use:
- polyvinyl chloride film;
- waterproofing for coating the entire surface;
- bitumen roofing felt.
The most popular methods for carrying out the process:
- Coating walls with compositions made on the basis of cement mortar. This technique creates an elastic layer several millimeters thick. The two-phase mixture is applied to the wall surface with a stiff brush and then carefully leveled with a roller.
- "Penetrating waterproofing." It consists of a set of measures in which compositions such as “Kalmatron” and “Penetron” are used.
- Cut-off horizontal waterproofing, into which water-repellent compounds are introduced.
Tip: To prevent the formation of condensation and excess moisture, ventilation holes should be provided in the base with a pitch of approximately five millimeters, which will ensure the circulation of air masses and at the same time remove fumes to the street.
- Thermal insulation. In this case, heat retention in the basement will be guaranteed, which will not be affected by the thickness of the walls.
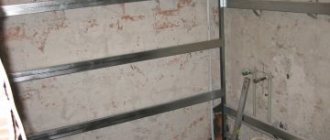
The simplest and most common way to insulate a basement from the inside is to use polystyrene foam.
For this:
- Waterproofing is being carried out.
- A layer of polystyrene foam five centimeters thick is laid, soaked from bottom to top with an adhesive solution.
- The foam is attached with glue, and sometimes with the help of plastic dowels with wide heads in the center and at all corners of the slab, which allows you to increase the service life of the insulation layer.
- The joints between the slabs are blown with foam.
- A special mesh is pressed into the foam elements to support the reinforcement layer.
- Covered with another layer of glue.
- After the glue has completely dried, the surface is sanded.
- The final finishing is done by plastering the wall and painting.
How to insulate the outside of basement walls
External basement insulation may be more important than internal insulation. In this case, the walls are protected from the direct influence of negative atmospheric phenomena, which does not allow cold from the street into the room.
When insulating a basement externally with polystyrene foam, the procedure for carrying out the work is as follows:
- Waterproofing the first layer.
- The second layer is thermal insulation along the entire perimeter of the structure.
- Parts of the building located in the ground are treated with mastic.
- The soil is sprinkled, which will create an additional cordon in the path of the cold.
Advice: Insulation of the basement walls from the outside should be carried out at the construction stage, which will be much more convenient.
- Plaster is applied to the above-ground surface of the wall, covered with foam plastic.
- It is covered with finishing panels or other finishing is performed at the discretion of the building owner.
Basement insulation with foam plastic
When externally insulating a building with rolled materials, such as: glass insulation; bitumen roofing felt required:
- The walls are coated twice with mastic or hot bitumen.
- Roofing felt is attached.
Tiling exterior basement walls
Subtleties when insulating basement walls
- It is necessary to begin measures to insulate basement walls with polystyrene foam from the outside in good clear and dry weather.
- Insulation work must be carried out along with improving waterproofing.
- When using mastic to perform thermal insulation work with foam plastic, it is necessary to pay special attention to its moisture-repellent property. This substance can be applied in two ways:
- pointwise or partially;
- covering the entire surface intended for processing. With this method, a uniform layer of solution will be an additional protective coating for the insulation, which will prevent it from destruction caused by the pressure of the soil layer.
- The edge of the insulation is glued half a meter higher than the ground level.
- When insulating basement walls with any insulation, it is necessary to carefully seal all joints that can create cold bridges.
High-quality finishing of the basement walls creates favorable conditions for its operation.
How to choose a place
The site for constructing a cellar at your dacha with your own hands must be dry and protected from seasonal flooding. The higher the platform, the better.
Objects located nearby that pollute the soil are potentially dangerous - compost pits, toilets, sheds with livestock, bathhouses, summer showers. SNiP 30-02-97 recommends safe distances:
- 12 m from cesspools;
- 12 m from the barns;
- 8 m from compost heaps;
- 8 m from the bathhouse, shower, sauna, swimming pool.
You need to take into account not only the sources of pollution on your site, but also on your neighbor’s. If the storage facility is located underground, it is recommended to move at least 7 m away from the residential building to prevent heat transfer through the ground. You can draw a diagram of all buildings in advance and determine the location of the cellar that corresponds to specific conditions.
How to find the groundwater level in your area
Water is the main enemy of all building structures, especially those located underground. To find out the groundwater level on the site, it is recommended to conduct small geological studies:
- Drill a hole 3 m deep. It is better to work in late autumn or spring. If the groundwater level is close, a wooden pole lowered into the well will be wet.
- Contact your local hydrogeological organization. There are all the answers regarding questions about UGV.
- Talk to your neighbors. Usually, nearby areas have similar conditions.
- Explore the area for the growth of moisture-loving plants - horse sorrel, sedge, nettle, alder, willow and others. If they are abundant on the site, groundwater is very close.
Nearby ditches, wells, and boreholes are also a source of information. Another telltale sign of a nearby aquifer is heavy dew falling at night. If, in addition to a high groundwater level, the soil has a clayey composition, building an underground cellar is very risky. It is better to focus on more “elevated” options.
Designing a basement in a garage
At the first stage of laying the foundation of a garage with a cellar, it is necessary to find out three facts:
- at what level the groundwater is located at the construction site;
- determine the depth of soil freezing;
- the design, depth and waterproofing of the foundation depend on the type of soil on the site.
If the garage has already been built and there is a desire to dig a cellar, then you need to pay attention to the following parameters:
- foundation design - a shallowly buried strip foundation will not withstand load-bearing loads, if you remove a large layer of soil inside the building - it is necessary to deepen and strengthen the foundation;
- if groundwater is located high, it is necessary to install a drainage system;
- on clayey and weak peat soils, it is important to pay attention to serious external waterproofing of the basement.
An important rule for the foundation of a garage with a cellar is that the lowest point of the foundation must be located at least 50 centimeters below the freezing point of the soil. During frost, the soil freezes and pushes out the weak foundation, which leads to rapid deformation and destruction of the entire building.
Construction of a basement in a finished garage
When digging a pit in an already built garage, especially if the cellar floor is much lower than the base of the garage foundation, it is important to correctly maintain the distance to the walls:
- to the garage wall, the basement wall is located at a distance equal to the depth of the basement below the base of the foundation.
For example, the cellar floor is 1 meter lower than the garage foundation. This means you need to step back a meter from the foundation when digging a pit.
Pit preparation
If it is necessary to determine the groundwater level in the wettest season of the year, it is recommended that the construction of the cellar be carried out in the middle or end of summer. During this period, the groundwater level reaches its lowest point.
The dimensions of the pit are determined based on the expected volume of supplies for storage. Usually it is 2.5x2.5-3x3 m, but there are no restrictions on area. The optimal depth of the cellar is 1.8-2.5 m. With this height of the room, a person can stand up to his full height.
The width and length of the pit also depend on the properties of the soil. If it is loose and prone to crumbling, a larger pit is dug, and retaining walls made of shields and struts are installed inside. If the soil is dense and holds its shape well, no additional reinforcement is needed.
You can dig manually, selecting the soil with a shovel. It is lifted to the surface in a bucket and poured at a distance so as not to collapse the wall.
If the cellar is large, it is better to save energy and hire an excavator, and then level the bottom manually.
Main stages of work
Before starting work, determine the location for the cellar. It is undesirable to install it near the foundation of the house, as this can cause uneven shrinkage of the soil under the base.
You cannot dig a cellar at the lowest point of the site - rain and melt water will flow there. The best place is a small hill. Cesspools, wells, sheds where livestock are bred are not the most suitable neighbors for a vegetable storehouse.
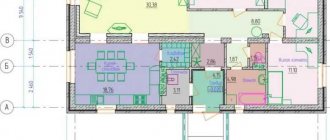
The boundaries of the cellar are marked on the ground. As a rule, the room for storing vegetables has small dimensions - from 6 to 18 m². Remove the top layer of soil - it will be useful for reclamation in the garden or vegetable garden.
Main stages of construction:
- digging a pit;
- adding crushed stone or sand, compacting;
- flooring;
- installation of walls and ventilation pipes;
- laying the floor;
- waterproofing works;
- backfilling;
- door installation;
- interior decoration and equipment.
They dig a pit 2-2.5 m deep. To access the outer surface of the walls and perform waterproofing, the hole is widened by 60 cm. It is left open for several days to determine the presence of groundwater. If they do leak out, a castle is made around it from moistened crumpled clay 10-15 cm thick, which is carefully compacted.
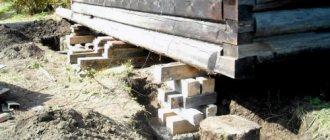
Foundation structure
Without a solid foundation, you can only build a cellar made of wood. And if the walls are made of brick or concrete, a good foundation is required.
The foundation can be arranged in two ways:
- Lay reinforced concrete strip. To do this, a groove measuring 20x30 cm is dug around the perimeter. The bottom is covered with sand to a thickness of 10 cm and compacted. Then you need to lay reinforcement cages from Æ10 mm rods and fill the trench with concrete. After 2-3 days you can start laying.
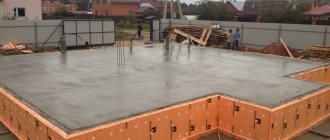
- Fill the monolithic slab. The structure has a multi-layer structure - a cushion of crushed stone and sand 10 cm thick with compaction, a layer of lean concrete 50-100 mm, hot bitumen plus 2 layers of roll waterproofing, a reinforcement frame and concrete of a grade not lower than M250. Such a foundation is practically waterproof and serves as a finished basement floor.
What is a basement
Basements can be used for a variety of purposes.
When equipping a room with heating devices, here you can:
- Place a storage room.
- Organize washing and drying of clothes.
- Set up a sauna (see Basement sauna in a private house: how to do it right).
- Build a workshop.
- Arrange a place to store the car.
- Even create premises for temporary and sometimes permanent housing.
However, potatoes, root vegetables and fruits cannot be stored in dry and heated basements. For these purposes, rooms with an earthen floor and natural humidity that corresponds to the humidity of the earth are better suited.
Advice: A basement can be used as housing only if it is possible to keep its walls and floors dry. Otherwise, a damp room may cause deterioration in the health of the people living here.
When walls are made of concrete, their high thermal conductivity does not allow creating the desired microclimate, which requires insulation. Creating a ventilated structure for insulation helps improve the situation.
Basement floors are made from:
- Brick.
- Clays.
- Concrete.
The ceiling can become a cold bridge, which is undesirable and will cause heat loss in the room. To do this, it needs thermal insulation.
Drainage
At the excavation stage, it is recommended to install a ring drainage:
- Dig a groove 30-50 cm deep around the perimeter of the foundation (outside)
- Lay perforated pipes with a slight slope at one point.
- Connect them to a vertical collector.
- Fill the drainage with crushed stone.
Based on the presence of water in the well, it will be possible to judge the rise of groundwater and take timely measures. Pumping is done with a submersible drainage pump. The liquid is discharged into a drainage ditch or onto the ground in a lower part of the site.
Waterproofing the cellar outside and inside
Water is the main enemy of basements and cellars. To prevent moisture from getting inside the room, and to prevent structures from deteriorating from moisture, external waterproofing and soil drainage around the perimeter are installed.
To protect against moisture use:
- coating materials – bitumen-based pastes and mastics;
- rolled - roofing felt, bikrost, hydroisol;
- penetrating - Penetron, Penekrit, Hydrohit, effective even when groundwater backs up;
- liquid glass;
- waterproofing dry mixtures;
- profiled membranes.
They are used from the outside or inside according to the instructions. The base is pre-cleaned, leveled, cracks and seams are sealed.
Important. To avoid leaks, the waterproofing barrier must be continuous, without gaps or cracks.
To prevent water from flowing in from above, the roof of the cellar is arranged in the form of a hill or slope, and the ceiling is sealed with rolled materials.
Read more: how to waterproof a basement from the inside.
Drainage is laid around the perimeter of the base - perforated pipes wrapped in geotextile. They are placed with a slope, connected into a ring and discharged into a collector or drain. The accumulated water is pumped out from the well with a pump.
Create a cellar at the right temperature
Walling
For the construction of the cellar, red brick, concrete blocks, rubble stone, and monolithic concrete are used. You can dig in large diameter sewer rings. It is not recommended to lay sand-lime bricks or large-porous cellular blocks in the ground. They have high water absorption, so they freeze and quickly collapse. If the cellar is above ground, the same materials are used as for the construction of buildings, but with enhanced insulation.
Masonry of walls made of bricks or blocks is carried out in bandaging seams with reinforcement every 3-4 rows. This will allow you to withstand the lateral pressure of the soil without the formation of cracks and eliminate the risk of collapse.
For the installation of monolithic walls, formwork made of plank panels is installed. Reinforcing cages are placed inside, concrete M250-M300 is poured. The solution must be compacted along its entire height with a metal pin to release air bubbles. It is advisable to carry out the pouring as quickly as possible, before the formation of seams between the set and fresh concrete.
You need to worry about a hole for ventilation in advance, so that later you don’t have to work with a hammer drill and break through the hardened wall. At a height of 50 cm from the floor, a sleeve is installed in the brickwork or in the formwork for concreting - a piece of pipe with a larger diameter than the future channel. The hole can be temporarily plugged with paper or a rag.
Reinforced masonry
The category of reinforced stone structures includes not only masonry made from concrete blocks, which were discussed above, but also from natural and ceramic stones, and all types of bricks.
Attention: With regard to basement walls: according to standards 3.03.01, only solid ceramic bricks can be used for this purpose. The use of sand-lime brick is unacceptable for external walls, but it is perfect for laying partitions.
A rich red color indicates that the brick is well fired.
Red, well-burnt brick (iron ore and clinker), according to GOST 530, can be used not only for masonry or wall cladding, but also for constructing foundations. However, in practice today no one does this, since it is both labor-intensive (it is necessary to widen the bottom of the wall) and expensive, because clinker is two to three times more expensive than ordinary brick.
And the main thing is this: the more seams in the masonry, the more difficult it is to ensure its tightness. For basement walls, this is the most painful issue, because water, as you know, will always find its way.
Therefore, brickwork, like small-block masonry, is laid on a ready-made monolithic foundation, protected under the base by a layer of rolled waterproofing.
What you need to know about rubble concrete masonry
Both rubble masonry and rubble concrete pouring, permitted for the construction of basement walls, are carried out using rubble - a natural stone of irregular shape. The only difference is that in the case of masonry, a larger stone is used, which has at least one bedded edge.
This makes it possible to lay it in rows much like a brick, although you have to try on, trim and adjust the stones to each other.
This is what rubble masonry looks like up close
That is, such masonry is also carried out in horizontal rows, tying the seams and filling the voids with mortar. The row height usually does not exceed 250 mm.
In regions where there are deposits of natural stone and its extraction is carried out, such material is inexpensive, and many prefer to build from it. Moreover, in the ground part the stone walls look very interesting and solid, and do not require further finishing.
Rubble stone is an excellent material for basement walls
Please note: According to SNiP, such structures can only be made for buildings with a height not exceeding ten meters (3 floors), and only on stable soils. That is, if the soil on your site is sand or sandy loam, then the reinforced concrete wall of the basement will be more reliable.
Construction of rubble concrete walls
Unlike rubble masonry, when pouring rubble concrete structures, the stone is not placed on the mortar in rows, but is laid in bulk in the formwork - or, as in the case of a foundation strip, it is poured into a trench with steep walls, and then filled with liquid cement-sand mortar. The cost of this design is the lowest, especially when there is waste material at hand.
Note: Both options with rubble stone are suitable only for regions with shallow soil freezing, or when the basement floor is above ground. In other cases, the construction of such walls is too labor-intensive, and if you have to buy stone, it’s expensive.
Ground floor made of stone
Basically, stone attracts developers due to the beauty of the masonry texture, so there is little point in laying completely recessed walls from it that are not visible. If a house is being built not with a basement, but rather with a ground floor, the walls of which will rise at least half above the ground, this option deserves the closest attention.
Floor installation
The roof of the cellar can be prefabricated - made of slabs, beams, boards - or monolithic reinforced concrete. The wood is pre-treated to prevent rotting. When laying slabs, the joints are carefully filled with mortar or foam.
If the cellar is underground and free-standing, waterproofing from roll or coating materials is installed over the ceiling. Then thermal insulation with a thickness of at least 300 mm is installed - expanded clay, clay with sawdust, polystyrene foam, slag wool. The last layer is laid earth. A slight slope is provided for water drainage.
In above-ground or semi-buried structures, waterproofing and roofing materials are installed on the insulation layer. In the basement, located under the house, in a garage or shed, the roof is the floor of the superstructure.
Overlapping device
The ceiling of the cellar must reliably retain heat, so thermal insulation should be at least 30 cm thick.
Most often, wood, monolithic or prefabricated reinforced concrete slabs are used for structures.
To install wooden floors, beams are laid on the walls of the cellar, hemmed underneath or laid on top of boards, slabs or poles. The lumber is treated with an antiseptic and lubricated with clay.
Thermal insulation is placed on top - expanded clay, sheets of polystyrene foam or expanded polystyrene, sawdust, peat. Cover with earth or sand.
Reinforced concrete slabs are mounted only on solid walls. The seams are carefully sealed with mortar. Roofing felt is glued on top of the hot bitumen. You can insulate with slag wool, expanded clay, or earth.
Ventilation system
Without good ventilation, it is unlikely that it will be possible to preserve supplies for at least some time. Properly organized air exchange will not only reduce air humidity, but also get rid of harmful radon, methane and carbon dioxide, which are dangerous at high concentrations.
A simple but effective ventilation system for a small cellar consists of 2 pipes located in opposite parts of the room at different heights:
- The supply channel is led outside and supplies clean air. The bottom of the pipe should be at a height of 30-70 cm from the floor.
- Exhaust air is removed through an exhaust pipe fixed to the ceiling and vented to the atmosphere. To create good traction, the top of the pipe must be located at least 0.5 m above the roof level.
Pipe sections on the street are insulated. External openings are covered with protective caps, internal ones - with rodent nets. If there is insufficient ventilation, a duct fan is built into the system.
Ventilation natural and forced
It is easy to make a natural ventilation system with your own hands from metal-plastic pipes. The main thing is not to forget about installing a garage basement with ventilation during the construction stage. Proper arrangement of a cellar without a ventilation system is impossible.
Natural ventilation
The main disadvantage of natural cellar ventilation is considered to be uneven air supply. In winter, the pipes are covered with frost and clogged with snow, and in summer the temperature outside is higher than in the cellar and the flow of fresh air into the basement is limited.
These problems can be avoided if you install a small household fan at the inlet of the pipe, which can be turned on as needed, so as not to waste money on electricity.
It’s easy to make natural ventilation in the cellar with your own hands:
- We install an exhaust pipe under the ceiling; the height of the pipe above the roof must be at least 35 cm. The higher the exhaust pipe, the stronger the air circulation in the room;
- the supply pipe is located 10 cm above the floor level in the garage and is discharged outside. A good flow is ensured by the height of the inlet opening - 30 cm from the ground.
It is necessary to install dampers in the pipe to be able to regulate the air flow and protective grilles from mice, leaves and debris.
Waterproofing
Measures to protect structures from moisture are carried out comprehensively. The waterproofing shell must be airtight and continuous, including floors, walls, and ceilings.
The most effective is double-sided waterproofing, which protects structures both outside and inside. This option is more preferable because the materials remain dry, freeze less and last longer.
As long as there is access to the outer surface of the walls, they are coated with mastic, covered with roofing felt or covered with fused materials.
A good effect can be obtained by using clay soaked in water. The solution in a plastic state is poured into the sinuses between the walls of the cellar and the pit. After hardening, a waterproof lock is formed.
If it is not possible to install waterproofing from the outside, all that remains is to install it from the inside. This will not save the walls from moisture, but will significantly reduce the risk of leaks.
Deep penetration agents are used as waterproofing for concrete, forming insoluble crystals in the body of the material. For bricks or blocks, it is optimal to use waterproof plaster or ordinary plaster followed by treatment with a penetrating compound or liquid glass. Rolled materials are ineffective in this case, since when water leaks in and the walls get wet, they peel off.
On the floors, the waterproofing is spread on top of the insulation layer. This will protect it from getting wet during precipitation and melting snow.
Sequence of construction work when constructing a basement
According to the dimensions of the preliminary drawing, you need to dig a pit and carefully compact the soil. The dimensions of a standard garage cellar are 2.5 m (width) by 2 meters (depth).
Important. The basement walls should not be located closer than half a meter from the garage wall. This is necessary for high-quality waterproofing.
Foundation structure
After the pit has been dug and the floor has been thoroughly compacted, we proceed to constructing a buried foundation:
- a layer of medium-fraction crushed stone is poured over the ground, minimum thickness 3 cm;
- a rough concrete screed is poured over gravel or crushed stone, thickness from 7 to 10 cm, depending on the strength of the soil in the area;
- After the concrete screed has hardened, a layer of roofing material is installed as waterproofing. It is necessary to lay the material in two layers, gluing the sheets together with liquid resin. In addition to roofing felt, you can use waterproofing under concrete floors or bitumen mastic; it costs more, but guarantees quality and reduces construction time;
- a layer of roofing material must be placed on the walls of the pit, the height of the overlap on the wall is at least 15 cm.
Important. It is imperative to install a drainage system around the perimeter to drain groundwater and seasonal water.
A reinforced concrete screed made of cement with water-repellent additives (Dehydrol Lux 10-2) is installed over the waterproofing layer or filled with ready-made concrete - grade W20. The thickness of the concrete screed of the cellar floor is at least 20 cm.
If you plan to arrange a cellar with a clay floor, then you need to pour the clay in several layers and carefully compact each one. The first layer of clay is 15 - 25 cm thick, the second layer is up to 1 m, compacted with moisture over sheets of roofing felt.
Construction of basement walls
A prerequisite is that the walls of the basement or cellar in the garage must be made only of reinforced concrete or red brick. Sand-lime bricks and foam blocks cannot withstand high humidity even with high-quality waterproofing.
It’s easier to line the walls in the garage cellar with concrete blocks - this will shorten the construction time, but requires the cost of renting special equipment. If the basement is being built in a finished garage, then you need to concrete the walls of the cellar or do brickwork.
Concreting the basement walls, cement grade not lower than M400:
- We put up wooden formwork. Be sure to install spacers to prevent soil from crumbling;
- We attach a strong reinforcing mesh. Rigid reinforcement of the walls cannot be done; the mesh of reinforcement only needs to be knitted with wire. This will prevent the screed from breaking due to seasonal heaving of the soil;
- We concrete the walls layer by layer. The height of the first layer of concrete is 40 cm;
- the height of each subsequent layer is no more than 30 cm.
Concrete hardening should occur naturally - the average time for complete hardening is 28 - 30 days, depending on weather conditions.
Important. When concreting basement walls, be sure to tap each poured layer with a rubber hammer to avoid voids and cavities in the walls.
The brickwork of the basement walls in the garage is done in one row with an offset of half a brick. Be sure to check the vertical level or plumb line every two rows of masonry. Sanding the seams is a must.
Cellar ceiling - floor slab
The garage floor will be the basement ceiling, so the main attention should be paid to the thermal and waterproofing of the floor slab:
- the floor slab on both sides must be waterproofed with bitumen or bitumen mastic in two layers;
- Insulation of the garage floor from below (basement ceiling) is done with polystyrene foam - this is the most budget option. But you need to remember that mice and rats can ruin the finish. Therefore, the thickness of the foam for ceiling insulation should be no more than 5 cm;
- The insulation layer must be plastered over the mesh. This will protect the insulation from dampness and rodents.
You can insulate the floor slab on top of the concrete floor screed:
- a layer of waterproofing (roofing felt, bitumen mastic) is laid on the slab;
- a layer of insulation (foam plastic, expanded clay) is mounted along the beacons, the thickness of the insulation layer is 10 - 15 cm;
- then a reinforced concrete screed is poured.
The hatch for entering the basement should also be insulated with foam plastic or mineral wool, so as not to create cold bridges in the cellar and not to provoke the appearance of dampness in the basement.
Insulation
During severe frosts, the cold penetrates into the room through the weakest points - hatches, doors, insufficiently insulated walls and ceilings. If frost is periodically detected somewhere inside the cellar, then the thermal insulation is not coping with its function.
In underground basements, the entrance area and ceiling most often freeze. For insulation, you can use polystyrene foam, polystyrene foam, polyurethane foam, securing them to the surface using dowel bends or glue and filling the joints with polyurethane foam.
Polymer materials have very low thermal conductivity and are not afraid of moisture. Their only enemy is rodents. To protect the insulation from mice and rats, it is recommended to cover the materials with a fine-mesh metal mesh.
Preparing the wall surface
After identifying the cause of excess moisture and eliminating it, you can begin preparatory work before applying plaster.
- All peeling fragments of the wall and its covering are removed.
- Oil and bitumen stains must be cleaned.
- If there are traces of fungus, they are removed with a stiff metal brush, after which the affected area is treated with an antiseptic.
- Efflorescence is also cleaned and treated with special neutralizing compounds.
- Seams and cracks deepen, widen, and notches are allowed on the surface of the walls.
- Be sure to remove dust from the surface. This can be done with a vacuum cleaner or dust-removing compounds that bind small particles, turning them from potential culprits of peeling into soil that increases adhesion by roughness.
- The surface is primed. The soil is selected based on the conditions of use.
Preliminary sealing of deep recesses with cement-sand mortar is allowed.
Efflorescence removal
Cleaning the wall from exfoliated fragments
Removing fungus from the wall
Notching the wall
Priming the wall
Doors, stairs, hatch
The doorway is the main route for heat loss. If it is poorly insulated, icing and freezing of the door is observed in winter. To prevent this from happening, the canvas is insulated with polystyrene foam or polystyrene foam and additionally sheathed with boards. Along the perimeter you need to lay a sealing tape in 2 circuits - along the box and the canvas itself. If winters are very frosty, double doors are installed.
The staircase to the basement can be either stationary or mobile - portable, folding, retractable. Structures are made of metal, wood, concrete, brick. The main emphasis should be on descent safety and fall protection.
The hatch, unlike the entrance door, is installed horizontally. You can make it yourself from wood or metal or buy it ready-made. The optimal dimensions of the hatch are 80x60 cm. Factory hatches are equipped with holding devices, hinges and locks. You can similarly equip a homemade structure.
If the cellar is located in the house, the finishing is done with flooring material so that the crawl space is visually invisible. A box is constructed above the street hatch to protect against precipitation and freezing.
Workshop, gym, recreation room and other “living” premises
To arrange all the listed rooms in the basement, it is necessary to resolve all issues with thermal insulation, ventilation and heating. Without this nothing will work. Only after all these points have been resolved can finishing begin. Various materials are suitable for it:
- Plastic panels are suitable in all cases except the workshop. In the latter case, there is a high risk of damage to the surface by various tools or materials during work.
- For a workshop, finishing the basement with OSB slabs is more suitable. The material is very durable, there are moisture-resistant types of sheets and, in addition, installation is not particularly difficult. The large weight of the parts requires the presence of an assistant.
- Drywall is an option for creating a rest room or other “living” area. You need to choose a moisture-resistant variety, and almost everyone knows how to work with such material. The disadvantage of the solution is the cost of the entire finishing and the need to carry out additional work in the form of puttying and painting the surface.
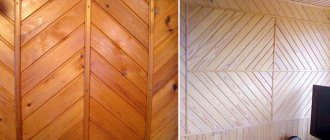
Often, the interior walls of a “residential” basement are decorated using one of the most affordable materials - wood. However, the use of lining or boards is possible only in cases where all issues with ventilation and insulation have been resolved. Otherwise, the wood will not last long.
Wiring
Due to constant humidity, the cellar is classified as a high-risk area, so the electrical wiring is installed according to strict rules:
- sockets are located outside the basement in a dry room;
- cables are laid only openly in corrugated channels or boxes; metal pipes cannot be used;
- luminaires must be sealed to avoid condensation.
It is recommended that you consult a professional electrician before installing wiring.
Interior decoration, racks and shelves
The most common method of finishing cellar walls is whitewashing with slaked lime. It dries the surface well, destroys fungal spores and insect larvae.
You can line the walls with waterproof plaster, ceramic tiles, and plastic panels. It is necessary to carefully ensure that the surface is as smooth as possible, without pores, since it is very difficult to fight mold on loose coatings.
Racks and shelves in the cellar are used in conditions of high humidity. Materials for manufacturing must be resistant to rot, moisture and fungi. This:
- impregnated timber and boards;
- metal with anti-corrosion coating;
- durable plastic;
- brick, stone, concrete.
Before storing supplies, the racks are dried, disinfected and, if necessary, the protective coating is repaired.
How to whitewash walls and ceilings correctly
Whitewashing is a traditional way to get rid of high humidity from walls, destroy mold and fungal spores. Slaked lime is a good antiseptic and fire retardant, it is inexpensive and easy to use.
Chalk is used for whitewashing - it creates a decorative coating without antiseptic properties. It is more often used for finishing above-ground premises.
Lime copes better with disinfection in the cellar than chalk, so it is worth whitewashing the walls and ceiling with a lime composition. The solution is applied to the surface with a paintbrush in 1-2 steps and allowed to dry. The coating is quite durable and does not wash off easily with water. You can add blue or pigment for decoration.
Useful tips
At first glance, building a cellar with your own hands is a simple matter. But every builder needs to remember:
- choose a location at a higher elevation, away from sources of pollution;
- The groundwater level must be at least 0.5 m below the floor;
- use materials that are resistant to moisture and decay, carry out protective treatment;
- foundation drainage, although not necessary, is very desirable, especially for regions with high precipitation rates or areas near water bodies;
- do not forget to reinforce the masonry;
- Observe electrical safety precautions when laying wiring.
Good insulation, reliable waterproofing and effective ventilation will help you preserve the harvest in the cellar without loss.
Key points when choosing materials for the construction of cellar walls
If the cellar is planned as a separate structure from the residential building, then there is no need to include a basement in the building design.
They try to choose a place for a cellar taking into account the occurrence of groundwater. If the primer level on the site is low, the cellar can be built in any convenient place and made deeper. If the water is high, the building is raised higher. In any case, the floor should not be closer than 0.5 m to the primer level.
Just in cases with groundwater, a plastic seamless caisson gives all materials a head start. Which, thanks to its absolute tightness, will never leak.
To build a cellar you may need the following materials:
- sand or crushed stone for backfilling;
- concrete for the floor (you can mix it yourself from cement, crushed stone and sand or order a mixer);
- materials for walls (blocks, bricks);
- beams and boards for wooden floors, slabs, reinforcement, concrete - for monolithic concrete;
- materials for waterproofing - coating, penetrating, bitumen and roll (roofing felt);
- insulation (expanded polystyrene sheets)
- drainage pipes;
- pipes for ventilation;
- for finishing - lime, plaster mortar.
Cellars are operated in conditions of high humidity, so they must be protected from rotting or corrosion.
Plastic cellars do not need waterproofing and they are not afraid of high humidity.
By the way, if the soil on the site is strong and clayey, and the groundwater level is deep, then you can organize a cellar without walls and waterproofing.
Here's what expert F. Khalilov says about this: If either larch or oak grows in your area, I would advise NOT making the ceiling of the cellar from concrete (from building concrete slabs or by continuous pouring), but from logs. After all, the main thing is that the ceiling breathes, not the walls. There is no drip from such a ceiling, but concrete will always cry, both in winter and in summer, condensation will drip from it.
Properly organized cellar ventilation will help cope with high humidity in the room. It can be natural or forced. For its production, plastic rather than asbestos-cement or metal pipes are increasingly used. Regular sewer gray ones or more durable brown ones will do. The diameter is calculated at the rate of 15 mm section per square meter of storage.
Read more in the article: The importance of organizing ventilation in the cellar for storing food
A staircase is made in the cellar, which can be permanent or portable. It is made of wood, concrete, welded from metal or used ready-made from light alloys (such as a stepladder).
For convenience and comfort, it is advisable to install electricity in the cellar for lighting or forced ventilation. To do this you will need wires, switches and a lamp. Electricians are not to be trifled with; they must be carried out according to strict rules in order to avoid accidents.
It’s good when special climate control equipment is used in storage facilities to maintain a certain temperature and humidity. Otherwise, your supplies will quickly become unusable.
A very important point is an insulated door or hatch cover. In cold latitudes, double insulated structures are usually installed to prevent freezing.
Customers of ready-made plastic cellars are spared all these problems. They don't need to think about an insulated door or stairs. And even lighting with ventilation is already provided in ready-made options.