Aerated concrete began to be used in construction not so long ago. In the 30s of the last century, the first plant for the production of artificial stone with cells filled with air appeared in Sweden. The material quickly gained popularity due to its combination of valuable physical and mechanical properties and relatively inexpensive price. The main purpose of lightweight porous blocks is the construction of low-rise residential, industrial or civil buildings. A house made of aerated concrete, a bathhouse, a garage or an outbuilding are the most common structures in private individual construction.
Properties of aerated concrete
The construction industry produces aerated concrete structural, structural and thermal insulation and thermal insulation blocks. The porous structure is formed as a result of the reaction of concrete with aluminum powder.
For the construction of a house up to 5 floors, it is optimal to use structural and thermal insulation material with a specific gravity of 500-900 kg/m³. It combines sufficient strength and low thermal conductivity.
Properties of aerated concrete that are most valuable for house construction:
- low thermal conductivity coefficient - 0.12-0.19 W/m°C;
- high compressive strength 1-1.5 MPa;
- good vapor permeability - 0.15-0.20 mg/mchPa;
- biological inertia;
- convenient dimensions for self-installation - thickness 100-400 mm, height 250-300 mm, length 500-625 mm;
- light weight of blocks - 15-28 kg;
- non-flammability;
- ability to cut, saw or drill material with hand tools.
Cellular structures are produced in the form of blocks with smooth edges, with tongue-and-groove locks, thin partitions and profile elements for lintels. Some products have recesses at the ends to make it convenient to build a house from aerated concrete with your own hands. They also produce reinforced slabs and beams that have high bending strength.
Overview of the estimated construction time for a house made of aerated concrete blocks
Every developer is interested in a pressing question: how long will the entire cycle of building a house made of aerated concrete take? Let's figure it out.
Table 4. Time frame for construction and finishing of aerated concrete housing:
| Project development, survey work and site preparation | 1-2 months |
| Foundation structure | From several months to a year. Some types of foundation must be stable |
| Masonry work | 2-6 weeks |
| Installation of floors and roofing | 4-6 weeks |
| Communications supply | Up to 6 months |
| Electrical and plumbing work | 1-3 months |
| Facade cladding | 2-4 months |
| Interior decoration | From 2-3 months to an indefinite period |
As it becomes clear, the construction time largely depends on the developer himself, his financial capabilities, personal wishes and the ability to use the services of contractors. In the latter case, of course, the speed of work will increase significantly.
The video in this article will tell you in more detail how to build a house from the material we are discussing in the shortest possible time.
Foundation for a house made of foam blocks
The foundation is the basis of the entire structure. The mistakes that were made during its construction are then difficult or almost impossible to correct. Aerated concrete is a fairly lightweight material. A wall made of it weighs 2-3 times less than one made of brick or expanded clay concrete. But the foundation for a house must be laid according to all the rules of construction science.
Choosing a foundation type
The main criteria when choosing the type of foundation for a private house:
- weight of the building;
- load from snow and wind;
- composition and bearing capacity of the soil;
- soil water level;
- presence of a basement;
- climate zone;
- relief of the site;
- surrounding buildings.
Important. When considering all the factors together, the developer chooses the type of foundation that will perform its task better than others.
The foundations for the construction of a private house differ in design. Main types:
- pile;
- tape;
- slab.
Depending on the installation method, they can be prefabricated or monolithic. In turn, pile foundations are made with a hanging, ground or buried grillage. Tape - in the form of a beam laid below or above the level of seasonal soil freezing. The base of the slab can also lie at different depths.
Soil conditions can vary not only in different areas, but also within the same area. It is optimal if the type of foundation is provided for by the project for building a house, taking into account all factors.
The developer can make an independent decision in the following cases:
- The site has dense, homogeneous soils. This is determined by digging holes in the corners of the proposed structure to a depth exceeding the foundation by 30-50 cm.
- Low - from 3 m - groundwater level.
- There are no moisture-loving marshy plants growing around. Their presence indicates possible flooding or release of interstratal water.
- The site chosen for construction is flat, without elevation changes.
- It is possible to install drainage to drain rain and melt water.
- No cracks or subsidence of foundations are found in neighboring houses and outbuildings.
In other cases, before starting construction, it is necessary to carry out engineering surveys, during which the characteristics of the soil are determined. The final decision is made after considering possible options for foundation construction. It is better to do this together with the design organization.
Shallow strip foundation
The shallow strip foundation - abbreviated as MZLF - has sufficient load-bearing capacity to absorb the load from aerated concrete walls, is not afraid of frost heaving forces, is not expensive and is easy to install. This is one of the most common types of foundations when building a house from gas silicate blocks.
Sequence of work when installing the MZLF:
- They mark the contours of the future foundation with pegs and a cord, and control the geometry with optical instruments or a tape measure.
- In the corners and intersections of the walls, cast-offs are installed from two posts and a board nailed between them. The position of the building axes is marked on it.
- Dig a pit 70-100 cm deep, having previously removed and removed a layer of fertile soil 30 cm thick.
- Crushed stone and sand with a total height of 30-50 cm are poured into the bottom of the trench and compacted layer by layer.
- Install removable formwork from wooden panels or permanent formwork from expanded polystyrene. The width of the strip should be 30-40 cm, the top of the structure should be at least 30 cm above the ground.
- Waterproofing material is placed inside with an overlap on the surface of the formwork.
- Reinforcing cages are mounted from rods with a diameter of 12 mm. Depending on the load, the number varies from 4 to 6.
- Install sleeves from pipe scraps for laying communications.
- Concrete of a grade not lower than M 200 is poured, compacting layer by layer with manual or mechanical tampers.
- After gaining strength, after 28 days, the removable formwork is dismantled.
Important. In parallel with laying the foundation, drainage is installed to protect the structures from moisture. They carry out hydro- and thermal insulation work and lay a temporary blind area. These measures will help prevent the destruction of the foundation from frost heaving of the soil. Also read on the website We're building a house about how drainage is arranged when building frame houses, which is better and more reliable.
Sibit - pros and cons
Why is Sibit gaining more and more popularity? The answer is quite simple: because of its positive properties, which make it ideal for building houses. Let's look at the main ones:
- The most important advantage is that Sibit has amazing thermal insulation properties. The house will be cool in summer and warm in winter. Based on practice, owners of sibit houses save up to 30% on heating the premises of their home, and this, you see, is a lot.
- The material is easy to process. If the blocks need to be adjusted or rounded, you can easily do this with a simple saw with large teeth. It is easy to cut and drill also by hand.
- Sibit blocks are lightweight, so you can save on both the construction of the foundation and special heavy equipment for conveying the blocks to the top.
- The porous structure allows the material to “breathe”, so the air space in the house will always be fresh.
- Building a house from sibit will be easier and faster, since the blocks are much larger than simple bricks. Laying walls can be done not only using simple mortar, but also using special glue.
- Sibit does not burn and is an environmentally friendly material.
Disadvantages of sibit: its fragility and strong moisture-absorbing properties. But this is not a huge problem, since during masonry the walls are reinforced, which will further strengthen them. And the moisture-absorbing block itself, for its part, will be covered with finishing material so that moisture does not get into it.
So, we've sorted out the positive and negative sides. If you still decide to use sibit as a building material, let’s take a closer look at where construction begins and how to build a house from sibit.
It is recommended to build a house from sibit in spring or summer, at temperatures from 5 to 25? C. If the temperature is above this limit, the blocks will need to be moistened when laying the walls.
Aerated concrete house: laying blocks
When we build a house from aerated concrete, we must take into account the features of this material:
- block masonry is unstable to bending deformations;
- the frame does not have the required rigidity at the junctions of the walls;
- openings of windows and doors significantly weaken the masonry, especially in load-bearing structures;
- subsidence of soils and the close proximity of neighboring buildings lead to uneven settlement of foundations and subsequent destruction of the masonry;
- if there is no ventilation gap under the finishing material, the constant presence of moisture leads to damage to the structure.
In this regard, cracks of various configurations can form in the walls, among which the most dangerous are vertical, inclined, V-shaped or parabolic. If they open upward, this not only disrupts the aesthetic appearance of the masonry, but also reduces its load-bearing capacity.
To prevent unpleasant consequences, the blocks are laid using appropriate technology and aerated concrete is reinforced.
Rules for laying aerated concrete blocks
Do-it-yourself laying of aerated concrete is carried out in accordance with the requirements of standards - SNiP, SP, SN:
- cellular materials with high water absorption are mounted on a layer of cut-off waterproofing along the top of the base;
- before starting work, ordering slats are installed in the corners of the building, a mooring cord is pulled between them to indicate the laying line of the first row;
- marks are applied to the rail corresponding to the position of each row;
- the masonry is carried out with bandaging of the seams, the amount of displacement of the top row above the bottom is 80-120 mm or 0.4 of the height of the element;
- after installing blocks of the same level, the mooring cord is pulled along a new line;
- blocks of the second and subsequent rows are laid on a special frost-resistant glue; the use of cement-sand mortar is not advisable due to the formation of cold bridges;
- additional elements at the corners or edges of walls, in the frames of openings should not be shorter than 115 mm;
- connections between internal and external walls are made to a depth of at least 200 mm;
- The masonry is reinforced with metal or glass polymer meshes and steel rods.
Work is carried out at an air temperature of +5°…+35°.
Important. In winter, antifreeze additives are added to the glue to protect the composition from premature freezing.
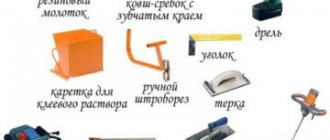
Tool
To perform masonry from aerated concrete blocks you will need:
- container and mixer for mixing glue;
- notched trowel for applying the solution to the surface of the blocks;
- laser level or building level to control the position of elements;
- rubber mallet;
- trowels;
- hand saw;
- grater;
- sander;
- brush for sweeping away particles after processing gas blocks;
- ruler and pencil for marking additions.
You will also need scaffolding for laying the upper rows, ladders, shovels and a box for preparing cement-sand mortar.
Construction stages
It will not be difficult to build a house with your own hands if you make calculations in advance and carry out all stages of construction clearly according to plan:
- laying the foundation;
- waterproofing;
- main row;
- subsequent rows;
- wall reinforcement;
- installing lintels in window and door openings;
- overlap
To build a house, a reinforced concrete slab is suitable as a foundation. It can be replaced with a monolithic strip foundation on a sand cushion. You can check its horizontality using a hydraulic level or a level. If there are differences of more than 20 mm, you will need to level the foundation to simplify the process of laying walls. After establishing the base, waterproofing is carried out from a double layer of roofing material. If this is not done, then mold may appear on the walls and there will be increased dampness and humidity in the house itself.
It is recommended to lay the first rows of gas silicate blocks on a cement-sand mortar to smooth out unevenness and level the first row horizontally. The blocks begin to be laid in the corners, after which a rope is stretched between them, along which the entire row will be laid out. The evenness of subsequent rows will depend on the correct placement of the first row.
The following rows can be laid with a special glue, which is applied with a trowel. It is very important to remove dust from the surface of the block in advance. Glue is applied to the surface of the wall on which the next block will be installed and to the end part of the previous one. Alignment is carried out horizontally and vertically, and the seam of the previous block should be in the center of the product being laid. Lightly tapping the end with a rubber mallet will help to press them together.
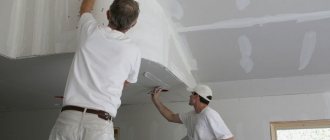
Photo: applying glue for gas silicate blocks
Every fourth row of blocks must be reinforced with fiberglass and metal reinforcement. The reinforcement takes on bending loads and prevents the walls from moving apart. To do this, a groove is cut at the top of the gas silicate either manually or using an electric wall cutter. Glue is half-filled inside the grooves, and reinforcing rods are installed. Reinforcement breaks in rows should not intersect to ensure greater structural reliability.
For openings no more than 1.5 m wide, metal corners are used on which the blocks are laid. Cuts of the required size are made in the surface of the gas silicate block to prevent differences in height. The corners must first be treated with a special anti-corrosion substance.
Photo: wall chaser
Photo: reinforcement
If there is an opening wider than 1.5 m, a reinforced concrete lintel with a height of at least 20 cm is poured. Before pouring concrete, it is necessary to install formwork of a suitable size and shape and lay a reinforcement frame in it. At the end, the ceiling is installed, which can be wooden or monolithic. Under the Mauerlat you will need to install a reinforcing belt with a thickness of at least 10 cm. Formwork is prepared for it from durable plywood or boards. Reinforcement is performed with metal rods, which should be installed in the thickness of the concrete, but not on the blocks themselves.
Building a house with your own hands from gas silicate blocks will not be difficult if you take all measurements correctly, use only high-quality materials in construction and strictly follow all stages.
Laying aerated concrete block
To build a house from aerated concrete, the walls are laid out in the following order:
- mark the position of walls and openings on the foundation or ceiling;
- install slats-orders, pull cords-moorings;
- spread the mortar and lay the first row of blocks;
- control the geometry of the masonry of the first and subsequent levels;
- lay aerated concrete blocks along the wall;
- sequentially carry out masonry and reinforcement;
- cut or saw out additional elements if necessary;
- Clean the surface with a float or electric grinder.
Important. Broken blocks with chipped edges are used for making additional stones, installing pediments, and partitions.
Laying the first row
The installation of blocks begins from the highest point of the foundation, determined by the building level or level. The lower surface of the element is wetted and placed on a leveling layer of cement-sand mortar. Moistening the aerated concrete is necessary so that the mixture does not set so quickly.
Each block is placed strictly horizontally. To do this, apply a building level and level the position with a mallet with a rubber knob.
If necessary, an additional one is made from a whole block. To do this, measure the size of the gap in the row and cut out an element along it. The ends are smoothed with a trowel, coated with glue on both sides and placed in the masonry.
To preserve the sling, the top row begins to be mounted by installing the whole block above the cut one.
Having laid a whole row, the surface is leveled with a grater. This operation will help prevent the formation of local stresses at points of height difference between blocks. Crumbs of material and dust are removed with a brush.
Second and subsequent rows
1.5-2 hours after laying the first row, they begin installing the second. Load-bearing walls start from the corners. Align the block vertically and horizontally.
Pull the mooring cord similarly to the first row and install the blocks. The glue is applied to the bottom plane and the end of the element with a notched trowel. Press the stone to the place of installation so that the thickness of the mortar layer is no more than 2-5 mm. The excess is removed with a trowel.
Within 15 minutes the position of the block can be adjusted. Glue stains are wiped off with a wet cloth. The hardened solution is removed mechanically.
Subsequent rows are installed in the same way. All seams are filled with glue, regardless of the configuration of the blocks. Tongue-groove joints are left partially unfilled.
Features of building a house from gas silicate
To build a house with your own hands, products with a tongue and groove are usually used, which will help save on adhesive composition and ensure even lines. As reviews from owners of houses built from gas silicate show, the most popular option is considered to be blocks with a density of at least D500.
You can build a house on weak-bearing soil without necessarily installing a strong foundation, so a shallow strip foundation may be the optimal solution. In this case, it is necessary to accurately observe the dimensions. The first installation should be carried out on a durable waterproofing layer in order to avoid moisture entering the cavity of the gas silicate block. It is advisable to use a cement solution or special glue as a bond. It is recommended to design window and door openings using gas silicate lintels, which will be similar in size to the main block.
Foreman's advice : when working, it is recommended to give preference to a special glue that will create a seam of no more than 2-5 mm and will protect against the penetration of cold.
Shallow strip foundation
Reinforcement of aerated concrete
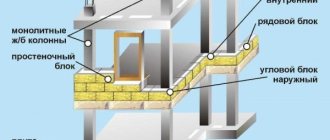
To ensure that a house made of gas silicate blocks is strong and reliable, and that the walls do not become covered with cracks, the masonry is reinforced. In earthquake-prone regions, during construction on subsiding soils, in areas with strong hurricane winds, reinforcement is designed for the maximum effective load.
Reinforcement rules
If the conditions are standard, certain areas of the masonry are reinforced:
- bottom row resting on the foundation;
- every fourth row if the wall length exceeds 6000 mm;
- corners and junctions of walls;
- places of support for lintels, rafters, ceilings, beams, stairs, balcony slabs;
- the lower part of window openings;
- vertical pillars or columns;
- areas where the load is increased.
Scheme of reinforcement of a house made of aerated blocks.
Important. Reinforcement of sections allows you to evenly distribute stress in structures, strengthen block masonry with respect to bending deformations, and reduce the likelihood of cracks.
Armopoyas
It is mounted along the top row in places where beams or floor slabs support. The reinforcement belt ties together block load-bearing walls and partitions and evenly distributes the load from the structures above.
The formwork is installed in a continuous strip along the perimeter of the building and internal partitions. Use boards, bricks or U-shaped profiles made of aerated concrete. You can lay thin partition blocks on the outside, and a board on the inside.
Steel frames are installed from steel class A 3. The diameter of the working rods is 12 mm. They are laid in 2 rows - 2 on top and 2 on bottom. The cross section of the clamps is 8-10 mm, pitch 200-300 mm.
The rods are joined with an overlap, and L- or U-shaped elements are laid in the corners and junctions of the walls.
To protect against freezing, polystyrene foam slabs with a thickness of 30-50 mm are placed in the formwork along the outer side. Its size is taken into account in the manufacture of the reinforcement frame. Concrete M 200-300 is poured, studs or anchors are pre-installed for fastening rafter beams and ceilings.
Masonry reinforcement
To prevent the walls from deforming and losing their rigidity and stability, the following types of reinforcement are used:
- Horizontal reinforcement with metal rods. Using a wall chaser, cut grooves 25 mm deep in the blocks and fill them with glue. Reinforcement with a diameter of 6-8 mm is placed in the grooves, overlapped, and bent in the corners. After pressing, excess adhesive solution is removed.
Laying reinforcement in grooves.
- Perforated tapes. Galvanized steel strips 16 mm wide and 1 mm thick are screwed to the surface of the blocks with self-tapping screws without grooves. To strengthen the tapes, they are laid in two layers.
- Reinforcement with masonry mesh. Meshes made of steel, fiberglass or glass basalt are laid out over the surface of the masonry, not reaching the edge of 50 mm. Metal products are embedded in the solution, composite products are secured with glue. Polymers do not corrode, have high adhesion to aerated concrete, and are tensile strength. Although they are more expensive than steel ones, unlike them they do not form cold bridges in the wall.
Strengthening window openings of aerated concrete houses
Sloping cracks from the lintel to the top of the wall are a fairly common sight, indicating that a house made of aerated concrete was built without following the rules of reinforcement. To avoid having to call specialists to inspect the building, dismantle windows, gates or doors and re-strengthen the opening, when laying the blocks, you need to lay rods in the window sill area and in the places where the lintels support.
Sequence of work when strengthening the window sill:
- Using a wall chaser, cut grooves in the masonry with a length exceeding the width of the window by 60 cm in both directions.
- Glue is poured into the groove.
- Class A 3 reinforcement with a total cross-sectional area of at least 0.75 cm² is laid. This corresponds to two rods with a diameter of 8 mm or one - 10 mm.
- Press the reinforcement into the grooves and remove excess glue.
Jumpers are made independently from a metal corner, monolithic concrete, or purchased ready-made. The wider the opening, the stronger the section of the structure should be.
In the places where the jumper rests, multidirectional stresses act. To ensure that the weight of the overlying wall is distributed evenly, the beam is laid in compliance with the minimum length of the installation in the masonry:
It is recommended not to increase the width of the partition between openings in load-bearing walls beyond 60 cm. If you need to lay out a narrower structure, use brick or reinforcement with vertical reinforcement.
In openings up to 1.2 m wide and the height of the masonry above them is not less than 2/3 of the width, it is permissible not to install a lintel, but to lay 2 rows of reinforcement inserted into the wall by at least 50 cm.
Vertical reinforcement
Vertical wall reinforcement is recommended:
- in seismic zones;
- with complex terrain of the site;
- under strong wind load;
- in pillars or columns;
- with aerated concrete density less than 400 kg/m³;
- with narrow walls, wide openings;
- in places where massive structures are supported.
Vertical grooves are made in the walls with a drill and a crown, and O-shaped aerated concrete profiles are installed. 1-4 reinforcing bars with a cross-section of at least 14 mm are inserted inside. Fill with concrete M 250-300.
Important. At the same time, the masonry is strengthened by installing horizontal steel rods or meshes.
Advantages and disadvantages
Thanks to the cellular structure of the material, a house built from sibit has a favorable microclimate
Before ordering a house project made from sibit, it is worth studying the pros and cons of this material in order to make the right choice. Among the advantages of Sibit, the following qualities are worth mentioning:
- Finished houses made from this material are distinguished by high heat and sound insulation characteristics. The thermal insulation properties of the material are 3-4 times higher than those of traditional brick. If you calculate how much money is needed to heat an ordinary brick house, then by heating a two-story house from sibit, you can save up to 30 percent.
- Thanks to its cellular structure, a house built from sibit has a favorable microclimate. The material accumulates heat well. In this regard, the building is very similar to a house made of timber.
- To make sibit, only components of mineral origin are used, so it can be argued that a country house made of sibit or any other building made from this material is environmentally friendly housing.
- This is a non-flammable material.
- The advantage of building houses from sibit is that the construction is much faster than a brick house. It's all about the size of the blocks. If you calculate how many blocks are needed to build a house, then their number will be many times (8-10) less than traditional bricks.
- Transporting and laying the material is also easy. As a result, you can build a small country house from sibit with your own hands without the use of construction equipment.
- The material is easy to process. It can be easily cut with a hacksaw to the desired size.
- You can reduce the cost of arranging the foundation by two or even three times. All this is due to the low specific gravity of the material.
- To build a country house from sibit, you need much less labor. The thing is that the dimensions of the sibit block are 6 x 2.5 x 2 dm, and the weight is 18 kg. It can be equated to 20 bricks.
- According to thermal engineering calculations, the thickness of the outer brick wall should be 8 dm without taking into account the thermal insulation material, while the enclosing structures made of the described type of aerated concrete can be 5 dm thick.
- Thanks to the porous structure, moisture from the room quickly evaporates, which helps maintain an optimal microclimate.
- Reinforced floor slabs can be made from sibit, which will not be inferior in strength to reinforced concrete structures. So, each square meter of such a slab can withstand a load of 8 c.
To protect porous walls from destruction, it is necessary to apply special vapor- and moisture-proof compounds
Among the disadvantages of the material, it is worth noting the following points:
- The main disadvantage is the low strength of the material, especially when compared with concrete or brick.
- It is not recommended to hang cabinets, shelves, heavy metal structures, heaters, etc. on partitions and walls made of sibit. To install them, you need to acquire special fasteners.
- When building a house, it is very important how many floors you plan to build. Thus, one-story houses made of sibit do not need additional reinforcement, while for construction above 5 floors you will have to make a strong frame.
- Developers often have a question about how to plaster walls. The thing is that to protect porous walls from destruction, it is necessary to apply special vapor- and moisture-proof compounds. If you plaster the walls incorrectly, the open pores of the material will cause a decrease in the thermal insulation qualities of the enclosing structures and their subsequent destruction.
Attention: the construction of a house from this type of aerated concrete should be carried out in the spring or summer, when the temperature is within +5 ... + 25 ° C. If the temperature rises above the specified limit, the blocks will have to be additionally moistened before laying.
How to winter without heating
If the house has already been built, but the connection to the central heating or gas line is not expected until next year, you need to prepare for the winter.
Measures to help you survive the winter without losses:
- drain water from all systems;
- close windows and doors tightly or secure two layers of thick film in the openings;
- insulate the foundation, plinth and blind area with polystyrene foam slabs.
For one or two winters the building can be left without exterior decoration. Frost resistance of aerated concrete is 50-100 cycles. The material can withstand this amount of freezing and thawing without changing its properties.
It is not recommended to throw aerated concrete for a long time without protection from precipitation. It has a water absorption of 20-25% by weight, and is prone to waterlogging and destruction at subzero temperatures.
We build walls
Principle of masonry
Start building the walls of a Sibit house 30 days after pouring the foundation; usually this is the time it takes for the foundation to become strong enough.
What you will need for construction:
- Sibit blocks.
- Adhesive solution.
- Fittings.
- A tool used for laying houses.
Note!
Start laying walls only after installing the waterproofing layer. It can be a double layer of roofing felt or waterproofing material.
To lay sibit blocks, use special glue. If work is carried out at sub-zero temperatures, then use a winter type of glue. Remember, the first row is placed on a sand-cement mixture.
Place the first blocks on the corners of the house; they will serve as a kind of beacons; to do this, stretch a strong twine between them. Constantly use a level to monitor the quality of the block masonry.
Walls made of sibit blocks must be reinforced to make them more reliable. This should be included in the design of your home. Make reinforcement with reinforcement rods with a diameter of 10 mm, which are placed in grooves that you carefully cut in aerated concrete blocks.
Reinforcement of masonry rows
Note!
Lay load-bearing internal walls simultaneously with external ones and also reinforce them. Use reinforcement bars to strengthen window and door lintels.
Floor slabs between floors are laid on an armored belt. Do it on external and load-bearing internal walls. Hollow slabs are well suited for the role of flooring. The weight of the interfloor slabs must be distributed evenly, this must be reflected in the design.
The armored belt needs to be equipped before building the roof of the house. After its arrangement, you can install the rafter system.
Note!
The armored belt cannot retain heat like sibit blocks, so it must be thermally insulated.
The next stage of work is the construction of the roof. Install the outer rafters, secure the ridge beam to them, then install the remaining rafters. Insulate the roof and install the roofing material you purchased.
According to your project, complete the laying of the internal partitions. For them, use thinner blocks. In the places where the partitions connect to the floor slabs, lay a sealing tape, and on the foundation - felt strips.
Completion of work
Brick cladding
The house is built, now you can start insulating the house. Sibit itself is a material that retains heat well, so houses in which the masonry was done using cement mortar rather than special glue are subject to major insulation.
In regions with harsh climates, mineral slabs or polystyrene foam are well suited for insulating sibit houses.
You can decorate the facade of the house at your discretion. The material for this can be facing brick, vapor-permeable plaster, siding.
Note!
Plaster is the best material for interior decoration of a sibit house.