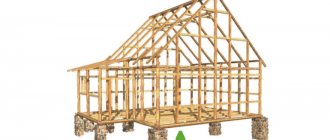
Building a wooden house with your own hands is not such a difficult task. The main thing is to know and take into account all the subtleties when performing each type of work.
Construction of wooden houses from A to Z includes:
- choice of material;
- drafting;
- foundation construction;
- erection of walls;
- roof installation;
- hanging windows and doors.
So, let's try to figure out how to build a wooden house with your own hands.
Tree selection
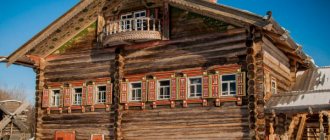
Modern wooden houses are built from logs and beams. The best log is rounded. It is sorted and processed industrially. Therefore, the material contains a minimal amount of traces of knots and is sufficiently dried. Chopped logs can also be used to build walls.
What are the benefits of log walls? They have a maximum thickness, thanks to which the warmth in the living quarters remains warm for a long time during the cold season. A log house has a long service life; looks original and beautiful.
Glued laminated timber has similar characteristics. In addition to its large thickness (210 markings are used for capital construction), it has the following important qualities:
- Gives minimal shrinkage (only 5 cm);
- Maximum resistance to aggressive environmental influences;
- Practically does not rot, thanks to special industrial processing;
- It has no natural defects (resin pockets, insects, etc.) that affect the quality of the walls.
In addition to profiled timber, the construction of wooden houses is carried out from sawn and planed timber. Their cost is several orders of magnitude lower. The beams have a lower degree of drying and, accordingly, shrink more.
As for choosing the type of wood, it is best to purchase coniferous species that grew in the northern part of the country. They are more resinous and therefore more moisture resistant. It is rational to build a wooden house with your own hands from spruce, cedar, and pine.
Types of wooden houses
Wooden houses are built mainly from coniferous trees: if we talk about the middle price segment, it’s pine, if we talk about the luxury segment, it’s cedar. Backing boards are made from larch, as it is characterized by increased density and minimal hygroscopicity, due to which it does not rot even in direct contact with water. Spruce, although it has lower thermal conductivity than pine, is usually used for making floor beams, hemming sub-ceilings and floors. Based on the wall material, wooden houses are divided into two main types - logs and timber, but within each there are several subcategories with their own characteristics.
Log houses made of rounded logs
A rounded log, abbreviated as OCB or rounded, is a factory-processed trunk - not only sanded, but also brought along its entire length to a given diameter. The output is even, smooth workpieces with excellent geometry, in which bowls are selected on machines for a specific project.
This material has several advantages.
- Simplicity and speed of assembly - the log house is mounted according to the type of the designer.
- Due to the excellent geometry, with sufficiently qualified craftsmen, there are practically no gaps between the crowns, and the log house turns out airtight. During the shrinkage process, although discrepancies will appear, they will be minimal; if desired, you can do without caulking, modern sealants will suffice.
- Relative affordability compared to other types of log houses.
The disadvantage of rounding is increased susceptibility to external influences - during processing, not only the bark is removed from the trunk, but also the hardest layer, which is a natural protection. A log house made of “soft” wood will have to be processed more intensively, using specialized means, taking into account its high absorbency. In addition, when drying and shrinking, OCB is more susceptible to longitudinal cracking.
Log houses made from hand-cut logs
Unlike OCB, a whole debarked log is processed manually (with an ax) - only the bark is removed, the integrity of the protective layer is not damaged. Like processing, the selection of bowls is also done manually, at the place where the frame is assembled, usually a production base, less often directly at the construction site.
Advantages.
- The classics of wooden house construction are originality and individuality.
- Increased resistance to the negative effects of natural factors.
- Increased durability.
- Longitudinal cracks form during shrinkage, but to a lesser extent.
Not so much the disadvantages, but the characteristic features of log houses made of chopped logs include the labor intensity and complexity of assembly, as well as increased demands on the skill of the performers. As a result, the cost of this type of wooden houses is one third higher than those made from central fiber boards.
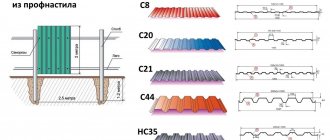
Houses made of profiled timber
The profiled beam is characterized by the presence of a tongue-and-groove locking connection on the upper and lower edges, which ensures reliable fixation of the crowns to each other. The material has good geometry and a smooth surface, which, coupled with beveled chamfers, makes the facade highly decorative. The profiled timber can be naturally moist or dry; in the second case, the calibration stage is preceded by chamber drying. Houses made of timber with natural moisture are more susceptible to shrinkage, but due to the groove fixation, the likelihood of warping and deformation of the crowns is minimal.
Advantages.
- Simplicity and speed of assembly is another type of “constructor”.
- Tightness - due to the tongue and groove, the joints are as tight as possible, without gaps; after shrinkage, the seams are sealed with sealant.
- Availability – material in the mid-price category.
The disadvantages include cracking, especially if the box is made of timber with natural moisture, significant longitudinal cracks can form. Like OCB, profiled timber is more susceptible to all pathological processes and needs enhanced protection.
Individual project
How to make a wooden house with your own hands without a project? It's practically impossible. A private builder will definitely make an omission in something. High-quality individual projects take into account the features of each stage of construction. The type of foundation, method of installation and fastening of the crowns, types of roofing are selected taking into account the properties of the log or timber.
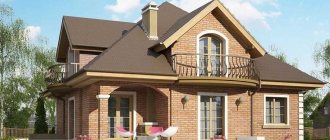
With the approval of the customer, the layout of residential premises and their square footage are developed. The total area, or rather the length of the external walls, determines how the crowns should be attached. Projects take into account many other nuances. Do-it-yourself wooden houses, projects (photo below) for which are developed individually, turn out to be reliable and beautiful, have no flaws and are durable.
Advantages of a log house made of round timber
The features of a wooden house made of round timber create an increased demand for the construction of cottages from this material
The features of a wooden house made of round timber create an increased demand for the construction of cottages from this material. The main advantages of log cottages include:
- Absolutely environmentally friendly material;
- High breathability of wood, which creates an optimal microclimate in the house;
- The low thermal conductivity of round logs allows you to economically spend resources on heating the cottage during the cold season and provides warmth in the house;
- The evaporation of valuable coniferous resins into the atmosphere during the construction of a house and its operation has a beneficial effect on the respiratory system of household members;
- In addition, log houses are distinguished by their durability (they can last about 80 years or more) and the ability to build cottages in seismically dangerous regions.
Choosing a foundation
A do-it-yourself wooden house requires a reliable, durable foundation. Since permanent wooden buildings do not have as much weight as stone ones, the choice of foundation is quite wide.
Foundations are installed in private construction:
- columnar;
- tape;
- slab.
Experts believe that the best of them is lightweight tape. It is called lightweight because no crushed stone is added when mixing the working solution. Therefore, the density of hardened concrete is lower.
The columnar foundation, although very popular, has significant disadvantages. One of the most significant is the cost of work. In addition to using special equipment to install piles or pillars, a preliminary geodetic survey must often be carried out to determine the properties of the soil. Slab foundations are good for residential wooden buildings with a large total area.
Although a spacious wooden house with your own hands (the video is presented at the end of the article) looks luxurious, it requires a lot of physical effort and money. According to the project, the depth of the strip foundation depends on the degree of soil freezing. The trench is dug to a depth where the soil does not freeze. The width of the trench should be 25 - 30 cm.
You can build a strip foundation for a wooden house with your own hands as follows:
1. A trench of appropriate depth and width is dug.
2. Sand is poured into a 10 cm layer, watered and compacted well.
3. A 10-centimeter layer of crushed stone is poured on top, which is also watered and compacted tightly.
4. A layer of roofing material is laid on top of the pillow.
5. Formwork is installed. If it is not removable, it is reinforced with metal wire.
6. Reinforcement is installed above the waterproofing layer. Antiseptic-treated metal rods are pulled lengthwise and crosswise and secured with rigid wire.
7. Next, concrete is poured. Grades 200, 250 and 300 are suitable. The consistency of the concrete should resemble liquid sour cream.
The time for sufficient setting of the foundation is 10 – 12 days. Under favorable weather conditions, concrete gains design strength up to 70-80% in 7-14 days. This is enough to already load the foundation, and complete 100% solidification of the foundation will occur only after 28 days from the moment the foundation is poured. You can continue building a wooden house with your own hands (video at the end of the article).
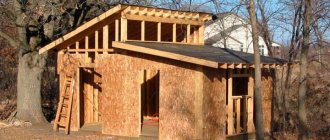
Construction of walls
Independent construction of wooden houses is simplified if profiled timber is used.
It has grooves that connect easily. Before starting the construction of walls, it is necessary to check the horizontalness of the foundation. It is necessary that the hydraulic level shows zero, since when installing the first crown, the construction geometry must be observed.
The foundation plane must be perfectly flat and straight. In addition, when laying, the corners of the first crown are aligned vertically. They should be exactly 90 degrees. If the geometry of construction is broken from the very beginning, the walls will not be smooth, and there will be skew at the level of window and door openings.
Installation of a wooden house with your own hands at the stage of wall construction is carried out as follows:
1. A layer of roofing felt is applied to the foundation without first applying mastic.
2. If it is necessary to level the surface of the foundation, when its skew is more than one centimeter, wooden wedges are placed at a distance of 30 cm from one another.
3. A “zero” board is installed on top along the entire perimeter of the foundation.
4. The space between it and the foundation is filled with polyurethane foam.
5. The first crown can be laid at a distance of 25 cm from the edge of the foundation. It is also allowed to install crowns behind the edge of the foundation at a distance of no more than 5 cm.
6. At the corners, the first crown is attached to anchors.
7. The bowls of the first and subsequent crowns are tightened for compaction by assembling them onto a pin.
8. The bowls of the first crown are tightened using a reinforced washer measuring 60x80 mm.
9. Further reinforcement of the screed using a reinforced washer is carried out every 5 - 6 crowns.
10. Screeding around the perimeter of the crowns is done using metal or wooden dowels.
11. The crowns are connected to each other thanks to grooves. A new one is placed on the lower beam. It is inserted into the grooves by hitting the overhead board with a sledgehammer from above.
In addition to anchor fastening, end fastening is also used - the ends of the crowns are joined at the ends. In this case, if one of them cracks, it can be easily removed and replaced whole.
We assemble the log house
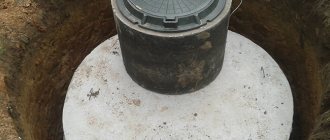
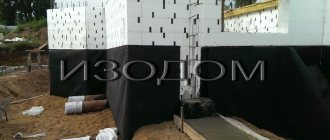
As a rule, a shallow shallow base is installed under the log house.
You can make a cottage out of round timber with your own hands if you have at least some carpentry skills. But first you will have to mount (make) the foundation for the cottage. As a rule, a shallow shallow base is installed under the log house. It must be waterproofed at the stage of pouring the solution, and also reinforced with steel rods. The foundation is waterproofed from above with roofing felt and bitumen mastic, but only after the concrete has completely dried.
Important: do not forget to make vents in the foundation so that the wooden structure can breathe from the floor. Otherwise, the tree will rot faster.
Wall installation
The walls of a round timber house need to start being laid on a backing board.
The walls of a round timber house should begin to be laid on a backing board. It will protect the lower crowns of the frame from rotting. It is better to use moisture-resistant larch as a material for the backing board. The board is laid strictly horizontally on a waterproofed foundation. In this case, the lining should be anchored to the base and additionally treated with bitumen mastic.
Houses made of large diameter logs using Canadian technology
The first crown of logs is already mounted on top of the backing board. Round timber is joined at the corners in several ways:
- "Into the bowl." This method requires additional processing of the wood to form bowls to join the wood at the corners. This method is considered the most aesthetic and at the same time warm. That is, cold bridges are practically eliminated provided that the insulation between the round timbers is installed in a high-quality manner. With this method of laying, the log should have a Finnish groove (a small notch of circular cross-section along the entire length). Thus, the upper round timber fits more tightly onto the lower one, which makes the cottage warmer. This type of joining of logs is also called “in the oblo”.
- Connection "in the paw". This method of installing wooden houses made of round timber is also called “cold corner”. Here the ends of the logs are trimmed in such a way that they take on a trapezoidal cross-section and join each other at an angle of 90 degrees. This method of joining the corners of a log house is more labor-intensive, and its result is not always pleasing with high-quality heat in the house.
Roof installation
The best option for a wooden house is a light gable or mansard roof. Roofs of complex configuration are appropriate for large buildings, as they are heavier. The proportionality of the weight of the roof with the ability to support it with the walls of the house is calculated when drawing up an individual project. It is difficult for a non-professional to calculate this value correctly.
Do-it-yourself installation of a wooden house at the roof installation stage consists of the following steps:
- installation of foundation beams;
- rafter fastening;
- laying of sheathing;
- laying waterproofing;
- roof fastening.
The base beams (mauerpats) are attached with one edge to the upper crown in a diagonal position using anchors. The horizontality of the opposite ends is checked with a level. The rafters are wooden triangles. They are knocked together and then attached, starting from the ridge, to the beams. A sheathing is attached to the top, that is, thin transverse and longitudinal boards. The size of the gaps depends on the choice of roofing material.
If you intend to cover the roof with sheet roofing (corrugated sheets, metal tiles, slate, odulin), the distance between the sheathing is half a meter; with rolled materials (roofing felt), the sheathing has a maximum gap of one centimeter.
Waterproofing is laid on top of the sheathing. At the joints of the roof, the roof panel is laid overlapping with a gap of 15 - 20 cm. Roofing material is attached on top of the waterproofing. How to install a roof on a wooden house with your own hands (video at the end of the article) can be seen in this diagram:
After installing the roof, it is advisable to insulate it, even if the attic will not be a living space. This allows you to halve energy costs when heating your home. The best insulation is mineral wool. It is made from natural raw materials, non-toxic and retains heat perfectly for a long time. Mineral wool is cut into medium-sized panels, which are attached between the beams and rafters.
If the attic is an attic and family members will live in it, it is necessary to additionally insulate the floors and walls. Mineral wool is also used for this. In the first case, it is necessary to install logs; in the second case, the insulation is attached to the sheathing. At the same time, do not forget about hydro- and vapor barrier. You can close unsightly gaps with chipboards.