Basic information
If a cesspool was built without taking into account all sanitary and technical standards (according to SNiP), sewage can seep into the soil, and then into groundwater, which can lead to severe poisoning of the body. If you are making a drainage hole with your own hands, do not forget to take into account all the requirements for the work.
This type of sewage system can most often be found in dachas, as well as in private houses where two or three people live temporarily. Such a number of residents use water evenly, so systematic cleaning of the cesspool is not necessary.
Results
The presence of a homemade sewerage system in a suburban area greatly increases the comfort of staying at the dacha. The simplest option is cesspools: making such a structure yourself is quite possible for any beginner. The simplest option is an absorbent structure that can meet the needs of a small cottage. It is advisable to equip large houses with prefabricated complexes with overflow. They not only provide excellent wastewater treatment, but also produce useful fertilizers.
Types of structures
The safest, but most expensive, are sealed ones . This design has no bottom and is only suitable for certain conditions. The choice of this structure directly depends on the type of soil foundation.
Concrete or brick are considered more complex structures . In turn, such a construction eliminates the possibility of wastewater entering the ground. The volume of the sump will depend solely on the needs of the user.
Note : They can be calculated based on daily water use and treatment options.
Simple tank design
Operation of sealed tanks is possible with the use of specialized biological activators. They will help eliminate unpleasant odors and make the cleaning process much easier. In areas where sandy soil predominates, you can get by with the simplest option.
When constructing a structure without a bottom, a completely different technology is used. Instead of a concrete or brick bottom, ordinary crushed stone is used.
Note : In this way, you can get a natural filter for all liquid coming from the house.
This design provides for nuances related to the amount of incoming water.
How and where to place it correctly?
The ease of use and safety for the health of others depends on where the sump is located.
When choosing the location of the pit, it is worth considering several important aspects:
- this is initially the distance from the well to the cesspool and from the residential building;
- its distance from the nearest water intake point;
- opportunity to freely drive up for cleaning.
Taking into account sanitary standards, the wastewater tank is located at a distance of approximately seven meters from the house. However, these calculations should also include the type of drive that will be used.
Thus, a sealed pit in a private house should be located at a distance of 5-7 meters, while a sump without a bottom should be made as far as possible. This will minimize the appearance of any unpleasant odors indoors and not violate sanitary standards.
If the site is equipped with a well or well, the sump should be placed 25-50 meters from them. By adhering to such standards, it will be possible to avoid harmful microorganisms getting into the water.
Advice . Due to the constant operation of the drive, frequent maintenance will be required. Therefore, it is worth taking care in advance about convenient access for the vacuum truck.
Location on the site
A closed cesspool is more often used in a private residential house, because it can be placed much closer to the living space than an open one. All requirements for choosing a location are described in detail in “Urban planning. Planning and development of urban and rural settlements”, decree 360-92 (Ukraine) and SanPiN 42-128-4690-88 (Russia).
Primary requirements:
- The distance from a residential building is at least 20 meters. A distance of 15 meters is allowed from non-residential premises. It is separately indicated that if the basement exceeds the area of the house, then the countdown begins from the wall of the underground building;
- You should retreat from a reservoir or well from 30 meters (closed pit) to 50 (open type reservoir);
- A distance of 2–4 meters is maintained from the road and the fence;
- According to the rules of good neighborliness, a cesspool must be separated from the neighboring plot by at least 10 meters.
In some cases, it is also indicated that the waste tank must be at least 5 meters away from the garden or garden. It must be remembered that failure to comply with these requirements entails administrative liability.
Sanitary standards
To avoid problems later, it is necessary to comply with sanitary standards:
- The drainage pit must be located at least 35 meters from the well.
- You cannot use a storage system without a bottom if there is excess waste (more than 1 cubic meter).
- The lid should cover the pit tightly, especially in winter, to avoid freezing of the tank. And it’s best if the lid has additional insulation.
Concrete drainage pit
As an option for arranging a home sewer system, you can consider installing a concrete cesspool.
Stages of constructing a concrete pit:
- calculate the required volume of the drainage pit;
- digging a pit of the required size;
- We install formwork around its perimeter and fill it with concrete solution;
- These walls are treated from the outside with bitumen for waterproofing;
- on the bottom of the pit we pour a layer of broken bricks, gravel, crushed stone;
- We install waterproofing made of film or roofing felt on the walls of the structure, as well as a ceiling with a hatch and a hole for connecting a sewer pipe. The ceiling can also be made independently from concrete;
- we lay and connect sewer pipes.
Using this technology, you can make a toilet drain pit with your own hands.
Basic standards
The device provides, first of all, the optimal location. It should be borne in mind that when installing a sewer system, the pipes should not pass near the house, but a long distance will not work either.
List of basic requirements in a private house:
| Distance | The distance from neighbors should be at least 5 m, the distance to groundwater and the fence should be no less than 1 m each |
| According to the rules, there should not be a drinking water well near the septic tank | If the soil is clayey, a distance between them should be at least 20 m. For loam and sandy loam, other minimum values are provided - 30 and 50 m, respectively |
| Calculation of volume, depending on the number of people living | For each person, you must allocate at least 0.5 m 3 of the total volume of the pit. If this rule is followed, it is possible to significantly extend the life of the sump. For example, when using clay soil, the filtration rate is the lowest, because for one year the purification ability remains at a sufficient level, and then is gradually impaired |
| Pipe slope | When laying pipes, they should be placed at a slope of 2-3%. That is, the angle should be 2-3 cm per linear meter of pipe |
Advice . Calling a sewage disposal truck is paid regardless of the filling level of the tank, therefore, when creating a drainage pit at your dacha, it makes sense to provide a reserve volume. For example, if three people live in a house, the optimal volume of the sump is 6 cubic meters.
For work you will need tools:
- gloves or tops;
- buckets and shovels;
- cable or rope;
- wheelbarrow;
- level and tape measure;
- ladder; Follow safety precautions and, if possible, do not work alone.
Installation of cesspools - preliminary planning
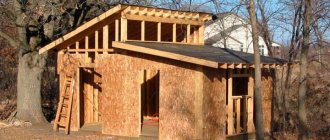
After making calculations and selecting the location of the cesspool for a private house, we install it ourselves. When the owner has chosen what material the sewer system will be built from, construction can begin. First of all, you need to dig a pit of a suitable size for the future cesspool.
This stage can be carried out with the help of specialized equipment and a team of workers, or completely independently. In the latter case, it will take more time, but sometimes this is the only option possible.
For example, when it is impossible to access special equipment or power lines are located too low.
To properly equip a cesspool for a private house with your own hands, you need to adhere to a certain algorithm:
- The first ring is installed, a person climbs inside it and begins to dig under it, throwing soil to the surface.
- As you dig deeper, the soil under the walls is also removed.
- It is imperative to maintain uniform removal of soil from under the ring, because An even vertical position of the product is important.
- When the ring is in line with the ground, install the next ring.
- The soil continues to be removed evenly until a suitable depth is reached.
When the preparatory excavation work has been completed, the products from which the drainage pit will be constructed should be prepared. Depending on the nature of the soil, the required structure and other factors, concrete rings, machine tires, plastic containers, and bricks are used. Formwork requires boards.
In addition to using basic materials, you will also need the following tools:
- components for creating cement mortar;
- crushed stone and fine gravel to create a drainage area;
- reinforcing bars for mounting the concrete top cover;
- waterproofing materials;
- a finished metal hatch or components for making it yourself;
- shovels, hammer;
- level, plumb line and cord;
- several containers for different needs, for example, making a solution;
- trowel.
It is advisable to immediately plan all the work and, based on the plan, prepare the necessary tools. If the project involves a lot of concrete work, then it is better to purchase, rent or borrow a concrete mixer.
Making a concrete cesspool yourself
Watch the video
A cesspool in your house. All stages of construction with your own hands
The design of a concrete cesspool can be called the best option for a private home in terms of service life and reliability.
Such structures can be used throughout the year, they are resistant to the lowest temperatures and high humidity, and do not deform under the influence of high soil viscosity during a long rainy season.
Advantages of choosing concrete as a manufacturing material:
- you can quickly build a structure;
- long service life (up to 50 years);
- reliability, manifested in resistance to negative environmental influences;
- no regular maintenance, repair or restoration work is required;
- it is easy to find and purchase raw building materials.
Disadvantages of building such a drain pit:
- the large weight of the rings, which will require the help of several people or special equipment for installation (especially if the diameter is more than one and a half meters);
- the cost of concrete materials is higher than the price of plastic analogues;
- the need to strictly follow the drawings.
The installation procedure consists of the following steps:
- A layer of crushed stone is placed at the bottom of the excavated pit to create a filtration element.
- A concrete screed is made or a ready-made reinforced concrete slab is installed, which will become the base of the structure. This step must be accompanied by a check using a level.
- The required number of reinforced concrete rings (usually 3-4) are placed on top of each other. If the height is not achieved, then sometimes low brickwork is made on top.
- A hammer drill creates holes through which communications for the sewerage system will be connected. The cross-section of the holes must be calculated based on the diameter of the pipeline and the shrinkage of the pit must be taken into account.
- Connections of concrete products, as well as all pipe joints, must be coated with a special sealant. Then, when the sealant has dried, the outer side must be coated with a water-repellent compound. The inside surface needs to be plastered.
- The ceiling (upper horizontal slab) is installed. You can make it yourself or buy it ready-made right away, but in the latter case it will cost more.
- The top is covered with soil.
Watch the video
Such a drainage pit, if installed correctly, will be leak-tight and stable. It does not require additional anchoring due to the large mass of the structure. Also, the structure will be completely resistant to freezing and heaving of the soil in the winter season.
Making a cesspool with your own hands from bricks
Watch the video
DIY brick drainage pit
A do-it-yourself cesspool made from brick is a popular option for arranging a sewer system in a private home. Solid red brick is used for the work. The best variety is considered to be burnt brick, which is not used in production.
It is not allowed to use varieties of products that have poor resistance to environments with high humidity. This category includes, for example, the silicate species.
Key features of a brick cesspool for a private house:
- the constructed pit will have a long service life;
- has excellent tightness and the ability to reliably retain waste liquids;
- brick allows you to create a pit of any shape and volume, as well as build it on any type of soil (both clay and sand);
- in terms of labor intensity and time spent on construction, the work is approximately equal to the construction of a system of concrete rings;
- a drainage pit can be built even in an area where groundwater runs close to the surface. This material is also reliably protected from soil heaving in winter;
- It is recommended to do brickwork carefully, because if implemented incorrectly, it may subsequently collapse. However, some aesthetic flaws are still allowed, because they will be completely hidden under the surface of the earth;
- a rectangular or square pit is not able to withstand heavy loads;
- It is quite difficult to build a round structure on your own; most likely, you will need the help of professionals;
- the cost of a brick pit is higher than the construction of plastic structures. You can save money if you use used products in the process.
If you plan to build a closed tank, then you need to prepare a large amount of sand and cement in advance. In most cases, a cylindrical or cubic pit is built with your own hands.
It is recommended not to make the depth more than 3 meters. The permissible volume of a septic tank depends not only on the fluid consumption of people living in the house, but also on the distance of the structure from the building.
How to make a brick cesspool with your own hands:
- Dig a pit of the required dimensions.
- Level the bottom and create a cushion of crushed stone on top (about 50 cm wide) or concrete it (in this case, reinforcement is also used for additional strengthening).
- Make brickwork walls with a rectangular, round or square shape. The procedure is carried out completely, and all joints are certainly filled with a mixture of sand and cement. When building a drainage structure without pumping, it is necessary to lay out bricks in a checkerboard pattern, this will increase the drainage function of the pit.
- It is recommended to make a small “pocket” between the brickwork and the pipeline, approximately 6-10 cm. This will not at all affect the tightness of the drainage pit, but will prevent the structure from deforming during shrinkage.
- Laying the walls begins 25 cm below the surface level, then the construction of the ceiling begins: a sheathing (sealed lattice flooring) with a ready-made hole for the hatch is installed, an armored belt is created and the entire slab is filled with concrete.
- The slab needs to be covered with soil and its level leveled with the surface. If installation is carried out in an area where the temperature drops to minus 20 degrees, then the top soil layer is increased to avoid freezing of the pit in winter. In this case, the distance from the surface level of the site to the slab is 50 cm.
Watch the video
Features of recesses for which there is no bottom
Stages of work:
- First, they dig a pit. 1.5 m 3 of soil is used for thermal insulation above the ceiling; the top layer and the rest of the soil are distributed throughout the site.
- Then they make a cushion at the bottom (crushed stone, sand), through which the sewage will escape.
- At the same time, pipes are laid at an angle, which avoids stagnation of liquid, and walls are erected, which can be either concrete rings or brick.
- After laying the second ring, a pipe leading to the well is installed in its upper part.
- When the pipeline is laid, rings and covers are installed, proceed to the installation of hatches.
- If the masonry is brick, make a trench, and the dimensions of the cesspool must be observed (the width is 30 cm, the height corresponds to the level of the walls).
- Don't forget to treat for moisture.
In this case, the concrete slab will lie not only on the walls of the well, but also on the soil layer, access to the hatch is left open.
How to build a sealed pit for a private house
Construction of a cesspool with a bottom, of course, is somewhat heavier and more expensive. But still, the devil is not as scary as he is painted. In general, when constructing such a pit, the same rules are followed as for a structure without a bottom. But there is no need to provide filtration technological holes at the very bottom of the pit walls, because the main thing here is tightness! The bottom of such a sealed pit is concreted. It is worthwhile to first reinforce the bottom. Please note that the reinforcing mesh can easily “sink” in the concrete. Therefore, it is better to place it on wooden stakes until the poured concrete hardens.
To achieve complete tightness of the object, it is necessary to seal all possible joints, cracks, and holes in the walls. Bitumen is suitable for this. A cheaper option is to simply coat the walls with viscous clay. If you prefer brickwork, then ordinary plaster will do just fine. In addition, if you are working with brick, then do not forget that before laying the walls, you need to let the concrete bottom stand for a week at best.
Experts also note that it is important to correctly install the pipeline from the house to the sewer pit. It must be located on a slope. It is generally believed that a tilt angle of at least 3% must be maintained. And also do not forget that in the cold season the pipe can completely freeze. To avoid this, simply bury the pipe deeper. Usually the depth is at least one and a half meters. The main thing is that the soil does not freeze to such a depth.
DIY installation methods
There are several methods for the device, much depends on the size and level of complexity.
How to make an absorbing model?
The absorption drain pit is suitable for owners of small country houses. Simple device, easy maintenance and choice of location.
Wall coverings can be made from several materials, but the simplest option is from tires or concrete products:
- A hole is dug with a diameter of 800 mm: please note, it must be larger than the size of the ring.
- A concrete screed is made around the perimeter of the pit, which will be a reliable base for the rings.
- In the lowest ring, holes are made every 100 mm to allow water to escape.
- The diameter of the filter holes is 50 mm.
Advice . The depth of the sedimentation tank should not exceed 300 cm so that it is not difficult to remove the sediment.
- The constructed pit must be filled with broken bricks, gravel or crushed stone to a depth of 100 cm. The pit is filled with exactly the same material from the outside.
- Before backfilling, it is necessary to carry out all waterproofing work that can block the external aggressive environment.
At the final stage of the work, a plate with several holes is installed (for the ventilation pipe and hatch).
How to build a sealed model?
In general, it is no different from the previous method, but there are still minor differences:
- The bottom needs to be concreted.
- No infiltration holes required.
Construction of an independent sewer system
Diagram of a homemade brick septic tank.
To speed up the work, the option of installing a ready-made storage tank, for example a septic tank made from Eurocubes, is often chosen. However, a structure built with your own hands from brick will be cheaper.
A diagram of such a design:
- digging a hole in the ground;
- the walls and bottom are reinforced with bricks;
- a sewer pipe is installed on the side under the soil layer, it is located at a slight angle to speed up the movement of wastewater;
- the structure is closed with a lid and a hatch is provided for maintenance;
- in the upper part of the pit (in the side wall) there is a hole for connecting the ventilation duct.
A structure with a filter base is built according to the same scheme. However, in this case, a crushed stone cushion is formed at the bottom. There should not be a hard bottom that ensures tightness, as in the first case.
When choosing a finishing material to protect walls from wastewater, you need to take into account the properties and degree of strength of the products.
For example, it is not recommended to use silicate or porous bricks. Such material will absorb moisture, which will not only lead to its destruction, but will also cause the contaminated liquid to spread outside the storage tank.
The best option for a sewer structure is baked brick. It is durable and therefore can withstand the forces of soil heaving. In addition, baked clay brick is not a material with a porous structure. For this reason, it is better resistant to moisture.
If you plan to install drainage at the bottom of the pit, use a multi-layer structure: a layer of soil, sand, gravel or crushed stone. The recommended distance of the filter base from groundwater during the rainy season, when its level rises to its maximum, is 1 m. Sometimes holes are left in the walls of the well during laying, which will improve the filtration properties of the structure.
Digging a pit
Excavation of soil on the site is carried out in accordance with previously made calculations. Moreover, between the outer surface of the brick structure, which will be erected in the future, and the walls of the pit, a gap of up to 50 cm is left on each side.
If this is not done, the storage volume will decrease, since brick walls will have to be moved.
This measure allows for waterproofing on the outer sides of the structure. Even if baked brick is used, the structure is protected from prolonged contact with moisture. This helps to increase its service life.
Preparing the base of the container
The foundation of a sealed structure must be strong. For this reason, reinforcement is performed, and drainage is additionally arranged. If you skip one of the stages, the strength of the cesspool will decrease.
Instructions for making the base:
Installation diagram of a septic tank with a sand and gravel filter.
- A sand and gravel cushion is formed at the bottom of the pit. The total layer thickness is 200 mm. The sand is carefully compacted, which reduces the risk of subsidence of the base during the process of pouring and drying concrete. Gravel should also be compacted whenever possible (it consists of large fractions, so such material is more difficult to compact).
- The base is waterproofed. To do this, roll durable material, such as roofing felt, is placed at the bottom of the pit. It is laid with an overlap. Thanks to this, cement laitance will not get into the ground when filling the hole with mortar.
- A pre-prepared frame of steel rods with a diameter of 8-10 mm is laid on top of the roofing felt. It is recommended to use flexible strong wire for fastening. Welding will cause a deterioration in the properties of the material, resulting in a decrease in the strength of the structure. The cell dimensions of the reinforcing mesh are 100x150 mm.
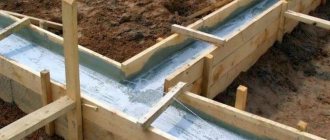
Concrete bottom casting
To prepare the solution, use cement grade M300 and higher. Due to this, the strength of the structure increases. The prepared multilayer base is poured with a layer of concrete up to 150 mm thick. This is enough for the cesspool to withstand the impact of a large volume of wastewater.
Installation work can continue when the concrete has dried. If there is no time to wait 28 days, they move on to brickwork after 7-10 days.
During this time, the solution will set and harden enough to withstand a significant load without the risk of loss of properties.
Walling
In most cases, load-bearing structures are constructed using half-brick technology. For large pits, more reliable walls are erected: 1 or 1.5 bricks. To strengthen the structure, after completing the construction of the vertical partitions, the space between the storage tank and the walls of the pit is backfilled. A mixture of sand and cement is used.
There is no need to prepare the solution. It is enough to wait until sedimentary moisture begins to release, helping to strengthen the cesspool. The desired result is achieved when the cement-sand mixture is completely moistened. The result is a monolithic structure that will withstand the load exerted by wastewater even when the storage tank is full.
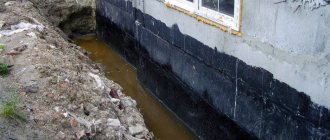
Application of waterproofing
Work to protect brick partitions from moisture is carried out as the masonry is completed. It will not be possible to protect the surfaces after construction is completed due to the small distance between the storage tank and the walls of the pit.
Coating and roll materials are used for waterproofing. Bitumen-based insulation is the most common. They use mastics and roofing felt.
It is recommended to cover the cesspool with coating-type materials. Roofing felt will not last long in direct contact with monolithic walls made of a moistened mixture of cement and sand. It is permissible to combine waterproofing materials, but this will lead to an increase in the cost of the structure. The sand and cement mixture used for backfill does not need protection. On the contrary, it is necessary to ensure access of moisture to this layer of material. Only under such conditions is it possible for the composition to harden.
Finishing the walls of the cesspool from the inside
Waterproofing a brick septic tank must be done using water-repellent materials.
It is recommended to use plaster compositions made from materials with suitable properties. Thus, preference should be given to mixtures with moisture-resistant properties.
But this waterproofing method is not reliable enough, given that the plaster layer will be affected by water in the existing storage tank around the clock.
For this reason, liquid glass is added to the mixture at the preparation stage. A potassium or sodium composition is suitable. This component improves the properties of the plaster.
However, all possible methods should be used to protect the internal walls due to the high humidity inside the drive. For this reason, the surfaces of the structure are additionally ironed with cement.
Covering the drain pit
From above, the pit and brick structure are closed in different ways:
- concrete slab with a hole for a sewer hatch;
- a wooden shield, to protect it from water, it is covered with roofing felt, the surfaces are pre-tarred.
A layer of thermal insulation material helps to reduce the outflow of heat from a structure in the winter season. It is recommended to use polystyrene foam for this purpose.
However, such measures do not always help prevent freezing. It is necessary to additionally use a layer of soil as a thermal insulation material. Soil is laid on top of a concrete slab or wooden panel. The layer thickness should be 150-500 mm.