Which corrugated sheet is suitable for a fence
In the marking of profiled flooring you can see different letter designations that indicate its load-bearing capacity and purpose. What types of corrugated sheets exist:
- "N". The load-bearing profiled sheet is one of the strongest, with a groove in the middle of each wave, which increases the rigidity of the material. Purpose – construction of interfloor ceilings.
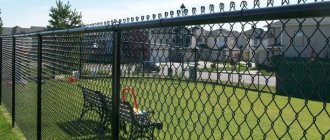
- "WITH". Wall, made of thin sheet steel, with a small width and height of waves. Purpose – installation of a fence made of corrugated sheets and wall cladding.
- "NS". Load-bearing wall, in comparison with load-bearing, is less rigid and cheaper. Also called roofing. Purpose – installation of roofing. Acts as an alternative to metal tiles.
We advise you to study in more detail: “Is it worth putting metal tiles on the roof: an overview of the material, for which roofs and buildings it is best suited.”
The fence is made of wall corrugated sheets. These can be brands, C10, C20, C21, C44. In some cases, HC35 is also used. The numerical designation after the letter indicates the profile height. It affects the final stiffness of the canvas.
Modifications of corrugated sheets recommended by experts for fencing
Please note: the C20 sheet, contrary to the markings, has a wave height of 18 mm, not 20 mm.
C8 sheets are suitable for the fence
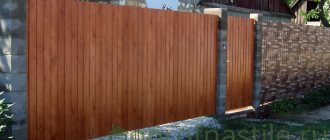
, and in regions with strong winds, it is better to take sheets from C10. They can have a thickness of 0.45-0.5 mm. Since the fencing also has a decorative function, it makes sense to buy painted corrugated sheeting. It is more aesthetically pleasing than galvanized and even more durable.
Properties and advantages of metal fence sheets
Comfort, reliability and practicality. This is exactly how this material can be characterized. A variety of color solutions allows you to choose a material that matches the existing cladding and roofing coverings. And the light weight and simple installation method makes it possible to install a fence from corrugated sheets with your own hands, even with minor construction skills.
The popularity of corrugated fences is growing every day. The times when builders used it only to cover the roofs of non-residential buildings, garages and for fencing construction sites are gone. Today, corrugated sheeting, which is based on a galvanized metal sheet, is considered a universal material for constructing a fence. It is successfully used for fencing areas for private, public and industrial use.
The structural strength of the material is given by its shape in the form of a corrugated profile.
The material has a number of unique properties that make it possible to give preference to the installation of fences made of corrugated sheets:
- high strength and durability - thanks to the stiffening ribs, the profiled wall sheet has strength and low weight. The strength of the panels is affected by the thickness of the sheet, the shape and height of the stiffeners. The polymer composition of the coating prevents corrosion and provides the material with a long service life, which can be 40-50 years;
- resistance to wind loads - depending on the strength of the prevailing wind in your region, you can select the required thickness of the sheet that can withstand such a load;
- wide range of colors - corrugated sheets are available in various colors, which can be selected according to the RAL scale (color standard), focusing on individual preferences and maintaining the architectural composition;
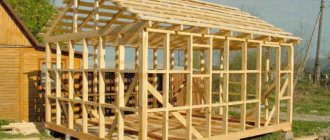
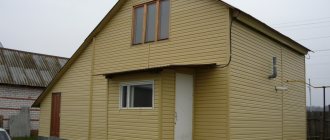
- versatility - the material can be used not only for fencing, but also for the construction of small outbuildings and sheds;
- sufficient noise insulation - the fence can block street noise and the hum of passing cars;
- simplicity and ease of installation - corrugated sheeting is a lightweight material, even one person can install it, fastening is carried out using special self-tapping screws with a polymer coating;
- easy to maintain - the profiled sheet is easy to clean in the usual way and does not require periodic repairs. If accidental damage occurs during the installation process, it can be quickly eliminated by treating the scratches with paint of the appropriate color from a can;
- attractive price - metal profile sheets for fences have an acceptable cost in comparison with materials such as traditional metal, brick or stone.
On a note! When choosing corrugated sheets for fencing, give preference to wall sheets that are lighter in weight and have a variety of profile shapes. This material has a lower cost than its roofing counterpart and, as a fencing, can easily cope with wind loads.
Profiled sheets are distinguished by the height and pitch of the ribs, which affects the strength of the material.
Wall corrugated sheeting used for fences is characterized by a profile shape with a small trapezoidal height - 8-25 mm and is distinguished by the simplicity and elegance of the coating. It can be used as an independent enclosing structure and as a background, for example, for a wrought iron fence.
Stage 1. Development of a fence made from corrugated sheets: sketch and drawing
A corrugated fence is an extended structure that includes:
- Pillars (2) installed in a hole in the ground (1), which is concreted and filled with sand and gravel backfill (4).
- Joists (5) connecting the pillars. For a height of up to 1.5 m, 2 joists are sufficient, top and bottom. If the fence is higher than 1.5 m, an additional log in the center is required.
- Profiled sheets (6), which are attached to the transverse joists with self-tapping screws. To hang a gate or wicket, the support posts are equipped with hinges.
What elements does the fence consist of?
To calculate the required number of materials and install a durable fence made of corrugated sheets, you should first develop a sketch of it. This is a preliminary sketch depicting:
- Where will the fence be located, taking into account the entrances, the location of the gate, green spaces on the site, topography, etc.
- Changes in ground heights are noted to determine where shorter or longer sheets will be needed.
- Dimensions of individual straight sections, their height and length.
- Pole installation points: basic and intermediate.
- The length of the sections is for a sectional fence. It is taken as a multiple of 1, 1.5 or 2 sheets of corrugated board.
When installing a fence made of corrugated sheets, it is necessary to take into account that the distance from the ground to the bottom edge of the sheet can be 0-150 mm. With a terrain slope of up to 3%, the difference between the sheets is 150 m. For steeper terrain changes, the height difference is taken individually.
An example of a drawing of a fence made of profiled sheets
Sketch of a fence made of corrugated board
Photos of the design of fences made of corrugated sheets
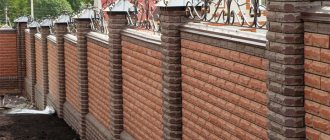
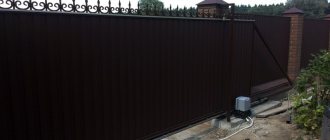
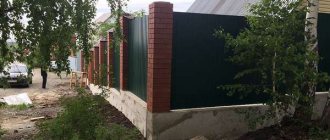
Often a profiled sheet is combined with forging, sometimes a frame is made from a profile pipe, a profiled sheet is mounted into it and the whole thing is decorated with metal patterns - forged or welded. Another option to make the fence non-standard is to install the wave not vertically, but horizontally. It would seem like a small change, but the appearance is different. Some ideas in the photo gallery below.
Horizontal fence made of corrugated sheets
Beautiful combination of stone, forging and red-brown sheet
Pillars made of a round metal pipe, strips are welded to them on the back side, to which the sheet is attached
Forged and polycarbonate inserts
More variations on the theme of forging
Color may not be uniform
You need to tinker with the non-linear top
Stage 2. Preparation of materials
Corrugated sheet
. For fencing, flooring marked “C” is used, sometimes “NS”. It is important that there is no capillary groove on the sheets - it is only needed on the roof.
Corrugated sheeting for building a fence
Support posts (pillars). Can be made of any materials: wood, stone, metal. But the simplest and most affordable are metal racks in the form of pipes with a round or rectangular cross-section. It is more convenient to use special ready-made support pillars. They have a “heel” for support on the sand cushion, holes for fixing the flooring and an upper plug.
Support racks (pillars) with special fastenings for corrugated sheets
Cross joists. The best option is pipes measuring 40x40x2 mm or 40x20x2 mm. Wooden logs are not suitable due to rotting at the attachment point.
Square cross-section joists
Holder plate for decking (bracket). Necessary for assembling the fencing frame using the non-welding method. Used in combination with hardware.
Holder plate for mounting logs on poles
Plugs for pillars (supports). Cover the end of the racks, preventing moisture and precipitation from entering them.
Plastic plugs for poles
Hardware: M6 bolts or screws (20 or 30 mm), self-tapping screws for corrugated sheets or rivets.
Hardware for attaching corrugated sheets to the frame
Decorative end strip. A fence or covering U-shaped strip that is attached to the upper end of the deck. Eliminates injury to people and protects the sheet from rust.
Fence strip to protect the upper end of the corrugated sheet
Paint for corrugated sheets. It can be used to mask defects that may appear during installation and paint over the cut of the sheet.
Additionally you will need:
- cement, sand and gravel (for making a cushion and pouring the foundation);
- screwdriver;
- solution container;
- drill or shovel;
- welding machine;
- primer and anti-corrosion compound;
- level and plumb;
- grinder for cutting sheets.
Attaching the corrugated sheet to the frame
Having completed the installation of the corrugated sheet fence frame, we approached the final stage of construction. This is the installation of the profiled sheets themselves.
We pre-install the sheet by placing wooden blocks under it and creating a temporary fixation with a support using improvised means. At this stage, be sure to check the quality of work using a level.
Each master can choose the type of fastening to his liking. Some people find it more convenient to use metal screws, while others prefer rivets. The joining of sheets occurs with an overlap on one wave. The corrugated sheet is quite durable, but despite this, there is no need to pre-drill it before installation. We screw the self-tapping screw into the lower wave strictly at a right angle.
Beware! Installation of profiled sheets is carried out overlapping, and it is necessary that the larger edge of the rib completely covers the edge with the smaller rib.
Attaching the corrugated sheet to the frame.
A correctly tightened screw is the key to successful installation and the key to reliable construction. Depending on the thickness of the sheet, we may need a different number of screws. It is also worth considering the load-bearing capacity of the sheet, terrain features, etc. 3-4 self-tapping screws per joist is the traditional amount. If your area is characterized by strong winds, you can use the mount in every wave.
Stage 3. Calculation of the amount of materials for a corrugated fence
In order not to overpay for extra materials and not face a shortage, you need to correctly calculate the quantity.
How to determine the number of profiled sheets:
- For a continuous fence, divide the total length of the fence by the usable width of the sheet.
- For a sectional fence, divide the total length of the fence by the entire width of the sheet, if it is equal to the length of the section, or by the useful width of the sheet, if the section is 1.5-2 sheets.
Solid and sectional fences made of corrugated sheets
How to calculate the number of support posts
- For a continuous fence, divide the total length of the fence by the distance (span) between adjacent posts (2-3 m).
- For sectional fence. The distance between the supports is equal to the total (if the section is one sheet) or useful (if the section is 1.5-2 sheets) width of the corrugated sheet.
Racks must be provided:
- at the corners of the fence;
- at the gate installation site;
- at the place where the gate is installed.
The resulting number of racks can be rounded down. The lack of 1-2 pillars is compensated by a slight increase in the span. The height of the rack should be equal to the height of the fence plus another 30% for penetration into the ground. For example, for a fence of 2,000 mm, posts with a height of 2,000 · 1.3 (130%) = 2,600 mm are required. Intermediate posts can be buried 25% into the ground.
How to calculate the number of transverse joists
It is necessary to multiply the total length of the fence by the required number of crossbars. If the fence height is less than 1.5 m, 2 logs are required, more than 1.5 m - 3 logs. For example, for a fence 50 m long you will need 50 · 2 = 100 logs for a fence height of up to 1.5 m and 50 · 3 = 150 logs for a height of more than 1.5 m.
Corrugated fence with two and three joists
How to determine the amount of remaining materials
Holder plate: multiply the number of posts by the number of rows of crossbars (2 or 3).
Plugs: add 2-3 plugs to the number of support posts as a reserve.
Hardware. The corrugated sheet is fastened:
- in 2 extreme waves;
- through 2 waves in the center of the sheet into each of the lags.
For two crossbars per sheet, 6 hardware is required, for three - 9 pieces. Next, 6 or 9 is multiplied by the number of sheets. The resulting value is rounded up by a multiple of the packaging.
Paint: one can or 50 g can is enough.
Decorative end strip: divide the total length of the fence by the working length of the strip itself. Round the resulting number up. Most often, the planks reach 2,000 mm in length. The working length is then 1,850-1,950 mm.
Fence support posts
The pillars are installed in a hole in the ground, concreted, and filled with sand and gravel. The distance between the pillars is no more than 2.5 meters. The height of the post is taken from the calculation of the desired height of the fence. To this value is added 1-1.5 meters for depth.
Digging of pillars into the ground and subsequent concreting occurs to the freezing depth, which is different in each region. In central Russia, the freezing depth is 1-1.3 meters, but it is better to play it safe and bury the pillars deeper to avoid deformation of the fence due to the mobility of heaving soil.
When making a fence from corrugated sheets with your own hands, be careful when choosing the material for the posts. It is better to take a profiled pipe 60 by 60 mm and 3 mm thick. If metal posts are mounted into the foundation, then you can take a pipe with a cross-section of 50 by 50 mm. In order to save money, many take a pipe with a cross-section of 30 by 60 mm, but these pipes often “walk” back and forth when the seasons change.
Currently, ready-made fence posts made from corrugated sheets are available for sale. Such posts have a special “heel” for support on a sand-gravel cushion, as well as holes for attaching corrugated sheets with hardware and an upper plug that prevents moisture from getting inside the post.
The thinner the pillars, the smaller the distance between them. The thicker the profiled sheet, the smaller the distance between the pillars can be, but we do not recommend making the distance between the pillars more than 3 meters.
Stage 4. Installation of a fence made of corrugated sheets
Installation of a fence made of corrugated board consists of several stages, including:
- Preparing the site for installation.
- Marking the site according to the sketch.
- Pouring the foundation and installing racks.
- Installation of cross beams.
- Decorative design of racks.
- Fastening the corrugated sheet to the frame.
- Installation of decorative and protective elements.
Preparation
It consists of cleaning the soil surface from anything that could interfere with the independent installation of the fence. Experts also recommend leveling out the most pronounced unevenness in the terrain, which can cause problems with installation.
Marking
To mark the site you need:
- Find the extreme points of the fence. These are the corners of the fence where support posts will definitely be installed.
- Hammer the pegs at the extreme points and stretch the cord between them - it will show the line of the future fence.
- Place pegs in the places where other supports are installed - they are determined again from the sketch.
- Attach a plumb line to a stretched cord at the location where the posts are installed - it will indicate the exact location for drilling a hole for the post.
Construction of the foundation and/or installation of support pillars
A corrugated fence is installed:
- On the foundation. In this case, the main support of the fence is not the pillars, but the foundation on which the posts already rest.
- Only on poles. Under each of them they dig out a hole with a bayonet shovel or drill a hole with a drill. The depth is chosen taking into account the penetration of the columns into the ground plus 100-200 mm for the installation of a sand and gravel cushion. The pillars are installed in dug holes and then concreted. Next, check again how straight the racks are and, if necessary, adjust their position.
Options for installing fence support posts
Which foundation to choose for a fence made of corrugated sheets
A fence made of corrugated board is a lightweight structure that does not require a serious foundation. For such structures, a strip shallow foundation is considered optimal. Its width is selected taking into account the width of the support posts. The depth is about 300-400 mm. But when installing a fence made of corrugated sheets, it is important to take into account a couple of nuances:
- In the place where the base pillars are installed (in the corners, where gates and gates are installed), the depth of the foundation pit should be at least 1/3 of the height of the posts plus 100-150 mm for the sand and gravel bed.
- For intermediate pillars, a pit with a depth of at least 1/4 of the height of the posts plus the height of the cushion is required.
This is an important condition, the observance of which will minimize the impact of groundwater and frost heaving of the soil on the structure.
Construction of a foundation for a fence made of corrugated sheets
The strip foundation for the fence is mounted using the same technology as in the case of a gazebo, bathhouse or house:
- A pit of the required depth and width is dug along the perimeter of the fence.
- According to the fence drawing, base and intermediate posts are installed: at the place of their installation, the soil is removed with a drill, a sand and gravel cushion is poured, and the supports are concreted to a depth of 100-150 mm.
- The foundation formwork is being arranged. It can be temporary or permanent (for example, from simple galvanized corrugated sheeting).
- The trench is reinforced and filled with concrete mixture.
We advise you to study in more detail: “What you need to know about galvanized corrugated sheeting: characteristics, types, advantages, areas of application.”
Installation of logs
After the support pillars are securely concreted, the installation of transverse joists begins. As a rule, you will have to wait at least 5-7 days for the solution to harden. The connection of the lags with the racks can be:
- welded (one-piece, non-separable)
- collapsible, i.e. using fastening elements.
In the latter case, holder plates are used. They are screwed to the support post, and the logs themselves are attached to them. This type of fastening is considered more reliable.
For a welded joint, the fixation area is first cleaned of paint using sandpaper or a grinding machine. To perform welding, you will need the help of another person who will hold the joist in the desired position. Welding is carried out along the entire length of contact between the crossbar and the post.
When the ground slopes on the site, logs and sheets must be mounted with a height offset
In the case of a pronounced relief of the site, the logs are mounted with a slight offset in height. The amount of displacement can be determined from a right triangle in which:
- The vertical leg (VC) is precisely the amount of displacement (height difference).
- Horizontal leg (AC) – the length of one profiled sheet. This is a segment parallel to the horizon, i.e. without a slope with an angle of 0°.
- The acute angle (A) between the horizontal leg and the hypotenuse (AB) is equal to the angle of inclination of the earth's surface, for example, 5°.
The tangent of angle A is equal to: tan A = BC/AC. Hence BC = tan A · AC. The tangent for an angle of 5° is 0.0875. If we take the length of the profiled sheet (AC) as 2,000 mm, then BC will be equal to 2,000 · 0.0875 = 175 mm. It turns out that each subsequent profiled sheet needs to be shifted in height by 175 mm. For this purpose, the logs are fixed 175 mm higher than in the previous span.
Using this scheme, you can find the displacement value (BC) of corrugated sheets, taking into account the slope of the ground surface on the site
Methods for attaching joists to support posts
- Front butt. Suitable for solid fences.
- Behind. Requires the use of a bracket, the optimal method for sectional fences.
- On the side. With this ability to fasten the crossbars, the corrugated sheet can be fixed not only to the joists, but also directly to the posts themselves. In this case, the consumption of self-tapping screws increases, but the structure itself becomes more stable.
Options for attaching the lag to the pole: butt in the front, using a holder in the back, from the side
Decorative design of racks
Installing a fence made of corrugated sheets is not just a dry installation technology. There is room here to show your imagination and sense of style. When choosing a sectional fence, you will have to decorate the support pillars. The most popular design option is to cover metal pillars with brick or stone. It is important to think through this stage at the sketching stage, since finishing reduces the distance between the pillars and, accordingly, the length of the required corrugated sheeting.
You can, of course, decide on such a design already during the installation process, but then you should be prepared for cutting sheets and increasing installation time. Important conditions for laying bricks:
- Use high-quality decorative bricks without chips or efflorescence.
- Maintain uniform seam thickness.
- Reinforce every third row of masonry with masonry mesh.
- Fill the void between the support column and the completed masonry with concrete mortar.
- The top of the post must be covered with a cap to protect it from moisture and precipitation.
We advise you to study in more detail: “Masonry mesh: what it is and what it is used for (+ technology and laying rules).”
We advise you to study in more detail: “A cap on a fence post – decoration or necessity? Varieties of products by shape and materials, advice on selection, installation instructions.”
Installation of corrugated sheets on the frame
To fasten corrugated sheets, rivets or metal screws are used. The most important thing is to install the first sheet correctly:
- Having determined the permissible height of the extension along the upper edge above the vein, the sheet is secured with one self-tapping screw at the top point.
- Then, using a level, set the second edge to the desired position and also grab it with a self-tapping screw.
- After this, you can screw on the remaining hardware.
- Subsequent sheets are mounted in the same way, overlapping the last covering wave of the previous sheet.
How to properly attach a corrugated sheet
In order for a fence made of corrugated sheets to maintain its spatial rigidity, it is necessary to follow the rules for fastening with self-tapping screws:
- The sheet is fixed along the edges to each of the transverse logs: one fastening is in the center of the sheet, the rest - through 2 waves.
- Fastening is carried out only through the lower wave.
- The sheets are fixed to each other through the upper wave.
- The screws are not fully tightened to maintain the integrity of the sealing rubber.
Self-tapping screws should not be tightened too tightly
Installing additional items
Almost the last stage in the construction of a fence made of corrugated sheets is the installation of decorative strips on the upper cut of all sheets. They are fixed with rivets to match the color of the flooring. The width of the strip is selected according to the wave height of the corrugated sheet. For a sheet with a profile height of 8 mm, you need a strip 8 mm wide without rolling or 10 mm including rolling. It is also important not to forget to install caps on the ends of the support posts.
Fastening corrugated sheets
To install the corrugated sheet on a metal frame, use the following step-by-step instructions:
- Preparation of material. If sheets of the same size are used, no preliminary preparation is required. If you need to adjust each sheet to size, mark and trim with an angle grinder. The protective film is removed before fastening, since after screwing in the screws, fragments of the film will be visible from under the rubber seal.
- Displaying the first sheet. To immediately set the correct order for installing the corrugated sheet on the frame, you need to correctly install the first sheet. The permissible height of the extension along the upper edge above the vein is determined. The sheet is secured with one self-tapping screw at the highest point. Then the second edge is leveled and also secured with a self-tapping screw at the opposite extreme upper point. Next, the sheet is screwed completely in increments through the wave.
- Installation of profiled sheets. After installing the first sheet, the others are fastened sequentially, with the obligatory check of the position of each sheet according to the level. If the position of even one sheet is disturbed, a failure will occur along the entire length of the fence. To install the profiled sheet, use metal screws with a rubber washer. It is important to maintain the optimal level of tightening: the rubber washer must fit snugly to the base. If the washer is pressed in, the self-tapping screw is tightened; if the washer does not fit tightly to the base and rotates, the self-tapping screw is not tightened.
- Installation of the plank. When building a fence from corrugated sheets with your own hands, you must not forget about protecting the top part of the material. To make the fence last longer, the upper ends of the sheets are covered with a special fence strip, 30 mm wide. To fix the strip, rivets with a head matching the color of the sheets are used.
Necessary calculations
Instructions on how to make a fence at the dacha from corrugated sheets:
- To calculate the amount of corrugated sheeting, the perimeter of the fenced area is measured - the same amount of corrugated sheeting will be required, but taking into account its useful width, since the material is mounted overlapping.
- To correctly calculate the required number of support posts, the perimeter of the fence is divided by the planned distance between the posts. The maximum distance between them is 2.5-3 m .
- To calculate the logs (crossbars between posts), divide the perimeter by the length of the log and multiply by 2. Usually, for a fence on a summer cottage, corrugated sheets are attached to two logs. If it is intended to be attached to three logs, the resulting value is multiplied by 3. The number of rows of purlins depends on the height of the fence: to install a fence up to 2 m high, two rows of logs are enough; for a fence higher than 2 m, three rows are needed.
What can you save on?
The lion's share of the budget will go to the purchase of profiled sheets. There is no need to seriously skimp on its quality, especially if the country fence is installed with the aim of blocking access to the site for intruders.
You can reduce costs by:
- Competent calculation of the required volume of building materials. Especially the profiled sheet. If you reduce the amount of waste to a minimum, the final savings will be at least 12%;
- Installing a fence with your own hands without involving craftsmen. Relatives can help at the stage of driving support pillars;
- Drawing up a competent design of the enclosing structure. You will need to take measurements, draw a diagram and mark the territory. Strict adherence to the plan will eliminate installation errors, which means additional expenses;
- Stages of work that you can do yourself;
- Ordering corrugated sheets in the amount required for the construction of the fence. To do this, you will need to accurately perform measurements and calculations. There is no need to buy material in large quantities. The remainder will then have to be thrown away or stored for the entire service life.
And if you purchase materials for building a fence in the winter - from December to February - then you will have to make fewer compromises on quality. During the “non-construction” period, the cost of all building materials without exception is reduced by approximately 12-45%. Many manufacturers of profiled sheets also offer free shipping during the off-season. Therefore, before ordering building materials, it is worth studying as many offers as possible.
You can order a fence made of corrugated sheets at a low price with installation from the Liga Fences company. Quick installation, 5 year warranty and 12 years of experience in installing gates and fences.
Foundation for a fence made of corrugated sheets
The enclosing structure made of corrugated sheets itself does not require a foundation. The base material is quite light - from 5.9 to 11.2 kg/m.p. Such a load can easily be withstood by support pillars, which will definitely have to be installed. The foundation is poured if high aesthetic requirements are imposed on a fence made of corrugated sheets at the dacha and if the sheet material will be hung in close proximity to the edge of the ground. In the first case, the entire structure will look more neat and elegant, and in the second, it will last longer.
If there is no foundation, and the lower edge of the corrugated sheet rests on the ground, then in winter the material will probably be deformed. At low temperatures, water in the soil freezes and provokes soil heaving. Simply put, the ice pushes fragments out, which in 9 out of 10 cases deforms the profiled sheet.
If the country fence is only supposed to protect the site, then you can save on the foundation by using one trick. A trench up to 10-15 cm thick and about 30-50 cm deep is dug under the lower edge of the corrugated sheeting. Ordinary sand is compacted into it. The better it is compacted, the better the profiled sheet on the fence is protected from deformation. No foundation costs - minus another 45% of expenses.
You can buy corrugated sheeting in Perm from the manufacturer at a low price in.
We save on poles and joists
Support posts and logs - stability and reliability of the fence. Therefore, it is better not to save much on their purchase. The standard version of supports is profile pipes 60×60×2.5 mm. But if the fence is no-frills, then supports of 40×40×1.5 mm will be sufficient to hold the corrugated sheets. By strictly adhering to installation recommendations, it is not difficult to obtain a strong and reliable enclosing structure.
To stay within your budget, you can make a corrugated sheet fence with your own hands from used pipes. They will cost half as much as new products, but you need to know which ones to choose. The most suitable option is pump and compressor pipes. They are dismantled after their service life in excellent condition. The pipe is thick enough to support a light metal fence. When purchasing, you need to check the products for pockets of corrosion and rust. After installation, paint with protective paints.
But it is better not to use wooden pillars as support. A cheap fence made of corrugated sheets with such elements will not last more than 5 years. Of course, you can choose thick oak or deciduous timber (wood that perfectly resists weather and climatic stress). With such a support, the service life of the fence will be much longer, but it will not be possible to reduce the cost of construction. The wooden beam must be additionally treated with special compounds, otherwise it will quickly rot and warp. Annual maintenance will also cost a pretty penny. And the cost of the timber is significantly higher than the profile pipe.
It is worth stopping at the use of wooden logs with metal posts. In this case, you will have to order additional metal brackets for attaching the planks. This means extra expenses and longer installation of the fence.
You can also save on the number of support pillars. The recommended distance between supports is 2-2.5 meters. If a profiled sheet with a profile height of 21 mm or more is selected for the construction of a fence, then this parameter can easily be increased to 3 m. But if the profile is low, then additional logs will have to be used to compensate for the large distance between the posts.
How to save money on the corrugated sheeting itself?
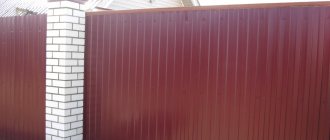
You shouldn’t skimp on the quality of corrugated sheets for a fence, but you can choose it wisely. Competently means taking into account the purpose of the design and the basic requirements for it. For example, you can purchase a regular galvanized sheet without a colored polymer coating. Costs will be reduced by approximately 14-29%. The external design data will not be so expressive, but over time this drawback can be eliminated yourself by painting the corrugated fence with a protective paint and varnish material. It is better not to buy non-galvanized sheets, since galvanizing them at home will not work.
A cheaper fence would be made from profiled sheets of grade C10, C12 or C14 (wall with corrugation heights of 10, 12 and 14 millimeters). The savings will be somewhere between 19-31%. When constructing structures enclosing the territory, it is recommended to buy corrugated wall grades with a corrugation height of 20 mm - C20, NS35, C21 or C44. Metal thickness 0.5-0.8 mm. The brand is selected according to the height of the fence. The higher it is (from 2.1 m), the more corrugation on the sheet, otherwise the fence will not be able to withstand even average wind loads (high windage of the sheet).
You can reduce the cost of construction by ordering a profiled sheet with a thickness of 0.45 mm. Saving about 13-17 rubles. at every linear meter. The optimal material thickness is 0.6 mm. But 0.45 mm is also perfect if you calculate the dimensions correctly. It is believed that the enclosing structure should have a height of 2 m. Usually 2.1-2.3 m. But, if you make a fence from corrugated board with a height of 1.8-2 m, then there will be no significant losses in its reliability and practicality. With such dimensions of the structure, it will be possible to reduce costs by 7-10%.
We minimize the costs of installing corrugated sheets
It will be much cheaper to build a fence from corrugated sheets with your own hands. Savings of approximately 15-20%. But this takes into account that the builder has at least minimal skills, otherwise correcting errors will cost 3 times more than paying for the services of professionals. Therefore, those summer residents who know how to work with their hands and have the necessary tools will be able to build a fence cheaper:
- Drills and concrete mixer;
- Welding machine in case you have to weld brackets for joists;
- Reinforcement and everything for tying it together - when pouring the foundation;
- Self-tapping screws, etc.
You should decide on the missing equipment in advance, otherwise the process will end before it even begins. When installing a fence made of corrugated sheets, you must also take into account its future external characteristics. Therefore, work is carried out following the instructions and carefully.