Features of the house layout
Through the efforts of two men, a cheap house for permanent residence with an attached garage was built. Initially, the project did not include a garage and was added after the house was completed.
finished frame house
attached garage
In general, the project changed as the discussion progressed on the advice of other builders and the requests of the wife. The original layout of the house included 6 rooms on two floors.
During construction, it was decided to equip two bathrooms, while on the ground floor the toilet and bathtub should be separate. The area of the living room and the location of the stairs have also changed. Compared to the initial project, the living room was too narrow and elongated. The stairs were also planned to be awkward and steep. After the changes, these shortcomings were eliminated.
house layout 6 by 6
Project No. 47-05
| Floor layout No. 1 | Floor layout No. 2 |
A two-story European-style cottage with an area of 124 m2 with a terrace, attic, garage, bay window and balcony. A real find for owners of small plots, since the dimensions of the house are only 11*12 m, and at the same time there are so many useful details. The wall material is brick. The client decided to replace the plaster finishing with facing bricks.
What is good about project 47-05 and the house built on it?
- Bright and memorable appearance;
- A small space that contains all the necessary functional areas on the first floor and two bedrooms on the second;
- Exit to the terrace from the dining room.
Completed construction of a cottage house according to project 47-05:
| Ready house | Project No. 47-05 |
The cost of building a house with your own hands
In May 2010, the father of a small family planned to build a cheap house with his own hands for the amount of 300 thousand rubles. This amount included costs not only for materials, but also for connecting gas and electricity. According to the estimate, the following expenses were incurred:
- Concrete - 20,700.
- Edged and unedged timber - 70,000.
- Foam plastic - 31,200.
- Plywood - 8023.
- Metal profile - 16,200.
- Siding - 22,052.
- Used windows - 4000.
- Nails, screws, etc. - 15,000.
- Delivery of material and excavator services - 5200.
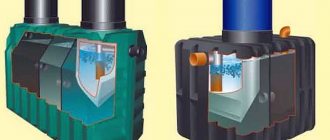
- Septic tank - 10,000.
- Plumbing, radiators - 35,660.
- GKL and finishing costs - 21280.
- Design and installation of a gas pipeline, connection fee - 37,000.
- Gas equipment (stove, boiler) - 29,000.
- Electrical connection with materials - 3000.
- Water supply connection - 2000.
According to the builder himself, the estimate lacks a number of small items. However, this also requires additional costs. It should also be noted that some of the windows were received from friends and did not require financial expenses. In total, 327,315 rubles were spent on the construction of the house without any small details. This amount does not include the attached garage. It was added later according to a separate estimate. Additionally, the construction of the garage required an amount of about 34,000 rubles. Taking into account unspecified expenses, the house cost no more than 400 thousand rubles.
How to build a house
This is the title of the topic on the portal by a member of FORUMHOUSE with the nickname Dimon2012, where he talks about country houses from which you can take an example. Judging by the survey, 89% of readers find it interesting.
Listen to our user's advice.
Dimon2012FORUMHOUSE Member
A beautiful house needs to be thought out from “A” to “Z”. It is important to take into account everything - architecture, design, layout, department. The house should fit harmoniously into your suburban area. One of the problems of novice developers is the pursuit of square meters and overestimation of their strength. People think that the bigger the house, the better. Dreams are shattered by reality. A large country house quickly drains all funds. Construction is stalled at the stage of erecting the “box”, and in order to bring the house to completion, you need to invest another 3-4 sums into it, already spent. In recent years, people are increasingly paying attention to foreign projects of country houses with an area of 100-150 sq.m. They understand that for a comfortable life they do not need mansions of 300-500 square meters. Therefore, I created a topic where photographs of beautiful country cottages actually built in Russia will be posted. The houses will be in different price segments - budget projects and expensive mansions, but the priority will be the middle price segment. Go!
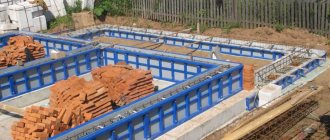
Installation of a shallow strip foundation
The foundation is pre-planned with a width of 35 cm and a height above the ground of 25 cm and 20 cm below the ground. A die-cut section of 2.5x100 mm was chosen as a reinforcing element. The reinforcement of the tape was planned in 2 layers, top and bottom, with three connected sheets of die-cutting in each.
On the advice of experienced builders, vertical elements were added, and the number of sheets to be connected was increased to 5 pieces. Additionally, the height of the foundation above the ground increased and amounted to 45 cm.
reinforcement with die-cutting - you can’t do that!
pseudo-reinforcement
the foundation is ready for pouring
After the foundation was poured into concrete, 20 anchor bolts were installed to install the lower frame.
the foundation is poured
mortgages
mortgages are mounted
Building a house from foam blocks with your own hands. Photo report
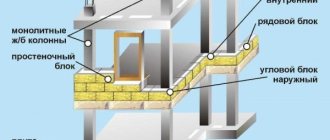
Let's consider an example of building a house from foam blocks.
This material is quite often used in private construction. Why foam block? Because this is a relatively inexpensive material, and due to its considerable size, the construction process goes quite quickly. Regardless of what material is used to build the walls, the sequence of building a house is always the same. So let's get started!
We decide on the construction site. To do this, we are buying a building plot.
We are starting to purchase building materials. This can be done at any time of the year. For example, during the non-construction season it will be a little cheaper.
And here is the main building material - foam blocks. For the construction of the house, 27 m3 was purchased. The blocks were purchased in winter.
If there are no utility networks near the site, then first of all you need to supply electricity. Since without electricity, building a house from foam blocks with your own hands will be very difficult.
According to the project, we mark out the construction site of a house made of foam blocks. We use wooden pegs and thread.
Now you can begin to develop a trench for the foundation. The depth of the foundation should be greater than the depth of soil freezing. In our case it is 1.1 m.
The trench is ready.
We lay reinforcement along the entire perimeter of the trench at the bottom, and waterproof the outside.
We begin to pour concrete.
By the way, the concrete was prepared in a concrete mixer. The process of pouring the foundation for a house made of foam blocks took 3 days.
For communications, it is necessary to provide technological holes in the foundation, so as not to hit the holes later.
The foundation is ready. You can move on to the second stage - the construction of the basement.
We assemble the formwork. In our case, the base will be 60 cm.
We pour the concrete again and after 7 days, when the concrete gains strength, you can remove the formwork. The base is ready.
Before laying walls made of foam blocks, you need to make waterproofing - two layers of roofing felt, which can also be coated with mastic.
Let's start laying walls from foam blocks. For work we will need a solution, a trowel and a level.
To increase the strength of the walls, they need to be reinforced after 2-3 rows.
The walls are erected very quickly and within a few days the result of the work will be measured.
The lintels over the openings were made in place. To do this, you need to make formwork, install reinforcement with a diameter of 10-12 mm and pour concrete.
We make an armored belt along the top row of foam blocks. To do this, formwork is made from brick, reinforcement is laid and concrete is poured.
Let's start installing the ceiling. For this purpose, wooden beams measuring 160x120 mm will be used. Of course, the places where the beams rest on the reinforced belt need to be waterproofed. Treat the beams themselves with antibacterial impregnation.
We move on to the construction of the second floor.
We kick out the walls.
To attach the Mauerlat, you need to provide embedded parts.
The most difficult part begins - installing the roof. The rafters need to be treated with impregnation.
Fastening the rafters to the mawelat.
Waterproofing is laid along the rafters and sheathing is installed.
The next stage is the installation of an ondulin roof.
It took 7 months to build the box of the house.
After the metal-plastic windows and doors have been installed, you can begin exterior and interior decoration, as well as connecting and wiring utilities.
As you can see, building a house from foam blocks with your own hands is a completely doable task. Yes, you need to spend time and money, but you will build the home of your dreams in which you will live happily ever after.
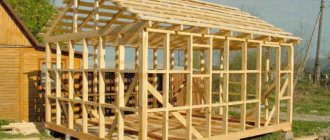
Construction of the first floor
Before installing the walls of the first floor, the platform was installed and insulated and pipes for the sewerage system were laid. The bottom of the platform is left open, the insulation is fixed by means of fixed cuttings of boards. 3 layers of foam plastic, 15 cm thick, were used as platform insulation. The subfloor is made of 150x50 mm boards.
insulation of the platform with foam plastic
subfloor is sewn
The walls were installed in a horizontal position. Foam plastic and 8 mm plywood protection are laid between the racks, and windows are also installed. The windows in the project were used second-hand. Installation of the assembled wall into a vertical position was carried out by two men. It was decided to abandon the installation of jibs in the construction of the walls. The builder assumed that the frame would be sufficiently rigid due to the plywood sheathing.
assembly of frame walls
insulation of external walls with foam plastic
wall frame
windows installed
wall on temporary braces
After assembling the walls of the first floor, the installation of internal partitions was carried out. Polystyrene foam was also used as insulation.
external walls are covered with plywood
assembly of internal walls
interior walls raised
first floor assembled
The principle of assembling the second floor
After installing the frame, a temporary floor from unedged boards was partially laid and the walls were assembled horizontally and installed vertically. Second-floor windows were also used.
installation of floors
assembly of second floor walls
raised gables
insulation of attic walls
attic walls raised
To increase sound insulation in the interfloor ceiling, non-woven cloth was laid on the floor joists under the boards. This allows you to partially dampen vibration from steps.
backing on joists to reduce vibration
Installation of rafters and roofing
Upon completion of the assembly of the walls of the attic floor, the rafter system was installed. The rafter overhangs were not extended. An inch board was used as lathing. The roof was covered with corrugated sheets 4 m long.
rafter system assembly
rafters
profiled sheets on the roof
finished roof
Project No. 51-54
| Floor layout No. 1 | Attic floor layout |
A compact country house with dimensions of only 7 * 8 m. At the same time, there are 93 m2 of usable area and an attic. Designed in a modern style. Finishing: plaster, wall material: brick.
What is good about project 51-54 and the house built according to it?
- Convenient for a small family of 3-4 people;
- The attic floor is reserved for the sleeping area;
- Suitable for construction on a narrow site.
This is what the completed house project looks like:
| Ready house | Project No. 51-54 |
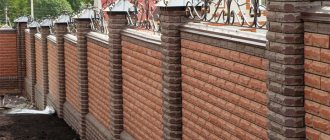
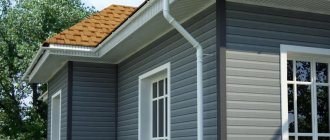
Exterior decoration of the building
Siding was used for the exterior of the building. It was mounted with a ventilation gap of 25 mm. Also at the stage of exterior finishing, a vestibule was added. The foundation for the vestibule was not installed; the structure was installed on pieces of concrete laid on the ground and sidewalk curbs.
the house is covered with inexpensive siding
facade of a cheap house
built a vestibule
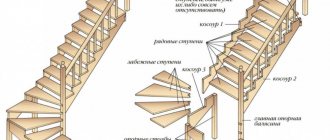
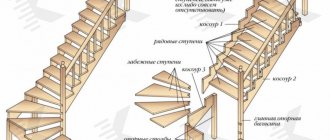
Features of the staircase and its installation
The location of the staircase in the project caused a lot of controversy. Initially, its location suggested excessive emphasis on the attic ceiling. After changing the location and design of the staircase, it was made without a platform with slight turns.
The staircase is made of boards 50x150 mm, the width of the steps is 30 cm. The staircase was installed after the rough finishing of the first floor. Under the upper span there is space left for installing a toilet there. According to personal feelings, the staircase turned out to be comfortable and compact.
DIY staircase to the second floor
the space under the stairs to the second floor is sewn up
installation of railings
ladder
Project No. 51-29
| Floor layout No. 1 | Floor layout No. 2 |
A two-story European-style house with an area of 150 m2 with a balcony, bay window and columns. The wall material is aerated concrete, the front finish is terracotta brick.
What is good about project 51-29 and the house built according to it?
- The walls are made of aerated concrete, which allows construction to proceed faster and save on insulation;
- On the ground floor there is a spacious dining-living room, on the second there are three bedrooms and an additional bathroom;
- The layout is suitable for a large family: the rooms are spacious and isolated.
Photo of the built country cottage according to project 51-29:
| Ready house | Project No. 51-29 |
Interior decoration of the house
Before the finishing of the premises began, insulation of the interfloor ceiling and flooring of the second floor were completed. To increase the level of sound insulation, felt is nailed between the joists and floor boards. After this, rough finishing of the interior of both floors of the cheap house was completed.
The rough finishing included three points:
- Installation of fiberboard as a wind barrier.
- GVL installation.
- Puttying joints and chips of GVL.
In the finishing process, water-based paint was predominantly used. The living room, kitchen and bedrooms are painted in different colors. The floors in the rooms are covered with linoleum, the ceilings are decorated with expanded polystyrene tiles.
almost finished staircase
made a hatch into the underground
old sofa
The owner built a homemade cabinet into the wall in the kitchen, and painted the bedrooms different colors.
homemade shelves 1
homemade shelves 2
mounted gas boiler
renovation on the attic floor
the walls are simply painted
It would be better to install the radiator under the window
They didn’t hide the electrical wiring in the hay
another bedroom
interior door
The toilets and bathroom ceiling are lined with plastic panels. The floor and walls in the bathroom are tiled.
budget toilet
the toilet is lined with plastic panels
small sink in the toilet
tiled bath
the space under the bathtub is covered with plastic panels
Type of building
Before building a house, you need to decide what type of building your building will be.
Before you build a house, you need to decide what type of building you will be building. Here everything depends on the dimensions of the building, its purpose and the characteristics of living in it. Thus, modern country houses can be divided into several types:
- mansion;
- cottage;
- construction of seasonal residence (dacha);
- eco-house
Mansion
If you decide to build a comfortable, well-equipped house with all the amenities that a city apartment has, then you need a mansion. As a rule, this is a two-story building or a structure with an attic floor, which is intended for single-family residence. The construction of a country mansion is carried out according to an individual project.
On the ground floor of a mansion there is usually a hall, a living room, a dining room, a kitchen, an office, a guest bathroom, a terrace, and a veranda. The second floor is used as a recreation area, where bedrooms, playrooms, dressing rooms and bathrooms are located. Guest bedrooms can be arranged on the attic floor. In addition, a large mansion may have a garage, solarium, swimming pool, storage rooms, sauna, etc. If you want to see examples of such houses, photos can be found online. These are usually massive buildings with spectacular architecture.
Cottage
Most often, when building houses, preference is given to cottages.
Most often, when building houses, preference is given to cottages. Typically this is a one- or two-story building of compact size. Its layout is thoughtful and rational. Often a cottage is made for two families, and each of them has its own separate entrance and does not interfere with each other’s living. A cottage built for two families allows you to save money on construction. And the point here is not only in saving materials, but also in the fact that the construction itself is cheaper than the construction of two separate houses.
The cottage may have a basement where a garage, sauna, storage room or laundry room are located. Often a veranda, terrace or winter garden is added to the cottage. As for the set of rooms inside the house, it is not much different from a mansion, the only difference is that the areas of the rooms do not exceed the standard sizes.
Ecohouse
You can find numerous positive reviews about the eco-house online. These buildings differ from a cottage in that they are built in an ecologically clean region from natural, harmless materials. The construction of such a country house is quite popular all over the world. In addition to natural materials, the eco-house uses an autonomous energy supply system, alternative energy sources, and a high-quality household waste treatment system.
Frame house for permanent residence: types and features
Seasonal house
Often, instead of building a full-fledged country house, city apartment owners prefer to build a small house for seasonal residence
Often, instead of building a full-fledged country house, owners of city apartments prefer to build a small house for seasonal residence in order to take a break from the bustle of the city during the warm season. Usually these are compact one-story buildings or houses with an attic floor. Often a bathroom is built not in the house, but on the street, and an outdoor shower is also installed there.
Recently, more and more often, city residents, accustomed to comfort, are striving to equip their country houses with water supply and sewerage systems. If such a house is thoroughly insulated and equipped with a heating system, even from a stove or fireplace, then you can live in it even in winter.