The most popular and popular supporting structure for most buildings is a strip foundation.
It is versatile, reliable and economical, which is the optimal combination of qualities.
In private housing construction, tape is the undisputed leader, proven by many years of practice in different conditions and with all types of buildings.
The technological methods used in the construction of this foundation have been worked out to the smallest detail, which allows you to avoid mistakes or miscalculations.
Let's consider the possibility of using a strip base for a house made of foam blocks, one of the most common building materials.
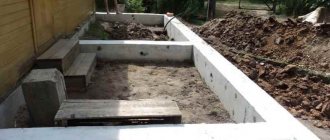
Strip foundation for a house made of foam blocks
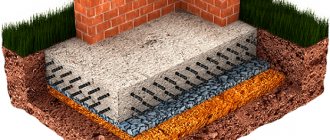
The strip base is a continuous strip (tape) of concrete or piece materials located under all external and internal load-bearing walls. For construction, a trench is dug in which a ribbon of a certain height and width is created on a layer of sand backfill.
All foundation parameters are subject to preliminary calculations made on the basis of a site survey, analysis of the hydrogeological situation and other factors.
Foam concrete is the lightest of all similar materials. The weight of a building made from it is 2-5 times less than the weight of a house of the same size made of brick. This allows you to build a foundation with less load-bearing capacity.
The strip base for such a building can be significantly reduced, both in terms of laying depth and strip width . This allows you to reduce the volume of excavation work and reduce the amount of building material.
Features of the construction of foundations of various types
Since foam blocks are a relatively light material, the choice of base will be based on the type of soil, terrain, depth of groundwater and level of soil freezing.
Table: comparative analysis of foundation types
| Type of foundation | What type of architecture is it suitable for? | What type of soil is it suitable for? | Construction options: depth, inter-step distance |
| Columnar | One-story house with relatively light weight | Heaving or peaty soils, soft soils, uneven terrain (height differences between adjacent pole supports may vary) | Possibility of using reinforced concrete pillars or piles or installing brick support pillars; interstep distance - up to 2.5 m, laying depth - to the depth of soil freezing (but not less than 1 m) |
| Tape | Two or more storey house | Non-heaving soils | Shallow; height of underground and above-ground parts - 0.5 m each |
| Monolithic | One-story house of small area | Any type of soil (with good waterproofing), but preferably rocky soil | Shallow; laying depth - up to 0.5 m |
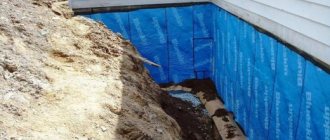
Since the structure of foam blocks is porous, the foundation under the house must be well waterproofed. To do this, the surface of the foundation is either covered with a waterproofing layer (liquid waterproofing can be used), or the base is covered with a layer of film before erecting the wall.
Photo gallery: types of foundation waterproofing
Clogging into the pores of foam blocks, liquid waterproofing fills the voids and prevents moisture from entering there
Not only the base of the house is insulated, but also the ceiling under the foam blocks
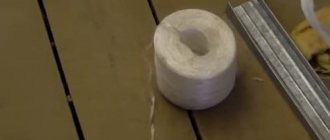
The insulating material is covering - film or roofing felt
A layer of roofing felt is laid on the inside of the formwork structure
Kinds
There are many design options for strip foundations:
- Monolithic. It is made by casting reinforced concrete directly on site.
- Made. It is built from piece materials, from large special blocks (FBS), to bricks or other similar materials.
In addition, there are options with different depths:
- Not buried. It is built practically on the daytime surface of the soil, without deepening. Requires an optimal combination of conditions, so it is rare.
- Shallow. The tape is immersed in the ground to a relatively small depth, not exceeding the freezing level. A common type of design that allows you to significantly reduce costs and labor with a very high-quality result.
- Recessed. It is used to create support structures for massive multi-story buildings that are heavy. The tape is immersed in the soil below the freezing level, which eliminates the occurrence of heaving loads directed from bottom to top, but creates conditions for the appearance of lateral horizontal forces applied to the outer lateral surfaces of the tape. Requires careful calculation and consideration of all impact factors.
For a house made of foam blocks, the recessed type of tape is usually redundant. For construction, only shallow monolithic or prefabricated options are used.
Properties of a foam block house.
- It is being built very quickly.
- Minimum financial costs.
- Good sound insulation.
- Comfortable stay.
- Environmentally friendly material.
How wide should the foundation for a house be?
Approximate dimensions for building a DIY foundation for a house made of foam blocks, as well as the necessary tools.
- Foam blocks – 600 x 300 x 200 mm.
- Foundation bases 6 t. X 6 t. Mm.
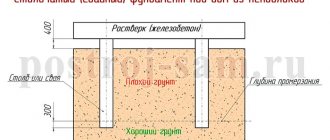
- Foundation height – 700 mm.
- Underground foundation – 400 mm.
- Sand layer – 200 mm.
- The crushed stone layer is 200 mm.
- Concrete M 400; Concrete M 200.
What should be the depth for aerated concrete?
The depth of the strip foundation is determined by the hydrogeological conditions of the site, the depth of freezing in winter, the composition of the soil layers, etc. Depending on the region, these indicators differ significantly from each other, since they are largely due to climatic features.
Some data is taken from SNiP tables, other indicators are determined by direct inspection of the site.
NOTE!
The weight of a house made of aerated concrete is small, so in most cases the immersion depth is 50 cm.
It must be taken into account that the main indicator of depth is the composition of the soil . If clay is present, the laying depth will have to be increased to reduce the vertical buoyancy loads and balance them with the pressure of the building.
Thus, for Moscow and the region, the optimal depth for laying the tape on clay soils is considered to be 1.6 m.
With the width of the tape the situation is more complicated. It is customary to make it 10 cm larger than the thickness of the walls. Aerated concrete blocks are about 30 cm wide, which requires creating a strip at least 40 cm wide, but in practice this is not done.
The reason is that the weight of the tape itself also matters; excessive loads can lead to subsidence of the foundation. This is dangerous, as the result may be the destruction of the house. Therefore, the tape is made narrower, about 20 cm, but the upper part is increased to ensure waterproofing.
You can also use an online calculator for calculations.
Execution of various types of foundations
The instructions for making a strip foundation look like this:
- A trench 50-60 cm deep is dug along the perimeter of future walls and under all load-bearing walls. The width of the base should be 10 cm greater than the thickness of the walls;
- A so-called cushion of sand and crushed stone is placed at the bottom of the prepared trench. The thickness of each layer should be about 10 cm;
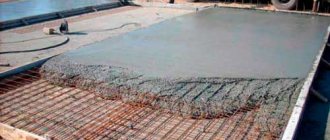
- After this, the formwork is installed and the reinforcement frame is mounted in two levels; for this purpose it is best to use rods with a diameter of 1 cm;
- When everything is ready, you can start pouring concrete. This must be done at a time, only then can the strength and reliability of the structure be guaranteed;
- After everything is poured with concrete, it is necessary to water the surface for several days to prevent cracks from forming;
- The building can be erected no earlier than 10 days, when the concrete has completely hardened and is ready to withstand loads.
Construction of pillars for the foundation
The technology for constructing a columnar foundation is slightly different and looks like this:
- Holes are dug at the corners of the future house and under the load-bearing walls, the depth of which should ideally be equal to the freezing depth of the soil, but in any case should not be less than 1 meter. The distance between the pits is maintained at about 1.5-2 meters;
- A special formwork is installed, which has a bottom;
- A reinforcement cage is attached to the loops of the pillars. For this purpose, rods with a diameter of up to 1 cm are most often taken;
- The pillars are lowered into pre-prepared holes and filled with concrete;
- You can begin to build walls after the concrete solution has completely dried.
A floating foundation for foam blocks is a little difficult to install on your own, but if you have help, it’s quite doable. All construction operations can be divided into the following points:
- A pit about 60 cm deep is being dug under the entire area of the proposed structure;
- A so-called cushion is poured into it, consisting of 25 cm of sand and 15 cm of crushed stone;
- After this, waterproofing is laid, for which you can use a regular thick film, and the reinforcement is laid. For reinforcement, take rods with a diameter of about 1 cm;
- When all the preparatory work is completed, the monolithic slab is poured. Its thickness for light buildings does not exceed one meter.
Before starting construction work, it is necessary to compare all types of foundations and determine for yourself which is better. For the construction of a private house, it is best to use a strip foundation; its advantage is that you can build a basement under the building.
If you are planning a basement, then you need to take this into account when digging a trench. It should be dug to a greater depth, as this will determine the height of the basement. The outer walls of the base of the house should be thicker than all the others, because there will be free space inside, on the walls of which the soil will press. During construction, you need to take into account that building a basement significantly increases the cost of building a house.
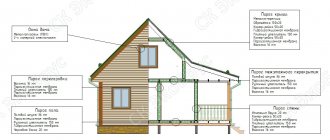
General installation diagram
Procedure for the construction of a shallow strip foundation:
- Removing the top layer of soil, leveling and marking the site.
- Digging a trench to a certain depth and width.
- Creating a sand cushion.
- Assembly and installation of formwork.
- Arm belt knitting.
- Pouring concrete, holding until the desired degree of hardening.
- Completion of work.
Without exception, all steps must be completed in the correct sequence.
IMPORTANT!
The depth of the trench should be increased by the thickness of the sand backfill layer, about 20 cm.
Pillow under the foundation
A layer of sand backfill is necessary to level the bottom of the trench and create a drainage effect. Screened river sand is used (ideally), without clay admixtures (this is important!) . Backfilling is done to a thickness of 20 cm.
The pillow is checked for horizontalness and compacted thoroughly. The possibility of tape subsidence depends on the quality of the seal. therefore it is necessary to achieve maximum density. The quality is checked by walking over the cushion - if no traces remain, then the tamper is of high quality.
Brand of concrete and reinforcement
For pouring strip foundations, M200 concrete is mainly used. This material has sufficient strength to support heavier buildings, but using concrete of a lower density is not recommended .
The quality of the material varies, but a certain margin of safety in this case will not hurt.
The thickness of the working reinforcement rods for the foam concrete tape is 12 mm, and for vertical (smooth) reinforcement, 8 mm rods can be used. This is quite enough, given the relatively small size of the tape.
When using composite (fiberglass) reinforcement, you should adhere to the same dimensions, since reducing the diameter of the rods can lead to deformations when pouring concrete.
Installation of formwork
To create formwork, you need to stock up on wooden edged boards.
The dimensions of the tape are small, so 25 mm thick lumber is suitable, but if the foundation parameters are large enough, you can use boards 30 or 40 mm thick.
The formwork is assembled in stages:
- Next to the trench, shields are assembled with a width of no more than 10-15 cm than the height of the tape.
- The shields are lowered into the trench, aligned along their axes and connected with crossbars. Their size determines the width of the tape.
- From the outside, the shields are fixed with inclined stops and vertical support bars.
When assembling the panels, it is necessary to monitor the tightness of the connection. There should be no gaps larger than 3 mm, as this will cause concrete to leak out. If gaps are found, they must be plugged with tow or hammered with wooden slats.
Reinforcement and knitting
The assembly of the reinforcement frame is carried out according to the standard scheme. It is necessary to form a spatial lattice of four working rods (two at the top and two at the bottom), with a depth of immersion in concrete of 2-5 cm . Vertical elements (clamps) are installed in increments of about 40 cm.
The corners are carefully designed, at which additional rods are installed to strengthen the joints.
The rods can be connected using electric welding, but for reinforcement of this size, annealed steel wire (1-1.5 mm) is usually used. A piece of wire about 25-30 cm long is bent in half, then the connection of the rods is grasped from below in a diagonal direction.
The ends rise up, grab the loop with a special hook and twist it 4-6 turns, tightly pulling the rods towards each other . The connection is strong, and the skill of work is acquired very quickly.
Fill
Filling must be done in one go. This is important, since the connection of concrete that has begun to set with fresh pouring cannot be strong enough; if a break occurs for more than a day, you will have to stop pouring and wait until the concrete hardens completely.
At the same time, it will no longer be possible to create a full-fledged monolith, so it is necessary to organize the work in such a way as to fill it in one go.
It is recommended to order ready-made concrete, which will be delivered directly to the site. This will free up labor and help obtain material of guaranteed and uniform quality.
Pouring is done from different points so that the concrete spreads evenly along the entire length of the formwork. To remove air bubbles, use vibrating machines or ordinary pitchforks.
After pouring is completed, the surface of the tape is smoothed, then the formwork is covered with polyethylene to protect it from sunlight or rain.
Foundation options for foam blocks
The construction of houses from foam blocks makes it possible to obtain structures with low weight, so the foundation can be lightweight. It is worth noting that the height of buildings made of such materials should not exceed three floors. It is permissible to use the following types of foundations:
Each of these methods of arranging the foundation of a house has both its advantages and disadvantages. In order to understand which foundation to choose for a house made of foam blocks, you should consider each of the options in detail.
A strip foundation will be an excellent choice for areas where the groundwater level is below three meters. This foundation is considered quite easy to implement. You need to dig a trench about 50 cm deep and for walls made of foamed concrete this is quite enough. Even a not very experienced builder can make such a foundation on his own; for this you need a shovel, a drill, a crowbar and a building level, which will periodically control height differences.
A columnar foundation is suitable for loose soils that contain a lot of clay or peat. It will also be a good choice if the ground freezes heavily in winter. Poles must be installed in the corners of the house, under load-bearing walls and in places where a large load is planned.
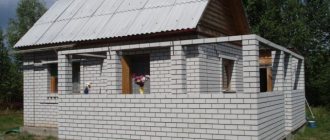
Construction of walls from foam blocks on an ideal foundation
Slab or floating foundations are suitable for all types of soil except clay. Experts call it floating due to the fact that it can move along with the ground, thereby protecting the building from cracks and destruction. This type of base is quite durable - this is achieved using rigid reinforcement.
Final stages of work
The cast tape is aged for 28 days. The first 3 days it is necessary to water it with water every 4 hours, then for a week watering is done every 8 hours. This allows you to equalize the stress and humidity of the outer and inner layers of the tape.
The formwork is removed 10 days after pouring.
NOTE!
Despite the long curing period, you should not try to shorten it, even if you feel that the concrete is already quite hard. The foundation is a critical element of the building, which does not allow for a free approach to technology.
Issues of waterproofing and insulation
The tape is waterproofed on all surfaces. Horizontal ones are insulated using a double layer of roofing felt, with an intermediate application of bitumen mastic . The bottom layer is installed under the formwork before the tape is poured, and the top layer is laid after reaching technological hardness.
The side surfaces are covered with bitumen mastic, hot tar or other means. Modern impregnations that cut off moisture from concrete at the capillary level have performed well. You can use roofing felt by gluing it to the walls with tape on a layer of bitumen mastic.
The insulation of the tape must also be done both from the outside and from the inside. For this purpose, polystyrene foam or liquid polyurethane foam is used. The choice of material is made based on the availability and financial capabilities of the owner.