Wooden houses, famous for their environmental friendliness and long service life, are popular in Russia. Light, but strong, durable coniferous wood in the European territory of the country is a traditional building material used for the construction of residential and commercial buildings. Now houses made of timber or logs have come back into fashion; they are being built everywhere as country houses, garden cottages or even city cottages. In order for a structure made from this wood to last for a long time, it is necessary to take into account the features of this material when creating a roof project, as well as choosing a roofing covering and related accessories. Today we will talk about the construction of the roof of a wooden house, its characteristic features and special requirements that must be observed during the construction process.
Common types of roofs of wooden houses
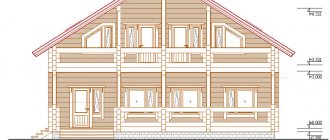
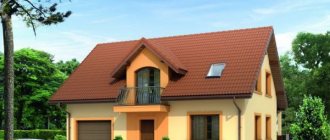
Appearance of a wooden roof
It should be noted that it is rare to find a wooden house with a pitched roof. Such a roof for a wooden house is not very practical, and if you consider that the shape of a pitched roof is not very beautiful, then other, more interesting options are often chosen.
The existing types of roofing for a private home are so diverse that choosing one on which wooden roofing material will look good is quite a difficult task. However, regardless of the type of roof, a wooden roof will always look original, distinctive and unique. Conventionally, all types of roofs of wooden houses can be divided into the following categories:
- Hip roof (which has not one slope, but several);
- Attic - they are also called sloping roofs;
- Gable roofing is one of the most traditional roof shapes;
- Multi-gable - roofs with a large number of gables;
- Hip roofs are another type of hip roof, which have equal slopes of the same shape;
- Semi-hip (there are both gable and four-slope).
If roof projects for wooden houses were initially conceived in such a way that there would be a wooden roof with slopes, then this can bring additional amenities, such as:
- Excellent drainage of water from the roof;
- Good properties for thermal insulation of floors;
- Removing snow cover from the roof under its own load;
- Possibility of using cheaper materials.
And these are not all of the benefits listed, but just some of them.
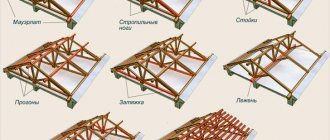
Connecting elements
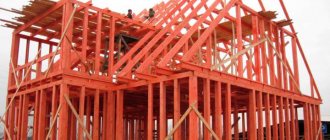
The internal structure of the roof of a wooden house is distinguished by many joints of different configurations. Creating a rafter system requires precise cuts, therefore, high skill of the builder. Many specialists still use classical methods when creating a rafter system, but this is not at all necessary.
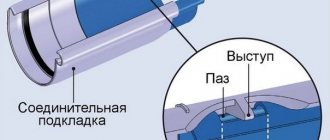
The industry offers a wide range of fasteners that will facilitate the assembly of the structure without compromising reliability:
- Rafter foot holders will allow you to quickly and securely fasten the rafter heel to the mauerlat. Depending on the specific project, you can choose a rigid mount or a floating one;
- the support helps connect pieces of timber at right angles or attach a beam to the wall of a building;
- metal connecting plates will ensure high reliability of the joint of the boards being joined. A wide range will allow you to choose the optimal part for any type of connection;
- corners of different configurations are something without which it is impossible to create modern wooden structures. You can choose rigid products with a fixed angle or sliding ones, allowing you to connect boards at any angle.
When assembling, you cannot do without all kinds of studs, including those with “screw” threads, bolts and nuts to create reliable detachable bolted connections.
Advice! With all the variety of modern fasteners, you should not discount time-tested nails. With a skillful approach, a cheap nail will help create a roof of no less quality than any modern fasteners.
How can roofs differ?
Log houses, as a rule, have pitched roofs of various shapes. The most typical and simplest one for private houses is a gable (or gable) one. This is exactly what we will talk about in this article.
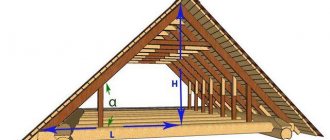
Also in low-rise construction, attics and, accordingly, mansard roof shapes are popular. However, for the attic it is not necessary to construct a broken-shaped roof. You can make a so-called “half-attic” if you raise the walls by approximately 1/3 or half of the floor and install a regular gable roof. You can even get by with a regular gable (triangular) roof if it is wide and high enough.
In principle, you can cover the sheathing with slate, and you’re done. And to insulate the ceiling - the ceiling between the attic and the living floor. This is, of course, the simplest and most brutal option. Many people prefer to tinker more thoroughly with a roof, even a cold one - especially now, when so many materials have appeared, and according to the assurances of their manufacturers, you cannot take a single step without all kinds of steam, hydro and other insulation and insulation. But the key idea is that it is much easier to structurally insulate the attic floor (ceiling) than the roof itself. Especially if we are talking about a log house with chopped pediments, and then it will be clear why.
On the other hand, you can make an insulated roof - for the attic, or in order not to make a separate ceiling (for example, in a bathhouse - in a relaxation room).
- According to the design of load-bearing elements:
- Many people know that the main load-bearing elements of the roof are the rafters. But there is also...
- roofing on slabs
The rafters can be rigidly connected to the frame of the house, or they can be sliding (“floating”) - an independent rafter structure. Hard ones are traditionally divided into:
- hanging - exert bursting pressure on the walls when the weight of the roof is transferred to the building; acceptable with a width between supports (external walls) of up to 6 - 6.5 meters;
- layered - connected to each other by a tie - a beam - at the lower ends, and thus exert vertical pressure; mandatory when the step between supports is from 7 meters.
In their pure form, hanging rafters are rare; they are often reinforced with crossbars, additional racks, jibs and other structural elements. The entire structure of a pair of rafters with other elements is called a truss. In addition to suspended and layered structures that are assembled on site, there are roof trusses that are assembled in a factory and delivered ready-made.
Roof design
The construction of a roof begins with calculations of the rafter system and roofing materials. The rafter system consists of timber and boards. The configuration of the structure depends on the type of roof chosen; it can be single-slope, double- or four-slope, with straight or broken slopes.
When calculating the power of the rafter system and the installation pitch of the rafter legs, it is important to take into account the loads on the roof, which are summed up from the individual loads:
- dead weight of the roof frame;
- weight of roofing pie elements;
- snow load typical for the region;
- wind load;
- the approximate weight of people repairing or maintaining the roof;
- safety margin in case of disasters (hurricane winds, increased precipitation).
Snow and wind loads depend on the climatic characteristics of the region (which requires the introduction of correction factors in calculations), as well as on the angle of inclination of the roof slopes
.
When calculating the material for the roof, it is important to take into account the working dimensions of sheet roofing materials, since they are laid overlapping. To minimize insulation waste and simplify its installation, it is recommended to select the rafter pitch taking into account the appropriate width of the thermal insulation material
You can calculate roof construction yourself, using the appropriate tables from reference books, or by resorting to a specialized calculator, of which there are plenty on the Internet. It is recommended to entrust the calculation of complex roofs to a professional architect.
When calculating the cost of constructing a roof, the quantity of each basic material is multiplied by its cost and 10% is added to the resulting value. We must not forget about consumables - fasteners, sealant, etc. The total cost also includes transportation of materials.
Preparation of lumber
The construction of the roof of a house is carried out on the basis of a detailed design, which indicates the length and cross-section of all structural elements, as well as the principles for the implementation of fastening units.
To install the frame, it is important to use well-dried (humidity up to 15%) high-quality lumber - without chips, cracks and other defects. This guarantees the necessary reliability of the rafter system, and also eliminates deformation of its elements during operation.
The roof frame is mainly built from coniferous wood, as this material is durable, resistant to rotting, and durable.
To increase fire resistance and protect the wooden frame elements from damage by microorganisms, they are treated with special fireproof and antifungal agents before installation.
. The fire-retardant composition is applied in two layers, and the second layer can be applied only after the first has been completely absorbed and dried. The installation of the wooden parts of the frame begins after they have completely dried.
The rafter system can also use elements made of rolled metal - corners, channels. But metal structures are rarely used when constructing a roof yourself, since their installation requires the use of welding equipment.
Purpose of rafter system elements
The last crown of a house made of timber or logs is called the Mauerlat. It, ensuring uniform distribution of the weight of the roof, should keep it from tipping over under the influence of wind load. The roof area has a greater windage if the slopes are located at a large angle of inclination. Typically this angle ranges from 15 to 45 degrees. Therefore, in areas where strong winds are possible, the angle of inclination of the slopes must be made smaller, but in such a way that during heavy rain water does not get, for example, under the tiles. The last crown is secured with metal staples or pins or wire.
Figure 3. Diagram of hanging rafter options.
The rafter legs must withstand all loads that occur on the roof during operation. Permanent and temporary loads are taken into account. Constants include the total weight of everything that will be included in the roof: external covering, insulation, vapor- and moisture-proof films, the dead weight of the rafters, etc.
A purely variable wind load should be considered, which, acting in short periods of time, can vary over a wide range. Snow load is also considered variable, but in winter conditions, if it changes, it only increases and not so quickly.
In a gable roof, the uppermost run, common to both slopes, is called the ridge. There is also a ridge in the hip roof (see Fig. 2). It is a common run between trapezoidal slopes.
Figure 4. Diagram of the rafter system of the attic roof.
The largest posts are located under the ridge at its ends. A skate of considerable length can be supported by racks in its middle part. It is absent in a hip roof, which significantly complicates the installation of the rafter system.
The rafter system creates the main difficulty for installation due to the size of the house. For example, installing a gable roof is much easier if you can use standard boards 6 m long. When choosing the size of the building (width), you must take into account that for a wooden house the roof overhang must be at least 55 cm.
Rafter systems for a wooden house
Rafters are the first step in shaping the relief of a pitched roof. Among all types, when constructing wooden roofs, one of three options is used:
- Wooden trusses;
- Hanging rafters;
- Layered rafters.
Wooden trusses are a very rare solution in individual construction. It is rational to use such structures for the reconstruction of old buildings, as well as for the construction of industrial structures. The main characteristic of wooden trusses is their ability to span large spans of up to 20 meters and the use of permanent wooden structures.
Hanging rafters are used when there is no load-bearing wall in the middle of the building
Hanging rafters are wooden roof structures when the house does not have a central load-bearing wall. They are mainly used for buildings whose width is less than 8 meters. In addition, hanging rafters are used for complex architectural solutions, for example, when constructing the roof of a Chinese-style house.
Layered rafters are the most common scheme for constructing a wooden pitched roof. They got their name due to the design feature when the lower end of the rafter leg is located on the mauerlat, and the upper one rests on the rack. The pitch used can vary from 60 to 200 cm. The material used is timber or composite boards. An ideal solution for houses with a width of 7 meters or more, the design of which requires the presence of at least one load-bearing wall.
When installing the rafter system of a wooden house, you need to use sliding fasteners for the rafters
General rules for constructing such a roof
Wooden roofs are laid only on pitched roofs, the slope of which cannot be less than 80% or 45º. This is necessary so that precipitation does not linger on the coating, posing a threat to moisture-sensitive wood. The specified limit is allowed in the construction of plank roofs. It is recommended to build steeper structures for laying shingles or shingles.
Direct contact between wood and building structures made of asphalt or cement concrete is prohibited. If contact is unavoidable, waterproofing must be installed between the wood elements and the concrete base.
It is important to note that a wooden roof is not stable. That is, when wet from heavy rains, during snowmelt or the traditional increase in atmospheric humidity in the off-season, wooden elements swell, and when humidity decreases, they shrink in size. Moreover, these changes can occur over the course of decades, and not the first year or two after the device.
According to the principle of operation, a roof made of wooden elements is similar to a spruce or cedar cone. When heavy rainfall occurs, its “scales” tend to cover as much space as possible to prevent water from penetrating inside.
By shrinking in dry weather, they open up natural ventilation pathways to remove excess moisture from underneath them. As a result of the described movement, condensation does not form under the wooden roof, it is well ventilated and perfectly protects buildings from precipitation.
The laying of wooden planks is carried out with the overlap of each element, i.e. with the overlay of the overlying part or the lower one so that the water flowing down the slope from above has no opportunity at all to seep under the roof. To speed up drainage on planks and shingles, for example, longitudinal grooves are selected.
Let's summarize the above information. A well-designed roof with a wooden covering should provide:
- Impeccable protection against atmospheric water penetrating from above. It is formed due to the swelling and closing of the edges of the elements when moistened, as well as due to the multi-layer system of the wooden covering itself.
- Unobstructed ventilation. The free passage of air flows is created by reducing the size of wooden shingles and having numerous channels for the flow of air flows.
- Impeccable water flow down the slopes. Non-stop water drainage is created by a special technology for laying wooden tiles and creating grooves on its surface for drainage.
However, there are significant differences in the device technologies that home craftsmen and owners of eco-houses who want to acquire a roof with a wooden covering that is a priority in an ecological and aesthetic sense should understand.
Anti-shrinkage roof structure for chopped gables
There are two fundamental solutions:
- roof on slags - close in technology to traditional nailless roof structures of traditional Slavic log houses;
- installation of sliding rafters.
There is also a rafter-rafter system, but these are the same sliding rafters, only with the addition of side rafters.
In fact, this is butter oil, because in the first version the load-bearing beams are located horizontally, and in the second version vertically. Both structures are powerful enough to withstand the heaviest roofing, such as a tile roof. There is no point in duplicating them.
Another thing is that in addition to holding the roof, the sleds also rigidly connect the gables. And when rafters are added to such a structure, they do this in two cases:
- to lay sheathing on the vertical rafters;
- to make a thick pie of a warm roof for the attic.
It is likely that engineering solutions for arranging a warm roof on a slab base are quite possible, but they have not yet been developed, since for now developers have enough rafters. Therefore, if you plan to build an attic, you cannot avoid installing rafters if you do not want to experiment.
Types of angled roofs for log houses
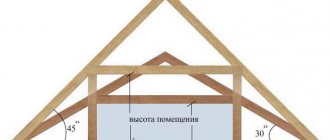
It's no secret that log houses go well with a roof that has two slopes. Knowing what technologies are usually used, it is quite possible to carry out high-quality installation of a gable roof rafter system on a log house. Typically, the roof slope angle chosen is from 45 degrees and even up to 65. The figures below clearly demonstrate the types of roof angles for log houses. The roof can be:
- with insulation;
- without the use of insulation;
- attic;
- roofless.
It is noteworthy that construction from logs retains ancient traditions, but also includes new technologies that allow wood to move freely without the risk of destruction of the structure. The fact is that installing a gable roof rafter system on a log house involves two methods:
- Installation takes place on males, namely on chopped log gables. The load-bearing parts rest on the gables. Then the sheathing itself is laid.
- Roofs based on the rafter system. They are built according to all the rules and regulations dictated by existing technologies. These roofs are either hanging or sloping. The gables themselves can be covered with boards, which significantly reduces the construction budget.
In some cases, the rafter and male system are combined. In this case, a truss with a hanging appearance is installed in the middle of the male type roof. Often the beam of the ceiling-type log house itself - the translation - can act as the basis for installing inclined rafters, and in some cases it acts as a tie that combines the elements into a triangle called a hanging triangle. The principle of the device can only be understood by familiarizing yourself with the classic installation options. Let's look at some important points that should not be overlooked.
The main features of making a roof on males
When it comes to the male scheme, you can take advantage of the enormous benefits provided by chopped boxes. They can be assembled and also disassembled without difficulty, like a constructor. To do this, you need to remove the crowns from their places and install them on a platform that is ideal for these purposes. The area must be level.
When work takes place on solid ground, it is much more convenient. Spacers made of aspen chocks are mounted under the crown itself. They will reproduce the previous rows of the logs themselves. The result is the top of a house made of logs, which converges like a wedge. It is built as usual, but the width of the end walls becomes much thinner. The edges of the gables will resemble steps. It is not long logs that are laid on the walls of the existing box, but rather logs. They should not be inserted into all rows, but only after 2-3 rows. The sheathing will then be mounted on the floor, then roofing type material will be used.
A slightly ridged type will unite the tops of the existing males. The log that completes the pediment is always cut exactly at 2 edges. In this case, the protrusions resembling steps that the male has obtained must be sawed off or hewn into the shape of a triangle. The remaining open areas at the top are filled with shorties. Few people know, but the old craftsmen, when carrying out fastening, never used fasteners when installing the presented roof. This greatly extended the life of the wood, since there were no metal rods inside it that were prone to rust. Such structures could last for several hundred years.
How slabs and rafters are combined
In some cases it is not possible to construct a male roof. This can occur when the excess has been cut off from the legs or males too much, and the cut-in joints have suffered. In such a situation, the usual option on top should be supplemented with rafters, thereby eliminating the need to cut off the humps.
Alignment should occur along the very edges on top of the existing rafter legs. The rafters themselves should be created strictly according to the established template; notches, as well as the lengths of the legs, are always marked in it. High precision cutting of future joints is not very important. It is better that the bowls are 5 cm larger than the arbis itself, since the log house will sag significantly for a long time and lose its former height. Behind the settling frame, the bottom of the existing rafters near the roof will sag, and the connection angle will decrease.
It is the wide notch that can guarantee complete safety during displacement. It is important that there is a small gap between the tops of the legs of the rafters resting on the ridge beam. When the rafters begin to gradually move apart from below, they will gradually move closer at the top. After the moment when shrinkage occurs, the tops must be connected with an overlay or a special tightening. Sometimes they are connected using a hinge joint and do not wait for shrinkage to occur.
In order for the roof to be reliable and not to be demolished from the house, it is necessary to tie the rafters through one, this happens in the 2nd crown from the top, into which the pins are driven, and wire twists are used for connection. Gradually the twists will weaken as they shrink, then they need to be tightened.
Layered rafters
The fastening is similar to the previous one, but this option does not require slugs. The legs of the rafters are called layered for the reason that their top and bottom rest on supports that are completely independent. In this case, the heels from below rest on the crown, and it serves as a power plate. If we consider resting the top, then it must be said that in such a situation there are several options.
- A prince's or ridge's line can be laid between the males. It is important that the tops of the existing rafters, which are laid flat, are not fastened together, or they are connected using a hinge.
- A wall that is capital. There must certainly be some gap left on top of the rafters themselves.
- A ridge structure is installed using the matrices, mounted under the beam. Males will not be needed. To reliably ensure compensation for shrinkage, it is necessary to install the support pillars on devices that make it possible to carry out regulation. We are talking about screw structures.
Hanging type circuit
The legs of the rafters were called hanging ones, since they seem to hang over the box itself. They rest on the walls. A part of the rafter will serve as a support for the top. And the heels from below are connected using the tightening method. As a result, the rafters begin to resemble a triangle with equal sides. It is often called a truss, or called an arch. It is the tightening that is ready to accept the thrust that is transmitted to the walls.
The expansion is compensated, and this is a huge plus. A beam called a ceiling beam may well act as a tightening. It is impossible not to note one more advantage of the hanging or layered option. The roof is assembled at the bottom; it is not necessary to go upstairs. Under safe conditions, all rafter triangles can be adjusted and joined together. But such a system is not suitable for buildings with large spans. If the spans are more than 5 m, then the tie rods for them will bend from their own weight.
Roof without a single nail
The chickens cut into several side slugs. The chickens themselves were cut down from spruce trunks, and the hook was made from the root system. The hens supported the stream - a hollowed out log, against which rested the boardwalk - the roof plank. The upper part of the plank was laid freely on the ridge beam in such a way that during shrinkage the upper ends of the gables could freely converge. For this purpose, space was left during installation. The ridge beam (knes) was hewn on both sides so that the gorges would fit more tightly.
If you leave 10 cm for lifting the gorges along the Knes, then this will be more than enough, because when shrinking, the chicken will also fall, and therefore the gorges lying on the beds. From above, the gorge was pressed against the ridge beam with an ohlupnik - a heavy hollowed out log. In this way, the gorges were fixed both at the top of the roof and on the plumbs.
Of course, now no one forces you to meticulously follow the ancient technology; where appropriate, you can use nails, screws, etc. The main thing is to grasp the principle. What is it?
Here's what:
In the same way, today you can attach a continuous sheathing to a slab roof. If you don’t want to bother with chickens (although this is no more difficult than with a rafter system), then you can rest the boards against a hollow hollowed out in the upper crown. Moreover, you can do the opposite - attach the boards to the ridge beam, so that they then fall into the hollow in the upper crown. This is exactly how they work when installing a warm roof using “Norwegian” technology, which I will briefly discuss below.
Roof structure of a private house lathing
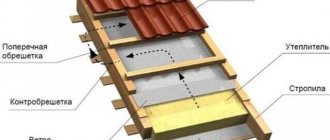
Having finished installing the rafters, you can fill the sheathing. To arrange it you will need boards (2.5 cm thick) or bars. The sheathing can be either continuous or have gaps. But before you build the roof. waterproofing should be laid along the rafters. When creating a living room in the attic, it is best to insulate the roof in advance. The insulation is installed in the space between the rafters. The material can be mineral wool or polystyrene foam.
To create a “warm” living space in the attic, lay insulation in a double layer. The thickness of one layer should not be less than 50 mm. The insulation layer helps absorb noise from outside the room. A vapor barrier membrane is laid on the insulation. It protects the material from the formation of condensation on it. To avoid spending extra money on repairing the roof of a private house, follow all the instructions and recommendations. Try to lay the layers of the roofing pie correctly.
Laying and installation technology
In order to understand the specifics of the construction of all types of wooden roofing, we will consider each option, breaking down the blocks of information into parts about the manufacture and installation features.
Shindel roofing
When manually splitting hemp into planks, the natural structure of the tree is preserved, attracting not only its natural beauty, but also maximum protection from moisture. Correct division of the workpiece into spindle elements is extremely important in terms of wear resistance of the coating. Therefore, it is better to entrust the workpiece to an experienced craftsman.
If you do not intend to use manual labor in production, it is better to buy the material from a reliable place, whose reputation on the market leaves no doubt. The shingle ready for installation must be pre-dried; according to the standards, its humidity must be 18%.
This type of coating is supplied in packaged packs, each of which is designed to lay a roofing area of 1 m². You need to purchase in such a way that the eaves overhangs are taken into account, the width of which is usually 40-50 cm.
Both coniferous and deciduous species are used in production. The priority is larch, red cedar and oak. Before purchasing, it is important to check the location of the annual rings; in a high-quality coating, they are located at an angle of 30º.
The pitch of the sheathing constructed for laying planks depends on their length. They are laid according to the “checkerboard” principle so that the adjacent side edges of the elements laid in the longitudinal row do not coincide with the edges of the overlying longitudinal row.
In order to ensure the “spreading” of the elements, each starting board in the second row is divided in half. The starting board for the third row is cut into three parts. The trimmings do not disappear, they are used in further installation; the location of the joints as a result of such division can coincide only after 3 rows, which is quite enough to create a non-leakage coating.
At the top, each plank is closed by 2/3, only a third remains outside. The result of this installation is actually a three-layer roof, which does not allow water to pass through when snow deposits melt and rain falls, and then “opens up” on its own to dry.
The laying of wooden elements begins with the eaves overhangs and then moves upward. Small gaps of 2-3 mm are left between them horizontally, which are necessary to ensure expansion of the wood at the time of swelling. The specified gap is observed over the entire area of the wooden roof.
The planks do not close along the ridge line; there should be a gap of 2–5 cm between the slopes, through which household fumes will escape. From above, this gap is closed with a shell, two boards connected to each other, or short boards assembled in a special way, the “rear” of which is turned to the windward side.
Shingled roofing
Shingles can be safely associated with shingles: in terms of the method of production and installation, they do not have too many differences. True, it is made mainly from coniferous wood, because... The elements of the shingles are thinner, therefore, it is wiser to chop it from pieces with a soft, pliable structure.
It is also made on machines, but knowledgeable homeowners prefer hand-made material. To produce such a roof, hemp without knots and similar defects is selected. They manually prick into peculiar plates with a wedge-shaped instrument, influencing it with a mallet. The work is carried out carefully, trying not to damage the natural fibers and capillaries.
The thickness of the shingle plates is 0.3 - 1.0 cm, the thinner, the more layers the roof will have to be constructed from. On average there are 7 – 9 of them. Simultaneously with this circumstance, the number of air gaps between the layers increases, as a result, the thermal insulation qualities improve, and at the same time ventilation is optimized.
The width and length of the plates, in principle, are not standardized. The length of the elements can vary from 30 to 100 cm, and the width from 9 to 15 cm. The main thing is that in one batch prepared or purchased for roofing, the shingles are approximately the same size.
In contrast to the material described above, shingles are placed on a continuous sheathing made from boards. The plank slats are fixed with a gap of 3–5 mm between each other, which is necessary for the formation of air ventilation flows. All other installation details are identical.
Shingle roofing
Shingles are one of the most structurally complex types of piece elements for assembling a wooden roof. On the side or top it is equipped with a “tenon” connected to a “groove” located at the bottom or in the side of the mating element. The most complex shingle options are equipped with an additional lock, arranged on a similar tongue-and-groove principle.
To cut shingles, blanks made in the shape of a parallelepiped are used, which are sawn diagonally. After that, all types of planned locks are selected in the sawn parts: from above, from below, and, if necessary, from the side.
The standard length of shingles does not exceed 50 cm, on average 35 - 40 cm. Width from 7 to 14 cm with some differences in the case of manual production.
In the manufacture of shingles, pine is mainly used; aspen, which has excellent moisture resistance, is used somewhat less frequently. The presence of knots, cracks and softened areas along the contour of the elements prepared for laying is not allowed.
Shingle roofing is most often laid in two layers, less often, and only if necessary in three. A single-layer shingle coating is only permissible over summer verandas and cabins.
Before laying, a sparse sheathing is constructed with a step depending on the length of the covering elements. Once again, we note that under each shingle there should be three supports, similar to ordinary ceramic tiles. A bar with sides of 50 or 60 mm is used as laths.
Laying starts from the bottom of the eaves overhang and moves up to the ridge. The arrangement of the rows follows the principle of running. The first row is assembled from shortened planks. The shingles are secured at the top with a nail to the lath. The element laid on top covers the attachment point, masks it and protects it from rusting.
Ploughshare roofing
The ploughshare is significantly ahead of its wooden rivals in terms of aesthetics and price. All elements of this coating are truly unique. They are sawn and turned from aspen by hand, and are made specifically for arranging certain buildings according to precise dimensions. It takes quite a lot of time and effort to produce a kit for laying such a roof, which is reflected in the cost.
In terms of technical and technological essence, plowshare roofing is not much different from any type of wooden tile. However, the frame for laying is much more complicated. For its construction, and for laying the patterned covering, skills and fundamental knowledge in the field of wooden architecture are required.
Board roofing
The plank roof is made from boards with a thickness of 19 to 25 mm. The width of the elements varies from 16 to 22 cm. The board is laid both along and across the rafters, but the longitudinal direction is predominantly used. In this case, the lower edge of the plank roof rests against the water jet - a wooden gutter.
To improve the drainage of water from the slopes on the outside of the board, a pair of longitudinal grooves is selected using a plane. Note that there can only be one gutter on the board. Its width is approximately 2.5 cm, depth is about 1 cm. It is worth remembering that boards with selected grooves are used in the construction of all layers of plank covering.
Often, the plank covering is laid in two dense rows with the joints spaced apart. This is the so-called folk technology “on the map”. The joints of adjacent boards of the lower row are overlapped by the middle of the board of the upper row, thus achieving tightness to protect against precipitation.
The second option for installing a plank roof is more economical than the first, but less practical. It is not used in the arrangement of residential pulpits. In this case, the board of the bottom row is laid with a gap equal to half the width of the board used in laying. The top row is laid so that the boards cover these gaps.
To lay a plank roof, a sheathing of timber with sides of 60 or 70 mm is constructed. The laths can be made from a pole with a diameter of 80 mm, hewn into two edges. The pitch between the laths is 60 - 80 cm. It is believed that two-layer plank roofing was previously made from transversely and longitudinally installed layers. The lower tier supposedly served as a continuous sheathing.
The construction of the plank covering begins with the edge of the ramp that is convenient for work. First, three or four strips of the bottom row are fastened, then they are covered with the top layer. The boards are fastened with nails, driving two of them into each lath. As fasteners, it is advisable to use hardware that is factory galvanized or boiled in drying oil yourself.
If the length of the board is not enough to completely cover the slope, the plank covering is laid with a “skirt”. First, the gorges are laid in the lower part of the slope, then the deficiency is completed at the top. An additional sheathing is installed under this very “skirt”, which is placed flush with the part of the roof that has already been installed.
A traditional ventilation gap is left at the top between the slopes along with the coating. The ridge is covered with a pair of boards fastened together or a cover is placed. It will press down the gorges with its weight and beautifully decorate the wooden roof.
Roof shapes
Pitched roofs come in different shapes. It is worth highlighting here:
- single-pitched;
- gable;
- hipped (tent and hip);
- broken
The most common are gable and hipped hip roofs.
The most common option is a gable or hipped hip roof.
The first requires the construction of pediments. Broken lines are relevant when constructing an attic. At first the rafters go at a steep angle, and then at a smaller one. This technology allows you to raise the ceiling of the attic room. We also recommend reading about the half-hip roof rafter system.
Design of a roof truss system
The design of the house truss system must be tested for strength by specialists. When calculating strength, they take into account, in addition to loads,
. the slope angle of the slopes and the shape of the roof, as well as the type of rafter system and safety factor.
The rafter system consists of many elements. Each element is acted upon by forces that are different in magnitude and direction.
The rafter system as a whole and its individual parts are subject to loads directed vertically, horizontally and tending to rotate the part.
When designing a rafter system, they take into account whether there will be an attic or attic on the roof, the presence of windows in the roof or gables, the conditions for supporting the rafters on the walls, the shape of the house plan and other factors. It is better and more correct to build the roof of a house according to a project completed by a specialist designer
The construction of simple types of roofs can be entrusted to an experienced specialist who does not have designer qualifications
It is better and more correct to build the roof of a house according to a project completed by a specialist designer. The construction of simple types of roofs can be entrusted to an experienced specialist who does not have designer qualifications.
The roof truss system of a private house must meet the following requirements:
- The rafter system must be strong and rigid
- changes in the shape or size of the roof under the influence of loads must not exceed permissible values. - The roof should be light
. in order to put less weight on the walls and foundation of the house. - The rafter system should not transmit thrust
(force in the horizontal plane) to the walls of the house. - The rafter system must be durable
. Replacing or repairing a rafter system is an expensive proposition.
To fulfill the first two requirements, the rafter system is made of separate linear elements assembled into a structure in the form of a triangle. A separate flat triangle of a rafter system, made up of two rafters and associated parts, is called a rafter frame or truss.
Rafter frames or trusses installed on the walls parallel to each other at a certain distance and form the roof truss system
.
Changes cannot be made to a rafter system designed by a specialist at will. Adding or excluding any part will lead to a redistribution of loads to other nodes of the system. Even changing the number of nails used to connect parts can lead to the destruction of the house.
For example, increasing the number of nails used to nail the rafters can lead to unacceptable thrust on the walls. Read about it below.
Try to make the rafter system symmetrical. The symmetrical arrangement of rafter legs, racks, and struts will allow the loads to be evenly distributed along the roof slopes, which will increase the stability of the roof and walls of the house.
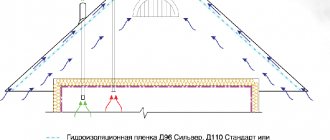
To remove moisture from the wooden parts of the roof and condensation, the attic space must be ventilated
with the help of perfumes. For this purpose, ventilated gaps are provided in attic roofs.
To protect against moisture, the mauerlat and other wooden parts of the rafter system are separated from the masonry walls by waterproofing.
If this is not done, the tree will quickly rot.
The rafter system for a private house is made of wood. Sometimes, for example, in frame houses with a metal frame, metal profiles are also used to make the rafter system.
Roofing pie
The roof structure of wooden houses is multi-layered, which is why it is called the capacious term “roofing pie”. The materials included in it complement and improve each other’s performance characteristics, making the roof resistant to moisture, temperature changes and durable. From the point of view of the composition of the roofing pie, the roof structure can be of 2 types:
- Cold. A cold roof is a structure whose composition does not include thermal insulation of the slope. Wooden towers in Rus' were equipped with roofs of this type. The under-roof space in them, where an unheated attic was equipped, served as an air layer that insulated the living floors from the cold. From a construction point of view, this is a simpler and cheaper structure, consisting only of a vapor barrier, waterproofing and roofing.
- Warm. Warm roofing is a more modern technology that has spread with the advent of modern thermal insulation materials and heated attics. If the under-roof space is heated, then the building is deprived of an air layer that protects against cooling, while maximum heat loss occurs through the roof slopes, which have a large area. Therefore, in addition to vapor barrier and waterproofing, a warm roof also includes a layer of insulation, which optimizes the temperature regime in the building.
Warm and cold roof
Differences between warm and cold roofs
Important! A warm roof for a wooden house is a rather complex and expensive construction solution, which is used only in buildings with residential attics and heated upper floors. Cold-type roofs are used for bathhouses made of logs and timber, canopies, gazebos, seasonally used or unheated buildings.
What kind of roof should be installed on a log house?
For a log house roof with chopped gables, only the option with sliding rafters is suitable.
All this is due to significant shrinkage of the log house. Now we are talking about gable roofs. It's simple: if some part of the frame is higher than another, then the geometry between these parts will change after shrinkage. Each log loses up to 15% of its diameter in the process of shrinkage, but this is a fairly large amount. For rounded logs the standard is 6-8%.
A chopped pediment is like this:
The logs in the gable (gable) part are called “males”.
If the log house is a flat box, then all its walls will settle equally. But if some parts (gables) are higher than others (longitudinal walls), then the difference in height between them will change, and if you build a roof on rigidly fixed rafters, then it will literally be torn off the frame, the males may fall out... In general, this is fraught with a serious emergency situation.
Here's how the chopped pediment shrinks:
For which log houses are rigid rafter structures suitable? For those without tongs! When the roof is placed on a flat frame box - for example, a hip roof. Or you can make a frame pediment (with boards, a blockhouse, etc.) ... But this will not be quite a log house in its pure form.
A full-fledged log house with a gable roof can only have a chopped pediment. Why? Because the pediment is also a part of the house, and a considerable one at that. If you make it frame, it turns out that half the house is a frame assembly. Maybe this is practical - because it is simpler - but in this case, it is practical to build the entire house using frame technology. Log houses are erected for their special merits, and if they are to be done, then do it sensibly and without half-measures.
How to build a house roof correctly, basic steps
Before you start studying material on how to build a roof for a house with your own hands, it is important to become better acquainted with the design features of each type of roof. So, the basic requirements for roof construction are as follows:
- high mechanical strength, which can withstand not only the weight of the roof, but also large wind loads in combination with the pressure of the mass of wet snow;
- low mass of the roof, contributing to the absence of pressure on the load-bearing walls and foundations of buildings and structures.
Depending on the design, the following types of roofing are distinguished:
:
- flat;
- pitched (with or without an attic).
If with a flat roof everything is more or less clear, then with a pitched roof the situation should be clarified. First of all, arranging a roof with an attic space has many advantages
:
there is an opportunity to get additional utility room where you can organize storage of things; Over time, you will be able to convert the attic into a living space (the so-called attic); the level of general ventilation of the building increases significantly during the construction of attics; the attic is an additional layer of thermal insulation between living quarters and the environment, therefore, during its construction, special attention is paid to the issues of insulation of this room.
Main structural components
The entire roof structure consists of units that have their own structure and design:
- Rafter.
- Lathing.
- Counter lathing.
- Cornice strip.
- Horse.
- Roof.
- Insulation and ridge cap.
- Valley (external and internal)
- Wind board.
- Gutter system.
- Snow barrier.
- Stingrays. These parts of the structure have different angles of inclination.
- Skates. The longitudinal parts, with their help, the slopes of the roof are connected, have the shape of ribs.
- Ribs. This is a connecting device for two slopes.
- Gable. This is the hanging part of the roof that protrudes above the frame. Has a size of 200 mm.
- Pipe. It is done in any private homes and is used for boilers and ventilation systems.
- Apron (pipe holder).
The most important parts, the frame and load-bearing parts of any roof are considered to be: the rafter system, sheathing, and Mauerlat. There are additional elements that are fastening (racks, struts, crossbars, spacers, etc.). Fasteners are responsible for the rigidity of the structure.
Mauerlat
This is a beam that is used as the main support for the rafter system. It is located along the perimeter of the load-bearing walls of the house. The corner connections of the Mauerlat are notches connected with staples and bolts to secure the screed. The cuts are made in half the section of the Mauerlat.
Lay the Mauerlat directly on the wooden wall. For waterproofing, a double layer of roofing material is used. The timber is tied to the main walls using clamps or pins. The connection is made to the anchors of the load-bearing walls.
Rafter system
Gable roof rafter system
The frame of any roof is the rafter system. Its design and components by one or another element are directly related to the shape and size of the structure that needs to be covered. The location of load-bearing internal walls and supports is also important. For production, timber, boards or logs are used. The types of its connection depend on what the material is like.
A wooden rafter system can have the following design:
- Layered.
- Hanging.
The layered rafter system consists of intermediate support beams (one or more). They are located on the load-bearing wall of the house or on its partitions.
The hanging structure rests on the load-bearing walls of the house without affecting the partitions. This system resembles wall spacers. To prevent greater pressure on the load-bearing walls of the log house, jumpers are made at the ends of the rafters. They restrain the pushing force on the walls.
For example, consider the frame of a simple gable roof. The distance that is being considered is different, since there may be several options for this rafter system.
- If the distance between the load-bearing walls is less than 6 m, the rafters rest on a beam, which is mounted along the entire perimeter of the walls of the log house (mauerlat). The rigidity of such a structure will withstand any roof, and the material consumption will be small.
- The span between load-bearing walls is more than 6 m, but less than 8 m. The structure consists of connected opposite rafters using a crossbar.
- The distance between load-bearing walls is more than 8 m and less than 12 m, in rare cases 16 m. The structure has a laid rafter system, but with its own characteristics. The intermediate racks will rest on the interior walls. One such support makes it possible to cover up to 12 m with a roof. If up to 16 m, then there are two supports.
If there are no internal load-bearing walls, and the gap between the main ones is the same 12 m, it is advisable to use a hanging system. In this case, the rafters will rest on the tie, and the tie will rest on the Mauerlat. The tightening is made continuous, but if this is not possible, you can use a composite one.
https://www.youtube.com/watch?v=fOlIW8FXVP8
The outermost rafters are installed first. The future plane of the roof depends on them. They are the main ones in the rafter system. Intermediate rafters are installed depending on the selected material for insulation.
Lathing
The frequency of sheathing is directly related to the roof. For soft rolls, you can make a solid one. It is made from plywood or OSB. For ceramic or metal roofing material, lathing with a pitch of 50-60 cm is suitable. The strength and appearance of the roof depends on what material is chosen for the roof.
Roofing materials
When ordering a turnkey service or building a house with your own hands, the question arises, which roof to choose? Various types of materials are suitable for the roof of a wooden house:
- Roll roofing.
- Bitumen coatings.
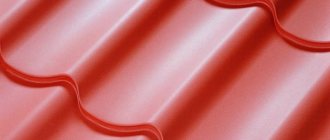
- Metal tiles.
- Ceramic tiles.
- Slate.
- Ondulin.
For low-rise buildings, such as a one-story house, a lightweight roof (corrugated sheeting, metal tiles, ondulin) is better suited. Roof repairs made from these materials are quick and easy to install. These roofing coverings cost: corrugated sheeting - from 210 rubles, ondulin - from 270 rubles, metal tiles from 320 rubles. The material is produced by both domestic and foreign manufacturers. Ondulin has advantages during precipitation. It is soft and noise insulation will be higher. Metal tiles look more beautiful and do not hold back snowdrifts. Corrugated sheeting is economical. All have a wide range of colors. They sell corrugated sheets unpainted and cost from 170 rubles.
For massive houses and cottages, both light and heavy roofing materials (ceramic tiles) are suitable. Installation of such a roof is more difficult, and the price starts from 430 rubles. But snow and water do not accumulate on the roof, sound insulation is increased, the roof is durable and can withstand heavy loads.
For a country house, you can use the most economical options (roofing felt, slate). These materials do not look very attractive, but the price for slate is from 70 rubles, roofing felt from 90 rubles.
But before laying roofing material, you need to think about insulation. It is important to properly vapor barrier it. You can read more about roof insulation here
Wooden roof repair
Problems with wood flooring usually arise in places where there has been stagnation of water or the elements do not fit tightly together. It is not recommended to make cuts or patches; it is best to completely replace damaged wooden elements, laying new ones in their place. If the rafter beam is damaged by rot, prepare the same one, with the appropriate dimensions and inserts, and then install it in place of the damaged part.
If the rafters are damaged, the entire roof may sag. In this case, you need to support it with racks and hold it with jacks, then install struts under the rafters and secure them with brackets. If the rafter leg has just begun to rot, it can be strengthened by installing overlays that are fixed on both sides of the rafters with bolts. The overlay must be at least twice the length of the rotted area.
You can strengthen the rafters by installing overlays, which are fixed on both sides with bolts
To avoid the need for repairs, it is necessary to periodically inspect both the roofing material and the rafter system. If a dull sound is heard while tapping the beams, this indicates internal damage; it is better to replace such an element immediately.
Installation
Thanks to a wide selection of materials, the installation process is less and less considered a labor-intensive job, and designer designs of various levels are increasingly being carried out. For the durability of the structure, you need a high-quality rafter system for a log house, the quality of which directly depends on the installation.
Main stages of installation:
- alignment of protruding parts;
- installation of roof trusses;
- installation of racks;
- installation of fillies;
- work on sheathing or continuous flooring, depending on the type of roofing material that is planned to be used for finishing work.
After completing these steps, you can begin roofing work.
Materials for roof insulation
It is very important to choose high-quality and reliable material for thermal insulation of the roof of a timber house. There are a number of parameters that roof insulation must meet
Material requirements
Key indicators of a high-quality heat insulator:
- environmental friendliness and safety for humans.
- low thermal conductivity (no more than 0.04 W/m°C);
- light weight so as not to create additional load on the load-bearing elements of the structure;
- holds its shape well;
- high vapor permeability;
- soundproofing properties;
- density not lower than 15 kg/m3.
What insulation can be used for the roof
Types of roof insulation
It should be said that among the huge number of modern insulation materials, there are not many materials that meet the criteria listed above.
To insulate the roof you can use:
- mineral wool;
- ecowool;
- expanded clay;
- expanded polystyrene;
- polyurethane foam.
Features of each material
To determine which insulation is better, let’s look at each in more detail:
Mineral wool is rightfully considered the best material for thermal insulation of a wooden house
With a low weight, it has a high density, which is very important when insulating a roof structure. Mineral wool is not flammable and does not absorb moisture; these indicators are especially valuable when used in wooden buildings
Resistance to high temperatures allows it to be used to insulate the roof of a bathhouse. The material is of natural origin, rodents do not like it, and insects do not grow in it. Ecowool. Made from cellulose, it is light weight and affordable. It is a good heat and sound insulator. But the material is highly flammable; to prevent ignition, fire retardants are added to the composition to prevent the spread of flame. It is not advisable to use in very damp areas. Expanded clay. Loose insulation consisting of hollow granules. Due to its porous structure it has high thermal insulation properties. For effective heat transfer, a thick layer of material is needed, which increases the load on the supporting structures. Expanded polystyrene. Presented in the form of slabs that are light weight, high strength, and have good thermal insulation abilities. The material is flammable, therefore, when insulating a log house, it is necessary to choose slabs with a flammability rating of G1. Polyurethane foam. Similar to the previous material, it is a light-weight, durable slab that is easy to install and lasts a long time. Spray insulation is also available for sale, but its installation requires professional equipment.