Installing a straight staircase to the second floor is one of the simplest, most reliable and convenient ways to connect two levels of a country house. This design is durable, practical and easy to assemble from ready-made kits offered by specialized manufacturers. However, in order to choose the right model from the catalog, it is necessary not only to visually imagine how the staircase will fit into the interior. It is also necessary to correctly calculate the dimensions of the structure, understand how it is designed, and what factors affect the convenience and safety of its use.
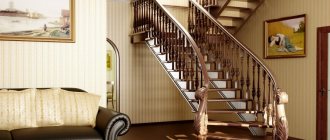
| Luxurious staircase made of top-class oak with a railing made of carved balusters |
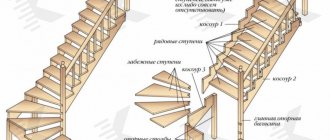
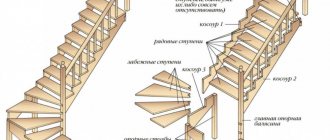
Straight staircase design
The ready-made kit of a straight staircase to the second floor includes several required elements: a frame, steps and a fence. Depending on the model, these components may have different designs:
- Steps are elements that experience the main mechanical load and are most susceptible to abrasion. Can be open or closed. In the first case, only the horizontal flat part of the tread step is installed. In the second, a vertical strip, the so-called riser, is additionally mounted. This element closes the space under the stairs and performs a purely decorative function.
| Lightweight open straight staircase |
- The frame of a straight staircase to the second floor can be made from supports of two types of bowstrings or thick boards supporting the steps from the end, for which grooves are cut into them according to a template. Or stringers of one or two sawtooth beams located in the center or on the sides. In this case, the steps and risers are attached from above.
- Fencing is an essential element of a straight staircase to the second floor, ensuring safety and ease of use. Depending on the configuration, one or two railings are installed, consisting of a handrail and balusters. You can completely abandon the fence if you plan to place a custom-made staircase between the walls.
or this one
Classic straight design for the second floor, installed between the walls
In addition, products can be equipped with additional elements that make operation more comfortable: inviting steps, upper or lower platforms, etc.
Detailed instructions for making an extension ladder
Once you have decided on the height and width of the staircase, you can calculate the number of beams you will need to make it. You will also need two strong bars of appropriate length that will serve as sides.
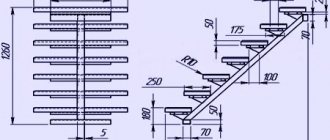
Drawing of a wooden ladder
Before making a staircase, you need to make a drawing on paper, on which you must accurately indicate the dimensions of all its elements. If the product is planned to be installed on loose soil, then it is necessary to provide for the installation of metal frames with pins on it. To prevent the structure from sliding on a smooth surface, you will need special rubber pads. To provide additional stability, metal hooks can be attached to the upper ends of the product, with which it can be fixed to pipes or protruding parts of the walls.
Step-by-step instruction:
Step 1. Before starting work, be sure to treat the wood with an antiseptic to extend the life of the product that you are going to make with your own hands. The antiseptic will destroy fungus and wood bugs, which can quickly destroy even the most durable and beautiful staircase.
Step 2. Mark the steps on the sidewalls, taking into account the width of the step and the fact that the outlet on both sides should be 5 cm - this will avoid cracking of the steps during operation of the stairs.
Step 3. Make stair steps from boards, 10 cm longer than the width of the structure. It is recommended to sand their edges.
Step 4. Lay the stair steps on a flat surface, aligning them with a tape measure (the diagonals between opposite sides should be equal).
Step 5. Place each step on the glue and secure it on both sides with self-tapping screws (it is recommended to use 2 self-tapping screws on each side to secure each step). You can attach each step to the outside of the sidewalls - but this option will not be reliable enough: it is best to make a suitable groove on each of the racks for each crossbar. The gap should be minimal. The most reliable connection in this case is the “tenon-groove” connection: for this, grooves are cut out in the supports, and tenons are made on both sides of the crossbars.
Step 6. Cover the wooden ladder with drying oil and clear varnish - this will protect the structure from the destructive effects of precipitation and extend its service life. It is not recommended to paint a ladder with oil paint, as its steps will become very slippery. To increase the stability of the structure, its bottom must be covered with rubber. You can prevent the ladder from sinking into the ground during its operation using metal spikes added to the lower edges of the product. To increase the safety of the stairs, the surface of its steps can be made corrugated. To avoid getting splinters while using this product, you need to carefully sand it before painting with sandpaper or a sander.
Video - Making a wooden staircase
After manufacturing, the product should be tested: for this, it is installed at an angle of 75 degrees and a static load of 120 kg is applied to the middle of each step through a rigid pad 10 cm long to simulate the load from the foot. In addition, the product must be carefully inspected: if cracks or other defects are detected, damaged parts should be replaced; masking defects is strictly prohibited. Thus, having spent very little money and time, you will get a high-quality and reliable structure that you can use on the farm, resting it on any vertical plane at an angle of 70-80 degrees (if the angle is less, it will be difficult to climb such a ladder).
Material selection
To make straight stairs in a house to the second floor, a variety of materials can be used: concrete, natural stone, metal or impact-resistant glass. But the most popular are wood structures that are lightweight and characterized by good strength, durability and aesthetics. Such products do not place significant load on the base, are easy to install and can be installed in almost any room. At the same time, wood is perfectly combined with other materials, such as glass or metal.
| Larch structure with elegant wrought iron fencing |
To make a straight wooden staircase to the second floor, you can use both coniferous and hardwood varieties. The choice of which type of wood is best to make a staircase from is up to the client, but it is worth considering that each type has its own advantages and disadvantages:
- Pine is an economical option available to most buyers. Products made from this breed are light, reliable, little susceptible to moisture and can withstand temperature changes well. Ideal for installation in country houses and temporary residences. The only drawback of the variety is soft wood, so all surfaces are usually protected with a varnish coating.
or this one
Inexpensive pine staircase - the best option for a summer house
- Larch is a tree with a beautiful reddish tint. It has all the advantages of pine, but has denser wood, which in terms of strength characteristics is not much inferior to oak or beech.
- Ash is the most budget option of hardwood with a rich color palette and performance properties similar to oak.
- Beech is an amazing wood with a pinkish tint, characterized by high density, aesthetics and an affordable price.
- Oak is an elite species. Straight stairs to the second floor made of this wood look luxurious, solid and respectable, have a long service life and, with proper care, can last more than 100 years, maintaining their attractiveness and impeccable appearance.
Important! The material used for the manufacture of straight wooden stairs to the second floor must be of the first grade, without damage or flaws, with a moisture content of no more than 8-10%.
Otherwise, over time, the wood will begin to deform, the product will “lead” and it will creak. In addition, the durability of the structure largely depends on the degree of drying.
Material for stairs
To make stairs with your own hands, you select planed wood that does not have thorns, deformations, or surface irregularities. Before starting work, the wood is dried. To give it a deeper color, the surface is treated with stain. After this, several layers of waterproof varnish are applied to the wood.
High-quality wood for stairs must be first grade and have a moisture content of no more than 10%. It is not recommended to use material with a moisture content of more than 10% for the manufacture of stairs. When drying, the wood will be subject to deformation and the stairs will begin to creak. To make a staircase with your own hands, they use both budget varieties of wood (pine, birch, ash) and more expensive elite ones (oak, cedar, maple).
Characteristics of some types of wood:
- Pine is a wood that is most often light gray in color. It has low strength and is easily exposed to external influences. With high humidity it may increase in size. In demand due to its low cost.
- Birch is a light wood with a uniform structure. The raw material is in demand due to its low price.
- Ash – characterized by a light color and a specific fiber structure. The process of working with it is not difficult, the material bends well, but its strength indicators are even higher than those of oak.
- Oak is one of the hard varieties with a light yellow color. It is generally accepted that products made from this wood are the most durable and strong, which is reflected in the price.
- Maple – due to the absence of pores, it is highly durable. This variety does not absorb moisture, as a result of which products made from it can be placed outside buildings. Along with this, maple is very difficult to process.
How to calculate the parameters of a straight staircase to the second floor?
Before purchasing a kit for making a straight wooden staircase to the second floor, you need to calculate its main parameters. To do this, first of all, you need to decide on the installation area of the product - the angle of inclination and length of the stairs will depend on the capabilities of the room:
- When allocating space for installation, it is worth taking into account the span height (the distance between the steps and the ceiling), so that it is comfortable to climb the stairs, it should be at least 2 m.
- Ideally, the angle of inclination is 35 degrees, but deviations are acceptable if necessary.
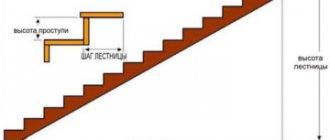
- The length of the span is calculated using the Pythagorean theorem, taking into account the height and angle of inclination of the stairs. For clarity, you can make a schematic drawing, where the hypotenuse will be the structure, and the legs will run along the floor and wall.
Important! When determining the height of the stairs, it is necessary to take into account not only the height of the room, but also the thickness of the ceiling with the finishing of the floor of the second floor.
Finished stairs usually comply with established standards governing the dimensions of the main elements. However, when purchasing, you should pay attention to the following dimensions, on which the convenience and safety of using the structure depends:
- The optimal width of the product is 80-120 cm; along such a passage it will be convenient to move and carry various loads. In small rooms it is permissible to narrow it to 60 cm.
- The recommended width of the steps is 26-30 cm, the step height is 16-20 cm. In this case, the dimensions of all elements should be the same, with the exception of the first upper step, which can be made smaller if necessary.
Stairs with steps narrower than the length of a person’s foot are not only inconvenient to use, but also dangerous!
TURNING LANDSCAPE OF STAIRS
Its height was chosen on the basis that both flights of stairs (lower and upper) would have the same angle of inclination, and when climbing, a person would not touch the ceiling elements with his head.
In this case, both flights must have an integer number of steps.
Vertical posts (bars 50 * 50 mm) were screwed to the wall with self-tapping screws. In the design, the middle posts are the most loaded, so they and the middle cross member were made from paired bars, reinforced with a metal corner.
Since in our case the site is supported on all sides by walls, I did not use any jibs or reinforcing stops. The platform flooring was made from planed floorboards.
DIY assembly and installation of a straight staircase.
To assemble the finished kit, you will need the usual set of tools, available in almost every home and used in most construction work - a screwdriver, a hammer, a level, a square, a marker or pencil, a grinder, sandpaper. It is also worth buying wood screws.
First of all, prepare the installation site - a support beam is fixed to the floor, grooves are cut out in the ceiling beam at the top, and the places where the frame is secured are marked. After which installation work begins:
- Supporting elements - stringers or bowstrings - are installed according to the marks, regularly checking their correct installation in terms of level and plumb, and connecting the parts with anchor bolts.
- At the next stage, using a screwdriver, first screw the risers (if any) into place, then the treads.
- Lastly, the fencing is installed. The first to be installed are the support pillars at the top and bottom of the stairs, between them there are decorative balusters, at the rate of one baluster per step. Depending on the type of fencing, balusters can be fastened with self-tapping screws or simply installed in drilled holes. If necessary, an additional support element can be added in the middle of the stairs.
- Handrails are installed, all joints are masked with decorative plugs.
The final stage of installing a straight staircase to the second floor with your own hands is checking the reliability of the connections and the symmetry of the structure. After which it is necessary to thoroughly sand all the wooden elements of the product, paying special attention to the joints and ends.
If you do not have the time or desire to assemble a finished staircase yourself, then in our catalog, along with the staircase, you can order an installation service.
Installation of a marching wooden staircase
Installation of a wooden interfloor staircase begins with the manufacture of stringers (or bowstrings), treads and risers.
Layout of a staircase along the wall with dimensions indicated
The treads are cut from the board according to a previously prepared template. Their standard thickness varies from 30 to 40 cm. If you do more, it will be an unjustified consumption of materials and make the structure heavier. Risers perform a decorative function in a building. Therefore, you can save on them by using a 10-15 mm board.
Stringers are made from a solid board that is free of any defects. Both stringers must be identical so that the staircase does not turn out asymmetrical and skewed.
Marking the stringer
Option for making a stringer with fillies
Assembling a bowstring with stiffeners
Frame assembly
Installation of stringers begins with making cuts on the floor beam located at the top of the flight of stairs. Sometimes the cuts are replaced with metal stops, which should be attached to the vertical floor with anchors. Regardless of which method you choose, the stringers must be firmly fixed to the ceiling.
Options for fixing elements
On the lower floor, along the line of the very first step, a support beam is installed in the floor. Anchors are used as fasteners.
Attaching the stringer to the floor
Installation of components
Installing the steps will not be difficult. The cutouts of the stringers are coated with glue and risers are attached to them, which then need to be leveled and secured with screws.
Attaching risers to stringers
Treads are laid on top and fixed to the risers and stringers. It is recommended to place polymer gaskets in the form of tapes under them. This will prevent squeaking from occurring as a result of wooden parts rubbing against each other.
Methods for installing steps on a stringer
Attaching the steps to the string
The function of the fence is performed by balusters, when installing them it is important to ensure correct evenness. For this purpose, install the upper and lower columns and connect them together with a stretched thread. It serves as a guide for installing other elements. Balusters can be attached with screws or self-tapping screws, which are masked with grout or plugs.
Fencing fastening scheme
The handrail is installed and fixed on the balusters. It can be wooden, iron or other material.
Finishing
After installation, all surfaces must be sanded, including hard-to-reach places, ends, and joints. Then the structure is treated with protective agents and covered with varnish or paint.
Painting the stairs
To protect the wood from rotting, mold and mildew, all structural elements are treated with an antiseptic. After which the stairs are coated with paint or varnish to prevent premature abrasion, scratches and minor damage.
When choosing a paint and varnish material, give preference to compositions that do not form a smooth surface. Slippery steps are dangerous!
The protective coating also performs a decorative function; with the help of clear or tinted varnish, you can emphasize the structure of the wood and give expressiveness to the natural pattern. Painting the elements will help to organically fit the product into the surrounding interior.
| Stylish staircase to the second floor made of wood, painted in two colors |
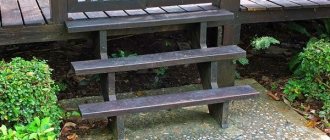
What can a hand-made wooden ladder be useful for?
A do-it-yourself wooden ladder can be made for the following purposes:
- organizing free access to the attic in cases where installing a stationary staircase is impractical or impossible;
- picking fruit in the garden, pruning trees;
- Carrying out repair and finishing work outdoors and indoors.
An attached wooden ladder is suitable for picking fruit in the garden and pruning trees.
Photos of finished stairs
Below you can see photos of straight stairs to the second floor of different designs.
Types of structures
To build a staircase structure, you must be able to use the tool and know the rules for constructing sketches and drawings. This will allow:
- design all the constituent elements of the structure;
- take into account potential weaknesses and correct shortcomings at the project stage;
- calculate the size of the steps so that it is convenient to go up and down.
It is best to use wood to make stairs. This building material is environmentally friendly, practical, and easy to work with, which is especially important for novice craftsmen. Using a special tool, you can make a staircase of a shape that would ideally suit your interior:
- straight or rounded;
- simple or decorative;
- heavy or light.
The following popular types of wooden staircase designs are distinguished:
- on stringers - the most common option. The main beam is a ridge on which the steps rest on top. The most commonly used scheme is with 2 stringers, but there are also options with 1 and 3 load-bearing elements.
- on a bowstring - the beams are located on the sides of the steps. This scheme visually makes the entire composition a little heavier, which is quite pleasant to the eye, but is no more difficult to manufacture than the previous version.
- on rails - here a metal fence acts as a load-bearing element. Such designs fit perfectly into modern interiors.
- on the central pillar - this system is used for spiral staircases.
Features of manufacturing a spiral staircase
The manufacture and installation of wooden spiral staircases to the second floor is much more difficult than marching ones. But, on the other hand, they allow you to save useful space and are placed where there would not be enough space for a marching structure.
The best option is to install a spiral structure with a central support. In this case, steps in the shape of a triangle or trapezoid are attached directly to it.
To make the structure more reliable, a support column with a specially attached heel is placed vertically and concreted at the base.