Wood is a practical and convenient building material with excellent performance characteristics. It is relatively inexpensive, environmentally friendly and safe for humans. Therefore, a wooden house built with your own hands is perfect for people who are used to taking care of their health and using safe and natural products. You can build a wooden house without the help of professionals. It is enough to have basic construction skills, time and desire.
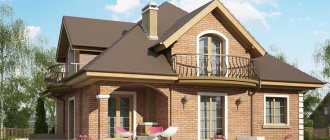
Wooden house construction project.
Project plan
The decision has been made, we are building a frame house using new technology. Specific plan:
- The house is designed to accommodate no more than 4-5 people
- In summer the house is used daily, in winter from Friday to Sunday.
- Estimated area up to 150 square meters.
- A site was selected located 20 kilometers from the city limits.
- The heating system includes a heat pump with a special geothermal circuit element.
- The "warm floor" technology is used.
- The sewerage design is based on a septic tank with three channels, discharging compounds into a drainage pipe.
Preparing for work
All that is available is a site unprepared for construction; there is no gas, water or electricity supply. There are 20 tons of sand, approximately 10 tons of gravel and within 3 cubic meters of boards. At the preparatory stage, a temporary work shed is built to store materials and working tools. The temporary structure is made of wood and covered with metal.
Preparing for the construction of a wooden house
Before you start building a house with your own hands, prepare a sufficient number of necessary materials and tools. To work you will need the following:
- concrete mixer;
- wooden beam;
- tow;
- saw (preferably gasoline);
- roofing felt;
- screwdriver;
- hammer;
- antiseptic;
- screws and nails;
- corrugated sheeting;
- drill;
- electric plane;
- scaffolding;
- wooden dowel
Construction of the foundation
An 8x10 frame house is built with the construction of a high-quality foundation. The trench is prepared using a standard dig; a grillage built on bored piles is selected as the foundation. When working on wells, first a drill using TISE technology is used, after which a special machine is used to prepare 38 holes, the depth of which is 220 centimeters. For a pile diameter of 30 centimeters, reinforcement with a diameter of about 14 millimeters is accepted.
10 centimeters of sand mixture are laid, the work is controlled using lasers. After checking the level, another 10 centimeters of gravel is laid, and the reinforcement frame is tied. It was planned to choose a foundation using TISE technology, but the fertile layer under the structure is not the optimal solution. The grillage made it possible to quickly build an 8 by 10 frame house, making it an excellent alternative. The columns are cleaned and coated with special concrete contact.
Choosing a foundation
A do-it-yourself wooden house requires a reliable, durable foundation. Since permanent wooden buildings do not have as much weight as stone ones, the choice of foundation is quite wide.
Foundations are installed in private construction:
- columnar;
- tape;
- slab.
Experts believe that the best of them is lightweight tape. It is called lightweight because no crushed stone is added when mixing the working solution. Therefore, the density of hardened concrete is lower.
The columnar foundation, although very popular, has significant disadvantages. One of the most significant is the cost of work. In addition to using special equipment to install piles or pillars, a preliminary geodetic survey must often be carried out to determine the properties of the soil. Slab foundations are good for residential wooden buildings with a large total area.
Although a spacious wooden house with your own hands (the video is presented at the end of the article) looks luxurious, it requires a lot of physical effort and money. According to the project, the depth of the strip foundation depends on the degree of soil freezing. The trench is dug to a depth where the soil does not freeze. The width of the trench should be 25 - 30 cm.
You can build a strip foundation for a wooden house with your own hands as follows:
- 1. A trench of appropriate depth and width is dug.
- 2. Sand is poured into a 10 cm layer, watered and compacted well.
- 3. A 10-centimeter layer of crushed stone is poured on top, which is also watered and compacted tightly.
- 4. A layer of roofing material is laid on top of the pillow.
- 5. Formwork is installed. If it is not removable, it is reinforced with metal wire.
- 6. Reinforcement is installed above the waterproofing layer. Antiseptic-treated metal rods are pulled lengthwise and crosswise and secured with rigid wire.
- 7. Next, concrete is poured. Grades 200, 250 and 300 are suitable. The consistency of the concrete should resemble liquid sour cream.
The time for sufficient setting of the foundation is 10 – 12 days. Under favorable weather conditions, concrete gains design strength up to 70-80% in 7-14 days. This is enough to already load the foundation, and complete 100% solidification of the foundation will occur only after 28 days from the moment the foundation is poured. You can continue building a wooden house with your own hands (video at the end of the article).
Making a grillage
The formwork is made from high-quality laminated plywood and OSB material - 9 mm. Next, the structure is poured with a mixer, and the material is dispersed over the surface of the formwork. The last procedure is simple, but when the formwork is squeezed out by the earth, we must strengthen the structure. The construction of the basement structure is underway, for which bricks are being imported. The bricks are sorted to eliminate defects, reducing their quantity to a minimum.
Laying the basement structure
Next, we build a frame house from the stage of laying the basement. The operation is carried out with the direct placement of bricks in three rows, while a special masonry mesh is located between the second and third rows. Then we begin assembling the formwork. When installing the formwork on the beams, the planned position of the septic tank must be marked, after which an excavator is used to carry out excavation work. When we build a frame house, we take into account that the septic tank is located directly away from the house itself and closer to the road level. On the site, one section of the fence is expected to be removable, which will allow the sewer truck to quickly access the pit.
How to build a wooden house
Scheme of a screw pile foundation for a wooden house.
The very first steps in creating your eco-friendly structure are creating a design and choosing a building location. In both cases, you can turn to specialists, but this will lead to costs. It’s easier to find a suitable project on the Internet and choose the location yourself. The building can be located anywhere in the yard, but if there is a hill on the site, build there:
- this is to allow water (rain and melt) to leave the house freely;
- it’s easier to build a sewer system - there is a natural slope
Article on the topic: Modern wallpaper: room design, photo 2021, ideas for the home, stylish interior, how to hang an apartment, views, two colors for the kitchen, video
After this, you should decide on the foundation. A wooden house is built on a columnar foundation made of reinforced concrete, brick or concrete, which, depending on the soil, can be reinforced (hard soil) or unreinforced (soft soil).
There are two ways to make a wooden house:
- For those who don’t know how to start construction, but are ready to assemble the structure themselves. Call the factory. They bring you a ready-made disassembled house, which is assembled thanks to special marks. The bars each have their own fastening pins and are located according to the numbers marked. You are given documentation, drawings and a plan for the sequential assembly of the structure. Advantages of this method:
- no need to pay construction companies;
- there is no need to wait for workers every day (many live quite far away), accommodate them (if they came for the entire construction period), feed them;
- construction time is reduced: you can get up early and go to bed in the dark.
Scheme of floor insulation in a wooden house.
For those who know how to start construction and are ready to assemble the structure themselves. Having at least basic information about architecture and knowing the sequence of work, you can build a house yourself. The house will have to be built gradually. Carrying beams and placing them on top of each other is difficult (especially if you are alone). You must make cuts yourself, cut windows and doors, adjust the material (for example, process it with a plane). Because of this, the construction time of your building will increase. They can be reduced by mechanizing labor using a grinder with an attachment or by reaching an agreement with the sawmill workers. Advantages of the method:
- budget reduction due to independent performance of many operations (cutting, cutting, drilling);
- any work schedule: you can work half a day or skip a day.
Sewerage preparation
Two drainage pipes are drained from the septic tank. Appropriate holes are drilled into the brick, having a depth of within 3 centimeters, after which the corresponding rods are inserted into them. In the dug trench under the right and left branches of the geothermal type circuit, it is planned to install a water well, as well as a collector. Water pipes, of which there will be three, are laid in trenches.
We reuse the formwork at the stage of constructing the beams; the second span is installed 50 centimeters narrower than the first, which makes it easy to use no more than four sets of beam formwork. When it is necessary to create permanent formwork, an inch board is used. A septic tank, a geothermal circuit, and a water well have already been added to the foundation.
A pit with a width of three meters and a similar depth is constructed as a septic tank. The depth is chosen in reserve, the bottom is filled with sand, leveling is carried out, and sewer pipes are laid. The length of the pipe is 20 meters; in case of cleaning it, inspection pipes are inserted in the central part so that a technological hole is provided for cleaning. The slope of the pipe is 2.5 centimeters per meter, the entire length is 0.5 meters, the end will be above the established ground level exit.
The pipe is wrapped in geofabric, which is secured with Mylar twine. The drainage pipes are filled in the reverse order with gravel and sand. The septic tank was chosen to be a three-chamber one, although it actually consists of one, but additionally equipped with special partitions. An asbestos cement board is used for the partitions; the liquid outlet is regulated by a check valve. The volume of the septic tank is 7 cubic meters, which is enough for 11 people.
Features of building a wooden house
Main stages:
- Creating a new project or studying an existing one. Thanks to such documentation, you can preview the final result, select materials wisely, distribute construction nuances, and obtain important permits. At this stage, all organizational, financial, and design issues are considered and resolved.
- Foundation. It takes more than 30% of material costs, a huge amount of time and effort. A properly created foundation guarantees a long service life of the building. When choosing a base for a wooden house, you need to focus on soil properties. Most often, building a wooden house with your own hands involves installing columnar or screw foundations.
- The first option is widely popular, it is reliable, economical, and can be built quite quickly. The design includes the following elements: reinforced concrete blocks, stone and brick. The foundation is deepened according to the type of soil on the site and the groundwater level. When erecting it, not only building materials are saved, but also labor costs, because laying such a base can easily be done independently.
- The second option, a screw foundation, is very expensive and requires professional intervention. It is being built in mountainous and forested areas. The piles are installed in a marked area and screwed into the ground to a depth of 2.5 m. Next, the entire structure is filled with concrete, after which the cap is welded and the upper part of the foundation is mounted.
- House type. The most common frame wooden houses are budget ones; they can be built for $190 per square meter (excluding communications). From rounded logs - $270, and from laminated veneer lumber - 460 or more. Attention: the ideal material for building a wooden house with your own hands is considered to be logs 7 m long and 25 cm thick. For a small house, wood 17 cm in diameter is suitable.
- Walls. After the foundation has settled and all preparatory work has been completed, the walls begin to be erected. They can be made from round logs, laminated veneer lumber or planed beams. This is processed wood without bark, knots and various irregularities, which has a good appearance and high production performance. Wood is healthy, has low thermal conductivity and allows you to decorate every area of the finished house. Before laying the walls, logs must be impregnated with appropriate solutions to prevent damage.
- Roof of a wooden house. To build it, you need to lay rafters, heat and waterproofing, and the main roofing material. It is important to choose the right shape of the roof so that it protects from weather precipitation and disasters, and also fits harmoniously into the overall picture of the building. The modern market presents several types of roofing coverings, these are ondulin, corrugated sheets, metal tiles, slate. As people say, “to the taste and color” of each owner.
- Windows and doors. Before making openings for these parts of a wooden house, you need to think about the mechanism used in operation (hinged, sliding), architectural design (classic, arched openings), and much more, which will allow you to use the windows and doors of your future home in the most comfortable and high-quality manner.
- Floor and ceiling. We choose the type of flooring; it must be strong, durable, and attractive. You can lay linoleum, tiles, laminate, carpet or wood. The ceiling for a wooden house must be made aesthetically pleasing and all electrical communications connections must be hidden in it.
Necessarily! Waterproof the floor even before the screed and finishing stage. - Is finishing needed? A house made of timber or rounded logs does not require decorative cladding work, but a building made of simple logs requires a long time for shrinkage and finishing using modern materials.
- Sewage and water supply system. If there is a water supply pipe near the house, then you only need to connect to it, and when not, then you will need an autonomous water supply, which costs considerable material costs. It is imperative to install a sewer system and drain pipes so that the foundation and floor covering of the entire area are not damaged by groundwater.
- Heating is carried out after the construction of the house is completed. You can lay a heated floor, connect an electric or gas boiler, or make a heating stove. It would also be correct to insulate the house both inside and outside, using thermal insulation materials.
And the last step is electricity. Wiring is installed according to the architectural plan of the building, sockets and lighting fixtures are placed. Of course, the construction of the house does not end there, but the main stages have been completed.
Pouring the floor
When pouring the floor, the structure is not tied to the outgoing reinforcement beams. The floor is reinforced with fiberglass, thickness 6 cm, “shell” design. The beacons are nuts; they are screwed onto rods that are installed at a higher height. For control, a cord was pulled across the span, at the level of the nuts. After filling the floor, we strengthen the strapping beam. The structure is drilled through where the rods pass. A recess for the nut and washer is drilled in the upper part.
Building a house with your own hands from timber: step-by-step instructions
The modern trend is that many residents of large cities would not mind living closer to nature, in their own home. The demand for suburban areas is constantly growing, construction on them is expanding.
Building a house with your own hands
Of course, the easiest way is to hire a team of builders who will take on the main load. But for most Russians it is common to try everything on their own, so many people practice building a house with their own hands on a purchased plot.
For central and northern Russia, the traditional building material has always been wood, and despite the variety of other possibilities, wooden houses have not lost their popularity at all. True, in this matter technology does not stand still, and instead of log houses made of round timber, houses from timber have begun to be actively built.
A house made of timber can easily be built independently if you take the choice of materials for its construction seriously and thoroughly master the basics of such construction technology. Well, you probably need to start with a closer acquaintance with this material in order to be able to choose it correctly, since this will determine how comfortable the future house will be and how long it will last without repairs.
Which timber should I choose for construction?
Properly selected wood is half the success in building a reliable home. Therefore, it is very important to know in advance what types of timber there are and how they differ from each other.
Which timber should you choose?
There are three main large categories of timber on the construction market - glued, planed and profiled. To make a choice, you need to get information about each of them.
This table briefly presents the comparative characteristics of wooden beams, planed and glued:
| Comparative characteristics of regular and laminated timber | ||
| Material evaluation criteria | Regular timber | Glued laminated timber |
| Draft | 6-8% | 0,4% |
| Warping due to uneven evaporation of moisture (geometry violation - screw, bend) | Maybe | Excluded |
| Cracks | Width up to 10 mm | Allowed in length, does not affect strength |
| Depth up to 150 mm | ||
| Length up to 1500 mm | ||
| Loss of aesthetic appearance due to fungal manifestations | Maybe | Excluded |
| Wormhole, rot | Maybe | Excluded |
| Surface | There is no perfectly flat surface, there may be knots or holes from them, cracks | Smooth surface that does not require additional processing |
| Temperature fluctuations | Wood deformation | No leashes |
| Thermal insulation qualities | Additional thermal insulation required | Complies with the requirements of SNiP II-3-79 “Construction Heat Engineering” |
Planed timber
The most inexpensive is planed timber.
Planed timber has a square or rectangular cross-section, and is made from solid logs by cutting them.
Manufacturing of planed timber
Compared to the other two types, the advantage of planed timber is its affordable price. If we compare timber with logs or bricks, its installation is much simpler than these materials and requires less cost, effort and measurements. In addition, the structure itself made of planed timber is much lighter in total weight than one made of brick or laminated veneer lumber.
However, this type of material has a number of significant disadvantages that you need to be aware of.
Planed timber is made from wood that has natural moisture. When humidity decreases, the wood dries out, and undesirable consequences may appear on it:
- Cracks are the most common negative manifestation when wood dries out. They increase the thermal conductivity of the walls, so insulation will bring more trouble. In addition, the appearance of the material also suffers, which also requires certain measures - leading to the need for additional work and unnecessary costs.
The scourge of low-quality timber is the appearance of cracks
- Deformation can also occur after moisture evaporates from the wood. So, you can buy a beautiful and smooth material, but after a while it can bend in the most unexpected way.
- Mold, rot and blue staining - appear when the material is stored in conditions unsuitable for wood, for example, in damp, poorly ventilated rooms, with beams laid close to each other.
The sad consequences of improper storage
- Slots are a common drawback of simple timber, as it is often not made to the exact dimensions. It is not surprising that when laying it, gaps form between the beams, and when the wood dries, they will not become smaller, but on the contrary, they will increase. The cracks will need to be sealed, which means you need to wait until the wood dries at least a little, otherwise the work will be done in vain and will have to be repeated again later.
- Shrinkage is also a consequence of wood drying, since the beams are somewhat reduced in size. The result may be subsidence of the entire building, and its magnitude will depend on the humidity of the surrounding air and the percentage of the initial moisture content of the wood.
Caulked gaps between the beams
It must be remembered that when the building subsides, the installed window frames and doorways will become deformed, and both the interior and exterior decoration will be damaged.
Therefore, a log house built from timber and covered with a roof must be given time to settle and adapt to new conditions. Only after this can construction work continue.
Planed timber does not have an ideal shape and surfaces, and when the above-described defects appear, it is significantly inferior to other types of this building material. Therefore, it is usually purchased for construction if the facade will be insulated on top and finished with other materials.
Profiled timber
Profiled timber differs from ordinary planed timber by the presence of a comb on its working sides, which is otherwise called a tongue-and-groove. By purchasing it, you can avoid some of the problems mentioned above that are typical for planed timber.
Profiled timber
The shape of the profile can be different - it can be a comb with numerous teeth, three large ones or two located at the edges. The last option involves laying a felt pad in the middle part of the beam.
Which profile to choose depends on the moisture content of the material. If it is increased, then it is better to choose a profile designed for laying with insulation, since when the timber sags, the felt will not allow a gap to be created, which means that the wall will not be blown through.
Felt pad between the tenons of the beams
The fine combs must fit exactly together when the two bars are aligned.
Profiled timber with a frequent fine comb
A timber with such a profile must be dry, otherwise, when drying out, the comb teeth may become deformed and create unwanted cracks through which cold air will enter the house.
Most often, profile beams are made to order, based on the drawn up house design. The master immediately provides all the parameters for the location of walls and doors in the wall, and also cuts “cups” for the corner joining of the timber. Each of the parts is numbered, so the installation of walls is quite simple.
It should be noted that usually profiled timber is made from dried logs with a moisture percentage of no more than 20 ÷ 22%. If this indicator is higher, then the material is considered low quality.
If you purchase dried profiled timber, it will not shrink much. But this material, made from solid logs, is not immune to cracks, so after erecting and covering the house, a certain amount of time is also required to adapt the walls to the external environment.
Glued laminated timber
Glued laminated timber is the most reliable option for building a house. It has excellent performance characteristics, as it has optimal humidity for construction. All boards, dies or bars with a small cross-section from which it is made are carefully prepared and dried before gluing.
The most durable and reliable, undoubtedly, is laminated veneer lumber.
A log house built from glued timber does not require seasoning - it can be finished immediately after construction.
Glued laminated timber has virtually no disadvantages - it does not crack or shrink, and in addition, each lamella is treated with fire retardants and antiseptics before gluing, which is aimed at protecting the wood from fire and rotting. A finished house, in principle, does not even need additional external and internal finishing, and it can only be carried out if the owner so desires.
Glued laminated timber is also often made to order, and each part is assigned its own number, according to which the assembly is carried out.
Prices for various types of timber
timber
What type of wood is best for home timber?
Another very important question after choosing the type of timber is which wood is best for building a house? If you rely on “dry numbers”, you can refer to the table of physical strength characteristics of wood for information:
| Wood type | Average density kg/m³ | Strength limits, MPa | ||||
| Along the fibers | Across the grain | |||||
| Stretching | Compression | Static bend | Radial chipping | Static bend | ||
| Pine | 500 | 110 | 48 | 85 | 7.5 | 86 |
| Spruce | 450 | 120 | 44 | 80 | 6.8 | 79.5 |
| Fir | 370 | 70 | 40 | 70 | 6.5 | 68.5 |
| Larch | 660 | 125 | 62 | 105 | 11 | 111.5 |
| Oak | 700 | 130 | 58 | 106 | 10 | 107.5 |
| Beech | 670 | 130 | 56 | 105 | 12 | 108.5 |
| Birch | 630 | 125 | 55 | 110 | 9.2 | 109 |
| Aspen | 480 | 120 | 42 | 78 | 6.2 | 78 |
But, probably, numbers are numbers, but it’s better to take a closer look at the material:
- Oak - has a dense structural structure and a beautiful textured wood pattern, but when it dries it is prone to cracks. Therefore, if you want to build a house from oak, then you definitely need to choose the glued version.
Oak laminated timber
It should be noted right away that this wood is one of the most expensive materials, but it is worth it. Houses made of oak timber are a reliable, durable and strong structure that will last, if properly installed, for a hundred years. Due to the density of wood, it practically does not absorb moisture, and with additional processing, oak timber can be called completely moisture resistant.
- Larch is one of the most suitable materials for building a house, as it is practically not susceptible to the occurrence of fungal outbreaks due to the presence of natural antiseptic components in its resin.
Larch timber
The wood has a high density, which also contributes to fire resistance. A house built from larch will also serve more than one generation of the family.
Larch has a pleasant color and beautiful texture. It is not afraid of any moisture, so even the supports of bridges over small rivers were built from it. In houses built from larch, thanks to the natural antioxidant and phytoncides contained in its wood, a healing microclimate is created.
Disadvantage - high-quality larch beams have a high cost, therefore, if it is not possible to build a house entirely from this material, then a gasket is made from it between the foundation and the wall beams.
- Spruce and pine - the wood of these conifers is the most affordable option and has good characteristics for the construction of a log house.
Pine timber is the most popular due to its relatively low price.
Pine has a fairly soft structure, so it is easy to process and adjust. It has pleasant warm shades, and the core, when dried, acquires a reddish-brown color.
There are usually quite a lot of knots on the pine trunk, but when cut they have an oval shape. The wood is permeated with numerous resin channels, and therefore it almost does not crack, which is very important for maintaining heat in the house.
A log house made of pine timber practically does not shrink, since the material is little susceptible to deformation.
Spruce bars are not very different from pine bars in physical characteristics, but have a slightly different color. The wood is lighter in color and does not have as pronounced a textured pattern as pine.
Spruce wood is somewhat inferior in quality to pine
The structure of spruce is looser, so its thermal conductivity is lower than that of pine. But a very large number of knots makes processing difficult, so spruce material is not so popular.
In houses built from such coniferous trees, it is easy to breathe, which has a beneficial effect on the health of all family members. Properly constructed pine buildings can last a long time. And if we take into account the low cost of the material, then this wood can be called the most popular for building a house.
- Linden and aspen - timber from these species is the best material for building a log bathhouse. As for linden, it is a fairly expensive material, but it is worthy of its price.
Linden beams are very good for a bath.
Linden has low thermal conductivity and has a pleasant light color with a pinkish tint that does not change over time. This wood requires intensive treatment with natural antiseptic compounds, as it is susceptible to fungus and mold.
Aspen has characteristics similar to linden. It also has its own advantage - it is more resistant to the effects of humidity at both low and high temperatures.
Aspen profiled timber
Both linden and aspen do not crack much when drying, but are prone to significant deformation. Therefore, if you decide to raise the frame of a house from them, then it is better to take a laminated veneer lumber, or a very well-dried planed one.
Is it possible to save on material?
If the budget allocated for building a house is not too large, and it is not possible to purchase too expensive material, then you can get out of the situation by purchasing untreated timber, and then independently prepare it for installation, saving a decent amount. To do everything correctly, you need to follow all the recommendations:
- The first thing you need to pay attention to when purchasing timber is its evenness. Even if at first glance it looks smooth, you never bother to check it further. To do this, lay it on a flat surface and then turn it over on each side. If the beam is deformed or bent, it will be immediately visible.
- Next, you need to study the annual rings, which are clearly visible on the end side of the timber. The distance between them should be approximately the same. If they vary greatly in thickness, then when drying, the timber can be greatly deformed.
- The timber will also behave if its layers have different internal stresses. This wood defect can be identified by its uneven color on the end and side edges.
- If the timber is freshly cut and not dried, but has good quality in color and evenness, then you can independently bring it to optimal condition, but this will take some time.
Such timber is stacked at a distance of 15 ÷ 20 mm from each other. Small vein bars measuring 15×15 or 20×20 mm are laid between the rows at a distance of 1000 mm from each other. Such installation is necessary to ensure that the entire timber is well ventilated and excess moisture evaporates from it.
Correctly stacked
In order for drying to proceed evenly, the ends of the timber are covered with lime, and stacks are installed so that the end parts are not exposed to direct sunlight, otherwise the wood may crack.
The drying time will depend on air humidity and the place where the timber stacks are stacked. It is advisable that this be a platform under a wide canopy. You should not place such stacks in the lowlands of the territory, near natural or artificial reservoirs, where the morning fog lasts the longest and the heaviest dew falls.
Construction can begin only after the wood has dried. You can determine readiness with a moisture meter. When it is not there, they make do with improvised methods. For example, a chemical pencil is drawn across the surface of the timber. If after a few minutes the mark turns blue, then the wood has not yet dried.
Internal drying is checked by tapping a timber from the stack with a short block - a dull sound indicates that the wood is still damp.
After drying, the wood is treated with a fire retardant and antiseptic. Some modern processing compositions combine both of these properties.
Home construction
If you don’t want to bother with calculations, you can order or buy a ready-made set of materials for building a house with the accompanying drawings, taking as the initial data only the area of the plot allocated for the house.
If planning is carried out independently, then the following table may be useful as a rough guide, which shows the calculation of materials for the construction of timber walls with a total area of 100 m² (minus window and door openings):
| List of works | Materials | Consumption |
| Construction of walls from timber 100 mm thick | timber | 10 m³ |
| Boards 25-32 mm | 0.11 m³ | |
| Tow | 140 kg | |
| Ruberoid | 27.7 m² | |
| Felt | 7.0 kg | |
| Construction staples | 2.7 kg | |
| Resin | 21 kg | |
| Antiseptic paste | 15.2 kg | |
| Construction of walls from timber 150 mm thick | timber | 15.2 m³ |
| Boards 25-32 mm | 0.15 m³ | |
| Tow | 211 kg | |
| Ruberoid | 27.7 m² | |
| Felt | 7.0 kg | |
| Construction staples | 2.7 kg | |
| Resin | 27 kg | |
| Antiseptic paste | 15.2 kg | |
| Construction of walls from timber 200 mm thick | timber | 18.1 m³ |
| Boards 25-32 mm | 0.18 m³ | |
| Tow | 253 kg | |
| Ruberoid | 27.7 m² | |
| Felt | 7.0 kg | |
| Construction staples | 3.0 kg | |
| Resin | 30 kg | |
| Antiseptic paste | 15.2 kg |
The staples and pins with which some structural elements will be attached must be made of non-corrosive metal or have undergone special training.
All work on building a house from timber can be divided into a list of successive stages:
- Marking the territory.
- Foundation construction.
- Checking the geometry of the base.
- Laying waterproofing material (roofing felt) on the foundation.
- Fastening a larch board or lower crown beam (if all walls are built from this wood).
- Assembling walls from beams and securing them to dowels.
- After all the walls are assembled, the floor and ceiling beams are laid.
- Installation of a subfloor and temporary flooring of boards on attic floor beams for the convenience and safety of working at heights.
- Installation of a rafter system with sliding fastenings of rafter legs.
- Lathing of the rafter system.
- Roofing decking.
- Hemming boards onto the attic floor from the premises side.
- Insulation of the roof and attic floor.
- Insulation and white flooring.
- Installation of partitions and communications.
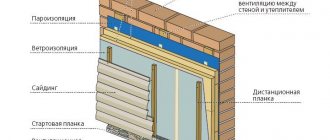
- Insulation and cladding of walls from the inside or outside, if necessary and provided for by the project.
- Flooring of the terrace floor, if provided (it is better to use a deck board for it).
- Installation of doors and windows.
In this order, we will consider these stages in more detail.
Video: stages of self-building a house from timber
Foundation
The foundation is constructed in the following order:
- Marking.
- Removing the fertile layer.
- Digging a trench for a strip foundation or separate holes for a columnar foundation. Due to its sufficient lightness, any of them is suitable for the construction of a house made of timber.
- Backfilling of the waterproofing layer is made of sand and the drainage layer is made of crushed stone.
- Installation of formwork and reinforcement grid.
- Pouring concrete.
If you choose a pile screw foundation, then you do not have to dig trenches or holes for it - the piles are screwed into the places marked for them. This type of foundation for a house can be built literally in one day, since it does not require perfect leveling of the site and waiting for the concrete solution to harden. Another advantage of such a foundation is that when screwing in the piles, they can be easily aligned exactly to the same level.
If you choose a strip or columnar foundation, then it can be made shallow, since a building made of timber is not as massive as walls made of brick or stone.
Construction of walls on a strip foundation
To learn in detail how to properly build a foundation for a house , you can follow the link to the section of the portal with the appropriate instructions.
Walling
- After the concrete of a strip or column foundation has hardened, its geometry must be checked. The process is carried out using a flat board and a building level. If unevenness is found, they will have to be corrected with concrete mortar, since if the base is uneven, the walls will also go awry.
- Whatever foundation is chosen, after it is ready, a waterproofing material is laid on its surface - roofing felt in two or even three layers.
Waterproofing the foundation surface
- Next, a larch board is laid on top of the waterproofing and secured with pins or anchors. It will become an additional leveling and waterproofing layer, as well as a strapping belt.
Fastening the strapping boards together
- The boards for strapping must have a thickness of at least 50 mm. At the corners of the foundation they are connected into half a tree, then through holes are drilled at the joints into which wooden dowels are driven. The first wall beam is installed on the free part of the dowel, left 80 ÷ 120 mm above the strapping board. To do this, a through hole of the required diameter is measured and also drilled.
- If the house is being built from deciduous timber, then the first lower crown is immediately laid on roofing material or on bars placed perpendicularly under it, measuring 50 × 50 mm. This gap between the foundation and the wall is provided for the insulation layer.
- If you choose a milled beam that is laid using insulation, then felt is rolled out in the middle of each lower, already laid part.
Laying and securing the felt pad
To prevent the felt from moving when the top beam is laid on it, it must be secured with staples in some places. In the same way, felt is laid between all wall elements.
If the felt protrudes beyond the width of the wall, it’s no big deal: it can then be easily cut off or tucked into the gap
- Rows of beams are most often fastened together by driving dowels, for which either a hole is drilled for them, or a slot-like groove is selected (depending on the shape of the dowel itself).
- At the corners, the timber can be connected in several ways:
- With the help of “cups” carved into it. The same connection is used when joining walls with partitions if they are built-in.
Connection at the corners with cups
— No timber protrusions beyond the walls. In this case, the outer corners of the house are smooth.
Installing butt corners
To prevent cold air from penetrating through the gaps in the corners of the house, tongue-and-groove joints are cut into them, which are made at a certain angle and must fit exactly together.
Curved groove connection
- All window and door openings must be calculated and prepared in advance, that is, they are not cut out during the assembly of the walls, and in those places where they are provided, smaller cut beams are laid.
- The walls of a one-story house should be raised in height by approximately 2.8 ÷ 3.0 m.
The wall is raised to the required height
- The next step is to lay the attic floor beams on them; they can crash into the wall beams, or they can be fixed to special metal brackets.
Installed floor beams
- If a two-story house is being built, then the walls of the second floor are raised.
Rafter system and roofing, attic floor
If the house is one-story, then a temporary flooring of boards is mounted on the installed floor beams - this is necessary for safe work at height. Next, you can proceed to the installation of the rafter system.
This table provides information on the sizes of rafter legs depending on their length:
| Rafter length in mm | Distance between rafters in mm | Sectional size of timber for rafters mm |
| Up to 3000 | 1200 | 80×100 |
| Up to 3000 | 1800 | 90×100 |
| Up to 4000 | 1000 | 80×160 |
| Up to 4000 | 1400 | 80×180 |
| Up to 4000 | 1800 | 90×180 |
| Up to 5000 | 1000 | 80×200 |
| Up to 5000 | 1400 | 100×200 |
- So that when the walls shrink, which is inevitable to one degree or another, the entire roof system does not become distorted, the rafter legs are attached to the mauerlat (the upper beam of the wall) using sliding fasteners. These elements will allow the rafter legs to move a little without disturbing the entire structure.
Movable fastenings of rafter legs
- At the top, the rafters can be fastened in different ways - it can be a ridge board, or they are fastened together with a metal plate.
- The next step is to install the remaining elements of the rafter system - these are racks, tie rods, headstock and others. The need for specific additional elements is determined by the size and complexity of the roof structure.
Possible elements of the rafter system
- The installed rafters are covered with sheathing, which is covered with a vapor barrier film on top.
- Next, a counter-lattice is mounted on top of the film or plywood is laid - this will depend on what roofing material is chosen for the roof.
- The next stage is the installation of roofing material.
Roof decking
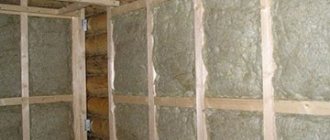
- When the roof is laid and secured, it should be insulated. Thermal insulation materials (most often mineral wool is chosen for this purpose) are laid on the attic side between the rafters. The insulation is covered with a vapor barrier film, which is attached to the rafters using a stapler.
Insulation of roof slopes from the inside
- Next, the attic subfloor is hemmed onto the attic floor beams, which will simultaneously serve as the ceiling for the underlying rooms. It is secured from the side of the rooms, and from the attic side, after laying the film, insulation is laid (or filled) between the beams. The work can be carried out in a different sequence, when the boards are nailed from the attic side, and the installation of insulation and ceiling boards or plywood is carried out from the room side.
Installation and insulation of attic floors
Step-by-step instructions for installing and insulating various types of roofs and attic floors can be found in a special section of our portal.
Prices for various types of fasteners for rafters
Rafter fasteners
Wooden floor installation
The floors in the house must be installed after the roof has been covered in order to prevent unnecessary wetting of the materials if it suddenly rains.
Floor design and insulation diagram
The floor can be arranged according to different schemes, but the most common is the one in which a subfloor is provided.
- The first step is to lay floor beams on the protruding part of the strip foundation or on an additional beam connecting the columnar foundation. They can be made of timber or boards, which are installed on an edge. The size of these parts is selected depending on the span between the walls. For reference, you can use the following table:
| Beam section in mm | Span width in mm | ||||||
| 3000 | 3500 | 4000 | 4500 | 5000 | 5500 | 6000 | |
| Boards | Step of installation of beams from boards or beams on the basement floor | ||||||
| 50×160 | 800 | 600 | 450 | — | — | — | — |
| 50×200 | 1250 | 900 | 700 | 550 | 450 | — | — |
| 80×180 | 1200 | 1200 | 900 | 700 | 550 | 450 | — |
| Bruschi | |||||||
| 140×180 | — | — | 1550 | 1200 | 1000 | 800 | 700 |
| 150×200 | — | — | — | 1650 | 1300 | 1000 | 900 |
| 160×220 | — | — | — | 2000 | 1700 | 1400 | 1100 |
- Beams can be fastened using metal corners or studs, but the latter will have to be embedded in the foundation in advance.
Laying beams with skull beams
- If the walls of the house are installed on a strip foundation, it is recommended to cover the entire area between its walls with fine-grained expanded clay, which will serve as additional floor insulation. In addition, rodents cannot tolerate it, which means they will not be able to get into the house through it. Expanded clay is poured with a thickness of 100 ÷ 150 mm.
- Next, in order to lay the subfloor, it is necessary to secure the cranial bars to the covering beams. They are nailed or screwed to the bottom of each beam.
Layed subfloor The
subfloor boards are laid on the skull blocks. Here you can use material that is not of the highest quality.
- If expanded clay is poured between the “black” and “white” floors, then it is recommended to make a flooring of vapor barrier film or glassine on the boards, and only after that can the insulation be poured.
More often, mineral wool is placed between the floor beams. If this material is chosen, then it is better to purchase basalt, as the most environmentally friendly of all its types.
Insulation of subfloors with mineral wool
If this is possible, it is preferable to use ecowool for insulation, which is made from cellulose fibers and is therefore absolutely safe.
You should not use polystyrene foam or materials made on its basis as insulation. Over time, this material begins to release fumes into the air that are not harmless to humans.
- The top of any insulation must be covered with another layer of waterproofing film, which will not allow lint and dust from the insulation to penetrate into the house and will not allow accidentally spilled water to pass down. The film is secured to the floor beams with staples.
- Next, a ventilation block is attached to the beams, on top of the film, which will allow air to circulate under the boardwalk, which will contribute to the long-term preservation of the floor.
- After this, you can move on to laying the plank floor.
The boards are not laid close to the wall, but with a distance of approximately 5 mm from it - this gap is necessary to ensure ventilation.
The boards are fastened together using tongue-and-groove joints cut on the sides of the boards. It is recommended to nail them to the floor beams not through the top, but into the groove of the board. This work must be done very carefully so as not to split part of the floorboard. You can use thin screws instead of nails.
Approximate plank floor installation diagram
- The final stage in arranging a wooden floor is attaching the baseboards to the walls.
After constructing the house, arranging the roof and roofing, ceilings and floors, it is necessary to address the issues of installing windows and doors. (after a certain shrinkage of the walls has occurred). And the last stage will be the process of insulating the walls (if necessary) and their external façade finishing. How to carry out such insulation of wooden walls correctly can be found in the corresponding article.
So, building a house from timber yourself is quite possible, especially if you have helpers who are at least a little familiar with the art of construction. And in order not to get into trouble with the calculations, the best option would still be to order the preparation of materials for the house from a specialized organization. Craftsmen will carry out this work according to a given project with professional precision, and you can try to assemble the structure yourself with assistants, saving a considerable amount of money.
And, traditionally, at the end of the article - a video with advice from professionals.
Video - Features of building a house from timber
Video - Mistakes when building houses from profiled timber
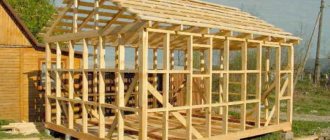
Installation of wall frame
We put the geothermal circuit pipes into the boiler room, fix the second end in the well well, and place the collector. Three PND-40 water pipes are installed in the bathroom. One of them supplies water, the second supplies electricity to the well, and the third will be a spare one in case of freezing.
The wall frame is laid, fastening points and problem areas are calculated. During the installation of walls, attention is paid to strengthening problematic beams, and the load on the surface of the material from the second floor structure is taken into account. It was decided to strengthen the overall structure of the frame by adding a number of beams (in areas with a distance of 1.5-2.0 meters). After installing the frame, the walls are installed, bosses are nailed at the bottom of the racks, and OSB forms the rigidity of the walls.
Wooden house installation technology
The work involves erecting a foundation, building a box, installing a roof, and subsequent finishing.
Foundation
For a wooden structure, you do not need to make a very powerful base: it is not very heavy. A shallow, tape-type version is suitable here. The following sequence of actions must be followed:
- Cleaning and marking the area.
- Digging a pit. Its depth is 50-60 cm, and its width is equal to the thickness of the walls with an increase of 15-20 cm. A waterproofing layer is laid at the bottom of the compacted trench, on which a layer of sand (20 cm) is poured. The pillow is compacted.
- Reinforcement and filling. Formwork is made from boards and a reinforcing frame is laid. The boards are pre-coated with moisture-repellent material. Now pour the solution. To prevent air from appearing inside, the concrete is compacted.
- Waterproofing the base. To do this, use roofing felt or coating compounds.
When arranging the foundation, you need to make a drainage system and blind area. Moisture is removed from the foundation and walls, reducing the risk of structural failure.
Walls
Logs for walls are lifted using a winch
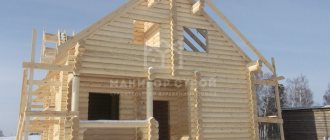
After the foundation is settled, you can begin building the walls.
- Laying the floor and the first crown. The first row of timber or logs is placed on a waterproofed base surface. Larch material should be used, as this species is the most resistant to rotting. Jute is placed between the beams for insulation.
- Installation of subsequent rows. The elements are treated with antifungal agents. If natural logs are used for construction, the corners are connected using the “bowl” or “paw” method. Profiled or laminated timber is laid using a tongue-and-groove system.
After the walls are built, a temporary roof is built. Before installing windows and doors, the house must go through a shrinkage process. When using laminated veneer lumber, this time is reduced to 6 months. During work, it is necessary to monitor the level of the walls.
Roof
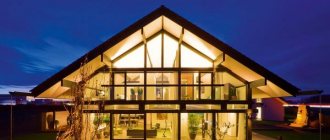
Gable roof for a wooden house
Before building a wooden house, you need to decide on the type of roof. It is best to use the gable option. The work includes the following stages:
- Floor installation. It is secured using special nails. Temporary flooring is placed on it.
- Installation of rafters. This procedure is carried out directly on the roof. Bolts are used to connect the rafter legs. The lower part of the elements rests on a protruding beam. In the area of the joints they are fixed with nails and tightened with staples. Several layers of waterproofing material are laid on top of the rafters: roofing felt or thick polyethylene film. The material is spread overlapping by 20-25 cm. Counter slats are nailed on top of the waterproofing. They are necessary to create ventilation space.
- Arrangement of sheathing. Screws are used to secure it.
- Roof decking. After this, they begin to attach the roofing material.
There are 2 options for arranging the rafter system: hanging or layered. The first option is used if the structure will rest on the side walls. She is easy. The distance between the walls is 6-14 m. The load on the capital side foundations increases. To reduce it, I use horizontal supporting elements and diagonal connecting bars.
If the house has internal load-bearing walls, you can use a layered rafter system. It has several points of emphasis in addition to the main side structures. The main support area is the ridge. Before building the roof, waterproofing and Mauerlat are laid on the walls. Lastly, the interior and exterior finishing of the structure is carried out.
Construction of the second floor, roof
By the time the second floor is erected, electricity is connected to the first floor. Passage racks are installed on the beams (the base of the second floor floor) at the joints. To lift weights, a hoist placed in the structure of the house is used. The walls are covered with glass wool (approximately 2/3), and gypsum board is filled around the entire perimeter. For waterproofing, the inner surface is lined with reinforced film, pressed with 4 mm plywood.
For blowing, a lattice is used, dividing the space into individual pillows. Beam fasteners are used as ceilings. The spans between the joists are lined with plywood; technicol, 40 cubes, is used as insulation, which is covered with a membrane on top of the ceiling. The rafters in the structure lie on racks, thanks to the presence of windows with different pitches. After the first slope, the second one is laid, using the same insulation. Onduvilla was chosen as the material for the roof; it was decided not to use any iron.
Selecting wall material
To build a house made of wood, you can use one of two materials: logs or timber
To build a house made of wood, you can use one of two materials: logs or timber. Each of these materials can be divided into several varieties depending on the processing method.
Installation of wooden houses can be carried out using the following types of logs:
- Rounded logs make a smooth, beautiful log house. In essence, this is an ordinary log from which the top layer has been removed to level the surface and give it a cylindrical shape. However, such treatment somewhat reduces the wood's resistance to negative weather factors. This is due to the fact that the layer under the bark contains a lot of resins that protect the wood, and during cylindering this protective layer is completely removed. That is why this material requires additional protection using special chemical compounds.
- A wooden house built from naturally shaped logs does not have such an attractive appearance. But the strength and durability of this product is much higher due to the presence of a natural protective layer with a high resin content. The only drawback of this material is that after the walls are erected they require decorative finishing.
The construction of a wooden house from timber can be carried out using the following varieties:
Advantages of houses made of profiled timber
- Profiled timber is a wall material that undergoes special processing, as a result of which the product is given the correct geometric shape with grooves and ridges on two opposite sides. Thanks to this, you can quickly build a beautiful, smooth, sealed wall by laying insulating material between the beams. Such a wall does not require external or internal finishing.
- Also, the construction of a house can be carried out using planed timber. The price of this material is more reasonable in comparison with profiled products, but its thermal insulation and aesthetic qualities leave much to be desired.
- If you decide to build a house from wood, then sawn timber can be used to construct the frame. Thanks to the use of this material, the construction of cottages can be significantly reduced in cost. Using sawn timber, you can build both a one-story and multi-story wooden house.
The construction of wooden houses can be carried out using frame-panel technology. In this case, in addition to the wooden frame made of sawn timber, the following products are used as wall materials:
- OSB – oriented strand boards;
- particle boards;
- special moisture-resistant plywood.
Chipboard and moisture-resistant plywood have recently given way to OSB. This material is used for arranging the outer and inner surfaces of the walls of a frame house. In addition, it is indispensable when performing continuous roof sheathing for laying flexible roofing material.
Important: the cheapest house will be one built using frame technology. Its price is within 190 $/m². A building made from rounded logs will cost a little more ($270/m²). The most expensive wooden house will be made from laminated veneer lumber.
Window installation
Among two options for installing windows, one with unpacking, or installation immediately with double-glazed windows, a decision was made to choose the second. The difficulty is the high weight of the frame structure, about 50 kilograms. Option - a ramp is built to lift the structure to the second floor. The frames were made to order and the installation was carried out independently.
Strengthening the frame, sound insulation and blowing in ecowool
Stiffeners are additionally added to the frame; the cladding is made of inch boards. After cross-strengthening the frame, sound insulation is laid between floors, which is used as thermal roll material. At the same time, the ceiling is being lined and energy-saving lighting elements are being installed.
Blowing of cotton wool is done with your own hands, using a special machine. The material is supplied in bags in pressed form; it must first be loosened. The boundary between dark and light-colored cotton wool is defined as the absorption of moisture by the material. The consumption is approximately 70-75 kg/m3. It takes 10 boards and a certain amount of scraps to strengthen the frame. At the same time, engineering structures and pipe outlets are being laid.
Materials and tools
- beams, boards, slats;
- dowels;
- roofing felt;
- saw, chainsaw;
- grinder with nozzle;
- hammer, sledgehammer;
- plane;
- drill, electric drill.
The main thing is to follow safety precautions.
The best posts
- All about hinges for metal doors
- Feng Shui rules: how to properly place mirrors in your home?
- Applications made from colored paper for preschoolers: master class for May 9
- Construction of loggia and balcony in Scandinavian style
- Bathtub renovation with acrylic
- DIY crib organizer: manufacturing technology
- Beige-brown interior: advantages and disadvantages of a beige kitchen
- Bodysuit for small children: knitting pattern and description
Installation of stairs
The construction and installation of stairs is underway, with the width of each step being 20 centimeters. The inconvenience of the design is noted, given the slight reduction in the turning area. At the same time, a vapor barrier is carried out, and a sheathing is installed for the installation of drywall. A bathroom is installed on the first floor, and communication lines are connected to it. A vapor barrier is attached to the roof, the corners are filled with ecowool, and the joints are taped. Next, at one of the final stages of work, the internal walls are blown in, using plasterboard and reinforced polyethylene materials. A special machine is used specifically for blowing, with an excellent range of adjustments.