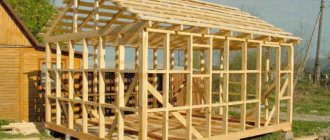
Installing a wooden staircase with your own hands is a labor-intensive and quite complicated process for a beginner, as it requires certain training, skills and abilities.
It is obvious that securely fastened and perfectly adjusted staircase elements make the structure as stable and reliable as possible, eliminating creaks, swaying and deformation. However, novice craftsmen often neglect simple rules, which leads to distortions, premature destruction and other extremely unpleasant consequences.
In this article we will try to talk about the key points of assembling and installing rotary flight stairs so that you do not make mistakes in practice.
If you don't have a finished project, we recommend that you use our online staircase calculator . It allows you to receive a ready-made estimate, a set of drawings, a 3D model and recommendations for manufacturing the most convenient design.
Content
- Introduction
- Wood grain direction
- Wall stringers
- External stringers
- Connecting stringers to each other
- Attaching steps to a string - methods
- Methods of fastening balusters
- Installing railings on stairs
- Attaching the handrail to the pole
Introduction
Installation of a staircase, like any other structure, is carried out in stages. First of all, parts are always installed that perform the function of load-bearing elements and access to which will be difficult in the future.
However, each master has his own exact sequence of assembling individual elements, and any of these methods does not claim to be the only correct one.
To avoid asymmetry, after each stage of work, check with a level that the horizontal and vertical projections are observed.
Wood grain direction
When manufacturing staircase elements, you should pay special ATTENTION to the direction of the wood grain . Drawings must be transferred to the source material, taking this feature into account, along the greatest direction of the template.
Wood has such a quality as anisotropy - that is, its physical and mechanical properties differ depending on the direction within the medium. For example, the compressive strength of wood along the fibers is 3-4 times greater than across the grain, the tensile strength is more than 30 times greater, and the indicators for fracture and chipping are similar. Professional carpenters know these nuances and produce products in accordance with certain rules that allow them to achieve the highest possible reliability of the final product.
For example, the winder step at the junction with the turning post has a rather small support surface, as a result of which an increased load is applied to this place. If the wood fibers are located parallel to the front edge (that is, along the larger side), the load is distributed evenly over the entire element , and if perpendicular, then near the attachment point, a break will soon occur along the direction of the fibers in the narrowest place.
The situation is similar with stringers in places where steps are cut - the direction of the wood fibers must be parallel to the upper and lower edges of the board. Otherwise, unreasonable arrangement of fibers will definitely lead to the appearance of a defect.
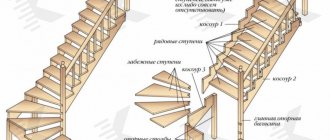
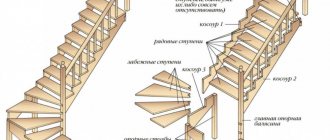
Attaching support posts to the floor
Support pillars are vertically located load-bearing elements that form the basis of the frame of the lower part of the staircase. They provide support for the winder steps (landing) and the stringer (string).
There are no special requirements for the wood of the part - the main thing is that it is uniform, without cross-layers and large knots. Typically made from the same type of wood as the rest of the staircase.
In order for the future structure to be strong and reliable, the pillars must be firmly secured. This can be done using steel angles, studs, zip bolts, wood glue and other devices - there are a lot of options.
Finally, it is recommended to connect the columns with supporting stiffening beams.
Of course, by this time, all the technological holes and grooves for other elements of the staircase should already be made in the pillar structure.
Design Features
The project must comply with GOST
The selected staircase design must combine safety and ease of use. GOSTs and Codes of Rules establish the parameters of structural elements.
It is prohibited to use transformable (folding, sliding, etc.) stairs as main ones. Such structures are used for access to basements and attics.
General requirements:
- the minimum width of stairs for two-story residential buildings is 800 mm, for buildings higher - at least 1000 mm;
- the width of the march should be the same along the entire height;
- the number of steps in a march is from 3 to 18, it is desirable that their number be odd;
- the maximum slope should not exceed 50o, the minimum slope should not be less than 20o.
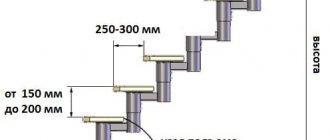
The dimensions of the steps are chosen based on maximum consideration of ergonomics:
- within one flight, the height of the steps is selected within the range of 12–20 cm, and the difference between them is no more than 5 mm;
- the width of the steps on the main interfloor stairs is at least 250 mm; if the width is more than 26 cm, the size of the protrusion is chosen to be no more than 300 mm;
- for wedge-shaped options, the minimum tread width in the working area must be at least 100 mm.
The length of the landings is selected within the range of 130-145 cm.
The minimum height of the railing is 90 cm, and the distance between the balusters is not less than 150 m.
Before design, the distance between the coverings of the first and second floors, as well as the parameters of the interfloor opening, are accurately measured. Take into account the thickness of the floor finish.
Taking into account the interfloor distances and the requirements for the height and width of the steps, their total number can be calculated. Based on the measurement results, a diagram or drawing is prepared.
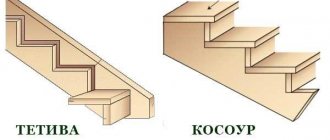
Installation of a stringer
Stringers are the main load-bearing elements of a flight of stairs, which are mounted at an angle to the adjacent floor. Do-it-yourself installation of stair steps is carried out directly on the stringers, in pre-prepared recesses.
Wall stringers
Installation of the supporting structure begins with the installation of a wall stringer. For convenience, it is recommended to make markings on the wall in advance and, immediately before assembly, additionally double-check the accuracy of the structure with a level.
It is highly recommended to glue all connections and fastenings of parts with liquid nails or glue.
Usually the installation process begins with fixing the lower part of the stringer. To do this, the beam is installed and pressed into the groove connection or groove on the support column. A temporary support structure can also be made if it is planned that the stringer will be supported on the outside of the support column.
Then they begin to attach the upper part of the stringer. Depending on the type of floor: wooden, metal, concrete, different types of fasteners can be used. For example, in wooden houses, it is preferable to use angles, bolts, studs and anchors.
To strengthen the structure, it is also recommended to install stringers in the cuts of the load-bearing floor beam.
At the final stage, the main section of the beam must be pressed against the wall with pre-prepared dowels or anchors.
In order to prevent squeaks from adjacent structures in the future, all joints should be generously rubbed with paraffin, except for those where glue will be used.
External stringers
Installing an external stringer is practically no different from a wall stringer. By analogy, it is necessary to secure the lower part of the beam in any convenient way and then fix the upper part, which is adjacent to the ceiling.
During work, you need to ensure that the stringers are positioned exactly opposite each other, otherwise the design will turn out crooked and many manufactured parts will have to be modified.
After installing both beams, you will end up with something similar.
If necessary, the attachment point of the stringer and support beam is additionally reinforced with a metal corner.
Connecting stringers to each other
There are options for non-standard designs, when the stringers are not fixed in the grooves of the support posts, but are attached to them from the outside, or when only one support post is used, and the internal stringers are held only by fastening to the wall. In this case, the question often arises: how to fasten the stringers together?
The most common and universal method is the tongue-and-groove connection. This is quite simple to manufacture, but the most reliable unit that allows you to rigidly fix the parts. If, in addition, you treat the joints with PVA glue, then if the standard loads are observed, such a structure will be almost impossible to destroy.
together using ordinary self-tapping screws, screws or flush bolts (shown schematically in the figure with the screw head protruding outward). This connection also makes it possible to achieve high structural strength, but it can only be used if the stringers are planned to be attached to the support beam.
The second method involves cutting down the grooves in the support column, cutting one of the stringers to the thickness of the other, installing them in the appropriate holes and tying them together with any hardware. The resulting connection will firmly secure the elements of the staircase, and is also guaranteed to protect the structure from creaks and loosening.
On our website you can also calculate the length of the stringers and the amount of materials for their manufacture.
Types of stairs
The variety of designs is grouped according to several criteria:
- geometric shape;
- material of manufacture;
- type of fastening.
When designing, all indicators are taken into account as a whole, taking into account the materials from which the walls and ceilings are built.
Staircase shape
It is impossible to lift large objects up the spiral staircase
Based on the size of the house and the type of floor, available free space, choose spiral, marching and combined stairs.
The screw (spiral) type is used when room space is limited in order to save usable space. The staircase rises in a spiral. The option looks impressive, but the design has several disadvantages:
- the difficulty of self-construction, high requirements for the qualifications and experience of the master;
- use for the manufacture of special expensive tools;
- low ergonomics due to narrow steps and the constant need to climb (descend) in a spiral;
- problems when moving large objects between floors due to the screw structure.
Single-span flight staircase - the simplest option
A self-built staircase to the second floor is the most popular type. It is distinguished by:
- simplicity of design;
- uniformity of all elements, which are made of the same size, which contributes to simplicity (manufacturability) in manufacturing and installation;
- simplicity of the diagram and calculation of the flight of stairs;
- suitability for construction of any type of materials;
- ease of use, including for moving pieces of furniture;
- the presence of platforms that allow you to make turns at different angles, using the space of the house more efficiently.
Marching staircases are built with one, two or multi-spans. Between the spans, platforms are arranged - rotary or straight. This design helps to make the staircase optimal in terms of the angle of climb.
Among all the options, a straight flight of stairs takes up the most usable space in the house. In order to save money, the slope angle is increased, but this affects safety and ergonomics.
The combined version contains parts of spiral and flight staircases. Making a combined type wooden staircase with your own hands is not easy; experience in this kind of work is required.
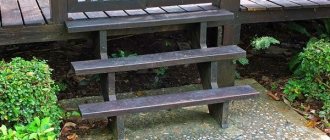
Attaching steps to the stringer
The next stage of building a staircase to the second floor with your own hands is attaching the steps to the stringer.
In cases where the design of the staircase also requires the presence of risers, it is recommended to install them first.
Let us remind you that the height of the risers should be approximately 1-2 mm less than the height of the steps. This is done so that in cases of increased humidity, when the wood swells, deformation of the entire structure does not occur.
After this, you can begin to directly install the steps. Straight elements along the stringer are installed simply and there is no point in going into detail, but the installation of winder steps should be considered in more detail.
There are two main ways to install winder steps:
- tongue-and-groove connection (classic);
- connection with the cut of the support column.
The first method assumes that in order to install the rotating elements, you will need to make blind grooves in the main support column. The vast majority of experts recommend making grooves slightly smaller than the thickness of the step, as this will allow the elements to be connected as tightly as possible and prevent their movement. In turn, this will prevent deformation of the structure and eliminate the appearance of squeaks.
The second method involves cutting through the support column to a thickness equal to the thickness of the step. The entire structure is fixed using wood glue or a pin wound inside the support column. To strengthen the selected connection, it is also practiced to create small grooves (locks) in the rotary stage to securely fix the entire assembly.
The outer side of the step, in both cases, must be attached to the frame made of winder stringers or supporting stiffening beams using PVA glue or self-tapping screws. If necessary, all connections are reinforced with metal corners.
Our website has a program for calculating winder steps - you will have access to drawings with actual dimensions, technical specifications and the amount of materials for manufacturing.
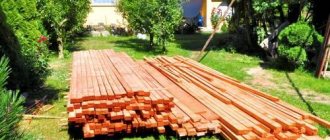
Material selection
After all the calculations have been completed, you need to purchase materials. This will require boards of different lengths and densities: for steps the thickness is 3-4 cm; for risers – 2-2.5 cm; for a bowstring or stringer, the thickness is 5 cm and the height is 150-250 mm. It is better to buy ready-made handrails and balusters, since their production will require a lathe and timber measuring 10x10, 15x15 cm. To fix the components, you will need screws and nails, as well as metal corners for reinforcement.
Installation of ladders on a bowstring
The string is the main load-bearing element of the staircase structure, which is located in an inclined plane relative to the surface of the floor/ceiling.
The main difference between a bowstring and a stringer is the method of installing the steps. On the bowstring, the steps are installed from the inside into pre-cut grooves, and on the stringer they are placed on top in special recesses.
When assembling the entire structure, it is assumed that first the treads and risers are installed on one string and only then the second one is pressed on the other side using a special hammer.
This design feature predetermines some difficulties when installing a staircase, since you first have to assemble a whole flight (string along with steps) in one place, and only then secure this bulky structure in another.
The remaining stages of installation exactly coincide with the stairs on stringers.
It should also be noted that bowstring ladders have greater bending strength, but due to drying of the wood and the lack of uniform lateral adhesion, the sidewalls are able to move slightly apart over time. Therefore, this type of structure is often reinforced with cords, which can be made of wood or metal. They are recommended to be installed at the beginning, middle and end of the flight or every five steps.
Attaching steps to a string - methods
The classic version of assembling a wooden staircase with your own hands implies that the steps must be assembled before the march structure is installed in a given location. In this case, at the initial stage of assembly, all joints of the elements are lubricated with a special adhesive, risers and treads are inserted into the grooves, and, if necessary, reinforced with self-tapping screws.
However, recently designs with overhead bars and corners have become increasingly popular. In this case, specially placed stops are attached using nails or self-tapping screws directly to the body of the bowstring, and the tread, in turn, is installed on them.
In this case, the assembly of the stairs is carried out by analogy with the structure on stringers, that is, there is no need to first assemble the entire flight and only then install it at a given position.
A bowstring staircase is an excellent solution for a spacious home; try our tool to get a finished design project.
Requirements for a ladder
This simple device consists of simple parts. Each of them has its own name. There are only 2 components:
- Crossbar. We rest our feet on it when going up or down. It's called a step.
- Long bars. The steps are attached to them. In professional slang they are called “strings”.
It is important to remember that you need to climb such a ladder holding on to the strings, and not to the steps. A person who climbs a ladder and holds on to the strings has a better chance of not falling down in an emergency, for example, a sudden breakdown of one of the steps.
A number of requirements are put forward for the stairs: in terms of materials, design and safety. Let's take a closer look at each of them.
Materials
Materials must be of good quality, without visible defects. It is better to purchase them in specialized stores with good reviews. In this case, it is necessary to take into account the requirements for materials:
- Strength. The strings and steps of the stairs must be “hardy”. They can easily withstand weight up to 120 kg.
- Wood. Parts of the stairs are made of pine. As an exception, you can make steps from hardwood - ash, oak, beech, birch.
- Fiber inclination. You cannot choose wood for work with a grain slope of less than 7%.
- Wood structure. When purchasing material, you need to check whether there are any defects in the wood. Curls, cracks, knots, resin pockets - all these flaws impair the strength characteristics of the finished product. Check the bowstrings: they should not have core tubes.
- External processing. The surface of the wood must be smooth, sanded, without chips or irregularities.
It must be remembered that the staircase elements must be made from solid parts of wood. A possible option is laminated veneer lumber - planks glued along the entire length. But when choosing, you should pay attention to the quality of such material. It should not delaminate or swell at the joints.
Design
A high-quality step ladder meets 100% safety parameters. It is better to draw a layout of the future product on a sheet of paper in advance, calculating the height of the stairs, the width and height of the steps. The design requirements are as follows:
- Height. The maximum possible height of an extension ladder is 5 meters.
- Distance between steps. The optimal distance between the crossbars is 30-35 cm. The first step should be located at a distance of 40 cm from the floor.
- Section of steps. The minimum permissible cross-section of steps is 2x4 cm.
- Grooves. To fasten the crossbars, grooves are made on the bowstrings. Their sizes depend on the width of the steps. Every 2 meters, the steps must be additionally reinforced with tie bolts with a diameter of at least 8 mm.
Safety
Working on stairs always carries a risk of injury. To avoid them, you must follow safety precautions:
- All elements are recessed flush. There should be no protruding parts in the structure.
- If you plan to use the ladder for work on smooth surfaces, then the lower parts should be “dressed” in rubber “shoes” to prevent slipping.
- If used for gardening, the bowstrings at the bottom must be equipped with a frame with metal spikes. It will prevent the ladder from becoming unstable on the ground.
- When it is planned to install the ladder at an angle of more than 75° or there is a need to hook it to the pipes at the top, it is equipped with removable hooks on top. They will prevent the structure from slipping or tipping over.
DIY installation of balusters and railings
Assembling the staircase railing is the last and one of the most important stages of installation. Durable railings ensure safe operation of the structure; they must protect people from accidental falls and must withstand the weight of people when leaning on them.
To achieve this effect, there are certain recommendations that determine the most optimal location of the balusters. For example, the clearance between the columns should be in the range of 15-20 cm; this does not make the structure much heavier, but prevents a child from falling from the second floor. It is also recommended to maintain the height of the handrail at 90-110 cm, since this is the most optimal value that will be convenient for the average person to support.
Methods of fastening balusters
To ensure that the railings are safe, stand firmly and do not wobble during use, several proven methods of attaching balusters are used:
- metal studs;
- metal platforms;
- dowels;
- self-tapping screws
Steel studs
Steel studs are one of the most popular fastening methods, as they provide the greatest strength of the connection. Experienced specialists recommend using studs when installing support balusters.
Based on the type of rod, they are divided into smooth and threaded.
In the first case, to create a strong connection, you need to drill a hole in the baluster at least 4 cm deep, add some liquid nails, carefully hammer in the existing pin and wait until the glue dries completely. After this, you need to make a similar cavity in the floor surface, also lubricate it with glue and connect the parts.
In the second case, you will also need to make a hole, but with a diameter 0.5-1 mm smaller than the diameter of the pin so that the wood does not crack when twisted. You can screw the rod into the support post using a lock nut.
It is also worth noting that mounting the structure on studs is only possible when the elements are placed perpendicularly, so it is impossible to use this method for a bowstring.
Metal platforms
Metal platforms are a fairly modern type of connection, which also allows you to completely hide all fastening elements.
The principle of operation of the mechanism is extremely simple - there is a steel platform in the shape of a lock, with four fastenings for self-tapping screws around the perimeter. In the middle there is a widened hole into which the bolt head is inserted, and a narrower elongated hole has a beveled side on the inside. Thus, by driving the head of the fastener inward and hammering it to the far side, we obtain a strong locking connection.
A fence completely installed in this way cannot be moved after all the supporting columns have been installed, but individual elements can be easily replaced if broken if you tap a mallet in the direction of the lock extension.
The main disadvantage of this connection is its applicability only in the horizontal plane - for a beveled march, it is necessary to use other types of fastening.
Wooden dowels
Dowels are cylindrical fastening products in the form of a short rod, most often made of wood.
They are used for fastening intermediate fencing elements or in cases where a threaded connection cannot be used, for example, on beveled surfaces.
The installation method is similar to installing smooth studs - first, a hole equal to half the length of the dowel is drilled in the end of the baluster, then it is filled with wood glue, and only then a wooden rod is installed there. After one connection has acquired the necessary strength, the pole is attached to the stairs.
The disadvantage of this type of fastener is the inseparability of the resulting assembly and, as a result, possible damage to adjacent structural elements during dismantling.
Pros and cons of wooden stairs
When listing the benefits of wood, it is worth starting with the fact that it is an environmentally friendly natural material. The second most important advantage is the ease of self-assembly. Wood is also easier to process than other materials and does not require a lot of additional means - varnish and paint will be enough.
The disadvantages of wood materials include its tendency to rot, as well as cost. Assembling a durable wooden staircase to the second floor with your own hands will require purchasing high-quality wood, which will not be cheap. In addition, after some time, even the highest quality wood will begin to dry out and make creaking sounds.
Also, the wooden product is too sensitive to the environment. A room with low air humidity and a stable temperature is best suited for its operation and storage. However, with proper care and proper use, the product can last a long time.