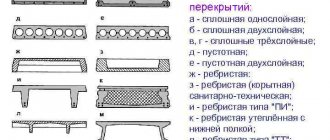
Types of floor slabs
Before you start installing a horizontal structure, you need to select a type. Reinforced concrete prefabricated structures are produced in the form of:
- multi-hollow;
- flat (PT);
- tent panels with ribs located along the perimeter;
- with longitudinal ribs.
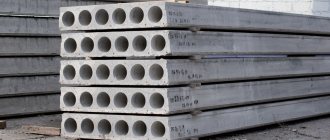
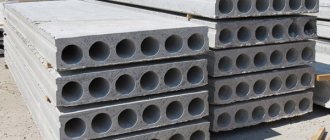
Most often they choose to use reinforced concrete hollow-core ones . They are available in two types, depending on the manufacturing method:
- round hollow (PC);
- continuous molding (CB).
Diagram of a hollow-core floor slab with holes
Round-hollow slabs are time-tested products that have been used in construction for several decades. Many regulatory documents and installation rules have been developed for them. Thickness – 220 mm. Products are installed according to serial sizes, which creates inconvenience during individual construction.
The manufacturing technology of these slabs involves the use of reusable molds for pouring, and before manufacturing non-standard products, you will first need to prepare the formwork. Therefore, the cost of the required size can increase significantly. Typical PC slabs have a length from 2.7 to 9 meters in increments of 0.3 m.
Scheme of reinforced concrete products with dimensions
The width of reinforced concrete products can be:
- 1.0 m;
- 1.2 m;
- 1.5 m;
- 1.8 m.
Structures with a width of 1.8 m are purchased extremely rarely, since due to their large weight the installation process in the design position is greatly complicated.
PBs are used in almost the same way as the previous type. But their manufacturing technology allows you to give the product any length. Thickness – 220 mm. The width is the same as the PC series. The disadvantage is little experience in use and poor regulatory documentation.
Flat PTs are often purchased as additional elements for hollow-core slabs. They are available in thicknesses of 80 or 120 mm and are smaller in size, allowing them to cover narrow corridors, storage rooms, and bathrooms.
How to lay and secure?
The method of fastening depends on the type of base and fastening element. Typically used as a base :
- concrete screed;
- underlying layer;
- frame made of wooden blocks;
- frame made of steel or aluminum profile.
The following is used as a fastening element :
- glue;
- self-tapping screws;
- dowel-nails and anchor bolts;
- clamps and nails.
Concrete screed
When laying tongue -and-groove slabs on a concrete screed, the method of fastening depends on the characteristics of the screed itself, that is, its horizontalness and evenness.
If the screed allows the material to be laid directly on it, then most often various adhesives are used for fastening , both bitumen and polyurethane based.
Where a high vertical or horizontal load is expected, the glue is duplicated with dowels and nails . If you need to ensure reliable fastening of the slab as a whole, but problems are possible at the edges, or you need to do all the work very quickly, then dowel nails are immediately used instead of glue.
However, this method of fastening often leads to the fact that the underlying layer begins to wander around the edges if there are defects on the screed. Moreover, defects can appear if water is spilled on the floor and it penetrates through all the layers and reaches the concrete.
Under the influence of water, concrete stone loses its strength and becomes loose.
Therefore, it is advisable to use glue and dowel-nails, and it is necessary to coat with glue both the screed and the back side of each slab, as well as the grooves of the tongue and groove connection .
In addition, the glue will play the role of additional waterproofing and prevent the cement stone from getting wet.
If the concrete screed is not suitable for laying the underlying layer or subfloor, then either self-leveling mixtures are poured, or a frame is mounted, to which the slabs are then attached.
In the first case, after the mixture has completely hardened and gained strength, the finishing material is attached as described above. In the second case, methods are used that will be discussed below.
Substrate
When laying the finishing coating on the underlying layer, either the technology of creating a floating floor is used, or it is fixed with glue . Compositions based on bitumen or polyurethane are used as glue.
The exception is the underlying layer of wood or plywood, because these materials hold screws well, which is why they secure the finishing coating with screws.
The essence of the floating floor technology is that the sheets are laid without fixation, due to which they can in a small space limited by walls and other slabs under the influence of temperature deformation and various loads .
As the temperature increases, each finishing element also increases in size.
However, thanks to thermal gaps, there is no overstressing of the material, as happens with rigid fixation.
After all, the coefficient of thermal expansion of the finishing coating, glue and underlying layer is different, and the temperature affecting them is also different.
The disadvantage of this installation method is the unpredictability of the behavior of the finish if the thermal gap is chosen incorrectly .
After all, only the outer elements pressed by the baseboard are fixed, so there is always a possibility that when the temperature in the room drops and there is intense movement through it, all the finishing elements will gather in one direction, causing a large gap to appear on the other side.
Frame made of steel or aluminum profile
The method of attachment to such a base depends on the type of finish of the slab and the shape of the tip of the screw. Laminated elements are secured using clamps, drilling holes in the profile for self-tapping screws.
The polished elements are secured from the outside using simple or drill screws. For the former you need to drill a hole of a suitable diameter, while the latter do it yourself.
The method of fastening parts to other front surfaces depends on the ability to hide traces of the installation of self-tapping screws .
If this is impossible or too difficult, then clamps are used. If possible, they are attached to the profile through the body of the slab. The same method is used if the reliability of fastening is more important than the appearance of the coating.
Frame made of wooden blocks
To attach to such a frame, clamps are used , which are inserted into the groove and nailed or screwed to the block.
However, due to the design features, clamps cannot be used for fastening GSP .
The laying of the remaining materials begins from the corner, turning towards both adjacent walls with ridges.
After this, the material is attached to the bars at the level of the plinth with nails or self-tapping screws, so that the plinth will then hide the fasteners. Having exposed the slab, it is secured using clamps, after which another slab is laid, its ridge is inserted into the groove of the previous one and also secured to the bars with clamps.
If for some reason it is impossible to use clamps, then the finishing material is attached to the bars with self-tapping screws .
How to plant with glue?
Glue mounting is used when laying slabs on the floor; it is not suitable for mounting on walls. sheets for glue mounting , except those on both sides:
- painted;
- varnished;
- laminated.
The choice of adhesive depends on the type of slab and base material. For gluing chipboard, MDF and OSB to a concrete surface, adhesives based on :
- polyurethane;
- polyvinyl acetate (PVA)
- bitumen
For gluing the same materials to wood, polyvinyl acetate gives the best results.
To glue folded gypsum boards to wood, it is advisable to use PVA, and to concrete you can glue them with any type of glue, although PVA also gives the best results.
Polyurethane
Polyurethane adhesives come in water-soluble and gel forms . Water-soluble ones are easier to work with, but provide less reliable fixation.
Gels are much more difficult to work with, but they provide more reliable fixation. Both types of glue are incompatible with each other .
However, the preparatory measures for their use are the same - you need to:
- clear the room of all objects;
- vacuum the floor using a construction vacuum cleaner;
- wipe the floor with a damp cloth;
- dry for 2–3 days.
You need to bring the slabs into the prepared room one at a time.
They are marked on the reverse side , after which they are laid on the floor without glue to determine which finishing materials need to be shortened, as well as where and exactly how much needs to be trimmed.
The size of the thermal gap depends on the conditions in the room . Then all materials are taken out of the room, cut according to the markings and the back side of each slab is treated with coarse sandpaper to increase adhesion, and the room where the slabs will be laid is vacuumed again.
Tools
To work with water-soluble glue you will need :
- drill or hammer drill with a nozzle for mixing the solution;
- Master OK;
- notched spatula.
To work with ready-made glue, you will need a hard paint brush . For any type of glue you will need a laser level , because without it it will be difficult to position the finishing materials correctly. The first slab is placed vertically next to its place so that it lies strictly along the laying line.
Instructions for working with water-soluble glue
Water-soluble adhesive is applied only to the flooring using a notched trowel, the optimal layer thickness is 3–5 mm.
Then the slab is placed in place and lightly moved in different directions to distribute the glue more evenly.
Then they are aligned strictly along the lines of the laser level and carefully pressed over the entire surface.
If you are laying thin finishing material, then on top of it and walk on it for 1-2 minutes to evenly press the finishing to the floor over the entire area.
Then glue is applied to the area from the side of one of the tongue grooves, and the ridge of the next slab is coated with PVA , after which the slab is placed with the ridge on the protruding part of the groove of the previous slab.
If both protruding parts of the tongue groove are the same in size, then the slab is placed on the mortar close to the one already laid and pressed down as well as the previous one.
After that, placing a wooden block in the groove, carefully strike the two slabs with a hammer. If the PVA from the tongue comes to the surface, then the glue droplets should be carefully blotted with a clean rag, then wiped along the joint, first with a wet and then with a dry rag. All other finishing elements are laid according to the same principle.
Procedure for working with gels
Laying on adhesive gel is used only for finishing materials of small size, in which the length of any side does not exceed the thickness by more than 50 times. That is, for a thickness of 9 mm, the maximum length of any side will be 45 cm.
the glue with a brush to the back side of the finishing material and set it aside for 5 minutes.
After 5 minutes, glue is applied to the floor and, after waiting another 2-3 minutes, the slab is laid and carefully pressed to the floor.
Then they also prepare a place for the second slab and its reverse surface.
Then they insert the comb into the groove of the first one, after which they gradually lower it and push it deeper and deeper into the already laid one.
When 2–3 cm remains from the edge of the second slab to the floor, pieces of wood are placed against its edge and sunk as much as possible into the first slab, after which they are laid on the floor and carefully pressed. All other finishing elements are laid according to the same principle.
PVA
PVA glue is used only for gluing sanded and unsanded surfaces to wood, gypsum and concrete screed , so it cannot be used to glue slabs that have a reverse side:
- painted;
- varnished;
- laminated.
Preparatory activities and markings are carried out in the same way as described in the previous section, including the use of a laser level. Then the floor is primed with a mixture of glue and water in a 1:1 ratio and left to dry for 48 hours.
If possible, you need to prime and dry the back surface of the slabs, this will increase the strength of the adhesive joint.
Then the glue is applied in a thin layer to :
- a section of the floor slightly larger in size than the finishing material;
- back side of the plate;
- tongue ridge.
The slab coated with glue is placed in place, slightly moved in different directions (it is acceptable to turn slightly in place) to distribute the glue evenly, and aligned along the lines of the laser level.
Then they cover it with a sheet of thick plywood and spread the loads evenly . You can use bricks as weights - 2-4 pieces per 1 m2, evenly distributing them over the entire area.
The setting time of the glue is 24 hours , after which you can remove the placed load and plywood.
Immediately after laying the first slab, the next slab is smeared and laid next to it, after which, substituting wooden blocks, its ridge is inserted into the groove of the previous one with light blows of a hammer. The remaining finishing elements are laid according to the same principle.
Bitumen adhesives
Bitumen adhesives are available for hot and cold applications . The former provide more reliable fastening of finishing elements, so they are even used for laying parquet. The latter are much easier to use, although they provide less reliable fixation.
Moreover, both compositions are completely interchangeable , because they differ only in thickness.
Therefore, we recommend diluting the glue (mastic) for hot styling with a suitable solvent.
This will slightly reduce the fastening strength, but for slabs whose smaller side exceeds 40 cm, this is not significant.
Preparatory measures are carried out in the same way as described above, after which the floor is primed with cold-applied mastic, diluted with a suitable solvent in a ratio of 3:5 .
The drying time for the soil is 1-3 days , depending on the type of solvent, while the vents, and if possible, the windows, should be constantly open .
Then the floor and the reverse side of the finish are smeared with cold applied mastic (the tongue ridge is not smeared), after which the slab is laid strictly along the lines of the laser level.
It is not necessary to move the slab; with this application, the mastic itself will be evenly distributed . In addition, the movement of the slab can disrupt the integrity of the soil, causing the installation strength of the entire floor to suffer.
Once the slab has been laid, a sheet of plywood is placed on it with the same weight as described in the previous section. The setting time of the glue is 2-3 days , while windows and vents must be open. Immediately after laying one finishing element, the next one is laid according to the same principle.
When working with bitumen-based adhesive, be sure to open all windows and not smoke. After all, solvent vapors are not only poisonous, but also very flammable, and at high concentrations they are explosive.
Fastening with self-tapping screws
When choosing self-tapping screws, it is necessary to take into account the base material . Self-tapping screws for wood are distinguished by larger threads (a pitch of approximately 2 mm, versus 1 mm for metal screws).
Despite the fact that there are drilling screws, we recommend using regular ones , adding a drill with a drill of a suitable diameter to a screwdriver with a Phillips head.
This will not only reduce the time it takes to install each self-tapping screw, but will also simplify the entire installation. Reducing the time it takes to install one screw will be especially important in cases where you have to attach heavy slabs to the ceiling.
In addition, you will need a drill for countersinking holes , which it is also advisable to install in a separate drill to avoid constant rearrangement of drills, which significantly increases the overall operating time.
Installation Features
Fastening with self-tapping screws through the body of the slab is used when laying sanded and unsanded materials on a solid wooden base and a frame made of wooden slats and a metal profile or on logs.
Also, the edge slabs with a painted, varnished or laminated surface are fastened with self-tapping screws at the location where the skirting boards will be installed.
After aligning the finishing element using a laser level or lines drawn on the floor/frame, determine the location for the screw and first drill a hole with a diameter of ½ outer diameter of the thread .
The depth of the hole depends on the type of base. For wood, it should be half the depth into the base.
That is, with a plate thickness of 15 mm and a self-tapping screw length of 50 mm, the hole depth is 32 mm. For metal, the depth should be 3–5 mm greater than the thickness of the plate.
Having drilled a hole , take a second drill and countersink a seat for the head . The diameter of the hole should be ¼ greater than the diameter of the cap, and the depth should be sufficient so that the cap goes 1 mm below the surface of the slab. Then a self-tapping screw is inserted into the hole and tightened using a screwdriver.
Selection of self-tapping screws and putty of mounting holes
To attach the trim to the floor and walls, you can use hardened (black) self-tapping screws , but for ceiling mounting you need white or yellow self-tapping screws . Black self-tapping screws are very fragile, so they can break off during tightening.
In addition, when attaching slabs to the floor and walls, it is necessary to tighten the self-tapping screws until the trim is pressed to the base and not overtighten them, but when attaching to the ceiling, it is necessary to tighten them with a force of 30–40 newtons.
After installing all the screws, the holes for the cap need to be filled with putty . On sanded and unsanded boards, a mixture of sawdust and PVA is suitable for this; on painted, varnished or laminated boards - acrylic or polyurethane putty.
Moreover, it is necessary to putty so that after the material hardens, it does not protrude above the surface of the slab or its coating.
How to attach to dowel-nails and anchor bolts?
This method of fastening is used only for installing tongue-and-groove slabs to a concrete surface when it is impossible to use an adhesive connection or its low efficiency.
Dowel nails are suitable for fixing finishing material of any thickness to the concrete floor from the floor side and for fixing materials with a density of 500–850 kg/m3 and a thickness of 8–10 mm to the ceiling .
Thicker or denser material needs to be secured to the ceiling using anchor bolts only , but working with them poses a problem. To bury the bolt head into the slab, it is necessary to make a round-shaped seat with a flat bottom parallel to the surface.
Procedure for fastening to dowel-nails
After installing the plate in place, a hole is drilled in it , the diameter of which is equal to the diameter of the plastic dowel. For drilling chipboard, OSB and MDF, use ordinary metal drills.
To drill GSP, you need metal drills with carbide tips (not to be confused with Pobedit drills for concrete). Then take a hammer drill with a concrete drill (the same diameter) and drill a hole, the depth of which is equal to the length of the threaded nail from head to tip plus 5 mm.
Having drilled the holes, pull the nail out of the dowel and cut off the head of the latter , that is, the extension under the head of the nail. After that, first a dowel without a head is inserted into the hole, then a nail.
The inserted nail is driven in so that it touches the slab and presses it slightly. In the same way, you need to install dowel nails along the edges of the slab, after which countersinking of the holes for the nail head is added to this procedure. It is performed in the same way as described in the previous sections.
After installing all the dowel-nails, unscrew the screw nails that were hammered along the edges, countersink the holes for them and re-hammer them . If you have an additional drill or hammer drill, you can countersink the holes right away.
Guidelines for installing anchor bolts
To install an anchor bolt, a small recess is drilled in the slab , the diameter of which is 3–5 mm larger than the diameter of the bolt head, and the depth is equal to the thickness of the head plus 3 mm.
Next, a hole is drilled along the diameter of the anchor bolt cage using metal drills, after which a hole is drilled in the concrete using a Pobedit drill.
The diameter of the hole should correspond to the diameter of the holder, and the depth should be the length of the anchor bolt plus 1 cm. All this time, the plate should remain motionless.
Once the hole is drilled, the frame anchor is inserted into it (other types of anchor bolts are not suitable for installing tongue and groove slabs due to the irregular shape of the bolt or inappropriate fixation method).
When the anchor has entered all the way, it is slightly deepened through a suitable spacer with hammer blows and begins to be tightened until it attaches the trim to the ceiling, and the tightening force reaches 20–30 Newtons.
After this, the bolt is tightened using a wrench and a cross-shaped nozzle until the force reaches 60–80 newtons. All other bolts are installed using the same algorithm.
Laying panels using clamps and nails
This fastening method is suitable for installing tongue-and-groove slabs on a sub-layer of :
- wood;
- plywood;
- OSB,
as well as a frame made of wooden blocks.
The clamps must fully correspond to the finishing material and be supplied complete with it.
If you take separate slabs and separate clamps, then there is a high probability that they will not fit and the finish will become brittle.
In most cases, clamps are fastened using nails, but there are models that can be fastened using hardened self-tapping screws, so they can even be attached to a metal profile.
Using clamps, the finish is attached to the floor and walls. When laying the finish on the floor, perform all the preparatory measures that are described in the previous sections.
By the way, this method is not suitable for fastening to the ceiling , because the clamps are not designed for load and only hold the finishing material.
When laying on the walls, it is enough to clear the room of clutter and dirt. Then the configuration of the slabs is determined and marked on the reverse side. If some slabs require cutting, then this is done as prescribed for finishing materials of this type, that is:
- Chipboard, MDF and OSB are cut using a circular saw or jigsaw with a standard cutting tool;
- GSP is cut using a circular saw with a diamond or carbide disk installed on it, or with an electric jigsaw with a ceramic file.
Laying begins from the corner along the markings or laser level lines . The end plate is secured with self-tapping screws at the location where the plinth will be installed. When attaching to the wall, I use self-tapping screws (if you plan to install a corner) or nails with bitten heads, and fasten the material from the corner side, turning it towards it with the ridge of the tongue.
When driving nails, care must be taken not to damage the material, as well as sink the nail to a depth of 2-3 mm and cover the hole putty of a matching color .
Having attached the finishing material from the ridge side, insert the clamp into the groove until it stops and nail it with a nail 20–30 mm long to the block or underlying layer.
If fastening with self-tapping screws is provided, then screw in a self-tapping screw of suitable size. Claymers are placed on each block, and on the underlying layer the distance between them is 50–80 cm.
Having attached one panel or slab, the ridge of the next one is inserted into its groove and also secured with clamps. If it is impossible to install clamps in the corner, then the material is secured with self-tapping screws or nails without heads, depending on whether a decorative corner will be installed over the corner of the walls.
Supporting the slabs
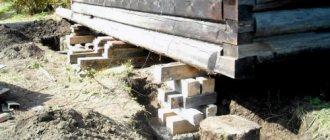
The laying of floor slabs is carried out after the preparation of the project or diagram on which the products are laid out. Floor elements must be selected so that they are sufficiently supported on a brick wall or expanded clay concrete blocks and laid without gaps in width.
The minimum support for the PB and PC series depends on their length:
- products up to 4 m long – 70 mm;
- products longer than 4 m – 90 mm.
A visual diagram of how to correctly and incorrectly support floor slabs.
Most often, designers and constructors accept the optimal value of support on the wall as 120 mm. This value guarantees reliability even with small deviations during installation.
It would be correct to pre-position the load-bearing walls of the house at such a distance that it would be easy to lay the slabs. The distance between the walls is calculated as follows: the length of standard slabs minus 240 mm. The PC and PB series must be laid with support on two short sides without intermediate supports. For example, PC 45.15 has a size of 4.48 m, 24 cm is subtracted from it. It turns out that the distance between the walls should be 4.24 m. In this case, the products will lie with the optimal amount of support.
The minimum support of PT series products on the wall is 80 cm. Installation of such reinforced concrete slabs is possible with support points located on all sides.
The support must not interfere with the passage of ventilation ducts. The optimal thickness of the load-bearing internal brick wall is 380 mm. 120 mm on each side goes under the reinforced concrete floor, and 140 mm remains in the middle - the standard width of the ventilation duct. In this case, it is necessary to lay it as correctly as possible. Shifting the product towards the ventilation hole will lead to a decrease in its cross-section and insufficient ventilation of the premises.
Summarizing what was said:
- PC and PB series up to 4 m are supported on both sides by at least 7 cm;
- PC and PB series more than 4 m - not less than 9 cm;
- PT series – at least 8 cm on two, three or four sides.
Floor mounting
The floor can be made using joists or a subfloor. Another option is using expanded clay. The backfill can also be another thermal insulation material that can withstand the required loads.
Correct installation
By lags
To install a floor along joists, you need to lay a layer of waterproofing underneath them. You can use any waterproofing material, even polyethylene film, but it’s better to use something more durable and modern. Lay the strips overlapping one another by at least 10-15 cm. It is advisable to glue the joints with mastic or double-sided tape. One more point: the waterproofing is applied to the walls and secured. It should be no lower than the subfloor.
The logs are made from timber with a thickness of at least 50 mm. The installation step depends on the thickness of the tongue-and-groove chipboard used. For slabs with a thickness of 16 mm, the recommended pitch is 305 mm, for 22 mm - 610 mm. That's right - so that the junction of the two slabs falls on the timber.
Logs need to be installed often
If it is necessary to simultaneously improve heat and sound insulation, the space between the joists is filled with materials with suitable characteristics. Next, you can lay tongue-and-groove chipboards. Place them with the long side perpendicular to the joists (across the joists).
There is another option that allows you to save on timber for the logs: make the installation step of the logs larger, lay the subfloor over them, and lay tongue-and-groove chipboards on top. But the surface of the subfloor should not have significant protrusions. Otherwise, the slabs will not lie down and will sway.
If the logs are already installed with a larger pitch than recommended, the manufacturer recommends laying the sheathing with the required pitch, using a board no narrower than 25 mm (see video below).
For expanded clay
You can also lay tongue-and-groove chipboard on expanded clay. This method is not as warm as the previous one. Modern thermal insulation materials better protect against the penetration of cold. But a floating floor on expanded clay is much cheaper. Only you must be sure that your floor will be dry. Otherwise, despite its water resistance, the material may swell and lose its properties.
Floating flooring on expanded clay
Work begins in the same way as when installing a floor along joists: we spread and secure waterproofing to the walls. Next, expanded clay chips with a fraction of no more than 5 mm are poured and leveled. Another layer of waterproofing is placed on the expanded clay. When laying, one strip is inserted onto the other by at least 20 cm and glued well. Chipboard with the selected groove and tongue can be laid on this substrate.
On concrete
If it is necessary to insulate or level a concrete floor, this can be done using tongue-and-groove chipboard. According to the manufacturer's recommendations, the slabs must be laid on a level base. To do this, too large protrusions must be cut off and significant depressions must be covered. If the unevenness is too global, it is better to fill it with a self-leveling concrete or polymer composition. After it dries, the tongue-and-groove chipboard will lie down without any problems.
On a flat concrete base
If there are irregularities, but they are not global - up to 5 mm per meter - you can lay a thicker laminate underlay under the tongue-and-groove slabs. You can use other similar foam material. If you want to improve the thermal insulation characteristics at the same time, it can be foil material (foil towards the room) or polystyrene foam - high-density polyurethane foam (at least 350 g/m³). You can now lay slabs on top.
Rules for laying and fixing
The slabs are laid crosswise on the joists: the long side is perpendicular to the joists. Begin installation from the wall farthest from the entrance. A gap of 8-10 mm should be left from the walls. It is needed to prevent impact noise from being transmitted through building materials. To maintain this gap, spacers of the required size are installed between the wall and the slab, and the slab is rested against them. After installation is completed, the gaskets are removed.
Don’t forget about the gap from the wall - otherwise the impact noise will be too “loud” to hear
Location rules
The slabs are laid with the tenon towards themselves. First they lay out a row along the wall, then move on to the second. At the beginning of the second row, you can use a scrap from the last slab from the first row. If there is no trim or it is too small, start the second row from half - this way the seams will avoid matching. The next row begins with a whole slab or with a trim of a different size - vertical joints must be spaced at least 30 cm apart .
It is necessary to ensure that the vertical seams do not coincide
Before joining the plates, the groove (this is more convenient) is coated with PVA glue. Applying with a brush each time is inconvenient and takes a long time. It’s easier if the glue is poured into a bottle with a long spout. The groove of another plate is inserted into the tenon lubricated with glue. To achieve a minimum gap, you can use a rubber mallet and a chip with a tenon from some kind of board. This scrap is inserted into the installed slab, knocked on it with a mallet, adjusting the slabs tightly. Having achieved the desired position, take self-tapping screws, a screwdriver and fix the installed sheet. Self-tapping screws are screwed in around the perimeter in increments of 15-20 cm, inside along the joists the installation increment of self-tapping screws is 25-30 cm. So, gradually, the tongue-and-groove chipboard flooring is installed.
Some little things
It is better to take black “wood” screws with a large flat head. To ensure a smooth surface, holes with a slightly larger diameter than the caps are drilled under the caps before installation (countersinked). After tightening the screws, the recesses are covered with wood putty. After drying, use fine-grain sandpaper to completely level the surface.
It is necessary to maintain a gap from all walls
To ensure complete tightness, the seams can be sealed with a compound that is used to seal ceramic tile seams.
Slab storage
Schemes for storing products of different types
After the scheme has been developed and the products have been purchased, they need to be placed on the building site for convenient installation in the design position. There are rules for storing materials:
- elements must be laid under a canopy;
- the storage location must be located within the access area of the crane;
- Pads are provided for support points.
Failure to comply with the last rule will result in a break in half. PC, PB and PT products work in such a way that the appearance of intermediate supports or a solid base leads to the appearance of cracks. Laying is done in the following order:
- wooden blocks or boards are laid on the ground under the edges of the slab;
- I transfer the ceiling element onto the boards using a crane from the machine;
- boards or bars are placed again on the laid slab;
- unload the second slab from the machine;
- repeat points 3 and 4, maximum storage height is 2.5 m.
Correct support of the slabs
We have already described above how to lay slabs on different materials. However, it should also be recalled that designers must specify a standard value when drawing up the technical plan. This value should be 12 cm.
As a rule, in the process of designing the construction of load-bearing structures, designers start from the length of the floor slabs and subtract 24 cm from it, which is equal to the depth of the supports on both sides. The result of this work is the correct amount of emphasis.
Masonry requirements
Calculation diagram for floor slabs
In order to correctly install floor slabs, it is necessary to ensure that the special requirements for a brick wall are met:
- evenness of the masonry in the place where the floors are laid;
- laying in three rows until overlapping reinforcing mesh with a cell of 5 by 5 cm made of wire with a diameter of 3-4 mm;
- The top row of the frets on the inside should be bonded.
If the slabs are mounted on expanded clay concrete blocks, an additional monolithic belt is installed under the floors. This design will help to evenly distribute the load from heavy floors onto expanded clay concrete blocks with less strength. The construction technology involves pouring a monolithic concrete strip 15-20 cm thick onto the blocks.
Installation of slabs - difficulties encountered
If the rules for transporting and storing panels are violated, unforeseen situations associated with the formation of cracks may occur.
The following recommendations will help prevent cracking:
- store reinforced concrete products on a level surface;
- install wooden spacers of equal thickness between the slabs;
- place the bars strictly vertically;
- Do not allow the hollow core slabs to touch.
In case of minor defects and small cracks, it is allowed to install panels in unloaded areas with sealing of cracks with cement mortar. Slabs with through cracks must be cut into separate pieces and used as short sections.
Laying floors
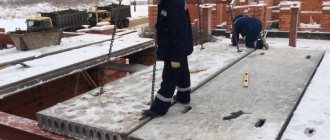
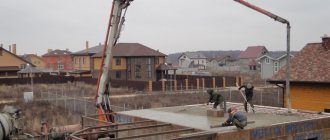
To carry out the work, a minimum of three people will be required: one performs the slinging, and two install them in the design position. If the installers and the crane operator cannot see each other, when installing the slab, another worker will be needed to give commands to the crane.
Scheme of laying reinforced concrete products
Fastening to the crane hook is carried out with a four-branch sling, the branches of which are secured at the corners of the slab. Two people stand on both sides of the support and control its evenness.
When installing a PC, pinching into the wall is carried out in a rigid way, that is, bricks or blocks are laid on both the top and bottom of the slab. When using PB series floors, it is recommended to use hinged fastening. To do this, the slabs are not pinched from above. Many builders install the PB series in the same way as PCs and buildings stand, but it’s not worth the risk, because human life and health depend on the quality of the installation of load-bearing structures.
Another important feature of the use of products from the PB series is that it is prohibited to make technological holes in them.
These punches are needed for heating, water supply and sewerage pipes. Again, many builders, even when constructing multi-story buildings, neglect this. The difficulty is that the behavior of this type of floor under load over time has not been fully studied, since there are no objects built quite a long time ago. The ban on punching holes has reasons, but it is rather preventive.
Product types
Seamed and tongue-and-groove products are one of the options for source materials.
However, in stores, tongue and groove slabs are positioned as a separate class of structural and finishing materials.
Therefore, we will talk about the differences that are inherent in these products.
They are divided according to the following parameters :
- sizes;
- purpose;
- type of front surface;
- water resistance class.
Dimensions
In size , tongue and groove products may correspond to standard slabs of their type, or they may be noticeably smaller.
It depends on the purpose - the parts for covering walls and partitions are made full-size, but the elements of a dry floor screed are usually much smaller.
Even less is the so-called laminate, that is, the finishing lining covered with a laminating wear-resistant film.
Purpose
The packaging of the plates indicates their purpose , that is:
- external decorative wall cladding;
- internal decorative cladding of walls and ceilings;
- subfloor layer;
- finishing floor covering.
Only those parts that are intended for internal cladding of walls and ceilings are interchangeable.
External cladding can be used for interior work, but its price is noticeably higher, but parts for interior work cannot be installed outside the house.
Elements of the underlying layer are deprived of decorative coating , so it makes no sense to use them for other work, just as it is undesirable to use parts intended for other applications as an underlying layer.
floor covering is protected by a high-strength film , and its cost is significantly higher than the price of material for other work, so it is used only for its intended purpose.
An attempt to lay cladding for another purpose on the floor will lead to the fact that within a month the pattern will be erased and the coating will take on an extremely unpresentable appearance.
Front surface type
The front side of most slabs is finished in various ways, but there are also parts without finishing. On the back of each part there should be a stamp with detailed information, including the type of front surface, which can be :
- polished;
- painted;
- varnished;
- laminated.
Polished parts are used to create an underlying layer, so this type of processing is only permissible for slabs for the appropriate purpose.
The painted surface is suitable for materials used for interior decoration of walls and ceilings.
The varnished and laminated surface of moisture-resistant boards is suitable for any application, except for creating an underlying layer.
Are they moisture resistant?
Like the original material, tongue-and-groove slabs can have 3 classes of water resistance :
- conventional (for dry rooms where humidity does not exceed 65%);
- waterproof (for rooms where humidity does not exceed 85%);
- weatherproof (which are not afraid of not only steam, but also rain).
These classes fully correspond to the classes of the source material, and information about them must be indicated on the back of the slab.
Special names
Often, seam plates are given their own names to distinguish them from the same material that does not have a seam. A striking example of this is “Quick Deck” series which are produced by Nevsky Laminate Plant LLC , which, by the way, has many positive reviews from builders and home owners.
Series includes :
- Quick Deck Plus is a decorated floor covering with increased strength and wear resistance.
- Quick Deck Master is a material with a durable waterproof film that can be removed after installation and all rough work.
- Quick Deck Professional is a moisture-resistant tongue-and-groove particleboard suitable for any job, so it can be used for ceilings, floors and walls, which is why this material has the highest price compared to the above.
Slab cutting
Sometimes, in order to install a slab, it is necessary to cut it. The technology involves working with a grinder and a disc on concrete. PC and PT slabs cannot be cut to length, since they have reinforced reinforcement in their support zones. If you support such a cut slab, then one edge will be weakened and serious cracks will appear along it. It is possible to cut PB slabs to length, this is due to the peculiarities of the manufacturing method. A timber or board is placed under the cut site, which will make the work easier.
Separation along the length is carried out along the weakened part of the section - the hole. This method is suitable for PC, but is not recommended for PB, since the width of the walls between the holes is too small.
After installation, the holes in the support areas on the walls are filled with lightweight concrete or filled with mineral wool. This is necessary to provide additional strength in areas where the walls are pinched.
Slab cutting
In some cases, it is impossible to lay a solid slab on the site or you simply need to make a technological hole for laying communications. It is in such cases that the technology of cutting reinforced concrete slabs is used. However, it is worth noting that cutting this type of product is an extremely traumatic undertaking. Plus, this leads to a deterioration in the quality of the slab, in particular, the declared strength. It is recommended to order this procedure from the manufacturer or professionals.
Naturally, situations arise when you need to cut a slab quickly and right on the spot; in this case, you need to stock up on a grinder for cutting concrete and an autogen for sawing reinforcement.
Be sure to follow the sequence of actions:
- Apply markings.
- Find a rigid substrate that matches the shape of the slab and place the slab on it.
- Make a cut along the previously drawn lines using a grinder.
- Knock out the cut material using a sledgehammer; you should start from the hollow areas, this will be easier.
- Cut the reinforcement very carefully with an autogen so that the metal does not lose its connection with the concrete.
- Next, you need to fill the voids in the slab with a solution with self-expansion property.