Hip roof
The roof of any house must necessarily perform a protective function.
And here there is no difference in what type of roof is used - in any case, it should not allow snow, water and cool air to pass through. Moreover, cost-effectiveness is also an important factor in this case. Among the roofs that are ready to provide this advantage is the hip roof. Or a hip roof, as it is also popularly called. Hip roof design
This type of roof consists of four slopes, two of which are arranged in the shape of a trapezoid, and two more slopes are installed in the form of triangles. There are also half-hip roofs, the design of which does not allow for the installation of a triangular slope so that it reaches the eaves or ridge. But that's a completely different story.
The difficulty in creating a hip roof lies in the fact that the rafter system is quite difficult to create. If you take into account other aspects, it is practically no different from ordinary pitched roofs.
Varieties (types and types) of hip roof
When studying the structure of the hip roof rafter system, it should be taken into account that within this type, there are several types of structures. In turn, this makes adjustments to the overall process of constructing the frame of the rafter system.
Classic hip roof
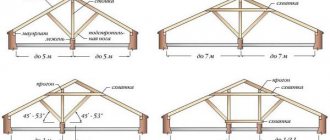
It is distinguished by the support of the diagonal ribs on the ridge support beam and the location of the overhangs at the same height. The individual elements of the hip roof correspond to a triangle (gables) and a trapezoid (slopes).
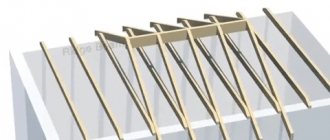
Diagram of the rafter system and the appearance of the hip roof (regular, standard)
Hip hip roof
It is distinguished by the absence of a ridge support beam. This leads to the fact that all the diagonal ribs converge at a single point, and ordinary short rafters are already adjacent to them. This type of roof is preferred if the house has a square frame. But forming a reliable ridge assembly is quite difficult.
Diagram of the rafter system and the appearance of the hipped hip roof
Half hip roof
It is distinguished by the presence of vertical gables in which windows can be installed. The picture shows the difference between two types of half-hip roofs (Dutch and Danish).
Diagram of the rafter system and the appearance of the Dutch hip roof
Diagram of the rafter system and the appearance of the Danish hip roof
Sloping hip roof or mansard hipped roof
The most complex design in terms of construction is the hip roof truss system, since in this case, all roof slopes have different areas and diverge at different angles. A sloping (attic) roof allows you to more rationally organize the internal roof space and, in addition to additional living space, give the house a spectacular appearance.
Diagram of the rafter system and the appearance of a sloping hip roof (mansard type)
Features of construction
The procedure for erecting a hip roof is conventionally divided into several important stages:
- drawing up project drawings;
- carrying out calculations;
- arrangement of the rafter system;
- hydro- and thermal insulation of the roof;
- carrying out roofing work.
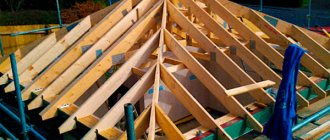
All hip roofs have a rafter system, which consists of rafter legs, frames, slanted rafters, and a truss truss.
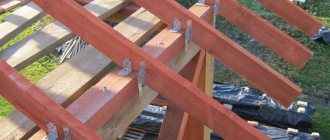
A truss truss is a timber or beam that is placed on the mauerlat of walls with an angular convergence. To prevent this beam from bending during operation, two additional struts are installed on it. During the construction of a private house, such a design does not require additional verification of all calculations. The beam or timber can have a size of 10x15 cm, racks 10x10 cm, and struts - 10x5 cm.
Narozhniks are often called rafter half-legs because they look like shortened rafters. They rest on slanted rafters.
The slanted rafters are directed to the corners of the end of the house from the ridge. They usually carry an increased load. Because of their peculiar arrangement, they are often called diagonal.
Hip roof rafters
Initially, you will have to make markings and make calculations for the hip roof. The ends of the mauelat must contain information about the direction in which the center line will run. The markings in this case are of great importance, since they are used as a guide for the skate. And only after this will it be possible to proceed to marking the installation location of the rafter legs.
Sloping rafters are created from two boards fastened together. It is important to make sure that these boards can easily withstand the load stated in the calculations. If there is a suspicion that the load will be too large, a special support board can be placed at the junction of the boards. It will serve as a protective agent if there is too much load on the roof.
If the span is covered by rafters for a length of up to seven meters, experts recommend installing one strut located at the top. If the span length is no more than seven meters, but not higher than nine, the lower part must necessarily contain a truss post (truss).
If you have a longer rafter, it is highly advisable to ensure that it has additional support. If the floor that makes up the hip roof contains a reinforced concrete slab, the support is placed directly on this floor. Otherwise, you will have to use an additional cross beam.
DIY hip roof step by step - video
The program shows the process of installing a rafter system for a gable hip roof with a central bay window along a short wall.
Once the rafter system is ready, you can begin installing the roofing covering, the specifics of its fastening determine the need to install the sheathing on the rafter legs.
Installation of a hip roof truss system is a long process that requires attention to every stage of the work - from calculation and selection of material, to installation of parts and strengthening of fastening points. But, if all stages are carried out correctly, the result will be a beautiful and reliable roof for a private home.
Tags:
Roof Rafters Hip roof
Installation of the rafter system
The main condition for a properly created hip roof is the unification of materials. That is, the design of a hip roof should not contain different materials.
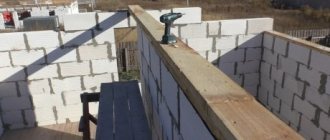
Before proceeding with the actual installation of the rafter system, the Mauerlat is attached along the upper edge of the walls.
Next, the central beam is laid. Please note - installation should be done as accurately as possible - according to the marks previously applied on all ends of the house. Racks for the ridge beam are attached directly to the central beam. They are secured with braces and stops. Installed racks must be strictly vertical. To control verticality, a plumb line and level are used.
The ridge beams are laid on the installed racks. Note that this is the most important stage. Its correct implementation will influence the further geometry of the entire roof without exception. The ridge beams must lie at an identical height from the floor of the house, maintaining a horizontal shape.
Having installed the ridge beam, you can proceed to the actual installation of the hip roof. The device consists of correctly fastening the remaining elements of the rafter system.
We build a hip roof
The roof of a building has many functions. From simple aesthetic to important protective. The roof must protect against temperature changes, precipitation and natural influences. Currently, the hip roof design is very common. It is characterized by a long service life, durability and various design options that can be adapted to a particular type of building. For example, in houses with attic rooms with a hip roof, attic windows can be easily installed. The hip roof is very aesthetically pleasing, economical and, despite all the labor intensity, is justified.
Installation of sloped rafters.
The accuracy of the installation of these parts has a direct impact on the appearance of the roof as a whole. Diagonal (sloping) rafters are fastened at one end to the mauerlat and the other to the ridge. A double bevel is created at the end of the ridge beam, and this is done in such a way that the planes of the beam and the planes of the bevels of the rafter system are identical. Please note that the calculation of the hip roof in this case should be ideal.
Then the intermediate parts of the rafter system are installed. The pitch of ordinary rafters depends on what type of roofing material the owner has chosen. The main condition for installation is the parallelism of the rafters relative to each other.
The flanges are installed to the diagonal rafters in different places. Each side should be parallel to the row rafters.
Having completed the installation of elements of the rafter system, you can begin further arrangement of the sheathing, installation of hydro- and thermal insulation materials, as well as installation of the hipped roof covering. A prerequisite is the treatment of wooden structural elements with special antiseptic and fire-fighting agents, which will increase the service life of the roof for many years. The sheathing should be laid in a perpendicular position relative to the rafters. It can be made either continuous or with small gaps. The choice of type of sheathing depends on the selection of roofing material.
Hip roof design
The construction of the hip roof frame is carried out according to the following method:
- The first step is to install the Mauerlat around the perimeter of the house. In addition to the Mauerlat, you need to install a transverse beam in the middle of the roof;
- Next, you need to install ridge girder posts on the cross beam. The racks should be set strictly vertically and then secured with braces;
- Next, the ridge girder is fixed on the racks using a level and plumb line. It is necessary to strictly maintain its location both in height and level. The entire geometry of the hip roof depends on the accuracy of the installation of the ridge girder. Therefore, this stage must be performed extremely carefully;
- The next stage in the construction of a rafter roof is the installation of slanted (corner) rafters. As a result, all four roof slopes are created, which means that the installation accuracy must be extremely high. so that all four roof slopes are planes without deviations, it is necessary to achieve equality in the lengths of the 4 slanted rafters;
- The slanted rafters are secured with the upper end to the ridge beam, and the lower end to the corners of the mauerlat. Fixation is carried out using special brackets and steel brackets. When installing slanted rafters, it is necessary to set the size of the overhang - the protrusion of the roof beyond the plane of the wall. The ideal overhang is approximately 40-50 centimeters, but in areas with powerful winds, an overhang of up to one meter is possible to protect the walls of buildings from precipitation;
- Next comes the installation of intermediate rafters. First, ordinary rafters are installed, which are secured both in the ridge girder and in the mauerlat. All ordinary rafters are mounted parallel to each other, and then secured with a notch and additionally secured with brackets. When installing a rafter system, it is necessary to carefully carry out complex components of the rafter system, in which several elements are joined at once. One of the most labor-intensive joints is the junction of the ridge, two central rafters, two diagonal rafters, and one hip rafter;
- To facilitate joining, trimming is performed on the ridge beam in the form of a double bevel. The most important thing is that the planes coincide with the planes of the bevels on the corresponding rafters;
- At the next stage, corner rafters (springs) are installed. It would be good if the flanges of the hip and main slopes would connect to the diagonal rafters in different places. Docking is carried out not only with the help of support (cranial) bars, but also with the help of a notch.
In this case, the hip roof extensions must be mounted parallel to the intermediate rafters. By and large, the production of rafters for a hip roof ends with the installation of the flanges. But in certain cases (especially if the roof has a large area), reinforcement of the roof may be necessary.
Roof terminology
What is coal
An iron ring placed on a pile to prevent splitting during driving. For a 6-inch pile, the weight of the ring is 6 lbs. For other pile sizes, the weight of the ring increases in accordance with the diameter. One ring can be used to drive 50 piles.
What is a Mauerlat
The Mauerlat is a wooden fastener (in the case of a metal rafter system, its role can be played by an I-beam or channel), which is laid on the top row of brickwork or armored belt, and it is tied to the wall as rigidly as possible.
This mount performs two main functions:
- Distribution of the concentrated load of the rafter legs evenly across the entire load-bearing wall of the building.
- Attaching the rafter system to the frame of the house.
What is a roof ridge
The ridge of the roof is formed by the closure of the planes of the slopes. Depending on the type of rafter structure, the ridge can be a beam mounted on special vertical posts or attached to the gables of the house. The rafter legs rest on the ridge beam (purlin) with their upper part.
What is a roof soffit
Soffits are panels with a polymer coating that are attached to the frame along the edge of the roof. Panels are made from materials such as aluminum, plastic and copper. When joining them, the locking method is used. This connection principle greatly facilitates the installation of soffits on the roof eaves. Moreover, it is possible to hide the fastenings.
We can say that soffits are essentially the same lining or siding, but are intended for decorating the ceiling.
What is a roof beam
Traditionally, wooden and reinforced concrete floors are used in houses. They represent a dividing plane between the floors of the building. Each of them is installed along the main load-bearing elements - floor beams. Their strength is very important. In addition to the load that the floor itself can withstand, the beams also take on the weight of the structure separating the floors itself.
What are roof trimmers
A shortened rafter leg that supports the section of the slope between the slanted rafter leg and the roof overhang
On hip roofs and roofs with valleys, it is necessary to install rafters directed towards the corners of the walls (external or internal). These rafter legs are called diagonal or slanted. Diagonal rafters are longer than usual, in addition, shortened rafters of the slopes (rafter half-legs), which are called narozhniki, rest on them.
Therefore, slanted rafters, as a rule, carry a load approximately one and a half times greater than conventional rafters. The length of the diagonal rafters exceeds the standard length of the boards, so the rafters are made paired. Pairing a slanted rafter leg solves three problems at once: firstly, a double cross-section is capable of bearing an increased load; secondly, joining the boards together allows you to get a long continuous beam; thirdly, pairing the rafters unifies the standard size of the parts used. Doubling the rafters allows you to use the same boards for installing slanted rafters as for conventional rafters. In other words, the use of boards of the same height for the manufacture of all types of rafters simplifies the design solutions of roof components.
What is a pediment
The roof gable is the upper part of the front facade of the structure, which is limited by the cornice and two roof slopes.
In addition to the aesthetic load, the gables also perform protective functions:
- Prevent rain and wind from entering the attic space. In this case, the roof should protrude 30-40 cm beyond the pediment.
- Evenly distributing the load from the roofs onto the load-bearing walls of houses, they serve as supports for roof truss systems.
The roof gable is greatly affected by the wind.
When drawing up a house project, you must consider the following:
- type of roofing used and local wind speed
- total height of the building above sea level
- specific features of the place where the building will be erected
- wind resistance characteristics of the building
However, when determining the parameters given above, you need to take into account that they may change depending on how the geometry of the house changes during the construction process.
What is a deadbolt
Crossbar (German Riegel - crossbar), in construction - a linear load-bearing element (solid or lattice) in the structures of buildings and structures. Connects racks, columns (frame crossbar); serves as a support for purlins, slabs (floor crossbars, coverings). Made from reinforced concrete, steel, wood.
Elements of the rafter system
Not only for a novice builder, but also for a professional, it can be difficult to understand the bill for materials, specifications or design when constructing a pitched roof. Incomprehensible to the average person, valley, mauerlat, filly, tongs, and other unfamiliar words can confuse or sow doubts about the sincerity of the order executor. To prevent this from happening, the article contains basic special concepts and definitions.
The basis of a pitched roof is the rafter system
in the form of a triangle. Why a triangle? This is the most rigid and economical design for this task.
Wood, timber and boards are used as materials for the rafter system in private construction. For more serious structures, the frame is made of metal. First of all, let's look at the main elements of the rafter system and find out why they are needed.
For example, a hip roof is taken, because... its design allows you to show the maximum elements of the rafter system.
Rafter
or
the rafter leg
takes on the main load of the roofing and snow with the wind. This load goes to the Mauerlat, which in turn transfers it to the load-bearing walls. The greater the load, the more often the rafters need to be installed.
Diagonal rafters
(sloping legs) are used in hip roofs and are installed in the amount of 4 pieces. The lower part of the boards rests on the corners of the house, the upper parts converge to the ends of the ridge girder.
Ridge run
- This is the top of the roof truss structure and the basis for the ridge. The beam is made from a wide-section log or two boards with a thickness of 50 mm or more are knocked together.
Characteristics and features of hip structures
The differences between a hip roof lie in the design of its slopes - triangular pediment and rectangular side ones. A characteristic feature of a hipped roof is two peaks connected by a ridge. The most difficult part is the installation of the rafter system, i.e. roof frame. The rafter system consists of several types of beams (rafters):
- The central support beams are called row rafters.
- Sloping or diagonal rafters.
- Corner rafters, which are called outer rafters.
A fundamental issue is the correct selection of material in the manufacture of rafters and other elements.
Important! The multi-slope design of a hip roof requires durable types of wood; pine and larch are considered the best. Only dried boards are used; they must be treated with an antiseptic before construction.
In order for the multi-slope structure to withstand its weight, snow cover and gusts of wind, load, boards must be selected with a cross-section of fifty millimeters.
Basic elements of a pitched roof
The main covering is laid on top of the rafter system, joints are made and the roofing pie is protected.
Roof slope
The largest and most voluminous part of the roof is the roof plane. It is for this plane that the type of roofing covering, color, and texture are chosen.
Horse
- this is a horizontal line that is formed as a result of the intersection of two slopes. Often, passages are provided in the ridge part to organize ventilation of the under-roof space. The very concept of “horse” dates back to pagan times, when the highest point on the hut was decorated with a carved horse’s head as a talisman. Thus, the owners showed that they honor and respect the gods.
Slanted ribs
go from the cornice and end at the top. For example, a roof in the form of a tower of triangular sectors. They represent an external angle that forms the connection of two adjacent slopes.
In places where an internal corner counter to the water flow is formed, for example, a chimney of rectangular cross-section, a groove
, which cuts the water flow and diverts it around the pipe. This is one of the most vulnerable places on the roof slope and therefore needs special attention.
gable wall
or
a pediment
completes the facade of the building and is limited on both sides by roof slopes and a cornice.
Pediments
(gable
,
ends
) - the end part of the slope from the side of the gables. The gables are decorated with gable elements (gable tiles, gable strips, gable elements), which protect the rafters, end board and building facade from water. The pediment can also be called a gable or simply an end.
The width of the eaves overhang determines whether rain or drops from the slope will fall onto the facade of the house, picked up by the wind, or not. It is desirable that the eaves overhang be 500mm, and for roofs with unorganized drainage, at least 600mm.
On houses with multi-level roofs, there are usually places where the roof slope abuts the facade. The junction between the roof and the vertical wall is called an abutment
. In such cases, the assembly is made using metal corner strips, which are mounted on top of profiled hard materials (metal tiles, corrugated sheets, etc.). If the roof is made of bitumen tiles, the covering is laid over the adjacent wall and secured with a batten.
Endova
- this is the internal angle that is formed by the intersection of two slopes. When installing a valley on a soft roof, an underlay carpet is first laid on the OSB sheathing, then a special valley carpet is fixed along the axis. After this, the asphalt shingles are installed.
Frontal board
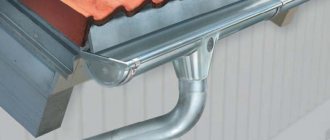
– attached to the ends of the rafter legs in the eaves part. The front board protects the rafters from getting wet, and the gutter brackets for the drainage system are also attached to it.
The lower part of the eaves overhang is covered with soffit strips. Soffit
serves as an architectural element and protects the under-roof space from blowing in precipitation, dust, leaves, as well as insects and birds. Often, ready-made special siding panels are chosen as spotlights, which can be solid or perforated. Perforated soffits provide air flow to ensure ventilation of the under-roof space.
If you are faced with the task of constructing a roof, then you can always contact the specialists of our company for advice on roofing materials, calculation of materials and organization of delivery of the entire roofing cake.
Hip roof rafter system - structure, necessary materials and roof reinforcement
Hip roof (rafters)
Sometimes the wealth of imagination and courage of developers evoke admiration and are simply amazing.
Pay attention to the architectural diversity and pretentiousness of the roofs of cottages and private houses. There are a lot of innovative solutions.
But still the most reliable hermetic structure for protecting the house is the rafter mechanism of the hip roof - a special type of 4-frame roof.
Types of hip roofs:
- Tent - when the house has a square at its base
- Danish or half-hip - when the hips are truncated at the top and not mounted to their full height
- A roof that combines pitches of different steepness is called a broken roof.
- Attic half-hip - with triangular small hips that are installed above the fronts.
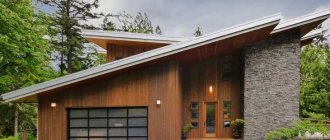
Hip roof - design and features of the device
It is difficult to imagine a house without walls, but it is simply impossible to imagine it without a roof. The roof protects the interior from cold, rain and snow, thanks to it the home acquires an attractive, finished appearance. Not least among the variety of options is the hip roof, the robust design of which guarantees long-term operation and safety.
Designers take full advantage of all the possibilities of a hip roof, using it in house designs with a residential attic, bay windows, dormer windows, and balconies. Modern roofing materials make it possible to harmoniously fit it into any architectural style. The hip roof looks great on a small gazebo, garden house or presentable cottage. We will tell you what it consists of and how to build it in our article.
What does it consist of?
Before erecting a rafter system, you need to lay a beam on which the rafters will then rest.
Before laying the Mauerlat, you need to equip an armored belt made of reinforced concrete, which enhances the load-bearing function of the wall and at the same time provides a horizontal, flat surface for laying the Mauerlat. Formwork is placed along the top of the brick wall, where concrete is poured and a reinforcement frame is installed.
When pouring concrete, it is important to strictly maintain horizontality along the entire perimeter of the building. During the installation of the reinforcement frame, galvanized metal studs with a diameter of ten millimeters are attached to it.
They should be so long that their top protrudes from the timber by three centimeters.
When the concrete becomes strong, its upper part is smeared with hot bitumen and roofing felt is glued to protect the Mauerlat wood from rotting.
A beam in which holes were drilled prematurely is placed on the protruding studs and the nuts are tightened.
A wooden beam with a cross section of one hundred by one hundred and fifty millimeters or one hundred and fifty by fifty millimeters is used as a Mauerlat for the frame of a hip roof. Wooden beams must be treated with an antiseptic.
A central beam is placed on the Mauerlat, parallel to the future ridge, on which the racks that support the ridge will then be installed.
The entire frame is made up of hip roof rafters, which in turn are divided into:
- Diagonal,
- Narozhniki,
- puffs,
- mowing,
- Ordinary rafters,
- Struts.
Sometimes such structural details as a truss for increasing the sloped rafters are used.
All parts of the rafter system are made from coniferous wood, which is dried to a moisture content of twenty percent.
Sometimes, for large spans, the rafter legs are lengthened by pairing 2 boards. This not only lengthens the rafter legs, but also makes them stronger.
All wooden parts of the rafter system must be treated with antiseptic agents. As a result, this operation will increase the service life of the entire structure.
Installation and installation step by step
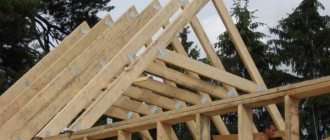
The structure of the hip roof rafter system begins with the installation of vertical posts that support the ridge beam.
The posts that hold the ridge are attached to the main beam using a bevel system. Then the installation of diagonal rafters begins. As rafters, you can use an edged board with a cross-section of fifty by one hundred and fifty millimeters.
Diagonal or slanted rafters are the main parts in the rafter system. They bear the main load, and the correctness of their installation determines the entire reliability and geometry of the roof:
- Diagonal rafters must be the same length. These are the parts that regulate the roof overhang.
- Typically, roof overhangs are made within fifty to sixty centimeters, but in areas with strong winds the overhang can reach one meter.
- The main difficulty lies in the correct joining of the diagonal rafters, the central rafter and the ridge beam from the end of the house
The structure of the rafter system involves, first of all, the installation of slanted rafters, after which ordinary rafters with a specific pitch are installed. The distance between them is calculated taking into account the width of the insulating boards.
Typically, the pitch of conventional rafters is maintained within sixty centimeters. Ordinary rafters are attached to the mauerlat and ridge beam using the cutting method.
Plus, their installation is additionally secured by placing top ties and crossbars.
Important: Do not forget about the studs on which the Mauerlat is attached. Ordinary rafters should not rest on these places, so that there are no unnecessary problems with fastening and cutting.
One flange is attached to the diagonal rafters on each side, connecting the mauerlat with the slanted rafters. They should not be joined in one place by slanted rafters.
The rafters and ordinary rafters are mounted parallel to each other and at right angles to the ridge beam.
Types of systems
The rafter system of a hip roof, according to the method of installing the elements, can be divided into layered and hanging . In the case of hanging parts, the installation diagram may present certain difficulties, and long-term operation may be associated with some hassle during repairs. Typically, such systems are mounted on external wall openings, because... they do not have internal analog systems. Layered-type systems are more precise, economical and constructive. Most often, such systems are used in buildings that have support-type structures (pillars) or structures that have a middle load-bearing wall.
If the structure has additional structures for support, then this makes it possible to construct a longer section of the span, equipping it with a layered structure. This will be relevant during the installation of hip roofs, which have a slope of up to 35°.
The design includes the following elements:
- Sloping elements - mounted diagonally or in the direction of the corners of wall openings;
- Narozhniki;
- Trapezoid elements of the ramp;
- Crossbars;
- Racks and struts;
- Sprengels;
- Runs and lays.
You can look at the diagram of the hip roof truss system to make it more clear where the elements are located and what its drawing might look like.
Sloping diagonal rafters on hipped roofs are fixed on one side to the lower support of the entire structure or to a beam that continues it. The other side of the slanted rafters is fixed to another pair of rafters. These elements for hip roofs are somewhat larger in linear dimensions than the usual complexes. This is all due to the fact that more force is applied to them, because they are a simultaneous emphasis for nazhnikov.
Narozhniki are complexes of rafters that are shortened along their length. They are fixed at one point on the rafters. In this case, another point of this support is mounted on the lower support. When the width of the structure is more than 4.5 meters, the rafter elements along the length are assembled simultaneously by several elements. Likewise, they become composite products.
In order to reduce linear dimensions, it is possible to use racks and struts. This approach to arranging the roof makes it possible to install it without the use of spacers. But in the case of a ridge roofing device, in which the parts support each other, it will be possible to use supports. In this case, it is necessary to use crossbar devices.
In order to prevent the formation of thrusts in those places where the interaction of the planes of structural elements with the lower support occurs, a horizontal level is made. In such situations, it is possible to use two types of connection with the lower support :
- On a beam embedded in an additional beam, which is located on the lower support;
- On the top type harness, directly on the lower support or on the top crowns.
It would be inadvisable to cut directly into the lower support, because... this will reduce its strength. After all, the bench will play the role of supports for the racks and struts.
The bench is installed on the internal opening of the walls or small brick pillars located in the ceiling. Sometimes the bed is secured by adjusting wooden linings made in the horizontal slab. This method of adjusting the beam makes it possible to greatly simplify the installation of racks and purlins.
Regardless of the type of floor laying you choose, at the first stage of construction it is necessary to perform waterproofing. In the case when the bench will be laid on small brick pillars, its cross-section can reach up to 100x150 mm. When the bench is laid on a wall opening or ceiling, its height is 5-10 cm lower. Installation of the beam will not be necessary when installing a rafter system without struts on the roof. In this case, it will be possible to tie the lower part of the racks with so-called contractions.
The elements of the hip roof rafter system include a beam, which is made of supporting parts and is located on the lower support in parallel, called a purlin . The main task of the run is to give the entire system additional strength. In this case, the purlin must be positioned so that it has additional support. Between the purlins and the lower support, the most optimal length will be no more than 4.5 meters.
The use of purlins in a general hip structure is due to design features. First of all, with the presence of wall openings and ceilings, which make it possible to fasten a beam located longitudinally, in relation to the opening, or fixing it to the ceiling.
To provide greater gain, it is necessary to install trusses. In this case, it is necessary to take into account the linear dimensions of the span, which will need to be reinforced with rafter elements. Sprengels are made from timber or logs. Sloping rafters, which are located diagonally across the rack, will increase the load, which is already transformed onto the truss.