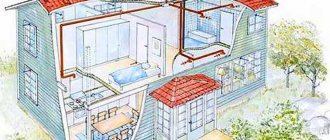
Features of ventilation devices in the bathroom of a private house
The type of ventilation system is determined at the stage of creating a house project. There are two types of systems used in bathrooms:
- natural;
- forced.
With natural air exchange, air movement occurs under the influence of temperature differences. The operation of forced ventilation in the toilet of a private house is ensured by a special exhaust device - a fan installed in the air duct.
Natural ventilation
The 2-3 cm gap between the floor and the door leaf, which is provided when installing the door, serves as an inlet opening. Sometimes special doors are used for this purpose, having ventilation holes or grilles at the bottom.
Exhaust ducts are vertical ventilation shafts, to which ventilation is supplied in the toilet of a private house through the wall - in its upper part or through holes in the ceiling of the bathroom.
When installing a natural air exchange system, the following recommendations should be followed:
- The bathroom requires the installation of a vertical air duct, which cannot be combined with the air ducts of other rooms.
- You can combine the ventilation ducts of the bathroom and toilet, but only if they are located on the same floor. In addition, you can combine hoods from different rooms in the attic if they are located on the same side of the cottage.
- When installing a ventilation grille, it is necessary to provide a check valve designed to protect against the penetration of cold outside air into the room.
Forced ventilation
Often, cottage owners are faced with the problem of excess humidity in bathrooms due to insufficient natural ventilation.
This is especially true for rooms in which a shower stall is installed, since in this case an air exchange rate of more than 75 m3/hour must be ensured. In addition, in summer the difference between indoor and outdoor temperatures is not large, and there may be problems with traction.
The flow of fresh air can be organized in the same way as with natural ventilation - through the gap between the door and the floor. Air circulation is enhanced by using an exhaust fan.
There are many fans of different shapes and power, but they all have the same operating principle.
When the installation of the ventilation system is completed, you can check the effectiveness of its operation. This can be done using a burning candle or match: bring it to the ventilation hole and observe, if the flame bends, then the system is working.
How natural ventilation works
With normal natural ventilation, air from the bathroom exits through the ventilation shaft to the outside of the building. This occurs due to the temperature difference in the apartment and outside. Therefore, a lifting force called thrust appears.
Due to the draft, the air escapes and a vacuum or reduced air pressure is created in the room. When the windows are open, air from the street enters the bathroom to eliminate the pressure difference. This type of ventilation is called natural supply and exhaust ventilation.
How natural ventilation works
For natural supply and exhaust ventilation to be effective, it is necessary to provide a horizontal slot at the bottom of the door. If the doors are hermetically closed, natural ventilation will not be provided.
But if the natural ventilation in the house is disrupted (for example, when the ventilation pipe is clogged or when it gets warm outside), then problems arise with the hood. Air exchange rates in the bathroom and toilet are set for an outdoor temperature of 5 degrees Celsius.
Fan characteristics.
When purchasing a fan for an vent, you must evaluate the noise that comes from the operation of the device. During normal operation, the amount of noise should not exceed 35 decibels. At the same time, in the room, as a result of air circulation, fresh air should refresh the room 5 to 8 times in one hour. To calculate the performance of the device, you need to multiply the space of the room, calculated in cubic meters, by 5, and increase the resulting result by 20%. Fans differ in installation method; devices of the same type are installed in the ventilation duct itself; there are also radial devices mounted at the outlet of the duct. Such fans have a discreet appearance, as they are hidden from the inside. Radial-type models usually have a decent appearance in order to fit into the overall interior of the room.
Fan models can also be very different:
- Conventional axial devices supply air mass along the axis of the structure using blades used for ductless devices.
- In low-performance diametrical devices, a drum-type wheel is used.
- Centrifugal models have an increased efficiency coefficient in operation, as well as a high noise level.
- Centrifugal axial fans produce less noise, but give the same effect during operation as centrifugal models of devices.
By improving ventilation in the toilet and bathroom, in some cases timers and gyrostats are mounted on fans, with the help of which it is possible to extend the operation of the device to achieve greater results.
Devices whose power is extremely weak cannot effectively remove odors and moisture, but it is also not advisable to operate high-power models. Devices with high power can produce such a high-intensity air flow that the air will not come from outside, but from various ventilation openings, in which case the musty air will again flow into the room.
Fan in the bathroom: luxury or necessity.
As you know, any standard house design must provide natural ventilation in the bathroom, kitchen and toilet. It includes ventilation ducts, at the entrances of which there are decorative grilles. Air movement in the system is carried out due to the difference in atmospheric pressure outside and inside the room. The question is whether it works fully, if at all, after the repair.
Operating principle of a household duct fan
The effectiveness of natural ventilation depends on many factors.
• Air temperature. For example, in summer, due to high temperatures, air exchange is minimal. • Air flow into the house. When predominantly wooden windows with many slits were used in construction, this issue was not relevant. But today, with the advent of plastic windows, air practically does not penetrate into the room and this significantly reduces the efficiency of the system. • Clogging. Not many people monitor the cleanliness of ventilation. Over the years, dirt, dust, cobwebs, and insects accumulate in it, and this, in turn, impedes the movement of air masses.
The bathroom is an enclosed space with high humidity; air exchange here should be especially good. And the only way to make it effective, regardless of external factors, is to install a fan. Forced ventilation in the bathroom will provide the necessary volume of fresh air regardless of weather conditions and will allow, if necessary, mandatory ventilation. But you need to take into account that household fans for bathrooms, after installation, cover the ventilation duct and completely prevent natural air exchange.
Operating principle of a household duct fan
Solving the problem of air exchange in this way has a number of other disadvantages. • Any device operates with a certain level of noise, which can cause discomfort. A silent bathroom fan would be a good solution, but silence will cost a little more. • The performance of a domestic fan is usually higher than what is required by regulations. This means that the operation of the device needs to be monitored. Especially in the cold season, when continuous ventilation will certainly entail extra costs for heat. • Additional, albeit small, energy costs.
The construction market offers a wide variety of exhaust system models, but before choosing a bathroom fan, you need to decide on some technical and functional parameters of these devices.
How does forced ventilation work?
The most common option: active type hood and active air flow. This will allow dirty air to escape outside the home. Various blade designs cope with this most effectively.
Sometimes, especially in a private house, the hood is made out through the roof. But this only works if there are gaps in the windows and between the doors.
In order to rationally use electricity, forced ventilation can be turned off and on at any time. Install special sensors that are triggered by movement or clap.
Self-installation
It is carried out in 4 stages:
- Preparatory stage;
- Selection of installation location;
- Selecting a connection diagram;
- The installation itself.
First, preparatory work is carried out. The first step is to compare the diameter of the exhaust device and the size of the shaft to make sure that the measurements were correct. If something happens, a plastic tube or corrugation will help, and the voids will be sealed with polyurethane foam. A narrow hole, on the contrary, is expanded with a perforator. Another point is the installation location. In the bathroom, hot, humid air needs to be eliminated first, so the ideal point is opposite the door and at the top of the wall. In a separate toilet, the installation location is not of fundamental importance. In the bathroom/restroom, the DIY installation algorithm includes 5 points. First, remove the front cover. Liquid nails, silicone or polymer glue are applied to the areas where the fan is adjacent to the wall. Then the device is inserted with an electric motor and a wheel with blades inside - completely hidden in the wall. Press the body tightly and wait until the glue sets. Then install a mosquito net, if it was included. At the end, the front cover is secured with dowels or self-tapping screws, after which the cable is laid and the device is connected to the network.
Ventilation in the bathroom and toilet in the apartment
Considering the type of air exchange, ventilation can be forced or natural. In the second case, we are talking about banal ventilation of the room through windows and doors. Creating artificial or forced ventilation is possible with the help of a fan; its purpose is to exhaust air into the street. Thanks to this option, you can easily say goodbye to high humidity and get rid of unpleasant odors.
Ventilation diagram in the bathroom and toilet in the apartment
Ventilation ducts are installed on the walls and ceiling. If there are no air ducts, then they must be installed if we are talking about artificial ventilation.
It is better to install a hood in the bathroom of an apartment opposite the door, this will help normalize the circulation of fresh air.
If the air duct has a too narrow hole, it can be widened using a hammer drill. When the hole is very wide, you can install a plastic pipe, then fix it with a cement-based solution. The cavities in the pipe are foamed, and the hood is secured with dowels.
It is important to note that the apartment must actually have air ducts. The only thing you have to do is install a fan
When the toilet has a ventilation duct, it is better to make several holes in the wall so that the circulation becomes more balanced. If there is no ventilation duct, a box is brought to the room, where the hood is mounted.
In many bathrooms, it is customary to cover the ceiling with stretch fabric, which helps combat moisture. Such coatings are characterized by excellent moisture resistance, but a space is still formed underneath where mandatory ventilation is required.
Ventilation under the suspended ceiling in this room is needed due to the huge amount of moist air and steam. In such cases, it is worth installing large diffusers, due to which a larger volume of air can pass through. The problem is solved by retracting and inflating the covering. It is necessary to install a small round grille, which is mounted in the same way as a built-in lamp.
Electric exhaust fan
Let's start by dividing all modern bathroom hoods into two types: simple and automatic. What is the difference between them? The fact is that the latter require minimal human participation in the air exchange process.
Simple hoods are an ordinary electric fan placed in a tubular housing. They can be activated either by a built-in switch or a separate switch. A fairly common way to turn it on is the switch key responsible for lighting the bathroom.
This approach to the matter is not very correct, since in this case the removal of polluted air is carried out only when a person is in the room. But the moisture does not have time to evaporate during this time. Therefore, it is advisable to install a separate switch for the fan.
Automatic hood. It differs from an ordinary one only in the presence of electronics that control its operation. Such devices can work using two different methods - some of them are equipped with a shutdown timer (they are turned on, like an ordinary hood, using the switch key), and others with special sensors that control the humidity in the bathroom.
As soon as it exceeds the permissible value, the fan turns on, after the humidity returns to normal, it turns off. These are quite convenient devices that do not require human intervention to control their operation.
In addition, both types of bathroom hoods can be equipped with additional options.
Some models are equipped with a so-called non-return valve, which does not allow air to flow in the opposite direction - this nuance will be indispensable for residents of high-rise buildings, where the smell of borscht or burnt onions coming from neighbors is considered a common occurrence.
For residents of the private sector, whose bathroom ventilation has direct contact with the street, it would be a good idea to purchase a hood with an adjustable diffuser - by tightening or unscrewing the washer in the center of the hood, you can regulate the amount of air emitted to the street.
Types of fans for bathrooms and toilets
The functionality of ventilation devices is quite important, so you need to understand how to choose a hood for a bathroom or toilet. Today, all exhaust fans can be divided into two types.
The standard hood for the toilet and bathroom is a conventional axial system, equipped with a check valve, which is designed to block the flow of exhaust air flow into the room.
This system can be turned on and off using a light switch, which is quite convenient. But when large volumes of steam are generated during the bathing process, such a system is ineffective.
An automatic hood is a more advanced, but also expensive device. Such devices are equipped with special timers that are set for a certain time period of operation, and more functional devices are equipped with a hydrostat, which determines the level of humidity in the room.
Having understood the basic parameters of the device, all that remains is to choose a suitable system, which you can install yourself without any problems. In this case, fastening is carried out with standard self-tapping screws or glue.
Installation procedure
Ventilation duct installation diagram
- When installing ventilation yourself, the ventilation duct is first cleaned. To do this, use a brush or a weight suspended on a rope. It is lowered several times into the channel in a rotating motion. The channel is cleaned if the indicator - a sheet of paper brought to the ventilation shaft - deviates towards the room or is not held by the force of gravity on the grille.
- All work is carried out with the electricity meter turned off at a height. To do this, you need to provide a stepladder.
- The installation is installed under the ceiling in the zone of maximum humidity, opposite the source of air intake.
- Taking into account the size of the fan and the location of the power supply, the position of the wiring and the installation itself are marked.
- Installation work is carried out with the presence of a grille, glue for fixing it, a screwdriver, and dowels. You may also need a piece of hose for the air duct, as well as a plasterboard box to mask the pipe and unit.
- The fan is installed in the air duct. If the model is of an overhead type, the box is first strengthened.
- The terminals located on it are connected to a two-core cable line with a cross section of 0.2 cm.
- The fan housing is mounted directly. For this purpose, most models have latches. Otherwise, dowels are used for these purposes.
- If the installation cannot be connected directly, the air duct is expanded. It is disguised in a box or decorated. For this purpose, a flexible, semi-rigid or rigid hose is used.
- To save energy and use equipment rationally, it is convenient to start the fan when turning on the light: you need to run a cable from the fan to the switch.
- After installation and connection, voltage is supplied to the network and the operation of the forced ventilation system is checked.
Before assembling the fan into the duct, the power supply is also turned off, but the procedure is slightly different.
Nothing should interfere with the movement of air masses
- The unit is placed strictly vertically in the channel, as deep as possible. This position is securely fixed so that during operation it does not fall due to the vibrations created.
- The supply cable must be new, without kinks or damage to the insulating winding, designed for “zero” and phase. It connects to the fan.
- A switch is installed in a convenient place to start the equipment into operation.
- Voltage is supplied to the network and the correct connection is checked, as well as the operation of the equipment.
Basic standards and requirements for installation and organization of ventilation
One of the criteria concerns access to fresh air per cubic meter of bathroom/toilet per hour. For both rooms this is 6-7 m³. For the combined option - 8-10. Ideally, they focus on indicators that are 20% higher. If there is only one ventilation opening in the bathroom, then it should be of the supply type. The principle of operation is checked using a lighter: if the flame moves away from the hood, then the device is a supply device, and if it gets closer, it is an exhaust device. Wall or window valves, if any, must have an air purification system. All norms and requirements are in SNiP 41-01-2003. According to them, if there is air pollution and there is no natural ventilation, and therefore sanitary standards are not met, then artificial air exchange is necessary. The air intake rate per person is 28 m³/hour.
The permissible concentration of carbon dioxide is (mg/m³):
- in rural areas - 650;
- in small towns - 800;
- in large cities - 1000.
Types of ventilation
In order to determine what kind of ventilation system you need to install, you should decide on its main types.
The main two types of ventilation:
- Natural ventilation - operates without the use of special devices; air moves naturally from an area of high pressure to a lower one. Fresh air enters through windows and vents, displacing polluted air, which moves through ventilation holes in the kitchen and bathroom and exits through the shaft.
- Forced ventilation - involves the use of fans that quickly and efficiently move air flows.
From the point of view of the functions performed, ventilation is divided into three types:
- Exhaust ventilation. Air exchange is carried out through exhaust ducts; it is used when it is possible to combine mechanical and natural ventilation methods.
- Forced ventilation. It works by displacing exhaust air with clean air.
- Mixed ventilation. As the name implies, it involves the combination of several types of ventilation, in this case both air injection and its forced removal occur simultaneously.
In apartment buildings, exits to the ventilation shaft are located in the toilet or bathroom, as well as in the kitchen, since in accordance with sanitary standards, greater air pollution is allowed here compared to residential premises. Air flows move from living rooms into these rooms, and then are discharged outside through ventilation ducts.
Installation recommendations
Correct installation of equipment always begins with inspection and, if necessary, cleaning of the ventilation shaft. Contamination, unevenness, and debris in it can significantly reduce the efficiency of the system. Without knowing how to install ventilation equipment correctly, it is better to seek help from a specialist. Or, as a last resort, carefully study the technical features of the selected fan model and other elements of the system.
According to statistics, in half of the cases the cause of problems with air exchange is incorrect installation of the working mechanisms of the forced system, errors in the design of ventilation shafts and a lack of supply air necessary for the effective operation of the system.
It is quite difficult to understand the real reasons without experience. In addition, amateur efforts often lead to a useless procedure - repairing a serviceable one. High-quality ventilation of any room is the key to the comfort and health of residents. For sanitary zones, this rule is doubly relevant.
Connection errors
1
In the 6th edition of the PUE, clause 7.1.39, it was stated in plain text that the installation of switches in bathrooms and toilets is prohibited.
In the 7th edition of the PUE, clause 7.1.52, the wording was slightly changed, expanding the definition of “switches” to “switchgear” and “control devices”.
True, they left a loophole for models with laces.
However, many have doubts about the interpretation of the “outdated” rules. After all, there are other points that seem to contradict the above. For example clause 7.1.47
That is, you can, as it were, install a switch, but you just need to do it in zone 3. In the same place as the sockets.
In houses with an improved layout, you come across such sizes of bathrooms that you can find zone 4 if you try.
In small apartments, except for the first two zones, nothing else will fit.
But what about clause 7.1.52? Maybe it applies more to public buildings, rather than to simple apartments and residential buildings?
Here is what a specialist who is directly related to all these rules responded to these contradictions:
At home, you can of course sculpt whatever you want, no one forbids you. You can connect sockets with cables.
Or lay the cable without corrugation.
Some even in private houses, instead of air input, SIP wires are buried in the ground and nothing happens.
But if this object is handed over according to acts, then you most likely will not receive an energy inspection conclusion. And you will have to redo everything.
According to safety rules, there should not be a single connection in bathrooms without adequate moisture protection.
And finding such a waterproof switch is not an easy task.
Otherwise, due to moisture on the contacts, firstly, after a while these same contacts will burn and spark, with unpredictable consequences.
And secondly, due to the leakage currents that will certainly be present on such a switch, you will be tortured to look for the cause of false alarms of the RCD.
If you don't have one, expect electric shocks. Minor tingling at first, but then who knows.
Moreover, even if it is a touch switch, a ban applies here too.
They are allowed to be installed inside only when powered by batteries or ultra-low voltage sources. Here is another expert's answer:
2
It would seem to be the simplest and least expensive option. But do not forget that for the fan to operate correctly, voltage must always be present on its control board, regardless of whether the light in the bathroom is on or not.
And if you power the ventilation from the nearest light bulb, then it will only work while this very light bulb is on.
Turn off the light when leaving the toilet, and the hood will also turn off, without really ventilating the room. And when bathing in the bathroom, you don’t want to feel a constant draft from the ventilation shaft. What if you have a fairly powerful and efficient fan?
3
There is no particularly big mistake here, but as mentioned above, during operation you may encounter inconvenient moments.
In addition, if we approach the reading of the rules with all rigor, then these same sensors are essentially nothing more than control devices.
And placing them inside bathrooms, without appropriate protection and execution, is again not recommended.
Well, don’t forget about their short service life and possible glitches with spontaneous switching on and off.
Sources - https://cable.ru, Kabel.RF
Types of ventilation systems
Professionals advise using two types of ventilation systems:
- duct ventilation system;
- ductless ventilation;
The difference between these systems is obvious based on their names - in the first design there is a ventilation duct, in the second - air flow is provided without it.
When working with bathrooms or toilets, it is advisable to eliminate the creation of separate channels. It is customary to create an opening in the wall and exhaust exhaust air into the general ventilation branch of the building. This procedure is not only more convenient and less expensive, but also more rational. Of course, this is applicable in multi-story urban buildings. But, if we are talking about a private house, then it is necessary to design ventilation at the construction stages, during the process of erecting walls.
Air flow into the bathroom and toilet is realized, as a rule, through one channel - in the bathroom, after which an additional intermediate opening is created in the wall between the bathroom and toilet for the passage of exhaust air.
An exhaust fan designed to provide ventilation in the bathtub through the toilet can come in a wide variety of designs and sizes. But the most important thing is the fan power. It must match the current in the wiring.
The fans have the following design differences:
- the axial model moves air parallel to the axis of the device. This is accomplished thanks to special blades. These systems are developed exclusively for ductless designs;
- diametrical models, which have rather low productivity, have special drum-type wheels in their design;
- a centrifugal-type device with a spiral casing guarantees extremely high performance, however, during operation the system creates quite a lot of noise;
- The combined centrifugal-axial device is quieter and operates with the same efficiency as a simple centrifugal system.
Types of Exhaust Fans
Domestic fans that you can install in your bathroom include:
- channel;
- wall-mounted
A wall fan is fixed at the inlet of the exhaust vent, a duct fan is installed inside the air duct. Both types will ensure the removal of stale air and high-quality circulation.
Based on the type of design, fans are divided into:
- Axial
(aka axial). An advanced view of exhaust fans. Available in price and installation. The body of an axial fan has the shape of a cylinder; inside there is a wheel with blades, most often with a check valve. Rotating, the blades “capture” air and remove it from the room. The device is mounted at the entrance to the ventilation duct. - Radial.
A radial fan consists of a motor, a rotating wheel with blades, and is enclosed in a metal casing. It has a spiral shape, visually reminiscent of a “snail”.
The fan may have the following set of devices and functions:
- timer,
- humidity and motion sensors,
- operation from a light switch,
- separate switch key.
The first two options are quite expensive and have their own inconveniences when used. The motion sensor is most often installed in the door, which requires additional investment and time. The disadvantage of a fan with a timer is that if you linger in the toilet, the fan will stop working earlier than you expected. The motion sensor is inconvenient because under similar conditions (there was not enough time), you will have to open the door slightly for the sensor to work. This can put you in an awkward position, especially if you have guests in your apartment.
How to make ventilation in the bathroom and toilet
The ventilation installation process can be done on your own, following some recommendations and rules:
- Using a brush, clean the system channel.
- Ventilation is fixed in an area of high humidity, namely under the ceiling and always opposite the air source.
- It is necessary to make precise markings of the installation, the location of the wiring, taking into account the location of the electricity source, and the size of the fan.
- Installation work is carried out using glue, grilles, dowels, and a screwdriver. A hose is useful for the air duct, and a plasterboard box is needed to mask the unit and pipes.
- Place a special fan in the air duct. If an overhead model is used, then the box is attached first. Connect the terminals to the cable line, but only two-wire.
- Install the housing, for which there are built-in latches. If you don't have them, you can use dowels.
- When there is no possibility of direct connection, you need to build up the air duct, which is masked or decorated. You will need any type of hose - flexible or rigid.
- In order to consume a minimum amount of electricity and use the device rationally, it is advisable to activate the fan at the moment when the light turns on. To do this, you need to run a special cable to the switch.
- After completing the installation, connecting to the network, you can apply voltage; this is required to check the functioning of forced-type ventilation.
When the equipment is not selected accurately and the calculations are not made correctly, the system will not work entirely efficiently. In simple words, it will work with the opposite effect, since the air will be blown back into the room.
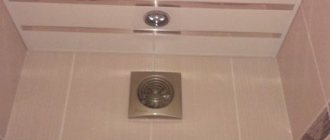
Photo: for example, when covering a toilet with plastic panels, the opening of the ventilation duct was widened and extended to the frame with a corrugated pipe
Next, the exhaust fan was installed
The problem can be easily solved by installing a check valve. The consumption of this device directly depends on ventilation. If the channel is vertical, then it is necessary to take a horizontal valve with a reverse effect. In the case of a longitudinal air duct, the help of a vertical valve will be required. To automate the entire ventilation process in the bathroom and toilet, you can use a timer. With its help, the established regime will be maintained, regardless of the presence or absence of the owners.
To summarize, it should be noted that ventilation plays an important role in the normal functioning, operation of appliances, the condition of furniture, and most importantly, human health. Constant humidity and lack of adequate air circulation are accompanied by the appearance of mold, dampness, and unpleasant odors. Considering the wide choice of ventilation and airing methods, you can choose exactly the one that you can install yourself.
Hood in the bathroom
Construction manuals clearly indicate the standards that must be followed for effective ventilation of sanitary premises with high humidity.
The system must provide fresh air for the bathroom or toilet at a speed of 25 cubic meters. m/hour, and for a combined unit twice as high - 50 cubic meters. m/hour. These standards are minimum.
Sometimes experts recommend removing air from the bathroom at a speed of about 150 cubic meters. m/hour.
Depending on the characteristics of air exchange, natural and forced ventilation are distinguished. In the first case, the exchange occurs due to the difference in air pressure outside and inside the room.
Air flows penetrate through windows, doors, special ventilators, etc. It is worth immediately noting that due to the nature of the bathroom design, the use of natural ventilation does not always achieve the desired effect.
To install ductless ventilation in the bathroom, it is necessary to make an opening that will connect the house ventilation duct with the bathroom room.
When forced or artificially ventilating a room, special fans are used to ensure sufficient air exchange.
Most often, a fan helps move air from indoors to outdoors, while fresh air masses enter the bathroom from living quarters. Sometimes a small fan is placed in the toilet, even with good natural ventilation, to speed up the purification of the air from unpleasant odors.
If it is not possible to naturally organize sufficiently intense air exchange, forced ventilation is mandatory.
Depending on the purpose there are:
- exhaust;
- supply;
- mixed ventilation.
The exhaust principle has already been described a little above: air is removed through the ventilation duct, and new air is supplied from the outside. Supply ventilation is organized differently: air is pumped in from the outside and forced out through the channel.
When using mixed ventilation, both the air flow and its removal are regulated.
A beautiful decorative grille for the hood in the bathroom will not only hide the design, but can also become an effective detail of a stylish interior.
Experts also distinguish between duct and non-duct ventilation, which is characterized by the presence or absence of a ventilation duct.
Creating dedicated channels should be avoided whenever possible. Usually, an opening is made in the wall that opens into the common ventilation duct of a multi-story building, and a fan is installed in it.
In a separate bathroom, if there is access to the ventilation duct in only one room, another fan is installed in the wall opening between the bathroom and the toilet.
Installing a separate ventilation duct makes sense in places that require intensive removal of polluted or moisture-saturated air.
Types and functions of ventilation for bathrooms
Before making a choice in favor of one or another air exchange system, you need to familiarize yourself with the types and principles of operation of such systems. Bathroom hood can be organized using natural or forced methods.
- Natural exhaust.
This hood works due to the action of natural factors, such as the difference in air pressure and temperature in the room and outside.
Exhaust air is removed through a ventilation duct running in the wall of the house. To carry out air exchange, an open window or door through which fresh air enters is sufficient.
Very often, especially in apartment buildings of old buildings, ventilation ducts become clogged or clogged due to the destruction of ventilation caps on the roof of the building. In this case, natural exhaust in bathrooms does not work.
Natural ventilation systems are inexpensive, easy to install and maintain, and do not require energy supply.
Natural exhaust in the bathroom and toilet is a simple and economical solution to the problem of ventilation if there is good draft. At the same time, one cannot ignore its shortcomings:
- unstable operation in hot weather, in which there is no required temperature difference;
- high sensitivity to clogging of ventilation ducts.
- Mechanical hood.
This type of exhaust system operates through the operation of fans that forcefully remove contaminated air flow into the exhaust ventilation ducts. The installation of such ventilation can be done at any time, while natural ventilation channels are laid during the construction stage.
Forced hoods in the bathroom and toilet are installed in the following cases:
- absence or poor functioning of natural air exchange;
- remodeling the bathroom or combining it with a toilet, when part of the ventilation ducts is removed;
- installation of electrical equipment that increases the formation of steam, the volume of which is not completely removed by natural exhaust;
- the room is small - the hood in the bathroom does not have time to remove the amount of moisture and steam generated when taking a bath or shower.
The disadvantage of forced ventilation is the need for electricity and the need to lay wires to each fan.
Ventilation check
There are two simplest ways to check the operation of the hood in the bathroom and toilet without the use of special equipment - using a candle or a sheet of paper.
A burning candle is brought to the ventilation duct - when ventilation is running, the flame deflects, indicating the direction of air flow. In the absence of draft, the flame remains vertical.
To check the correct operation of the ventilation system, you can take advice from specialists. To do this, you will need a regular paper sheet that is applied to the ventilation grille in the bathroom or toilet, and if it is held on it by the air flow, then everything is in order with the hood.
In turn, if paper falls on the floor, then you need to think about installing an exhaust fan.
I would like to note that even a normally functioning system does not always cope with its responsibilities, since it works due to the difference in temperatures inside the apartment and outside.
Very often in the summer, when it is very hot outside the room, the natural ventilation system becomes absolutely useless and does not remove unpleasant odors from the toilet.
Poor ventilation can also be caused by insufficient fresh air flow. This problem is typical for old houses after the installation of plastic windows. To solve this problem, windows with ventilators should be installed.
How not to make a mistake when choosing an exhaust device
If there is poor air circulation in the bathroom or toilet, moisture accumulates on the ceiling and walls, causing water droplets to condense and mold and mildew to form. And due to the lack of windows to let in fresh air from the street, the only correct solution would be to install an electric exhaust fan for the toilet or bathroom.
In this case, when buying an exhaust device, you need to proceed from the following criteria:
- the total area of the toilet or bathroom used for ventilation;
- number of residents using the bathroom.
In order to save electricity, it is better to choose exhaust devices with a built-in power regulator and a built-in function for disconnecting the device from the mains if such a need arises. To buy an exhaust device that best suits a particular room, you need to understand its main characteristics.
The performance of the exhaust device is one of the most important parameters. If an exhaust system is installed, passing from the toilet through the bathroom, it means that it will process quite large volumes of air and standard fans for exhaust in the toilet with a very low level of efficiency will not cope with the task assigned to them.
Safety of the device - an electric hood for a toilet or bathroom must comply with all regulatory safety parameters and be located in a hermetically sealed housing. Vapors and moisture often accumulate on the ceiling, so even hoods placed on the ceiling surface must be protected from such external factors.
Due to the fact that most multi-storey buildings are equipped with a common exhaust duct for several apartments, when purchasing a ventilation device you need to choose systems equipped with a check valve.
First of all, this is due to the fact that exhaust air, saturated with unpleasant aromas from the ventilation duct, can penetrate back into the room. In addition, the check valve protects the room from the penetration of dust, fluff and other dirt from the street.
Installation of ventilation in the bathroom and toilet
Before you begin installing a ventilation system in a bathroom or toilet, you need to decide on the location of the exhaust fan. The hood structure should be located opposite the door at the top of the wall or on the ceiling.
In this case, you need to worry about the presence of electrical wiring, of course, if the fan is not equipped with a battery. After choosing a convenient location, you can proceed to installation, during which experts advise adhering to the following recommendations.
- It is better to install ventilation for a bathroom or toilet during the renovation process in the apartment.
- It is better to connect the fan from the light switch.
- The wiring going to the fan can be hidden in grooves.
- To significantly simplify the installation process and protect the fan from external influences, insert a plastic pipe into the hole in the wall, which is easily secured with cement mortar. But before that you need to connect the device.
- If the ceiling height in the bathroom or toilet is sufficient, then you can use a more functional, albeit complex ventilation structure, constructed using plastic boxes, fixing the device itself directly above the toilet.
- When connecting the exhaust device, it is important to study in detail the instructions included with the fan in order to correctly connect it to the power supply.
Apartment buildings are usually designed in such a way that the ventilation duct is located directly behind the wall of the bathroom or toilet. All that remains is to carefully make a hole in the right place (if there is none) so that it goes into this channel.
A radial axial fan is installed inside the opening. The device is connected to the power supply, observing all the requirements for the operation of electrical appliances in rooms with high humidity.
If necessary, install additional controls (timer, gyroscope, etc.). The niche is covered with a beautiful decorative grille. If the apartment has a separate bathroom and the ventilation duct is located behind the walls of both rooms, the second fan is installed in the same way as described above.
Otherwise, the ventilation hole is made in the wall separating the toilet and bathroom. A fan is also placed in this opening and covered with decorative screens on both sides.
Sometimes it is more convenient to use decorative grilles, in which the design provides for mounting the fan in special slots.
The figure clearly shows a diagram of connecting an exhaust fan to the power supply using a timer, which allows you to turn off the fan some time after the visitor leaves the bathroom.
It is somewhat more difficult to solve the problem of bathroom ventilation when the ventilation duct borders another room. In this case, you will have to create duct ventilation.
First you need to choose a location for the ventilation hole in the bathroom and toilet. Then you need to draw up a plan for placing a ventilation duct through which air masses will move outward.
When creating duct ventilation in a bathroom, a flexible corrugated duct is used only in small areas where installation of other structures is impossible or difficult
- There are the following types of ventilation ducts:
- plastic round or rectangular;
- hard or soft corrugated metal;
- metal, tin or galvanized, usually rectangular in cross-section.
Plastic boxes are easier to install and lighter in weight than metal structures, but they are durable and easy to care for.
Therefore, plastic structures are confidently displacing metal from the construction market. Corrugated products are used extremely rarely; they are permissible only for short distances and are used only in particularly difficult cases.
It is recommended to install the box during the process of renovation work in the house or even before it begins, but the installation of the fan and decorative grilles is carried out after finishing work.
After completing the installation of the ventilation system, it is necessary to check the operation of the equipment.
Installing a hood in the bathroom with your own hands
Here is an example of self-installation of a hood when a ventilation duct is provided in the room:
- we check the functionality of the ventilation shaft;
- if the channel is clogged, we clean it with our own hands; if the area of the hole does not accommodate the dimensions of the device, carefully use a chisel and hammer to increase it to the required size;
- remove the external grille from the fan, insert the device into the hole in the ventilation duct and fasten it using self-tapping screws or liquid nails;
- make sure that the device is tightly located in the opening of the ventilation duct;
- cover with a grate and use sealant to seal the joints between the outer grate and the wall;
- connect the wires to the electrical network;
- For aesthetic reasons, it is better to choose a grille design that matches the style of the bathroom.
By installing a hood in a bathroom or toilet, you will prevent the formation of condensation on the walls and metal surfaces of faucets, eliminate unpleasant odors - the air in the bathroom will be clean and the room dry.
Installation materials
Depending on the selected ventilation system, the following parts may be needed:
- ventilation ducts (ducts, pipes)
- fastening fittings
- channel connecting elements
- fans (for forced ventilation)
- sealant
- decorative grilles
Ventilation ducts
They are boxes or pipes of different sections, made from special materials and having a number of characteristic features in installation and operation as an air flow channel for a bathroom ventilation system.
- Plastic channels:
- are light in weight
- easy to install
- silent air movement
- have ready-made fittings, easy to connect
- Metal:
- There are hard and soft (corrugated pipe)
- may produce noise from air vibration
- heavy
- require more thorough fastening
- more difficult installation
Fans
The main element of the forced ventilation system. Due to the small area of the bathroom, low power fans are used. To choose the right fan, you need to understand their differences.
| Type | Description |
| Installation methods | |
| Radial | Installed on the entrance hatch. It is equipped with fastenings and has a protective grille, which allows it to fit into the interior of the bathroom. |
| Duct | Mounted inside the channel. The hatch is closed with a decorative grille. |
| Design Features | |
| Axial | The blades are located on the axis of the device. Installed directly into the hatch. Noisy. |
| Diametrical | Has a drum-type impeller. Low productivity. |
| Centrifugal | The blades are installed in the form of a spiral. Good performance, but very noisy. |
| Centrifugal-axial | Combines the design features of axial and centrifugal fans. It is characterized by its small size and high performance. Low noise. |
Fan performance calculation diagram:
- calculate or find out the area of the bathroom and toilet
- multiply the result by the frequency of air changes in the bathroom, i.e. by 5
- add 20% to this value (fan performance margin)
- With the obtained indicator, you can select a fan by comparing it with the technical data sheet data
Considering that the bathroom and toilet have their own specific conditions (high humidity, unpleasant odors, small area), when choosing a fan, the following factors must be taken into account:
- the fan must be moisture resistant
- low noise
- power must correspond to the area of the room
At the moment, there are fans with humidity sensors and timers, which help control the operating mode of the ventilation system and save energy.
DIY hood installation
Before making a hood in the bathroom, you need to make the appropriate preparatory measures:
- First, you need to check the draft in the ventilation shaft by holding a lit candle or match near the hole. If the flame deviates towards the well, this means that the hood is working naturally. If the flame deviates back, it will be necessary to clean the vent. channel. If you suspect that the channel is tightly clogged, you need to call specialists. They will check the entire well from the roof of the house and fix the problem.
- Try on the purchased device. If the device does not fit into the ventilation hole, you can expand it, or exchange it in the store for another more suitable model.
- Remove the outer mesh and grid from the device.
It is also important to check the air flow into the room with the doors to the bathroom closed. You may have to install a special grille at the bottom of the door leaf or trim the door by removing it from its hinges to leave a larger gap at the bottom. These options will make the flow from the living room to the bathroom constant.
Hole preparation
If the hole does not match, and it was not possible to change the fan, then this can be corrected as follows. When the hole in the channel is larger than the cross-section of the device, then you need to insert a plastic or corrugated pipe into the hole and seal it with foam around the gap. And after it has cooled, cut off the protruding fragments of the filler with a sharp knife.
If the hole in the exhaust shaft is smaller than the diameter of the exhaust product, it must be expanded using a hammer drill and a bolt. To do this, you need to drill holes along the intended circumference, and then use a jumper to chop off the jumpers.
Selecting the optimal connection scheme
There are several methods for connecting ventilation to the power line. The fan can be turned on by configured sensors, or by turning on a light bulb in the bathroom. In the first case, it turns on after the humidity in the room reaches the maximum value.
The end of operation of the device can also occur in two ways: by a timer after a certain time or by a switch located in the bathroom.
Connecting the hood to the light bulb ensures that it starts working the moment the light is turned on. However, the device needs an individual switch so that these two chains can be disconnected: the hood and the lighting. It is usually installed on the wall, if it is not intended to be placed on the product body itself.
In the latter case, the fan is turned off by pulling the chain. If possible, choose a model with a long cord so that it is accessible to small family members.
Timer shutdown has its pros and cons. When leaving the bathroom, you don't have to worry about turning off the device. But if the fan does not completely remove dampness, and it is necessary to increase the time, then inconvenience arises. Therefore, it is better to purchase a product with a switch so that its operation can be controlled.
The procedure for carrying out installation work
Before installing the fan, you should carefully read the instructions. Remove all accessories from the box: fasteners in the form of four dowels and screws. If you don’t have the opportunity or desire to drill, you can glue the device’s mounting location to the wall. But if you have to change it, it will be difficult to remove the fan.
Let's take a closer look at the entire algorithm for installing a fan on an exhaust hood in a bathroom using self-tapping screws:
- remove the facing grille from the device by unscrewing the bolt or removing the latch (depending on the model);
- insert the product body into the hole in the exhaust well;
- make markings for the mounting holes, taking into account the location of the cable entry;
- remove the device from the hole;
- drill holes for dowels in the marked places (if you have to do this on tiles, you need to drill with care so as not to split them);
- insert plastic rods into the drilled holes;
- insert the wire into the technological window, align the holes with the dowels and secure the fan;
- open the terminal box and install the wires according to the diagram;
- lay the wires in special channels, close the box;
- check the operation of the device, turning on the light or from your switch.
Thus, the forced ventilation in the bathroom is set up and ready to remove damp air from the bathroom.