Strip foundation is the most tested and proven type of foundation, capable of withstanding significant loads and working on fairly complex soils.
It is economical, versatile and simple in design.
The tape combines well with other supporting structures, forming combined types of base that combine the best qualities of both types.
These qualities allow us to consider the strip base a confident leader among alternative options.
The manufacturing technology of strip bases has been well developed and tested under different conditions and over a long period of time.
Pouring a strip foundation - what is it?
Pouring a strip foundation is a term that refers to the process of making a monolithic reinforced concrete strip by casting directly on the construction site. Liquid concrete is poured into a specially prepared form - formwork, hence the term “pouring”.
At the same time, the construction process itself is much more complex and consists of a set of sequential actions, of which the actual pouring is only one of the stages. It is considered the main one, but without all other operations it cannot be performed.
Technology of the foundation pouring process
In winter, to pour the foundation, you need to build a tent and install heat guns in it
The concrete mixture is poured into the frame immediately, without technological interruptions, and compacted. To ensure that it lies flat, tapping the boards is practiced. Simultaneity is important because pouring over an already hardened composition predisposes to the appearance of air cavities, which can cause the structure to crack.
Working with a concrete mixer
Preparing the building mixture will go faster if you use a concrete mixer. The number of working cycles is determined by its productivity. To optimize large-scale construction, a concrete mixer truck is well suited. But its use will require additional transportation costs.
How to fill in winter
Sometimes the foundation has to be poured in winter. The phased structure of such work differs from that carried out in the warm season.
Since water may freeze prematurely when preparing concrete, antifreeze components are added to the composition. A tent structure is installed on the site, inside of which heat guns are placed.
To prevent the poured mixture from hardening so quickly, the formwork is made of polystyrene foam. There is no need to dismantle it.
How to fill in parts
To prevent the formation of voids, each portion of the mixture is prepared immediately before pouring. The maximum interval between cycles is 2 hours in the warm season and 4 in the cold season. If you have to take a long break, it should not exceed 64 hours. Before pouring a new portion, dirt is removed from the concrete surface and treated with a stiff brush to improve the quality of adhesion.
Preparing the trench
Preparatory work requires the availability of construction equipment. It is possible to do them manually, but it will require a significant investment of time and labor. In the end, it always turns out to be faster and cheaper to pay for the work of a bulldozer and excavator.
Procedure:
- Removing topsoil and unnecessary vegetation, site planning.
- Marking using wooden pegs. It is recommended to install them outside the perimeter of the future trench, and mark the boundaries and intersections with cords stretched between the stakes. This will allow you to save them and clarify the contours of the trench if doubts arise about the correctness of the actions.
- Digging a trench to a certain depth. The excavated soil is placed on the outside or transported outside the site.
- Backfilling the sand cushion. The classic option is the sequential laying of 20 cm of sand, 20 cm of crushed stone and a leveling sand layer of 5 cm. Each of them is carefully compacted. The immobility of the future tape depends on the density of the pillow. Settlement threatens to destroy the building, so the quality of the compaction should be taken seriously.
- Laying a double layer of waterproofing on top of the pillow. Typically, roofing felt is used, which is laid without gaps or gaps.
Upon completion of these actions, you can proceed to the next stage of work.
NOTE!
Sometimes a layer of the so-called is poured on top of the pillow. footings - about 5 cm of concrete, forming a flat and dense platform. It allows you to keep the waterproofing intact and prevents the pillow from being pressed through by the rods of the armored belt.
Foundation and estimate
The foundation is the supporting part of any structure, so during construction it is necessary to take this type of work seriously. Calculations based on estimates, manufacturing or installation of a foundation strip cost 1/3 of the cost of the entire structure.
If it is necessary to reduce the cost of working with the foundation, a decision is made on how to make the foundation with your own hands.
Being a responsible type of work, the manufacturing process is not too complicated and even novice builders can do it.
We lay out the site for construction and choose a method for making a strip foundation.
Choosing a concrete grade
The grade of concrete determines the degree of its resistance to external loads.
For the construction of the belt, grades from M150 to M400 are used:
- M150 - suitable for the foundations of light and auxiliary buildings - garages, utility rooms, etc. It is not recommended to use this brand for building a foundation for a residential building.
- M200 is a common option, used for tape for one- or two-story private houses. This grade of concrete is classified as structural and is widely used in the production of reinforced concrete products.
- M250-M300 - Suitable for the foundation of houses up to 5 floors. Grade M300 can be used for the manufacture of interfloor slabs.
- M400 - used in the construction of multi-story buildings (up to 20 floors).
The best option for a private house with 1-2 floors is M200 concrete. Most experts agree that complex and lengthy calculations almost always lead to the choice of this option . If the hydrogeological conditions of the site are very difficult, you can increase the grade of concrete to M250, but this does not always help solve the problem.
It is more correct to increase the support area to change the specific pressure on the ground. If necessary, you can use online calculators and find the average belt width that gives the minimum draft.
What kind of concrete is used to pour the foundation?
For the construction of suburban buildings, concrete with a strength of M200 or higher is mainly used, but in the end it all depends on the features of the project, recommendations of specialists and calculations performed.
It is almost impossible to select the brand of concrete on your own, and when constructing multi-story buildings, it is dangerous and completely unacceptable.
Construction stores are engaged in filling and selling them, or you can order them from production. In a home production environment, you will need cement, sand, crushed stone and water to mix concrete. If you decide to prepare the filling yourself, these instructions will help you.
Return to contents
Calculation of the amount of concrete
The amount of concrete is calculated using purely mathematical methods. First of all, you need to calculate the length of the tape .
To do this, you need to measure or calculate the outer perimeter and add to it the length of all internal sections. The cross-sectional area of the tape is then calculated by multiplying the width by the height. The last step is to determine the volume - the product of the length and the cross-sectional area. This will become the required amount of concrete mixture.
It is recommended to increase it by 5-10%, especially if you plan to order a ready-made solution in a mixer. Manufacturers are not always meticulous in their calculations and may deliver slightly less material, which can create a serious problem.
If excess is formed, it can always be used to fill the area in front of the entrance or other structural elements.
IMPORTANT!
When calculating the volume of the tape, all measurements must be made in the same units - if the length is in meters, then the cross-section should be in square meters. This will help you avoid mistakes and order the correct amount of material.
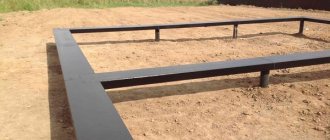
Creating formwork
Formwork is a removable form for pouring a concrete strip. It is made on site from edged boards 25-40 mm thick, depending on the size of the foundation. Shields are assembled 15-20 cm higher than the size of the tape.
The inner surface of the formwork must be planed, although this condition is not always met.
The panels are assembled next to the trench, then they are lowered to the bottom, aligned along the axis and width and fixed from the inside (top) with cross members that determine the thickness of the tape, and from the outside with support strips and stops that prevent the formwork from bending under concrete pressure.
The panels are assembled carefully, avoiding the formation of cracks or gaps. The maximum size is 3 mm; larger gaps must be sealed.
For this, tow or thin slats are usually used, which are driven into the cracks and level the surface.
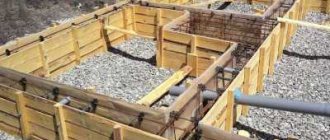
Construction of the foundation
Of greatest interest in terms of construction work is the strip-type foundation. Its construction includes the following stages:
- preparatory stage;
- excavation and pillow laying;
- installation of formwork with installation of reinforcement;
- preparing the solution and pouring the foundation body;
- final arrangement.
To carry out the work, you will need the appropriate tools: a shovel and a crowbar for digging a trench, a grinder, a trowel, a vibrator, a construction mixer, a hacksaw, a hammer, pliers, a building level, a level, a plumb line, a tape measure, a metal ruler.
Preparatory stage
Preparing the site for construction begins with clearing the area and leveling the construction site. All vegetation is removed and stumps are uprooted. It is important to create a fairly flat, horizontal platform , for which the mounds are cut off and large recesses are filled.
We recommend: Concrete trays: advantages and features
The marking of the base is carried out in strict accordance with the project. It is best to use a level. If there is no such device, then you can do it the “old-fashioned” way. 4 pegs are driven into the corners of the future house. Using a tape measure, measure the distance between them diagonally.
Both sizes should be the same, which indicates that the correct rectangle has been marked. If they do not match, then the pegs are moved until the desired result is achieved.
After fixing the pegs in the right place, a cord is pulled between them, forming an overall rectangle of the foundation (along the central axis). Inside it, the internal walls of the house are marked, under which a foundation is also provided according to the project.
We recommend reading: How to properly mark the foundation for a private house?
Trench preparation
Excavation work involves digging a trench around the entire perimeter of the house and in places where the foundation is laid under the internal walls. This is the most physically difficult stage of manual labor, and therefore, whenever possible, an excavator is used, especially if the soil is excessively hard and rocky.
The maximum width of the trench is not limited, because restrictive formwork is still installed. The minimum width should exceed the size of the concrete strip by 20-30 cm. The depth of the trench corresponds to the depth of the foundation with the addition of the thickness of the cushion.
A pillow is poured into the bottom of the trench. This element plays an important role. It is designed to restrain soil swelling and perform a drainage function . For heaving soil, the layer thickness increases. The pillow is made of sand, which must be cleaned of clay impurities.
Typically, the thickness of the sand layer is 20-25 cm, but for heaving soil it increases to 30-35 cm. The pillow is carefully compacted, and after laying it is spilled with water.
More on the topic: How to properly dig a foundation pit and trench for the foundation of a private house?
Installation of formwork
To form a concrete strip, the next step is to install the formwork. It is usually made in a removable version from boards .
Despite the temporary nature of the design, it must be taken seriously. It ensures the required dimensions and correct shape of the foundation. To do this, the formwork must withstand the bursting forces that occur when pouring concrete, without deformation or displacement. At the same time, leakage of the solution into the cracks must not be allowed.
Wooden formwork is made from timber 40x(50-60) cm and boards 15-20 cm wide and 20-30 mm thick. Installation is carried out in the following order:
- The timber is cut to a length exceeding the height of the foundation by 40-50 cm. The lower end of each segment is sharpened with an ax.
- The beams are placed at a distance of the length of the board, and then the boards are nailed in the form of a shield. They must be fitted tightly to each other, without gaps.
- A support board is installed in the trench, to which the edge of the shield is attached. The sharp end of the beams drives the shield into the ground. This is how the formwork is positioned along its entire length, parallel to both sides. The distance between them must strictly correspond to the width of the concrete strip. Verticality is controlled by a plumb line, and horizontality by a level. When installing panels, the beams are located on the outside of the formwork.
- Bars are fixed between the shields to prevent them from moving apart. In one row, the joints of the shields are strengthened with clamps or bandage wire.
- If the height of the formwork exceeds 60 cm, then reinforcing jibs are installed on the outside, located at an angle of 45 degrees.
- The walls of the formwork are covered with polyethylene film to prevent leakage of the solution. You can use roofing felt, roofing felt.
We recommend: Types of foundations for a private house. Which one is better to choose?
When installing formwork, special attention should be paid to the corners. In these places, the joints of the shields should be secured most firmly. In addition to boards, plywood, metal and plastic sheets, and flat slate can be used in the manufacture of panels.
More on the topic: What and how to properly make formwork for the foundation?
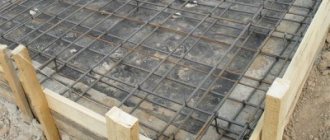
Installation of reinforcing frame
The strength of the foundation is ensured by reinforcing elements, which cover the entire perimeter of the foundation with a continuous belt.
For these purposes, steel reinforcement with a diameter of 10-16 mm is used. The reinforcing belt is made up of horizontal, vertical and transverse rods.
For longitudinal, horizontal laying, reinforcement with a diameter of 14-16 mm is used. Most often, 2 rods are laid in one plane at a distance of 25-30 cm from each other.
If the tape has a large width, then 3 or more rods can be used. The next tier of horizontal elements is mounted at a height of 50-80 cm from the first.
Horizontal tiers are fastened with vertical and transverse rods with a diameter of 10-12 mm. The pitch of their installation is selected within 70-90 cm. The rods are tied at the crossing points using knitting wire. It also fastens horizontal elements in one row to ensure a continuous structure. The use of welding for connection is undesirable , because eliminates compensation for ground movement.
The reinforcing belt can be installed directly on site, i.e. inside the formwork or on the surface of the ground, followed by lowering into a trench in the form of separate sections/frames and then connecting them together. In the first case, the tightness of the trench causes inconvenience and there is a risk of partial collapse of the walls during sudden movement.
Reinforcement
Reinforcement is an important procedure that allows you to preserve the tape when bending loads occur. Concrete tolerates pressure well, but axial tensile loads are dangerous for it .
Installing a reinforcement cage inside the tape allows you to transfer unwanted stresses to it, which ensures the integrity and durability of the foundation. The reinforcement cage consists of horizontal rods (working) and vertical (auxiliary), which are needed only to support the working rods in the desired position until pouring.
The frame is a spatial lattice with the working rods located at a depth of 2-5 cm under the outer surface of the belt. Assembly is carried out by welding or by knitting rods with soft steel wire.
The assembly of the frame parts is usually carried out next to the trench, after which the belt fragments are installed in the trench, aligned along the axis and other parameters, and connected.
Installation of formwork
All formwork is made from boards with a thickness of at least 40 mm, as well as from low-grade plywood or OSB boards. The formwork is made from boards with a thickness of at least 40 mm, low-grade plywood or OSB. The resulting shields are reinforced crosswise and lengthwise with bars.
- Soil resistance - a practical guide on how to determine the main parameter (75 photos)
Sanding timber - modern mechanical and manual processing of wood (80 photos)
Insulation of facades - selection of materials and instructions for creating ventilated facades (85 photos)
In the trench, struts are installed on the shields from the outside, and spacers are installed on the inside. The fasteners must be particularly reliable, since the mass of concrete will exert a very high load.
DIY pouring
The process of pouring concrete is a responsible operation that requires accuracy and an understanding of some subtleties. First of all, you need to consider the weight of the material . If you pour from a height, there is a risk of destroying the formwork or reinforcement cage.
To create an optimal filling mode, you should make a tray along which the mixture will be directed into the trench. This will create a uniform supply of concrete and eliminate sudden changes in load as much as possible.
Self-manufacturing and pouring is not a desirable option, since productivity is very low and the process is slow. This creates a layered structure of the tape, reducing its strength and load-bearing capacity.
It is strongly recommended to use ready-made material and pour it from several points. You should not count on the mixture spreading over the entire length of the formwork. It is necessary to prepare in advance several access points for the mixer to the trench, provide for the possibility of installing a tray and pour in even portions from different points.
This is the only way to create a monolithic casting with the same strength characteristics at each point.
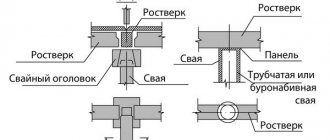
How to pour piles under the foundation
To carry out high-quality pouring of piles under the foundation of a house, it is necessary to follow a certain procedure:
Pouring piles with concrete
- Prepare the area and mark it. The construction site is leveled using a level. The places where the piles are planned to be installed are marked. It is necessary to have support at the corners of the house, at the junctions of load-bearing walls and partitions.
- Using a manual or mechanical drill, holes with a diameter of about 30 cm are made for pouring future piles. The depth of the holes is selected in accordance with the type of foundation and soil condition. It is important that the bottom of the hole is below the soil freezing level.
- Permanent formwork is installed. If the construction budget is sufficient, asbestos-cement or steel pipes can be used. To save money, you can build formwork from roofing felt. To do this, the material must be rolled into a pipe of a given diameter. The prepared formwork is lowered into the hole so that it rests on the sand cushion. The shell formed in this way prevents freezing of the soil and pile during the cold season. In addition, the design prevents moisture from penetrating into the concrete. When using metal and asbestos cement pipes, treatment with a waterproofing solution is required.
- The installed formwork is filled with a small amount of liquid concrete mortar and raised slightly. As a result, a cavity is formed under the pipe into which liquid concrete penetrates. After the mixture hardens, a kind of pillow is obtained at the bottom of the hole. It greatly increases the bearing capacity of the foundation.
- A frame made of reinforcement is installed. For its manufacture, steel rods with a cross section of 8-10 mm are used. Their number directly depends on the thickness of the pile. Most often, 3-4 rods of reinforcement are connected together with soft wire, installing transverse jumpers along the entire length of the frame. The frame is also lowered into the hole. Reinforcement of the well allows you to protect the future pile from the impact of soil from the sides, which can lead to fracture of the pile.
- The prepared well is filled with high-quality concrete mortar. Concrete must be compacted periodically using a special vibrator. You can use a crowbar or a piece of reinforcement for these purposes. In both cases, the mixture is compacted by removing air. It is best to fill the piles with concrete in one go, this will make the pile a solid monolith.
Is it possible to fill in parts?
The technological requirements in this matter are unanimous - filling must be done simultaneously. The presence of sections in the tape with different pouring times is considered defective and is not allowed for use.
The concept “at once” in this case is understood as the absence of breaks for more than a day. You can often find recommendations about pouring in layers, creating “cold joints” and other bad advice.
Indeed, private developers are often forced to fill in parts due to the inaccessibility of equipment, the remoteness of the site from the concrete manufacturer, etc. It is necessary to understand that they act at their own peril and risk, creating a layered structure of the tape, forming vertical joints that weaken the foundation.
The danger of destruction is too great and real; it is better to consider the possibility of delivering and pouring the finished material.
Soil analysis and design selection
The type of foundation is chosen depending on the geological features of the area and the size of the building
Before pouring the foundation of a building, you need to study the characteristics of the soil in the area where you plan to build the house and select the most suitable design for the given conditions. It is necessary to find out what type of soil the composition is, determine the bearing capacity and location of groundwater. These characteristics determine the depth of the foundation and the overall configuration of the foundation.
Carrying out construction work without understanding and taking into account the characteristics of the soil can lead to unpredictable consequences for residents. This can also result in the choice of an irrelevantly complex design that requires a lot of resources, or, conversely, insufficiently reliable execution in the pursuit of savings.
If you neglect to study the soil for the presence of water, the drainage may become clogged with silt or sand will be washed out. It is also necessary to examine the internal structure (the presence of water-saturated, unstable areas) and the type of relief (flat, sloped, etc.), and the presence of differences. The latter matters in the context of developing an architectural project - for example, it determines whether a basement or ground floor can be made.
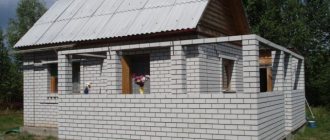
The foundation for a house is poured taking into account the characteristics of the building and the surrounding space (the presence of extensions, fences, etc.), the raw materials used, and technical and economic factors. Some common materials used for the construction of walls (for example, blocks of foam and aerated concrete) are especially demanding on the quality of the base, since they can crack under bending loads.
Among the main types of foundation are:
- Pole base - suitable for lightweight buildings erected on non-heaving, stable soil.
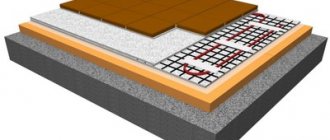
- Slab foundation, optimal for a house used year-round. The disadvantage of this type is its significant thermal inertia, which is why it is not very suitable for country houses.
- Ribbon structure, the advantages of which are ease of construction and a wide range of possible applications. Such foundations are common in low-rise buildings for various purposes.
- Foundation on metal piles. There are different options for its execution, for example, liquid and using screw structures. This option is also suitable for areas with significant elevation changes.
The best soils for building a house are coarse sandy and dense, non-moist clay soils. In such conditions, even a tape design will provide reliability.
It is better not to build structures on some soils. These include peat, chernozem, dusty, water-saturated soils. These soils are subject to replacement or special measures for consolidation.
How to properly level the foundation after pouring
Leveling the surface of the tape is done for two purposes:
- Aesthetic . After dismantling the formwork, traces of boards or other elements often remain. Differences of up to 10-15 mm on the side surfaces are eliminated by conventional plastering. A reinforcing mesh is attached to the surface and a leveling layer of plaster is applied.
- Practical . This option allows you to correct more serious errors with the formation of differences of more than 30 mm. In this case, it is necessary to reinstall the formwork in problem areas and fill in the leveling layer. The reinforcing mesh is preliminarily attached, the point of maximum displacement of the surface from the design contour is determined, and the formwork is installed. After pouring, the concrete is cured as usual.
Correction of the upper surface is carried out by installing partial formwork and pouring a leveling layer. Horizontal control is carried out using a laser level, level or conventional construction bubble tool.
After pouring, the surface should be smooth and horizontal, ready for the construction of walls.
↑ How to save on foundation
And is it possible to save money? When building a house, these are common questions from developers: how to pour the foundation for construction cheaply and with high quality. You can save a little:
- Expensive work when building a house is considered to be digging a pit and pouring the foundation for the building with concrete mortar. Here everyone chooses independently: to carry out the preparatory work and pour the formwork with concrete themselves or to invite a construction team.
- Digging the trench and pouring the shallow foundation yourself will save a lot of money. Only this type of foundation is suitable for the construction of one-story houses made of lightweight building materials. In other cases, a deep foundation is required, which is poured below the freezing point of the soil.
- Removable formwork is assembled from boards. After dismantling the formwork, these boards are used to make a subfloor or for other construction work. To make the boards look “decent” after dismantling, make shields out of them and cover them with plastic film. The film is attached with a construction stapler. When the formwork is dismantled, the film is removed. And the boards basically look the same.
- By pouring a slab foundation, you can save money. To do this, use a thin base, forming stiffening ribs.
- You can save money by using fiberglass rods instead of steel reinforcement.
Concrete hardening time
The hardening period of concrete is quite long.
In practice, exposure is carried out in stages:
- The first three days are watered 6 times a day (every 4 hours).
- Then water for 7 days three times a day.
- After 10 days of exposure, the formwork is dismantled.
- After 28 days, the tape is ready for further work.
Watering allows you to balance the loads that arise due to the difference in humidity inside the tape array and outside.
NOTE!
A 28-day curing period does not mean that the concrete hardening process is complete. The material has only gained sufficient strength to continue construction, but the hardening of concrete continues for a long time.
Pouring concrete
Concrete for pouring the foundation can be ordered ready-made at the factory, or you can mix it yourself, which will help save money. To prepare your own concrete you will need:
- Cement M400-500.
- Sand.
- Crushed stone.
- A wheelbarrow for transporting the solution to the right place.
- Shovel for mixing all ingredients.
- Concrete mixer.
The required solution is first mixed from dry ingredients: 50 kg of cement, 150 kg of sand, 250 kg of crushed stone. When the resulting mass becomes homogeneous, pour in 60% of the cement mass with water.
Table of composition and proportions of concrete mixture
We fill the foundation with concrete gradually, in a layer of 10-15 cm. Each layer should be compacted with a shovel or hoe and tapped with a hammer on the formwork. This is necessary so that there is no air left in the concrete, which could later cause delamination of the concrete. When pouring the foundation, it is also worth removing the white foam from the poured mortar from time to time, which, like air, will delaminate in the future and make the concrete weaker.
After mixing the concrete with your own hands, you need to use it within 1.5 hours. It is important to remember that the more time passes between pouring each layer, the weaker the concrete will end up. Therefore, it is advisable to have time to complete the task within 24 hours.
At the end, when the entire foundation is poured and leveled, it is allowed to settle for 3-4 hours and covered with burlap to protect it from the harmful effects of the environment.
Strip foundation
Important: You can level and correct ready-poured concrete before it begins to set. If you do this later, it begins to crumble, and it is no longer advisable to touch it.
On the 4th-5th day the foundation is considered ready for removing the formwork. It is during this period that all additional structures are removed. If you rush and remove everything earlier, the foundation may lose its original shape, and if later, then it will simply be impossible to pull anything out of the hardened concrete.
The purchased concrete is ready for further construction, namely the construction of walls, after the 20th day from the day the foundation was poured. Do-it-yourself concrete should be left to dry completely for 25-28 days. Afterwards you can continue building the walls.
Waterproofing
Waterproofing is the procedure of applying a cutting layer to the surface of a concrete strip.
There are two types:
- Horizontal waterproofing. It is performed from below and above the tape and allows you to eliminate the process of capillary absorption of moisture by the concrete tape from the lower soil layers or to cut off the walls from the concrete, preventing the penetration of water. Usually a double layer of roofing material is used, coated with hot bitumen or mastic.
- Vertical waterproofing. This is the process of applying insulator to the side walls of the tape. Various materials are used, roll, liquid or impregnation.
There are opinions that waterproofing is not necessary. Some experts are inclined to believe that moisture does not pose a serious danger to concrete. However, in regions with severe frosts, wet concrete can be destroyed by water expanding during freezing, so waterproofing should be taken as responsibly as possible.