Installation
Date of publication: 10/13/2015
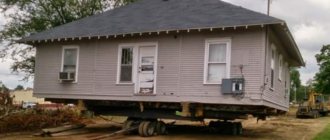
2
65282
- What is the essence of construction
- First stage of construction: foundation
- Second stage of construction: walls
- Third stage of construction: roofing
- Fourth stage of construction: floors
- Fifth stage of construction: finishing
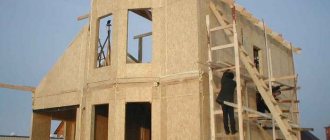
Over the past few years, the construction market has been flooded with so-called frame houses, which are erected weekly in huge numbers both by companies and with their own hands. The reason for such love for “frameworks” lies in the ease of construction and the pace of construction. The phased construction of a frame house allows you to assemble a full-fledged residential building in one season, which will look quite presentable, and have an attractive price and cost-effectiveness in maintenance. The technology is easy to understand and implement with your own hands.
DIY frame house
Content
- Construction of the foundation of the house
- Basement of a house
- Installation of frame walls
- Frame wall cladding
- Window installation
- Roof, rafter system
- The final stage: interior decoration of the house
- Basic materials and tools used in the construction process
- Auxiliary structures for house construction
- Bottom line
About the construction of mini-houses: thinking through the details
When you decide on the material and purpose of the structure, we suggest collecting more information on how to build a small house. Let's start by thinking about the most important characteristics that will determine the future design specifications.
- How many floors, residential and auxiliary premises are expected?
- Is there a need for a toilet, bathroom (shower, bath, sauna), catering unit, garage?
- What will be the geometric shapes and dimensions of each room?
- What architectural style is preferable, what volume-spatial solutions would you like to achieve as a result?
- What the foundation will be made of, the type of supporting structure.
- What systems need to be designed and installed - electricity, sewerage, water supply, air ventilation.
- Is external finishing necessary (in the case of wooden huts, the natural appearance of logs or boards is often left)?
As for the interior design of a mini house, you should show real designer taste and approach: maximum functionality in a modest area, so that the space is comfortable for living and free from clutter. Plan in advance for the presence of niches, use the entire usable area, including the space under the stairs , give preference to laconic interior styles (Scandinavian, minimalism, eco-style).
Construction of the foundation of the house
The entire construction process was planned to be completed on our own, but the construction of the foundation was still entrusted to a construction company. It had to be built quickly. They decided to make the frame on screw piles, since they have a number of advantages:
- Such a foundation is made on any type of soil, in this case the area is unkempt, unplowed, with turf growing;
- Construction takes little time - the foundation was laid in one day;
- Construction on screw piles will cost much less than a traditional foundation;
- Piles can be screwed close to utilities;
- Such a foundation will last more than 80 years, and if it is filled with concrete, much longer.
The company's employees delivered the material and installed screw piles. The price for the foundation with work was $1100.
Note: Even if you are absolutely confident in the quality of the materials that were used to build the foundation, you should not leave it unloaded for the winter. There is a possibility that the piles will be displaced from the ground and the foundation may bend.
Stages of building a frame house
Let's consider the main stages of constructing a frame house in order.
Preparation and marking of the site
Preparatory work cannot be ignored. They are necessary in the construction of any house, and even more so a frame house, the construction of which must adhere to a certain technology. If you created the project yourself, you probably took into account the characteristics of the soil on the site. If the project was purchased, you will need to adapt the project to your site.
First you need to do the following work on the site:
- Clearing debris: there should be no building elements, branches, snags, or stumps. If you purchased a plot with an old building, you need to dismantle it and remove construction debris.
- Preparation of entry for transport. Free entry to the site is necessary both for garbage removal and for the delivery of building materials. It is important to provide for the possibility of turning equipment around the site.
- Leveling the area. A large number of hillocks, depressions and other irregularities will interfere with your marking and assessment of the slope of the terrain. Rough leveling must be done before the start of construction work.
- Creation of a temporary warehouse. Consider where you will store building materials. If the terrain is uneven, it is better to stack materials in elevated places so that moisture does not accumulate in them, and also to build a canopy to protect them from precipitation.
Before building a frame house, it is necessary to make markings - this is a designation on the area where the future structure will be located. The diagram, created in electronic media or on paper to scale, is correctly transferred to the site using bars and ropes. The stakes are dug into the ground, and a rope is pulled between them to mark the walls, as shown in the photo:
Marking for a frame house
During marking, the angles are measured so that they are clearly 90°, taking into account the length of the walls indicated on the diagram. Even minimal deviations in calculations and degrees must be avoided - the consequences are fraught with warping of the walls from the slightest load - such a house will not stand for long.
Types of foundation: which one is better for a frame house
The construction of a frame house cannot be done without laying a high-quality foundation. It is the basis, a perfectly flat “stand” that holds the entire structure. The goal is to evenly distribute the weight of the house to prevent any deformation.
Frame construction is considered “lightweight” because the walls are quite light and do not put pressure on the soil and foundation as much as brick or concrete buildings. Therefore, the foundation for a house is usually quite simple, but capable of supporting load-bearing walls - this is a pile or shallow strip foundation. However, when choosing the type of foundation, it is important to consider the overall weight of the structure and the condition of the soil.
Pile foundation
Required if the soils are unstable, heaving, mobile and unstable, partially eroded or filled with moisture. This occurs on clay or heavy loams, and also happens if construction is planned near a river or reservoir. This type of foundation involves the installation of piles that are screwed or drilled deep inside, where there are motionless, persistent layers of soil. Piles can be metal screw or poured, when concrete is poured into a drilled hole using reinforcement. On loose soils, special formwork or casing are used for strengthening.
Strip foundation
This is a stone ribbon that goes into the ground approximately 100-400 mm. From above, such a foundation rises to 300 mm. The total height will be up to 700 mm. The tape is poured into previously dug trenches. As for pouring, this is a concrete solution that you can do yourself. First, a “sand cushion” of up to 100 mm is created in the trench, and metal reinforcement is placed on top. Afterwards it is filled with solution.
If you wish, you can deepen the base lower or make it higher - the parameters are at your discretion. To do this, you will have to spend more materials, but the base design will be more bulky and massive.
Slab foundation
Its other name is floating. It is so called because it takes into account the seasonal expansion of the soil: the base will rise and settle along with the soil. The quality of the material cannot be neglected: the slab must be as resistant to loads and mechanical damage as possible, and be strong and durable.
Such a foundation is created from reinforcement and concrete. The reinforcement is tied with wire in the form of a mesh to increase strength. The slab is immersed in the ground by 100 or 200 mm - this is the minimum depth. You can do without this - pour concrete directly onto the gravel bed. The slab should be approximately 300mm in height.
Waterproof concrete additives are helpful to keep the slab protected from moisture. And then there will never be wet floors or dampness inside the house. Such a foundation will last for many years.
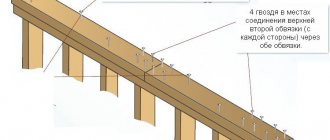
Timber tying
In the construction of a frame house you cannot do without strapping. Horizontal timber beams are placed on top of the installed piles, which act as a frame and serve to distribute the weight of the house. To create a strong harness, as a rule, choose a beam with a section of 150x150 mm. The corners are connected using the half-paw or half-tree method, which can be seen in the photo:
Corner connections
When using one method or another, it is necessary to remember that the thickness of the cut of the tree plays a significant role here. Half-foot - the beam is cut so that the elements are at an angle to each other. Half a tree - half the thickness is cut off. The connections are secured at the top with a plate. A metal bracket is also used for better strengthening. After this, the corner of the strapping is installed on the foundation and a reliable fastener is created using a metal anchor. Do not forget that the timber must be treated with a special antiseptic solution.
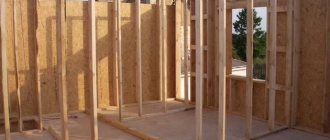
Installation of a frame house
The installation instructions begin with the frame - this is a very important point in which you need to select the right boards, beams, and connect them using the chosen technology.
Frame
Step-by-step instructions for constructing a frame:
- Measurement process. Those places where the joints of wooden parts will be located, as well as where the racks will be installed, must be measured with a tape measure so as not to make mistakes in the calculations. Afterwards, mark everything with a pencil so that subsequent work is carried out correctly.
- Checking corners. First, check the racks to see if they are vertical and if there are any deviations from the required size and angle. Check the angle of the connection, as well as the horizon of the upper trim. There should be a clear 90° angle between the beam and the stand without the slightest deviation.
- Selection of fasteners. It is very important that all frame elements are securely fastened together. For this purpose, the most durable parts are selected.
Wall assembly
A frame house is assembled from elements that are prepared in advance and assembled separately, like a children's construction set. The finished templates and walls are lifted, supported with beams for temporary installation, and then fasteners are used to securely connect.
How walls are built:
- First, lay the bottom trim.
- Wall frames are assembled separately for each side. These are vertical elements, also lower and upper. Otherwise, such details are called templates. They are lifted and placed on the harness.
- Another frame is built on top of the templates - the top one. It is needed to install the roof rafters.
The template is usually 6 m or more in height. Naturally, no one will be able to cope with such a cumbersome detail on their own. Therefore, it is advisable that the template be lifted by three people, no less. If the walls are required to be taller and longer, then for their construction several templates are connected into one using threaded recesses.
Ukosiny
These are inclined frame elements that are indicated in the house diagram. They perform an important role - they increase the strength of the entire structure. To create jibs, take boards 100-50 or 150-50 mm. To ensure that the parts are positioned correctly, carefully study the diagram, and also consult with a specialist in this matter so that the installation is performed perfectly accurately.
Rigel
A crossbar is a board located horizontally. It is attached together with the board, which is located in the upper frame. First, the crossbar is fixed into a template, which is assembled on the ground. To create this element, wooden elements with a thickness of 50 mm or more are used. It is the crossbar that ensures that the load on the racks is even and there are no distortions or tilts.
The crossbar is also an additional support between the inclined parts of the roof. This word can denote all beams that are used in construction and work in compression.
Piers
Internal walls or partitions between rooms are assembled in the same way from separate templates, and then installed entirely into the structure. Since the walls inside are almost not loaded with anything, they are made of lightweight boards with a small cross-section. But don’t forget about sound insulation. The thickness of the walls should accommodate soundproofing material, as well as insulation if necessary.
Angles
The corners play a very important role in the frame - the load on them is substantial. Therefore, it is advisable to assemble the corners from several boards - take two or three supporting elements.
Doors and windows
If you have installed the frame correctly, installed the internal walls and strengthened the corners, it’s time to install the doors and windows. It will be much easier to order windows along with the installation service, since installation requires certain skills and knowledge. This kind of work is best left to specialists.
The doors can be assembled independently with ease. The box is created from wooden boards, which should have a thickness of 25-30 mm.
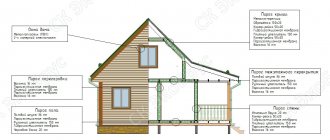
Roof
The types of roofing and the principle of roofing a frame house do not differ from houses built using other technologies. First of all, you need to decide on the type of roof structure. Most often they choose between a gable and a sloping mansard roof. The first option is easier for a DIY device. If you are building a house for the first time, it is better to go with this option.
In this case, it is necessary to check the slope of the roof slopes included in the house design. The most optimal slope is considered to be 30-45 degrees, which ensures natural drainage of snow and water during precipitation.
The roof frame is a set of rafters supported by strapping beams - mauerlats and a ridge girder. To generally strengthen the entire roof structure of a frame house, a horizontal beam is used, with which the upper part of the rafters is fastened - the wind crossbar. A base for installing insulation and roofing material is mounted on top of the rafter structure - a sheathing made of dry boards.
Particular attention is paid to the calculation of the rafter system: the number of rafters, their length and cross-section, installation pitch, fastening method. You can select the appropriate section yourself or using special construction tables. The parameters of the rafter system are influenced by the expected wind and snow loads, the weight of the roofing materials, and the roof slope angle. The rafters must be completely identical.
The construction of a roof in a frame house begins with marking the bottom frame. At the next stage, the necessary calculations and verification of the parallelism of the installation of the entire structure are carried out; the last stage of preparation for the construction of the roof is the alignment of the strapping boards.
Subfloor
To properly create a subfloor in a frame building, you need to know the step-by-step process. The floor of a frame structure consists of two layers: the subfloor (base) and the finishing floor. The subfloor can be concrete or wood.
The construction of a concrete floor contains several layers:
- Sand layer, which should be approximately 10 mm.
- Thermal insulation made from expanded clay. Sometimes other materials are used - penoplex, sawdust mixed with clay.
- Waterproofing - concrete is poured into which substances are added that protect against moisture.
When constructing a wood subfloor, there is usually a hollow space underneath. Wooden logs are placed on top of the lower frame, and the floor boards are already attached to them. From above, through the insulating material, insulation from the material of your choice is placed on them. The finished floor covering is spread on it, also through a vapor barrier membrane: OSB, laminate, linoleum and others.
Watch a video about building a frame house from:
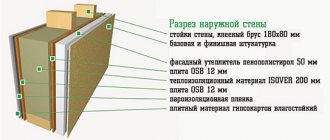
Insulation and filling of the frame
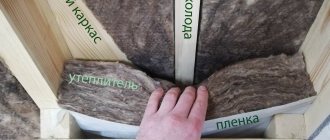
Now the power frame is already ready. It's time to address the issue of insulation. Properly selected insulation will help maintain a comfortable temperature regardless of weather conditions and season. There are many options for insulating a frame house. The most popular are mineral wool and its derivatives, glass wool and ecowool; polystyrene foam is still popular, the use of which still has a lot of limitations:
Mineral wool
It is considered the best option for insulation. It is available in the form of mats, compressed for ease of use. It allows enough air to pass through, does not create condensation and minimizes heat loss. Over time, the material remains the same: it does not clump, does not cake, and does not lose its original qualities. It may shrink a little at first - during installation. But then it completely straightens and fills all the cracks and seams, thanks to which drafts will not flow around the house.
But remember that mineral wool absorbs moisture quite well, so it needs to be protected from the outside by covering it with a membrane film that will allow air to pass through and protect it from high humidity. The structure of the membrane is such that it does not interfere with air exchange, so it can and should be used. Thanks to it, there will be no dampness in the house; you don’t have to worry about condensation, mildew, mold on the walls and other troubles.
Sometimes polyethylene is used instead of a membrane. In this case, all the “breathing” properties of the material disappear. Then you can simply use cheap polystyrene foam and not spend money on mineral wool.
Styrofoam
Foam boards are made from polyurethane foam. They are much cheaper than mineral wool, but this is their only advantage. They leave gaps and you can’t do without additional sealing: you need to fill everything with foam. Also, foam plastic does not allow air to pass through, which is why condensation can accumulate in the rooms and dampness may appear in the air. This kind of insulation will require the mandatory installation of an exhaust ventilation system.
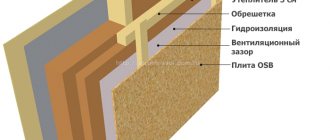
Remember that the exterior finishing material may also not allow moisture to pass through or remove it from the house. That is why it is advisable to leave a ventilation gap between the plates and the membrane, through which moist air will be removed. To create a gap, take a wooden sheathing with parameters of 50x50 mm and install it along the supports.
Read more about energy efficiency and insulation in our article “Energy-efficient home: technology or fashionable bait?”
Finishing work
Finishing work is the final stage of building a frame house. Finishing is divided into external and internal.
Interior decoration
Interior finishing consists of installing finishing material. This material may be:
- lining
- drywall or gypsum fiber followed by wallpapering or painting the walls
- OSB board for subsequent plastering of walls
Sequence of finishing work:
- Install interior wall material from OSB or plasterboard.
- Eliminate joints. Pay attention to the gaps between the panels: they will certainly be there. If we are talking about drywall, then it is advisable to putty all the joints or glue them with paper tape.
- Primer. If you want to hang wallpaper, apply glue to the surface, and use a special primer for paint.
- Finishing. This includes painting walls, applying drawings, decorative elements, a layer of plaster, gluing wallpaper, gluing sheets of cork, etc.
Frame construction technology provides sufficient freedom in choosing materials for the interior decoration of the house. However, there are nuances associated with preparing the foundation. Read more in our article “Interior decoration of a frame house.”
Exterior finishing
Exterior finishing, in addition to being aesthetic, also has a protective function, so the choice of finishing option is also influenced by the climatic features of the region where the house was built.
There are two key principles for installing the facade of a frame house - with and without a ventilated facade. A ventilated facade allows you to create an additional insulation circuit for the house, which is why it is chosen most often.
The exterior finishing options themselves are very diverse - from wooden panels, block houses and imitation timber, and from inexpensive plastic siding to expensive thermal panels and facade clinker tiles. Frame technology allows you to implement any design ideas: facades can be combined from 2, 3, or even 4 different materials. Read more about exterior finishing options in our article “Finishing a frame house.”
Basement of a house
Do-it-yourself frame construction, as is known, is usually carried out using the “platform” technology. However, it was decided not to follow this advice, since there was a possibility that the insulation would get wet if it rained. That's what we decided to do.
After the foundation was prepared, it was time to install the frame and joists of the house. We carefully laid out boards for strapping measuring 150x50 cm and treated the wood with an antiseptic (in this case, Senezh red ognebio). The harness was assembled according to the drawing. We attached it using a nailer with rough, glue-coated nails 0.9 cm long. We did everything according to the level, the diagonals met perfectly. As a result, the result was a harness with a height of 15 cm. The entire process of creating the harness took about two days.
A load-bearing beam was placed strictly in the center of the frame (along the building). Its function is to support the sexual lags. After this, an antiseptic should be applied to the entire beam.
Boards were nailed on top of the strapping at a distance of 60 cm from each other. A beam of 150x50x600 cm was filled, acting as a subfloor. Two layers of polystyrene foam were laid in the formed cells - the first layer was 5 cm wide, the second was 10 cm wide, which was foamed around the edges and covered with 50x300 cm boards.
Advice: You should make the holes in the harness slightly larger, otherwise you will have to flare it.
Electrical wiring
There are special requirements for electrical wiring in frame houses. The structure, partially made of solid wood, has an increased fire hazard. Therefore, all electrical wiring installation work must be carried out by a qualified specialist.
If the wiring is internal, then all installation work is carried out at the construction stage, before the interior rough finishing is completed. The wiring diagram should be stored along with the most important documents; you cannot do without it during finishing work, repairs, or interior renovation.
External wiring in a small frame house is safer. Moreover, modern electrical appliances and components can turn it into a real interior decoration, for example, the use of twisted wires on roller insulators in a retro style.
Installation of frame walls
Tip: Wood for building walls should be chosen with no more than 15% humidity.
They assembled and raised the walls quite quickly. We decided to assemble the frame walls in a horizontal position on the prepared floor, since there is a possibility of encountering the problem of inaccurate calculations in the drawings.
The future walls of the house were assembled right on the floor. It is necessary to take into account that the slab must overlap the upper and lower frames by at least 5 cm, so the stand height should be selected from 2.6 meters.
When the installation of the walls is completed, it is recommended to check their level using a cord; this can be done as follows: pull the cord from one corner to the other. If there are still deviations, the walls must be pressed in from the side from which it is necessary to align. After final leveling of the walls, the jibs should be nailed.
Note: In order not to waste valuable time on leveling walls and filing posts of different lengths, you should carefully measure everything several times.
Glulam beams were used for the floors. They can withstand higher loads, which makes it possible to increase the pitch between the lags. Spacers were inserted between the floor joists.
Preparation
The project of a house in the shape of a ship with panoramic glazing was approved not only by the whole family, but also by members of the forum.
There are many similar examples on our portal, but this one is interesting not only for the original design of the house, but also for its thorough approach to construction. Neither more nor less - to save money and optimize the process of extraction/delivery of building materials, a truck was purchased.
Cyberb
Since the construction was planned to be extremely budget-friendly, we decided to buy a truck, and after looking at about a dozen fairly tired examples, a pepelats was purchased, which I called Hottabych. Having paid thirty-five thousand hard-earned thousand to the greedy owner, they shook hands. On the very first day, “horns” were welded onto the front side for transporting a six-meter gun.
Then, in the last days of August, the craftsman “landed” into the field with his acquisition, simultaneously picking up used lumber - about five cubes of dry timber and boards, which had successfully served as a stable for three years before. The peculiar aroma did not scare away the craftsman, since he was once involved in equestrian sports, plus treatment with lime both disinfects and removes the smell.
The development of the site began with an attempt to mow dead wood by hand - literally fifteen minutes showed that not everything is so simple. Fortunately, only the braid I bought could not stand it and broke. A neighbor, also our forum member with the nickname Garich, came to the rescue and “treated” him to a gasoline trimmer. In two days the grass stand was finished, and it was time to mark out the foundation and dig a pit. The craftsman advises everyone who is just planning to do this to sharpen a new shovel - “life will become brighter.”
Frame wall cladding
External cladding was used with 9 mm OSB sheets, this is sufficient to provide the necessary rigidity. The bottom sheets were installed from the ground, and sometimes homemade sawhorses were used, and scaffolding was used to install the top sheets. The sheets were fastened using screw nails 50-60 mm long at a distance of 1.5 cm.
Tip: In order not to constantly count the required gap between the OSB sheets, you need to install two nails into the frame posts and place the sheet on top. Thus, a gap of the required size, 3 mm, is obtained.
After covering, we painted the edges to prevent them from swelling due to rain.
Tip: OSB sheets are an excellent wind barrier, but you should still be careful about minimal waterproofing to prevent the material from swelling.
The facade was wrapped with windproof film, and doors purchased in advance were installed.
How did you prepare for the construction season?
All winter before construction I was busy preparing the land. Meanwhile, dad was making a house project in SketchUp. He thought through all the connections, passages, sizes, distances - all the subtleties. By the start of construction, we had the clearest possible plan. Only thanks to this we were able to build quickly. If after each stage you go looking on the Internet for what to do next, you can take a very long time to build.
Window installation
Windows, like doors, were installed after wrapping the façade of the house with film. No cutouts were made in advance for window and door openings. The following technology was used: the film must be carefully cut and the ends bent inside the opening, secured with a stapler. Next, insert the window block level and foam the seams. After the polyurethane foam has dried, carefully remove the excess. This eliminates the possibility of moisture getting between the opening and the window frame.
Brick house
As brick became available, replacement of log structures began. The main reason was the fire safety of the brick.
Over time, it became clear that brick has other positive factors. Its small dimensions and geometric shape made it possible to create various architectural masterpieces. Since brick comes in a variety of colors, it can be used to create a colorful façade without the need for additional cladding.
In addition, such a brick country house has another advantage - it is environmentally friendly.
Clay, sand and water are used to make bricks.
The brick is made without chemical impurities and has no odor. The material is characterized by high strength and long service life.
Such a beautiful house can last for ages, since it does not react to atmospheric changes.
Project of a small house with an unusually shaped attic and garage
The material is frost-resistant, not afraid of mold and mildew. In addition, the brick is distinguished by:
- increased sound insulation;
- vibration damping;
- high thermal insulation.
Roof, rafter system
Installation of the rafter system
The next stage of building a frame house with your own hands is the roof. The roof model was carefully worked out, and it was taken as the basis for construction. For this house, a frame with a load-bearing ridge truss was chosen. At this stage, the most important thing is to install the ridge correctly, then it will be easy to mount the rafters made according to the template. It is important to note that the width of the ridge must be no less than the length of the rafter support.
Rafters 150x50 were installed at a slope of 20 degrees. It is better to attach the rafters to the ridge beam using metal corners.
Note: One rafter sample should be made and each subsequent piece should be measured only according to this sample to avoid errors.
Roof installation
To improve the ventilation of the room, vents were made under the ridge and an upper ventilation gap measuring 50x50 mm in the roof structure (concrete lattice).
Tip: Regardless of whether you insulate the roof or not, you must install waterproofing and install two ventilation gaps 2-4 cm high.
Since the attic was not intended as a living space, insulation and heating were not particularly dealt with. A wind- and moisture-proof film was used instead of a membrane, so a mandatory gap was created. We decided to insulate the roof with 1.5 cm rockwool.
When fastening the sheathing, you should ensure that it extends beyond the outer rafter by approximately 20-50 cm. When the sheathing is secured, the excess must be cut off.
Tip: To avoid unforeseen situations, you should immediately fasten all roof parts as securely as possible. Thus, the strength and rigidity of the entire structure will be ensured, regardless of unforeseen weather conditions.
The roof of the house was covered with metal tiles, since it is ideal for a gable roof - minimal material consumption is provided.
Types of houses by materials and purpose
The overall cost of the project and the comfort of living are primarily affected by the selected building material. The choice of materials for building a small house depends on the climate, aesthetic preferences of the owners, as well as financial capabilities. The most popular options among customers today are as follows:
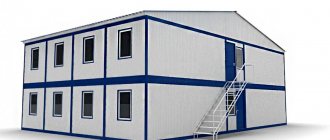
- a building made of sandwich panels attached to a frame made of metal or wood;
- house made of boards;
- miniature brick domilion;
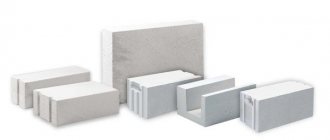
- residential structure made of foam blocks.
Temporary dwellings are distinguished according to their purpose - a hunting lodge, a winter house, a country house, a mobile small house on wheels, a guest house, an extension to the main cottage.
House with frame structure
A simple frame house is characterized by a durable, well-fitted structure - wooden or metal. After installing the finished sandwich panels on the walls, the building is subject to insulation and external finishing, after which the home can be used. You can assemble a house on a frame basis on any soil, including unstable soil, with predominant silt and marshy soils.
The advantages of frame technology: speed of construction, work in any weather and temperature, unpretentiousness of the design to the initial conditions, stability of the finished frame house. The disadvantages are insufficient sound insulation and the risk of fire when using wood .
The use of sandwich panels is dictated by the low cost of technology, speed of installation, good thermal insulation properties, and normal reaction to temperature changes. In order to be minimally dependent on weather conditions, sandwich panels with an anti-corrosion coating and a waterproofing shell are chosen.
House made of wooden beams
The healthiest microclimate will be provided by a house made of boards. This is an environmentally friendly material with high-quality air exchange that retains heat inside the building. Fans of natural wood value it for its visual beauty and durability, but it is necessary to understand that behind the external attractiveness of a wooden structure is regular maintenance: the wood is processed, the paint is periodically updated. You should also be aware of the potential fire hazard of wood . The main building materials for walls and partitions are solid, glued or profiled timber, rounded logs, boards.
A hunting lodge made of wood in the forest, in close proximity to the hunting grounds, looks very harmonious. To build a hut right on the territory of a forest or protected area, be prepared to go through several authorities and fulfill a number of conditions in order to obtain permission. It is most profitable in terms of time and money to purchase a plot and build in a village next to a forest.
Useful: Unusual frame houses: types and technologies
Brick or foam block?
Brick and foam blocks are well suited for constructing buildings with your own hands. The use of these materials assumes that the building will be heavy and require a solid foundation underneath. If we compare brick and foam concrete, brick walls will be lighter and more durable, but in order to avoid the formation of dampness in the room, a significant thickness of external walls . Porous concrete in the form of foam blocks is completely moisture-resistant, which is its main difference from bricks, and is also resistant to critically low temperatures. In terms of thermal protection, both materials showed positive results.
If, from your point of view, ideal construction should be inexpensive, give preference to a small house made of foam blocks or gas blocks (the second option is more suitable for periodic pastimes - a summer house, a winter house). Be prepared for the fact that in terms of time, constructing a building from blocks significantly exceeds assembling the frame of a house.
The final stage: interior decoration of the house
For maximum vapor barrier of the house and hermetic entry of communications, a film was used, which is designed to prevent moisture from entering the house, and steam should easily escape from the house. It is also assumed that the film will protect the house from blowing, especially where the frames and racks are connected. The standard film is 1.5 m wide, easily stapled and very tear-resistant. However, they attached it with tape.
Tip: It is better to seal joints and holes in the film vapor barrier with bitumen-rubber roofing sealant, since the tape is not attached firmly.
They laid floors, insulated the walls and ceiling.
We made a partition for the vestibule, brought electricity into the house, made internal sheathing and laid drywall. We laid OSB-3 9mm linoleum on the floor to support the insulation from below.
Ready-made mini-house projects using frame technology
Comfortable housing is considered to be multifunctional housing that can simultaneously satisfy the household and work needs of all family members. The main way to solve such problems is the correct layout of the premises, if necessary, dividing them into separate zones.
A frame mini house is quite capable of providing a family with the necessary useful space. There are already ready-made projects for such buildings, with the layout of areas for work and rest.
If you wish, you can create your dream home project yourself, incl. calculate the required area, quantity and cost of consumables.
One-story mini houses
Houses with one floor, the usable area of which is no more than 36 square meters. m, there are different modifications. They are intended for both summer and all-season use.
The cost of such housing varies from 600 thousand rubles. up to 1.2 million rubles. It will depend on the building materials and insulation chosen by the customer. The implementation period for such projects is from 1 month.
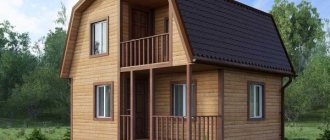
Small frame houses with a pitched roof
For a young family or as a guest house located in a large estate, projects of frame mini houses with a pitched roof are suitable. Their usable area is about 35 square meters. m. Depending on the configuration and type of finishing, their cost can range from 800 thousand to 1.5 million rubles.
Private houses with flat roofs
There are projects of small housing with a flat roof. These are modern frame-type houses, designed in a minimalist style, but with all the necessary amenities for a comfortable stay.
This mini housing project is perfect for a small family. Usable area of premises up to 65 sq. m. Construction completion period – from 80 days. The cost of finished housing is up to 2 million rubles.
Small cottages with attic
You can also order a mini-cottage project with an attic of 51 square meters. m. The small house has a combined kitchen-living room and 2 bedrooms, incl. bathroom and toilet.
The implementation period for such a project will be from 1 month. The total cost will depend on the design configuration and finishing materials chosen by the customer. Starting price – from 600 thousand rubles.
Basic materials and tools used in the construction process
- Screw piles;
- Rockwool 1.5 cm for roof insulation;
- Boards 150x50 m;
- Antiseptic for treating all wooden coatings Senezh red ognebio;
- Rough nails 90 mm;
- Screw nails 50-60 mm;
- Sheathing paint;
- Metal tiles;
- Film for the facade and vapor barrier of the house;
- Windows and doors;
- Drywall;
- Workers from a construction company were hired to install the façade;
- OSB 18.3 mm (subfloor) and 9 mm (wall and roof cladding);
- Foam plastic for subfloor;
Auxiliary structures for house construction
When building a frame house, it is necessary to have various temporary structures. To secure the films and cover the frame with OSB sheets, homemade scaffolding, a trestle, and a wooden ladder were used. Scaffolding, trestles and making a ladder with your own hands is not at all difficult.
Construction of frame houses and their prospects
Most construction market analysts agree that this kind of construction is the future. Even in our country, in recent years there has been an increase in interest in mini buildings. There is nothing surprising here, because frame house projects are based on three principles:
- simplicity;
- efficiency;
- high speed of construction of the facility.
Foreign experience of living in such a house has proven that they perform well in extreme conditions; they were used for living in the desert, where the daytime temperature reaches +60 and in the Far North with its -60 degrees.
For some reason, most people are sure that frame houses are very fragile, this is a common misconception, they are quite strong and have excellent earthquake resistance, thanks to their frame they can withstand shocks of up to 9 points. By the way, this became one of the decisive factors why they are especially popular in Japan and New Zealand.
Due to the fact that only natural materials are used in creating a mini house, living in it is absolutely safe. Now the market is replete with a huge variety of configurations, but it is always worth remembering that you can order such a building taking into account your preferences, without relying on types.
Bottom line
In just a month and a half, we managed to build a foundation, make a full-fledged frame of the house, and insulate the walls and floor. At the same time, all work (except for the facade) was carried out on our own, without the involvement of hired workers. Using similar technology, it is easy to build other buildings, for example, a do-it-yourself outbuilding. About $6,000 was spent on building a 6x4 frame house with your own hands, excluding the exterior cladding of the house.
Based on materials from Forumhouse
How much does it cost to build a small house
We'll tell you about an approximate budget if you are planning to build a popular frame structure. So, how much does it cost to build a small frame house? We recommend focusing on four price categories, in which we included the price of the foundation, doors, windows, engineering systems, interior decoration, but without the cost of construction work . Considering the variability of the price tag for work in different regions of the country, calculate it in the range from 40 to 70% of the estimate for materials.
- If you have a budget of up to 500 thousand rubles, as a result you can get a small frame house on one floor with an approximate area of up to 50 square meters. m. If saving resources is a priority, choose the most laconic forms, an open plan, cheap (used) building materials, get by with a small pumping station and a dry closet instead of a sewer system . For heating, design a small brick stove.
- To invest up to a million rubles in your budget, consider options for frame house projects with an area of 50 to 70 square meters. m. It can be a square or rectangular building, a short length of communications, insulation in this category, usually made of basalt or stone wool. For exterior finishing, you can order imitation wood or cork. For heating, it is advisable to consider installing a gas heater or electric convector .
- With an upper limit of one and a half million rubles, you can assemble a house from 85 to 110 square meters. m. The golden mean in the pricing policy of installing small houses for permanent residence, but you will have to balance in the choice of materials and technologies: plastic or wooden windows, eco- or mineral wool, block house or siding. When choosing expensive material, you will have to save on other elements of the home.
- If you are ready to spend up to two and a half million rubles, the result, with a reasonable approach, will be a full-fledged frame of about 120 square meters. m, which can be considered as a mini home for year-round family living. The project can already include a reinforced layer of thermal insulation (up to 20 cm), high-quality energy-saving double-glazed windows, and bimetallic heating radiators. You can afford to decorate a small house with a terrace, mezzanine, balcony or bay window.
Useful: Cheap frame houses