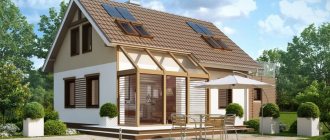
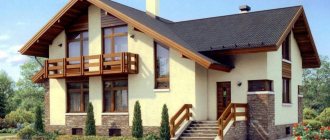
What is the best material to choose?
First you need to figure out what aerated concrete is and what aerated silicate is, and whether there is a difference. These materials belong to varieties of concrete and differ only in manufacturing technology, but have the same characteristics.
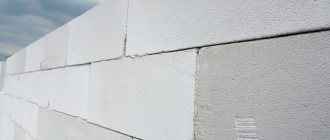
Gas silicate is aerated concrete, which may not contain cement at all, or may be present in small doses. A silicate mixture is used for the binder.
Aerated concrete is made from cement, water, lime and quartz sand . Both compositions undergo the same technological process. To form pores in materials, paste or aluminum powder is used. Non-autoclaved concrete is produced using old technology.
The difference in name (gas silicate or aerated concrete) refers to the material used to create the product. According to the new standard, autoclaved concrete does not require marking of the binder composition, so it is more correct to call this type “aerated concrete.” It is worth noting that in practice the same product can be called differently.
Autoclaved and non-autoclaved aerated concrete
Autoclaved concrete has a number of advantages:
- made using special technology, it is more durable;
- has soundproofing qualities;
- has less weight compared to other concretes.
The main disadvantage of autoclaved concrete is its great fragility.
Although non-autoclaved concrete is of lower quality, it also has some advantages. It absorbs less moisture and is cheaper.
When choosing a material for construction, you need to know a number of parameters . Density: the strength and thermal insulation characteristics of gas silicate depend on it. Blocks with a density of 500 kg/m3 are considered suitable for the construction of low-rise buildings.
Durability: this parameter depends on the quality of production. Good quality means the minimum amount of defects found in the purchased blocks. Ease of processing: it is easier to finish walls using gas silicate than brick.
Dimensions
When choosing the size of gas silicate blocks for building a house, you need to decide on the thickness of the wall (we'll talk about this below): an external wall with a thickness of, for example, 400 mm. can be placed either in one row or in two rows of 200 mm each. Here are the standard block sizes most commonly found on the market:
- Block width for external walls: 200, 250, 300, 350, 375, 400, 500 mm, for internal partitions: 100-150 mm.
- Length: 600, 625 millimeters.
- Height: 200, 250, 300 mm.
When choosing a material for building a house from gas silicate blocks, remember frost resistance . With strong temperature changes, intensive wear of the material occurs.
It would be a good idea to look at the product recipe. Remember, the more cement there is in the blocks, the less moisture it will absorb. When purchasing aerated concrete, you need to let it rest.
Gas silicate blocks have a service life of up to 100 years in a suitable climate and 50 in a humid climate.
Laying aerated concrete material
The preparatory stage is represented by the following steps:
- Checking the horizontalness of the base. Deviations up to 30 mm are allowed.
- Cut-off waterproofing device. A layer of bitumen mastic is applied, and waterproofing is applied on top, using roll material. You should not choose cheap roofing material, which quickly becomes unusable.
- A level base is a prerequisite for simple masonry.
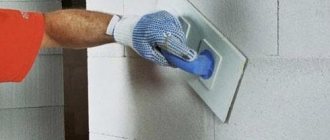
How to lay aerated concrete blocks?
The laying of aerated concrete blocks is carried out in the same way as brick. It is necessary to do horizontal tying of rows. The wall looks more aesthetically pleasing when the vertical seam falls in the middle of the aerated block; it is necessary that the indentation be at least 10 cm.
A special adhesive is applied to the blocks using a carriage equipped with teeth along the edge. To ensure a good fit of individual blocks and minimize heat loss, an adhesive thickness of no more than 1 - 2 mm is needed.
Advantages and disadvantages
The main reason for choosing this type of blocks for construction is their relatively cheap cost.
According to estimates, one square meter made from blocks is half as expensive as one made from bricks .
Many who built it claim that this is not entirely true. Since the material is quite fragile, there is a lot of fighting going on.
The cost of construction also increases due to the outer cladding of the walls. Without this it will not work, since gas silicate easily absorbs water and begins to collapse.
Not every material is suitable for wall covering . Siding is best suited for this purpose; you can line the walls with facing bricks, but this will increase the cost of construction. With dry cladding, you will need a gap for ventilation to prevent mold from appearing in the house.
When advertising their product, gas silicate manufacturers say that houses made from it will be warm and construction will not take much time. Is it so? The house will be warm, but then the walls will need to be protected from moisture.
Much depends on the geometry of the blocks; with an error (1 mm per 600) it will be easy to build a house . This quality of material can only be created by reputable gas silicate manufacturers, and the products will not be cheap.
When building a house, you should not skimp on mortar; glue for blocks retains heat better. The blocks are heavy and impossible to handle alone, but they are easier to process than bricks.
When building a house from aerated concrete, consider the following points:
- Do not build higher than two floors, the walls may not withstand the load.
- Make a metal mesh frame for each floor.
- The house requires a monolithic foundation.
- Remember that the walls will shrink.
In houses made of gas silicate it is easy to carry out electrical wiring and install heating. If you do everything wisely, the house will turn out warm, beautiful and built in a short time; you can move into it in less than a year.
An aerated block is 14 times larger than a brick. Building a house from blocks takes less time.
Let's compare the parameters:
- costs less than a brick;
- gas silicate is warmer than brick;
- The blocks have better thermal conductivity;
- Frost resistance parameters for aerated concrete are 50 cycles, for brick 80-100.
Flaws :
- low compressive strength;
- water absorption, the need to prime the facade.
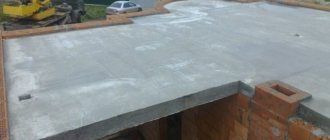
Let's start construction: foundation
To properly build a house from gas silicate, you need to lay a reliable foundation
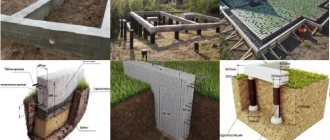
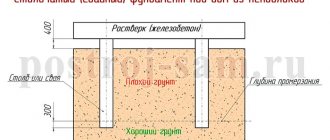
To properly build a house from gas silicate, you need to lay a reliable foundation. For a house of this type, the ideal options are a strip shallow foundation (provided the soil on the site is not heaving) or a slab monolithic foundation. The second has a higher price, but at the same time it can easily withstand the load of the house in case of heaving soil at a construction site. Such a foundation will simply maneuver in the ground, protecting the house from soil pressure from all sides. As a result, the house will remain safe and sound.
Both types of foundations are poured from prepared concrete mixture. To prepare it, use cement of a grade not lower than M-200, sand and crushed stone. The ratio of bulk materials is 1:2:2.5. All ingredients are diluted with water to obtain a mixture of medium consistency (like thick sour cream).
The resulting mixture is poured into pre-assembled formwork in a prepared pit or trench.
Important: to properly install the foundation, it is necessary to lay a sand and gravel cushion at the bottom of the trench/pit, and then lay a layer of waterproofing.
Foundations of both types must be reinforced with steel rods with a cross-section of 8-12 mm. It is necessary to knit a mesh from them, which will additionally strengthen the hardening concrete and make the base strong and durable.
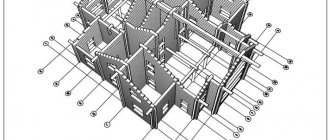
DIY technology for building a block house
Important: when pouring the solution, it is necessary to compact the mixture well using a construction vibrator, but without touching the reinforcement. This way, all air bubbles will come out of the concrete, and the foundation will have better density, which will have a positive effect on its strength and solidity.
The finished base is left to dry completely for about a month. After the concrete has completely dried, the foundation should be waterproofed on all sides.
Wall thickness
The optimal thickness of the walls of a block house must be agreed with SNiP. The use of gas silicate is strictly regulated:
- We need to calculate the height of the walls.
- Height restrictions are 4-5 floors.
- For three-story houses, the blocks must be grade B-2.5.
For summer living, adhere to the following rules:
- Use blocks with a thickness of at least 200 mm.
- Two or three storey houses are built from blocks 300-400 mm thick.
- The partitions are erected from gas silicate with a thickness of 200-300mm.
For year-round living in central Russia, the thickness of the blocks is 375 mm. brand D400.
All parameters can be calculated using special formulas. Correctly made calculations will ensure a sufficient level of strength and resistance to your home under any loads.
In the Middle Zone, the thickness of a gas silicate wall is:
- Block density 400 kg/cub.m. the wall must be at least 44cm thick.
- At a density of 500 kg/cub.m. wall thickness 37.5 cm.
Disadvantages of gas silicate blocks
These blocks, despite their popularity, have significant disadvantages, such as insufficiently high strength and a tendency to absorb large amounts of moisture. But this allows them to be used for the construction of premises with high humidity, for example, for the construction of a bathhouse from gas silicate blocks.
Foreman's advice : the problem of insufficient strength can be solved by additional reinforcement of the load-bearing walls for the house, but this eliminates one of the main advantages - the light weight of the wall, and also leads to additional financial costs.
Gas silicate blocks are a good analogue for classic and familiar options for laying the walls of houses. Despite the existing disadvantages, they are more practical and also environmentally friendly. They are also very simple and convenient for building a house, which makes them even more in demand on the market among “self-builders”.
Do-it-yourself technology
Masonry
Before laying the blocks on the foundation, you need to install waterproofing. This can be roofing felt or bituminous material.
In a ratio of 1 to 3, apply sand-cement mortar to the waterproofing . We pay special attention to the first row of gas silicate. We place the block on the mortar, align it vertically and press it horizontally, tapping it with a mallet.
We lay it down, bandaging the previous row by 15-20 cm, the bandage should run exactly half the length of the silicate block. In hot weather, wet the wall.
We start laying from the corners, pull the cord and lay out a row. Don't forget about openings. Every four rows we make reinforcement. We connect each last row of the floor with an armored belt made of red brick.
We reinforce the masonry on the first row and every four rows . It often happens that not whole blocks are needed. Aerated concrete cuts well, so no problem.
Openings (doors, windows)
The blocks cut well. The corner device allows you to make a perfect cut; you need to fulfill one condition: the aerated concrete must be at least 15 cm long. Plus, the cheapest manufacturing method.
Several methods are used to create openings. The impact method is done with a jackhammer. This type of work should only be done by a specialist. The non-impact method, using diamond cutting, allows you to accurately make an opening.
The best way is to clearly plan the openings when building a house and strictly follow the markings.
Partitions
For partitions, the industry produces gas silicates of smaller thickness . The standard for such blocks is 100-150 mm, brand D400. Before creating a partition, it is necessary to accurately mark all the parameters. A laser level is best suited for this.
After marking the floor, waterproofing is done. To reduce cracks and for sound insulation, vibration-damping material is laid. To better connect the walls, metal plates are placed in the masonry seams.
The partition is done as follows:
- Make a cement screed 10 cm thick.
- Mark the walls and ceiling.
- They make a temporary frame.
- Clean the walls and ceiling from dust.
- A layer of glue is placed on the screed, the block is put in place, leveled using a fishing line stretched between the posts of the temporary frame, glue is applied to the bottom row, each row is shifted by half of the block for tying.
Jumpers
They make lintels to enhance the strength of cottages and low-rise buildings. This makes it possible to distribute the loads and get rid of cracks in the opening area.
When using a U-shaped design, the installation of the jumper is simplified. The most reliable and simplest option is to install silicate on the jumpers from the corner, cutting them into the block.
Let's consider different options. Reinforced aerated concrete lintels are made for houses no higher than 17 m. Such beams are light in weight, have no “cold” elements, are quickly installed, and are well processed. The downside is the price.
Reinforced concrete floors are made of concrete and iron rods. Plus low price.
Wooden lintels are treated with an antiseptic; you can make them yourself ; they are well processed and light weight. Minus: short service life.
Metal profiles have good characteristics, but are susceptible to corrosion. Need painting and fixing. Monolithic concrete beams can withstand heavy loads, but are labor-intensive to manufacture.
Interfloor armored belt
To give stability to a building, a reinforcement frame is needed. Every home has problem areas that need to be strengthened:
- between the foundation and the first row of masonry;
- the surface of the main walls that receives the mass of the roof;
- openings of doors and windows.
The formwork panels are attached to the walls with self-tapping screws. Spacers are made from timber along the width of the armored belt at a distance of 1.5 meters from each other. Twist the boards with wire, pressing them tightly against the spacers.
The armored belt is reinforced with a 12 mm frame . rods connected with wire. Place the frame in the formwork and fill it with mortar. You need to fill it in one go.
The armored belt, creating a stiffening rib in a gas silicate structure, prevents the structure from collapsing. Such a monolith stabilizes deformation in walls with heterogeneous loads.
Aerated concrete house: laying blocks
It all starts with preparatory activities:
- Checking the horizontalness of the foundation. If there are deviations of more than 30 mm, they must be eliminated. If there are small humps, it is easier to cut them off and fill the holes with mortar. If the surface is too uneven, additional formwork is installed, the surface is filled with concrete and leveled. Just keep in mind that the minimum thickness of the concrete layer is at least 3 cm, and for leveling you need to either add plasticizers that improve spreading, or treat the solution with a concrete vibrator. Work can continue when the concrete gains 50% strength, which is 7-9 days at a temperature of +20°C, and 14-20 days at lower temperatures.
- Cut-off waterproofing is installed. First, it is coated with bitumen mastic, and roll waterproofing is rolled out on top. And it’s better not roofing felt. It is, of course, cheap, but in its modern design it is ineffective and very short-lived. When the tapes meet, one overlaps the other by at least 15 cm.
At the preparatory stage, everything must be done with maximum diligence. The smoother the base, the easier the laying will be. We have already written about the importance of waterproofing: if you want a house made of aerated concrete to be warm, make sure it is dry.
Rules for laying aerated concrete blocks
Laying aerated concrete can begin on top of the cut-off waterproofing. It is carried out according to the same rules as brick: with horizontal ligation of rows. This means that the vertical seam of the bottom block is overlapped by the body of the block lying on top. The wall looks more beautiful if the seam is in the middle of the block, but the minimum offset is 10 cm.
The principle of laying aerated concrete blocks
Special glue is used for laying gas blocks. That's what it's called - for aerated concrete. It is applied in a thin layer of 1-2 mm using a special tool - a carriage with a serrated edge. Why is it advisable to lay just such a layer? Firstly, the glue is expensive, and secondly, it is a cold bridge, since its thermal conductivity is much higher than that of a gas block. Therefore, the specified thickness is optimal: it ensures a strong connection and minimal heat loss.
Tool
For uniform placement of glue there are branded carriages. They are a box into which up to a bucket of solution is loaded. Laying aerated concrete blocks with your own hands using a carriage is shown in the following video.
Carrying it up and down the walls is a dubious pleasure and is justified only for large volumes, when the entire bucket can be rolled along the wall at one time. Therefore, when independently building an aerated concrete house, simpler devices are often used - small manual carriages (look at the photo). As you can see, it looks like a scoop and is easy to make with your own hands from a piece of galvanized steel. The width is equal to the width of your block (exactly up to a millimeter, maybe 1-2 mm less). Teeth are cut along the edge (you can use a grinder), and a handle is attached. In principle, you can get by with a trowel and a large notched trowel, but the work will not be as convenient.
The second necessary tool is a saw. There is also a special one, but foam concrete can be cut perfectly with an ordinary handsaw with a well-sharpened tooth.
Carriage and saw - basic tools
You also need a piling device. According to the construction technology of aerated concrete, reinforcement is laid in every 4th row. For these rods, grooves are made in the body of the block. There is a special tool for this - a cutting edge on a handle with a rest for the second hand. You can also do something similar yourself.
Two models of wall chaser for gas block
Devices for transferring blocks are also needed. There are blocks with cutouts for arms, but they are more expensive, and the voids will then have to be filled with mortar. To transfer blocks with smooth edges, there are special pliers that work due to gravity.
Block transfer device
In addition to all this, you need a container for mixing glue, a paint ladle, a mallet to level the blocks, a brush to clean off dust, a building level, a cord, a set of sandpapers or a special grater to level the surfaces. That's all the necessary tool. There is another interesting device - an angle that allows you to cut at right angles. In the photo it is near the helmet, but you can do without it if you wish.
A set of tools necessary for building a house from aerated concrete
Laying aerated concrete block
The technology for laying aerated concrete is simple: glue is applied in a more or less even layer to the bottom surface. Recommended layer thickness is 1-2 mm. With this application using a carriage, there is no excess glue, and it is rarely squeezed out. Glue is also applied to the side surface of the adjacent block. This can be done using a trowel, spatula, or directly with a carriage. The excess is also removed with the serrated side of the tool. When applying glue, try not to let it flow over the edges of the block: it is difficult to remove it from a white surface.
How to apply glue under aerated concrete
All of the above applied to masonry with special glue. Some people use cement-sand mortar to save money. You can’t lay it out in a thin layer, so there will be excess. They can be removed with the edge of a tool, but the masonry still looks untidy. It’s better not to talk about the thermal parameters of such a wall at all: the cold bridges are very wide.
Before installation, the block is dusted: take a brush and go over all surfaces. If the weather is dry and hot, the block is sprayed with water. You can apply it with a wide brush, or with a spray bottle. The cleaned and moistened block is lifted and placed on the glue, close to the already installed one. Using a mallet, knocking on the clean side surface of the installed block, achieve the required seam thickness of 1.5-3 mm. Excess glue that is squeezed out is removed with a spatula.
Installation of the block
Now we take a level and level the block on a vertical and horizontal surface: we knock on the appropriate places with a mallet. It may take some serious effort. We select squeeze-out glue, if available.
Align the block in all planes
This operation is repeated over and over again. Simple but monotonous work. But you can build a house from aerated concrete with your own hands without any construction skills. The main thing is to follow technology.
Useful devices and useful improvements to masonry technology in the next video. People build a house from aerated concrete for themselves with their own hands; they do everything efficiently, but quickly, using interesting devices. The solution is applied using a modified notched trowel. Small plates are attached to the sides; they prevent the solution from draining outside the block. The design is shaped like the letter “P”, but with short “legs” and a wide “back”; a spatula handle sticks out from the middle.
The structure is placed on a block, glue is poured along the wide side. The edges or the handle are pulled along the block. At the same time, glue is squeezed out from under the teeth. It is immediately distributed evenly. Using the same device, glue is applied to the side, but not of the installed block, but of the block being installed. The laying speed with this method is high.
The device for transferring the block is very interesting. This is a metal strip with two welded handles. Of course, each time it is screwed with two self-tapping screws to the block, but it is more convenient to carry than just holding the edges. In general, a useful video, they just align the blocks “by eye.” This “trick” is hardly worth adopting, but otherwise the method of laying aerated concrete blocks in the video is very good.
Laying the first row of aerated concrete
During any construction, it is very important to correctly set the first row: we will then focus on it when building walls. That’s why we do everything very carefully, double-checking it several times. We place the first row of aerated concrete blocks on a cement-sand mortar, all the rest - on glue. Attention! The side surface is coated with glue: these seams should be normal - no more than 1-2 mm.
The corner blocks are laid out first. Very often their outer edge protrudes beyond the base. Firstly, the base will then be further insulated and finished, and this will significantly increase its thickness. A wall hanging over the plinth not only looks more organic, it also reduces the jamming of the plinth, and first of all, its junction with the wall, and for an aerated concrete house this is very important.
First of all, using a laser plane builder or a water level, we find the highest angle of the base. We start laying with it. The whole point of the first row is to align the blocks in a horizontal plane by varying the thickness of the mortar. During the preparation stage, the largest differences were eliminated, but the surface was still unlikely to be ideal. In order to make it easier to lay aerated concrete blocks in the future, the surface will be leveled.
Watch the video to find out how to find the highest corner of the foundation.
Therefore, at the highest corner of the solution we place the minimum amount. Lay out a layer of 0.5-1 cm, level it. We place the first block so that its outer edges protrude at least 50 cm beyond the base. As they wrote, this protrusion is not necessary, but it solves many problems, and, most importantly, it closes the joint with the base.
We place the first block, knock with a mallet, leveling
We take a level and, tapping with a mallet, level it in the horizontal and vertical planes. At the adjacent corner we perform the same operation, only the height of the block is adjusted according to the first one and for this we use a water level. To make work more convenient, the level flasks can be mounted on even boards of the same thickness. By installing one flask on one corner block, you can use the second to adjust the height of the other.
Convenient device
We repeat the same operation on the remaining blocks. One subtlety: we transfer the level only from the first block. This way the error will be smaller. After all the corner blocks are set (they are called beacons), a cord is stretched along their outer edge. Moreover, the cord marks the top edge of the block and all the others are aligned along it. Pull the self-tapping screw screwed into the block: it turns easily and holds well. You can screw strips into which self-tapping screws are screwed onto the blocks.
Two strips are nailed to the side, to which a cord is already attached to mark the row level
It is advisable to lay the masonry from two corners, moving towards the middle. This way there is a greater chance of avoiding distortions, which then have to be leveled by tearing off the already installed blocks.
Second and subsequent rows
Upon completion of laying the row, take sandpaper, a plane, and a building level and go along the entire perimeter, removing too large differences in heights. This is an important point that allows you to use a minimum of glue. But minimal stitching isn't everything. If the height of each row is not equalized, local stress points will form in the wall, which, under minimal loads, can cause cracks to appear. Therefore, do not skip this stage.
Working with emery is not very convenient; there is a special grater for this purpose. It doesn't clog like that. So everything is leveled out. Then they take a brush and walk around the perimeter again, sweeping away the dust. This stage also cannot be skipped: the presence of dust significantly reduces the adhesion of the glue to the blocks.
The height difference is checked by touch))
All this in order to withstand the recommended layer of glue of 1-2 mm. The geometry of even the best blocks still has a run-up. Let the difference be 1 mm, but with such an amount of glue it is significant. Therefore, everything is aligned until it coincides completely.
Hired teams often skip this stage and add glue up to 5 mm or more in violation of the technical process. But such houses turn out to be cold, and the consumption of expensive glue is enormous. Average glue consumption per cubic meter:
- smooth blocks - 1.2 bags;
- with tongue and groove - 1 bag.
Laying the second and subsequent rows of aerated concrete blocks also begins from the corner, only the corner block is positioned so that the seam is offset. Now the adhesive composition is applied to all surfaces. The technology for laying an aerated concrete block is described above.
How to lay out the corner block of the second row
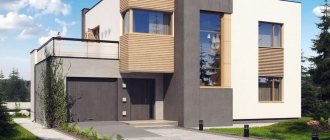
Construction of frame houses according to individual projects
Low-rise construction has become very popular today, but the construction of an individual house is associated with considerable hassle. Not everyone understands how to independently choose a material with the required technical characteristics. Without professional knowledge, it is difficult to understand the ever-growing assortment of the construction market. Intrusive advertising often confuses rather than helps in finding materials that allow the construction of a building with characteristics that fully correspond to the real needs of its owner. No less problematic is the search for construction workers who are truly capable of building quality housing. I would like to deal with an organization that can not only build capital projects, but also save the customer’s money.
Advantages of ordering from CITY STROY
Our company offers to order standard or individual construction from gas silicate blocks. Take advantage of several ordering benefits:
- Affordable prices for all types of construction work. We offer favorable prices for the construction of frames and roofs, complete finishing and connection of communications.
- Guaranteed quality. Any order will be completed at a high level, all work is performed by experienced specialists.
- Reliability and responsibility. A personal estimate is drawn up and its compliance is guaranteed during construction.
Call the numbers provided to clarify the detailed terms of cooperation and place an order.
Main technological features
Houses made of silicate blocks are increasingly showing demand among developers. This is due to a number of positive qualities that this material has.
For construction purposes, gas silicate is used in the form of blocks, which according to density class can be divided into two main types:
- Thermal insulation – intended exclusively for arranging thermal insulation. Their density does not exceed 500 kg/m3.
- Structural - used as a material for the construction of walls, and their density is 500–1200 kg/m3.
Structural blocks are divided into two subtypes and are intended for load-bearing and internal walls. In the first case, the most popular standard size of the product is 390x190x188 mm, and in the second - 390x100x120 mm.
Gas silicate includes the following components processed in an autoclave:
- fine quartz sand;
- aluminum powder (gas-forming additive);
- water;
- lime.
The finished product has many advantages over many alternative building materials.