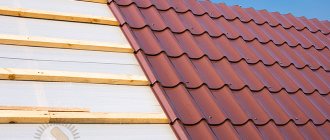
There are a large number of high-quality options on the roofing materials market. Attaching metal tiles to the roof will be the most reliable solution to the problem among all samples. This material is ideal for this task as it exhibits amazing durability. On top of that, the new coating has a unique appearance.
Doing all the work is quite simple. You need to familiarize yourself with the basic rules of how professionals attach metal tiles. If all points of correct installation are carried out correctly, the ceiling will not require repair for a long time.
General information about metal tiles
The composition of the most common roofing material is quite simple.
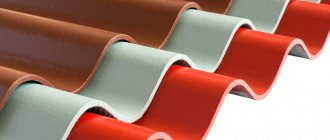
Decorative tiles are based on steel sheets. During manufacturing, they are coated with a special polymer coating. The characteristic shape is achieved through a stamping process. Visually, this material is practically no different from ordinary tiles. Transverse rows appear as waves in metal tiles. Experts call longitudinal profiles rows. The material pitch is measured by the distance between rows.
The most popular sample has the following parameters:
- Sheet width – 1.18 m;
- Working width – 1.1 m;
- Step – 0.35 m.
The fastening of metal tiles depends on many factors. The length of the profile cut, the individual needs of the client and the wooden roof sheathing are taken into account.
As a rule, the distance between the bottom cut and the edge of the stamping is 5 cm. The distance between the upper edge of the stamping and the cut is determined both by the length of the sheet itself and by the individual features of installation on a particular object.
Advantages of the material:
- Metal tiles are considered the best option for roofing, since they fully meet the criteria of quality and reasonable cost.
- With proper calculation and provision of accurate information about the project to the manufacturer, large volumes of waste during installation can be avoided.
- The material does not make noise in the rain. If unpleasant sounds are observed, it means that the installation work was not performed efficiently.
- The polymer coating of metal tiles can reliably adhere to the metal surface for 10 years. The majority of brands provide a guarantee for this period.
- No water seeps between the sheets. The fastening points are hermetically sealed with gaskets mounted on self-tapping screws.
Technology and procedure for installing roof units
Especially often in modern roofing work, the installation of a cornice assembly with a sheet protrusion of five centimeters is used . This method allows rainwater to fall directly into the gutter, and elements made of wood are protected from splashing water. According to the standard instructions, the self-tapping screws are screwed through the wave at a distance of seven centimeters from the stamping line.
It is possible to install this unit by placing a standard metal tile cut on top of the eaves board, which is convenient when performing roofing work in conditions of stepped eaves or violations of the roofing geometry in this section of the roof.
The ridge strip is fastened using self-tapping screws at the highest points of the metal tile sheets . The spacing between fasteners should not exceed 80 centimeters. All fastening points should be placed with the same spacing in the sheathing, which will prevent deformation of the ridge strip when tightening the screws.
When attaching the end part of the slopes, fasteners should be mounted on each wave of roofing material in the places of the standard points . To fasten the end strip, the highest points of each sheet of metal tile are fixed through a wave with a step between fastenings of no more than 80 centimeters.
Find out more details below:
- installation of a metal roof;
- how to choose the best one.
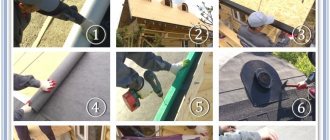
For more information on how to properly screw in the screws yourself, watch the video.
The need for additional fastening with self-tapping screws
The main task of using additional fasteners is to ensure resistance to significant wind loads, which always requires the provision of high-reliability fastenings in the most significant areas.
Fastening additional screws for fastening metal tile sheets to each other:
- self-tapping screws along the waves;
- with self-tapping screws in rows.
Fastening metal tile sheets with self-tapping screws to the sheathing:
- along the eaves line;
- along the ridge line;
- The roofing sheets are fixed to the boards along the end line using self-tapping screws.
General rules for installing metal tiles
Before you begin arranging the roof, you should study several basic installation rules.
- The first thing to remember is that cutting sheets must be done with a special tool. The bottom line is that the cutting tool should not have an abrasive coating, as this can significantly damage the surface. The most suitable option is a saw and a circular cutter. Scissors are also often used for cutting metal. You cannot use a grinder, because it melts the polymer layer at high speeds.
- You need to move on the roof as carefully as possible. Stepping on the wave is not allowed. If you need to move on the material, then your foot must be placed in the deflection of the sheet so that it does not deteriorate. It is also recommended to carry out work in shoes with soft soles.
- Metal tiles are fastened using special self-tapping screws. They differ from other samples by the presence of a special soft rubber gasket. When screwed in, the gasket compresses, reliably sealing the hole. A characteristic feature of this fastening material is the ability to select the desired color of the product.
- If a screwdriver is used for installation, its speed must be reduced. Why is this being done? When the self-tapping screw is screwed in with excessive force, the sealing rubber may be pinched. Reducing the torque allows you to carefully screw in the screw without damaging the seal. It is necessary to use a low speed, because high speeds of the equipment can turn the fasteners in the mounting socket. As a result, the screws will not stick to the wood.
- It is not allowed to screw in the fastening material at an angle relative to the metal tile. The screwdriver must be directed perpendicular to the sheathing.
- The self-tapping screw is screwed into the deflection of the wave.
- The step of placing the fastening material on the bottom sheet is through the wave.
- The vertical overlap of the sheets is fastened with smaller self-tapping screws in the areas where the waves fall.
- Fastening sheets of any metal tiles to each other is mandatory! It protects the roof from gusts of side winds. Proper placement of screws will create a uniform plane. In order for the longitudinal joints to fit tightly, the screws are screwed in until the sheets are firmly adjacent to the sheathing.
- Fixation is performed in a checkerboard pattern.
- Often the consumption of screws is 8 pieces per 1 m².
- How to attach a snow guard to a metal tile? The following calculation will come to the rescue - there should be at least 35 cm between the screws. This means that the installation is carried out in transverse waves. The best option would be to install snow guards around the entire perimeter. It is necessary to securely fix these accessories above each dormer window.
- After the sheet has been secured, chips and other waste are removed from its surface. Experts do not recommend damaging the protective layer. To do this, use a soft brush. If sawdust remains on the surface, the roof will begin to deteriorate over time.
- In case of minor damage to the roof from the outside, you can use a can of paint. The damaged area is painted over to prevent rust. It is also recommended to paint over the cut areas.
- How to properly fasten metal tiles with self-tapping screws? Using markup! It will help prepare the sheathing and calculate the correct placement of the sheets on the surface of the wooden slopes.
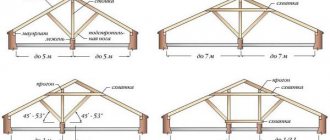
- The peculiarity of triangular-shaped slopes is that the profile will have to be cut off in the area of the valleys.
- Any type of geometry involves the creation of a small structure of 4 sheets. They are secured to each other. The left edge is also screwed, and then the product is adjusted relative to the level of the cornice. The line should be as straight as possible. You cannot staple more than the specified number of sheets. The structure will be too heavy and, as a result, the level will not be able to be adjusted correctly.
The nuances of do-it-yourself installation
Before you begin installation, you need to familiarize yourself with the information on how to properly twist metal tiles:
- Cutting tools include a circular saw and metal scissors. Experts do not recommend using a grinder, since the cutting process destroys the protective layers applied to the material, designed to enhance the anti-corrosion resistance of the sheets.
- When working with a screwdriver, it is necessary to limit the torque in order to prevent the screws in the roof sheathing from turning, since the fastening will eventually weaken. The result of this will be an insufficient degree of sealing of the holes and deformation of the gaskets. You need to know how to screw metal tiles - after screwing in the fasteners, the gasket should be slightly compressed.
- Before laying metal tiles on the roof, you need to prepare shoes with soft soles. To prevent the roofing material from being damaged, there is a way to move along it: you need to step with your foot into the deflections of the waves located in the area where the sheathing elements are located.
- According to the manufacturer's instructions, which describe how to twist the metal tiles, fastening is carried out perpendicular to the surface of the slats.
- To determine the number of self-tapping screws, you need to know that one “square” of roof surface requires 8 – 10 pieces or 3 pieces per linear meter.
- If damage or scratches are found during installation on the polymer layer of the sheets, these areas should be covered as quickly as possible with paint of a similar shade from a can. The same operation is performed with the sections available on the sheets.
- When laying metal tiles, hexagonal self-tapping screws are used as fastening accessories along with rubber gaskets of the same color.
- The place from which they begin to install this roofing material depends on their type. If it is gable, then from the end side, and when it is tent-shaped - from the place where the highest point of the ridge is located.
- The covering is fixed so that each subsequent sheet covers the lock of the metal tile of the previous one.
What screws should be used and where to screw them in?
First of all, it should be noted that ordinary screws are not suitable for installing this type of roof. The main requirement is that the customer chooses only high-quality screws. The elastic should be both dense and soft. It should not have a porous structure.
Often this fastening material is presented on the market in galvanized versions with a hexagonal head. There are both regular varieties and colored metal tiles. The second option is considered the most popular because it does not stand out on the roof.
The most common mistake buyers make is purchasing roofing from a specialized supplier and purchasing fastening materials on the market. The quality of the products is completely different. Unreliable screws often ruin expensive polymer coatings.
The main feature of a quality screw is the ethylene-propylene rubber from which the seal is made. Its structure allows you to reliably seal the hole. Cheap equivalents are made of simple rubber.
In just 3-4 years, the unreliable material will show itself in all its glory. The rubber will begin to dry out and become completely brittle. It does not tolerate sudden temperature changes. And if a relatively small number of such screws are placed over a large area of the sheet, sooner or later the roof may completely move away from the sheathing. The ethylene-propylene seal pattern can last up to 50 years.
It is best to fasten metal tiles with self-tapping screws according to a scheme that has repeatedly proven its effectiveness and reliability of the entire structure. There is nothing complicated about it.
There are two main ways where and how it is more convenient to screw in self-tapping screws. The screws can be screwed in from the bottom of the wave. In the first case, the problems of tightly fixing the roofing material on a structure made of wooden boards are solved. You should retreat approximately 2 cm from the step. This calculation will be a good guideline for further installation. The second method is used exclusively for connecting sheets to each other.
The screw is screwed in so that it goes 2 cm deep into the sheathing. In this case, it is worth adjusting the direction of the screw in the center of the wooden beam. Ideally, the seal should deform so that it seals the screw-in point tightly. After some time, the gasket vulcanizes. As a result, the hole will be completely impenetrable to water. The attachment points should be as close as possible to each other.
Important! The best option is considered to be self-tapping screws, the length of which is 2.8 cm. They are used everywhere when installing this type of roof.
It is not recommended to start installing a new floor if the home owners do not know how to properly fasten metal tiles with self-tapping screws. Many people make the mistake of choosing 6 cm long screws for fastening along the top of the wave. The problem is that such a connection is not rigid enough to press the substrate tightly. The washer compresses the sealing material too loosely. In addition to this, the upper part of the wave has steep slopes, which also contributes to poor fit of the fastening material.
It should also be noted that the method of fixing sheets at the top of the wave cannot be called effective due to the fact that such a connection begins to “play” in the wind. During sharp gusts of wind, a characteristic noise is observed from the metal profile.
Let's take a closer look at self-tapping screws ↑
The installation of this sheet material is carried out using roofing screws. It is extremely undesirable to use nails for these purposes, since the impact resistance of metal tiles is not high enough and under the influence of loads of this kind the building material delaminates.
Externally, these are ordinary screws, but made of alloy or stainless steel. A real self-tapping screw must also have an anti-corrosion coating, usually a layer of zinc. All these are important components of effective resistance of fasteners to corrosion processes.
The hexagonal shape of the head helps to distribute the load evenly over the surface of the tile. Since, in addition to its intended purpose, it must also seal the mounting hole, therefore a sealing gasket in the form of a flat ring must be provided under the washer. It seemed that the unremarkable ring performs several functions at once:
- protects against scratches and, therefore, rust;
- from the formation of depressions or dents after laying the coating;
- seals the hole for the fastener.
This small part is under constant influence of daily temperature changes, precipitation, and wind, so high-quality material must be used for its manufacture. The best option, as practice has shown, is EPDM rubber, which is resistant to the above negative factors and does not lose its elasticity for a fairly long period.
Roofing washers are produced in various colors and if you choose them correctly in color, fastening the metal tiles with self-tapping screws will not stand out against the background of the coating at all.
Buying self-tapping screws, of course, is not difficult, but keep in mind that many of the well-known manufacturers offer original self-tapping screws of their own making. As a rule, they are supplied as a set. In case of refusal to purchase the supplied fasteners, the buyer does not receive a guarantee for the purchased roofing material.
Features of installing metal tiles with hidden fastening
Today, a fairly common type of flooring is a material that has hidden fastenings. It looks neater than all other types. True, some manufacturers have significantly increased the cost of special technology.
How to attach such metal tiles to the roof? When installing such material, a screw with a press washer is also used. The only difference is that you can save a little on fastening materials. Often, suppliers themselves offer to choose the usual type of screws - galvanized, without paint.
Laying diagram of metal tiles
Before proceeding to laying a roof made of metal sheets, you should remember the basic installation rules:
- The fastening of the material begins depending on the shape of the roof. Basically, the sheets are attached to the lower left corner of the sheathing.
- Each sheet is installed one by one from bottom to top. The principle is to seal the bottom layer with a top sheet.
- The cornice can be made perfectly even only if the first sheet is installed carefully and as carefully as possible.
By following these rules, everyone will be able to lay new material on the sheathing.
So, what does a diagram of the correct fastening of metal tiles look like? The cornice strip is installed first. After this, the lower valley is installed. Then the process of installing the tiles begins. It is the most labor-intensive, since the most important thing here is correct calculations and use of the level.
Experienced roofers use a simple tool at hand - a devil. It is assembled right on site from 4 boards. The bottom line is that it helps to mark straight lines on complex slopes. The roof is quickly laid on the dash, creating a perfectly flat plane.
Installation ends with the following steps:
- fix the upper valley;
- install end strips;
- screw the ridge strips and external corners;
- install ventilation parts;
- snow guards, stairs, and transition bridges are installed.
Many companies offer the last point as an additional option, since not all clients use these elements on their roofs.
The optimal consumption of screws can be observed according to the following plan:
- The end sheets, as well as the overhang, are attached along each wave. This will help create a reliable connection. A similar flow rate must be calculated for valleys and ridges.
- The predominant amount of roofing material is fixed at a distance through one wave.
- The metal tiles are connected to each other with screws in increments of 1 meter.
- It is better to install additional elements using 3-5 self-tapping screws per 1 linear meter.
Choosing a metal tile fastening scheme
The scheme for fastening sheets of metal tiles with self-tapping screws refers to the procedure for installing and sewing the material to the sheathing. When installing the roof, the following procedure is used:
One of the recommended schemes for attaching sheets of metal tiles to the sheathing
- Install the cornice strip.
- A protective mesh is attached along the eaves strip.
- A protective comb is sewn on top of the cornice strip.
- The lower valley panels are laid along the continuous sheathing.
- They arrange pitched connections to walls and protruding structures.
- Install roofing material.
- Install the upper valley linings.
- Protective aprons are attached to the exit points of the outer parts of the building.
- Secure the end strips.
- Mount ridge strips.
- Arrange external corners.
- Cover the bottom of the cornice with protective grilles (soffits).
- Install passage and ventilation elements.
- They install stairs, snow guards, weather vanes, and transition bridges.
When laying tiles on the left side of the roof, each subsequent sheet is inserted behind the last wave of the previous element.
Now more about installation work
In general terms, the whole process looks extremely simple. This is due to the fact that ordinary available tools are sufficient to get the job done. But, as practice shows, many home owners do the installation incorrectly. Therefore, a detailed analysis of the installation will allow you to avoid numerous mistakes and damage to metal products.
Stages of laying a metal tile roof
- Cornice strip. These roof elements must be installed before installing the tiles themselves. The planks are mounted on top of special gutter holders for drainage. To perform this task, galvanized screws are used and placed at a distance of 30 cm. The eaves elements should be overlapped by 10 cm.
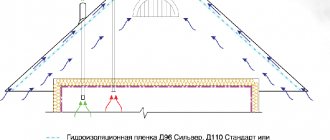
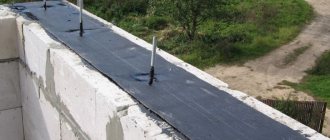
- Lower valleys. The joints of the slopes must accommodate the valley. Therefore, it is laid before attaching the metal tiles. The basis, as a rule, is boards, which are laid out as continuous flooring. The use of waterproofing is a mandatory element.
Advice! A special seal should be laid between the lower valley and the metal tiles. It must have a porous structure and excellent adhesion properties.
- Adjunctions. To create a perfectly sealed connection to pipes and walls, an additional internal apron is installed. The lower junction bar is applied to the walls of the pipes, and a mark is made along the upper edge. After this, a groove is installed along the marked line. The apron is attached from the bottom wall of the chimney. If necessary, the bar can be trimmed. It is fixed with roofing screws.
Fastening metal tiles to eaves and roof ridge
This stage has its own characteristic features. When it is necessary to install cornices, the profile sheets are mounted with a protrusion beyond the bar, approximately 5 cm. What is the purpose of this arrangement? The lip will allow water to flow down the roof directly into the gutter. If you do not make such a reserve, water will constantly fall on the wall or be blown under the roof.
To prevent the bottom cut from sagging, the outermost sheathing board should be slightly thicker than the rest.
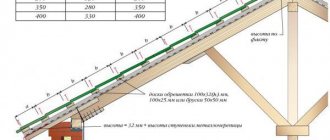
Each sheet of metal tile is fastened slightly above the stamping. Basically, the offset is about 7 cm. When the top cut is located too high from the stamping, it becomes necessary to install a ridge board above the sheathing. Also, we must not forget about ventilation gaps. They should be evenly spaced between all sheathing elements.
The next step is attaching the metal tiles at the highest point - to the ridge. Screws are screwed along the outer row into the deflections of the waves.
How to install metal tiles around pipes and other obstacles
The process of laying material around pipes can be called one of the most difficult stages. This is due to the large amount of work. It is necessary to install a structure that can effectively drain flowing water to the sides.
As already mentioned, the apron will act as the basis. Boards are attached to the pipe, which continue the sheathing. The adjacent profile is cut to 15 cm in length.
Mistakes that novice roofers often make
A fairly common situation is when home owners decide to carry out floor repairs themselves. The problem is that lack of experience creates a large number of errors. Moreover, they can be of a very different nature. This includes the wrong choice of products, savings on lathing, and lack of knowledge of the installation process. To prevent such problems from arising in the future, it is worth considering all the mistakes that clients most often make.
Wrong product selection
A reliable roof begins with the quality of the profile itself. It is necessary to carefully study all possible offers on the building materials market. It is better to opt for metal tiles with a price category above the average. Often in this segment you can purchase the highest quality products from world-famous brands.
Having chosen a certain brand of decorative tiles, you need to examine them for defects. They are highly likely to appear, since manufacturing problems arise constantly.
If no flaws were noticed, you can proceed to the selection of fastening materials. It is better to buy screws of the required length from the same supplier as the profile itself. And the color will match the chosen shade, and the quality will not let you down. Often the best quality screw seals are found from authorized suppliers.
Mounting error
This point is the most important, as it will help any beginner to perform roofing work correctly.
The most common mistake is screwing the screws not into the lower part of the wave, but into the upper one. The result is that the sealing element is not pressed with sufficient force by the washer. This leads to the fact that water will very soon begin to seep in certain places on the roof.
Also, many problems with the new floor begin to appear if the roofers did not make preliminary markings on the sheathing. It helps to correctly calculate the consumption of fastening materials and accurately fix the profile.
Video about basic installation errors:
Laying technology
Corrugated sheeting is a modern roofing material that is used to cover roofs with a slope of 8 degrees or more. The technology for laying the material depends on the angle of inclination of the slopes of the structure. The sheets are installed with an overlap to ensure the tightness of the joints. Considering the light weight of the corrugated sheet, a roof with such a coating has a high windage capacity and experiences intense wind loads, so the pitch between the screws should not exceed 50 cm. The corrugated sheeting is laid as follows:
- Pitched roofs begin to be broken from the bottom of the end, laying the first sheet with a protrusion of 2-3 cm.
- When laying, the top row is always laid on the bottom to prevent melt or rain moisture from flowing into the joints.
- The horizontal minimum overlap between sheets is 10 cm, which is 1 wave. The lower the roof slope, the greater the overlap.
- The vertical overlap between the sheets is 20-25 cm.
- If the angle of the roof slopes is less than 15 degrees, the vertical and horizontal joints are treated with silicone-based sealant to reliably seal the seams.
- Each sheet is secured to the bottom and top battens of the sheathing in each wave, the remaining screws are screwed in in a checkerboard pattern so that the maximum distance between them does not exceed 50 cm.
- The fasteners are screwed into the lower part of the wave adjacent to the sheathing so that when a wind load appears, a lever effect does not occur.
- A ridge profile is installed at the connection of the slopes, fixing the part with self-tapping screws in each wave.
Layout of corrugated sheets
Method of fastening corrugated sheets
Please note that after installation it is important to monitor the condition of the fasteners on the roof surface. They should not become loose or untwisted. To prevent intense wind loads from leading to deformation of the roof, it is necessary to quickly tighten it using a screwdriver. If pockets of rust appear at the fastening points, it is better to replace the screws with galvanized ones.
Advice from an experienced specialist:
- Always follow the metal tile fastening diagram. Installation begins from the left edge of the roof. Subsequent sheets of material are placed under the previous layer.
- After fixing the first sheet of the ridge, the second sheet is laid in a straight line. When joining with an overlap, at the top point the sheets are connected with one screw.
- If the top row of the ridge is not level, the sheets are raised and the slope sides are usually shifted slightly. This way they can be carefully placed in the required position. Then secure firmly.
- If during installation through holes and numerous overlaps are formed, these places must be sealed urgently. For this purpose, special silicone-based compounds are used.