Purpose of the drainage system around the house
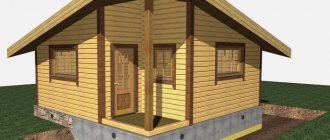
Drainage around the house and blind area (a waterproof covering around the perimeter of the building, located at an angle to the wall for easy drainage of water) are necessary to protect the foundation and base of the walls from the effects of groundwater and precipitation. The blind area performs an important function, but without a drainage system it is not able to effectively protect the house from moisture.
Heavy rains and melting snow raise the groundwater level. In the absence of a water drainage system, the following processes occur.
- Water stagnates in the upper layers of the soil. The soil becomes swampy and heaving. When it freezes, it expands, putting uneven pressure on the foundation. As a result, the house settles unevenly.
- At the same time, water seeps into the microcavities of the foundation and the base of the walls. When it freezes, it expands, increasing the size of the cavities. Over time, the foundation cracks, which sharply reduces the life of the structure.
- Water seeps into the basement through cracks. This causes mold growth and damage to supplies and equipment placed in underground areas.
- Further, dampness and mold spores rise to residential floors, affect walls, furniture and cause diseases in households. In cold weather, moisture in the underground causes the formation of frost on baseboards and walls.
Drainage around the garden plot is used to create optimal soil moisture on flooded lands. This gets rid of puddles and stagnant water. Allows you to grow the desired crops and get a good harvest.
Drainage fields, cassettes, wells - where they can be used and where they cannot
Before purchasing a septic tank, you need to study whether the geological conditions of your site allow you to install a budget solution. Perhaps it would be more optimal to install biological treatment of household wastewater.
Expert opinion
Albert Lyushin
Engineer-technologist with more than 15 years of experience.
Ask a Question
It is important to consider that cheap solutions for wastewater disposal often turn out to be pseudo-budgetary. For example, maintenance, installation, additional communications and possible problems in the operation of a septic tank made of concrete rings, based on a period of use of 3 years, can become significantly more expensive than installing a bio-septic tank right away.
Where are they used?
- Overflow septic tank made of concrete rings, bricks;
- Homemade septic tanks of any type;
- Flow-through, non-volatile septic tanks;
- Other devices with wastewater treatment less than 50-60%.
If the system cleans the drains by 90 percent or more, there is no point in installing drainage elements, except in cases where there is nowhere to put the water and the only option is to dump it directly onto the site.
When possible (provided that all items on the list match)
- Low groundwater level. Up to 1.5 meters from the ground surface and below.
- Well absorbent soils. Sand sandy loam, sandstones.
- The distance to outbuildings exceeds 5 meters.
- The distance from a stream or other natural reservoir to a septic tank and drainage is more than 15 m.
- The nearest tree is located more than 3 meters away.
- If there is a reservoir nearby, the distance to it should exceed 30 meters.
- The source of drinking water must be located no closer than 50 meters from the drainage and fields of additional filtration of wastewater.
- You need to step back at least 5 meters from the road.
Types of drainage, their features and purpose
There are 2 types of drainage around a low-rise building: surface and underground; let’s look at both types:
Surface
Surface drainage and point storm drains around the house are built to collect excess moisture that falls in the form of precipitation. According to the layout of drainage pipes (drains), this type of system is divided into ring, layer, and wall.
For each specific case, a separate project is created, which takes into account the landscape, soil type, location of buildings on the site (existing or future), type of foundation of permanent buildings, level of soil freezing and many other points.
Type 1. Wall
The drainage around the winding is of the linear variety. Be built simultaneously with the foundation. Construction of the system after completion of construction is possible, but it is much more difficult and expensive.
Necessary for removing moisture from the external surfaces of the foundation. It consists of trenches encircling the foundation along the perimeter at the maximum permissible distance, in which drains are laid. The depth of the trench is 0.3-0.5 m below the foundation level.
The trenches have a slope, usually 1 cm -2 cm per 1 m, so that water flows under the influence of gravity to one lower point.
At the lowest point, the drains are connected to the inspection well. An outlet pipe is also connected to it.
Type 2. Layered
A complex, expensive and at the same time very effective way to prevent the destructive effects of water on the foundation. It is used to drain the soil under the foundation and communications when:
— a permanent structure is planned to be built directly above the groundwater lens;
— the site is located on an aquifer;
— groundwater comes to the surface under pressure;
— other methods of protection are not effective.
The plot of land is not drained in this way due to economic infeasibility.
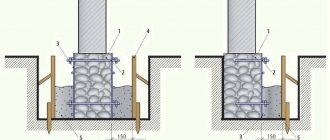
Reservoir drainage is constructed under the foundation and connected to a wall or ring drainage system. This bond effectively removes moisture.
It is a sand cushion with a thickness of 0.3 m with prisms made of gravel or crushed stone, which are placed at a certain pitch. Also, the sand cushion can be covered with a continuous layer of gravel/crushed stone. The latter option is used when enhanced water drainage is required. The perimeter of the sand layer is made larger than the perimeter of the foundation.
The top of the drying pad is covered with perlite. Perlite prevents concrete from leaking into the gravel or crushed stone layer when pouring the foundation, maintaining its drainage properties.
Type 3. Circular
To be built to lower the groundwater level. Unlike stratum, it is used to protect the foundation from water and drain the land.
To protect the house, a ring system is laid around it at a set distance. The distance to the drains is maintained at least 5 m to prevent soil shrinkage. If necessary, strengthen the soil. The drainage depth around the house is 50 cm ± 20 cm.
To drain the site, a project is being developed that matches the topography and location of the buildings.
The principle of this drainage device around the house is similar to the construction of a wall system.
The advantage of the ring type is that it can be erected when the construction of the house is completed. Also, the ring system can be combined with wall and layer ones.
Underground (deep)
They build deep drainage around the house on clay soils when the construction of a surface system is impossible or impractical. It is a complex, sometimes multi-level system. They are built on watery lands, in lowlands and in areas located in floodplains and near floodplains.
For private houses, 3 types of underground drainage systems are relevant: horizontal, vertical, combined.
View 4. Horizontal
Consists of drains, inspection wells, and catch basins. You also need a pump to pump out water.
The principle of laying drains for an underground horizontal system is similar to laying surface linear drainage. At corner joints and at the lowest point, drains are connected to inspection wells. This is necessary in order to notice and clean up dirt in time.
Water flows through drains into reservoirs. From there it partially goes into the underlying layers of soil. The water that remains in the reservoir is pumped out with a pump for irrigation or other household needs.
Similar to surface drainage, horizontal deep drainage can be implemented in the form of a ring, wall and layer structure. The latter differs from the layered surface one in that instead of a drainage cushion under the foundation, an artificial reservoir is created, filled with gravel or crushed stone with a depth of 0.3 m. The water from it goes into the soil or into another part of the drainage system.
View 5. Vertical
It consists of water intake wells and reduction wells, with a depth of 20 to 50 meters and a pump. From the wells, a certain amount of water goes into the soil, the excess is pumped out with a pump.
Type 6. Combined
Combines the design of vertical and horizontal drainage.
On topic: Site drainage in 5 steps: how to do it yourself
SGround.ru
The article touches on issues of drainage and water reduction on the site
Table of contents
- Relevance of the issue
- Main types of drainage (water reduction)
- When is drainage necessary?
- Where should water be discharged during dewatering (drainage)?
- How much can the groundwater level be reduced?
- Choosing the type of drainage system for a site or house
- Materials and components for the drainage system
- What can be dangerous about drainage?
- Conclusion
- Related Articles
You can order water reduction services in Moscow and the Moscow region at TD STROY (pompanasos.ru)
Relevance of the issue
Territories allocated for the construction of gardening and dacha societies and partnerships very often have a high groundwater level, sometimes very close to the surface of the earth. This often applies to the territories of cottage villages.
As a rule, in the territory of flooded areas, to bring them into a form suitable for exploitation and agriculture, a global system of drainage canals and ditches is carried out. For example, in our area, such canals connect lakes, of which there are a lot, and these canals stretch for many kilometers right up to the tributaries of the river. Over time, the channels become overgrown and clogged or are damaged, for example, when laying a gas pipeline, an oil pipeline (“thank you” to these organizations because they “care about the environment”) or other communications, and cease to fulfill their functions. Often they are not even recognizable after 40-50 years - it seems that it is just a natural overgrown ravine. Groundwater over a large area begins to rise, and only after this do the inhabitants of local areas remember the existence of such a system and try to restore it.
Unfortunately, there is a little confusion with the terms drainage and water reduction - they are often replaced with each other, but for clarity it is better to distinguish:
[ Drainage in construction means the removal/disposal of water. This is usually water or other liquids coming from the surface - for example, from drainpipes coming from the roof or surface water from sidewalks and roads, or from an accidental spill of liquid at work, as well as rain and melted atmospheric water.]
[ Dewatering is the removal of groundwater moving in the soil mass and entering the dewatering system mainly from below and from the sides from the surrounding soils. That is, in other words, this is an artificial decrease in the groundwater level]
Buried drainage systems can also serve to reduce water. This article will mainly focus on groundwater drainage, i.e. water reduction.
The problem of high groundwater levels is very unpleasant and complex. The practice of exploiting land plots indicates that almost every owner of a country house, dacha, or cottage is faced with the problem of draining the site if this was not taken care of in advance during the construction of the house and development of the site. For many summer residents and owners of private houses with a basement, the issue of reducing groundwater level is a very pressing one.
Photo: the area is flooded with groundwater
The choice of measures aimed at artificially lowering the groundwater level depends on many factors, including the goal set - draining the entire site or only protecting the foundation from moisture and the basement of the building from flooding.
In European countries, drainage of the foundation of a house and site is very common. This is, of course, an accelerated removal of surface water from sediments or ponds and pools. It is used everywhere: in landscape and park management, house construction, landscaping and reclamation work, construction of playing and sports fields, agriculture, road construction, etc. Particular attention is paid to country drainage:
Main types of drainage (water reduction)
There are 2 classes of drainage (water reduction) - permanent and temporary (for the construction period).
By design we can distinguish:
- Vertical dewatering system - groundwater is discharged through vertical drains, wellpoints, or from wells and wells - water is usually pumped out using pumps (vacuum or submersible);
- Horizontal system - water is discharged by a system of horizontally located (in fact, with a slight slope towards the collector, low area of relief or well) drainage pipes, ditches, trays or ditches. In this case, water is usually drained by gravity due to level differences; Can be open or closed.
- A combined system consisting of a network of buried drainage pipes or open trays connected to vertical collectors, from which water is pumped out by pumps in the direction of discharge.
Collector of a combined drainage system
Ideally, a drainage system is created even with low groundwater and provides for the removal of surface storm and melt water and wall drainage to protect the basement from flooding with surface water - it is used mainly in private housing construction in Europe and in Russia during the construction of elite private houses. Such a system is designed to simply increase the comfort of staying on the site and living in the house by quickly removing moisture from the surface and preventing flooding of the basement by precipitation. It consists of storm inlets under each drain pipe and trays along the edges of paths and platforms, connected by a ring of ordinary, non-perforated pipes almost at the very surface of the earth, and a second ring of perforated drainage pipes laid at a depth just below the basement floor along the perimeter of the building. All these pipes are brought together into common collectors, from which the water is subsequently removed somewhere - into a filtration field, into a central sewer system, etc.:
In the simplest case, a dewatering system for the construction period consists of a pit in some part of the pit and a drainage pump for periodically pumping out the water entering the pit (open drainage). In more complex cases, wellpoint filter systems or anti-filtration curtains are used.
Photo: installation of wellpoint dewatering
– there are a lot of videos on the Internet about the operation of wellpoint dewatering systems, if you are interested you can read them yourself.
But such systems cannot be used on a permanent basis for the period of operation due to high operating costs, at least in private construction - these are temporary solutions.
On an ongoing basis, to reduce the groundwater level, they are used in private construction, as a rule:
- a combined wall water reduction (drainage) system around the building,
- a horizontal surface drainage system in the form of open or closed shallow trays and ditches, when an area with groundwater very close to the surface is drained - this makes it possible to drain both surface water in the spring and rainy periods, as well as excessively high groundwater.
Photo: drainage with an open ditch. The ditch does not look aesthetically pleasing and takes up a lot of space
Layout: closed drainage ditch
In ditches filled with crushed stone or other drainage material, water moves slowly. therefore, the productivity of such a system is significantly less than in the case of using drainage pipes.
When is drainage necessary?
To permanently protect foundations and basements from groundwater and atmospheric waters, there are 3 options:
- Make high-quality, ultra-reliable waterproofing;
- Do drainage, water reduction;
- Raise the area by filling it with imported soil by a large amount so that the groundwater, even at the highest level, is below the floor of the basement or foundation.
And if the groundwater is really close, it is safer to use the first two or even all three options together.
It is not difficult to answer the question of whether permanent drainage is necessary. Drainage should be provided in the following cases:
- It is planned to build a permanent residential building or some other building with a basement . In this case, if in summer the groundwater is at a depth of less than 1.0 m from the basement floor level, drainage around the future house is mandatory, because in spring and autumn, the water can rise by an average of 1.0 m. If the groundwater level (GWL) is 1.5...2.0 m lower, drainage will be a desirable preventive measure. Also, wall drainage along the perimeter will help protect the basement from flooding with melt and storm water from the surface if waterproofing cannot cope with this.
- If the groundwater level in summer is at a depth of less than 1.0 m from the surface of the earth or high water forms on the site - in such conditions, unfortunately, it is better to forget about the basement (unless you raise the site by 2-2.5 m, which is usually simply unrealistic ) – organizing a dry basement will not only be very difficult, but also very expensive. It is necessary to at least protect yourself from flooding of the site (the release of groundwater to the surface or at the distance of the capillary fringe) and take care to reduce the impact of frost heaving on foundations and ground-based structures. With such a close location of groundwater, it is better to lower the water level throughout the entire area.
Where should water be discharged during dewatering (drainage)?
The main thing when creating drainage (water reduction) is to have somewhere to drain the water - you need a place where you can direct water from the drained area for a long time, without harming either the neighbors and their buildings, or the environment.
So, if your site has a problem with high groundwater levels, then you need to determine where to direct the drainage system. Carefully inspect the area closest to the site and try to find one of the following places in decreasing order of preference:
- centralized storm drainage;
- drainage ditch outside the property line;
- the nearest body of water (if it does not have fishery significance);
- the side of the lower relief (if there are no neighbors of anything similar).
When determining the discharge location, keep in mind that for normal gravity movement of water, the minimum slope of the pipe or tray must be at least 0.005 (5 mm difference per 1 meter of watercourse length). That is, if you, for example, need to lay 40 meters of a tray to the drainage ditch behind the fence, then to the place of discharge it will drop 40 * 0.005 = 0.2 m or 20 cm. If the depth of the tray itself started at 40 cm, then the ditch should have depth 40 + 20 = 60 cm. If the ditch turns out to be less deep, then in this situation you will either have to look for another direction for water drainage, or build a dewatering system with a permanent pump.
To determine the downward direction of the relief in areas with minimal slopes, you can look at the movement of streams in the spring and after a rainstorm, or use a geodetic instrument - a level (if you have access) - usually even in almost horizontal areas, although it is tiny, there is still a general slope of the relief in any side - this can be used. You shouldn’t expect a super effect from drainage with slopes less than 0.005, but it’s still better than nothing.
To discharge water into a body of water (for example, a pond or lake), the water level in it must be low enough to provide a minimum slope of 0.005 of the drainage from your site to the reservoir.
In most cases, drainage is feasible, but sometimes it may simply be impractical due to very high material costs, so before starting work, it would be correct to calculate all costs and assess their acceptability in a particular case.
How much can the groundwater level be reduced?
How many meters the groundwater level can be reduced when implementing a drainage system depends on:
- Soil filtration coefficient (the ability to pass water) - with an increase in the filtration rate, the volume of groundwater that needs to be removed at the same time also increases;
- On the performance of system components, i.e. on its ability to remove the incoming volume of water from the soil per unit of time; The parameters of each component are important - both the throughput of drains (pipes, trays, etc.) and their cross-section, as well as the performance of pumps.
- Laying depths of drainage pipes/depths of wells and the distance between them (step).
Scheme - change in groundwater level under the influence of drainage
It should be understood that it most likely will not be possible to lower the groundwater level to a greater depth compared to the original position using simple means and on a permanent basis. The maximum depth to which groundwater can be lowered due to gravity drainage pipes and pumping water from collectors will be from 0.5 to 1.5 m, depending on the ability of the soil to pass water (filtration coefficient). At the same time, in sandy soils with a high filtration rate, it is more difficult to drain water, because it quickly comes from the surrounding layers and a high-performance water removal and/or pumping system is needed.
As the difference between the artificially lowered and the original (natural) groundwater level increases, the rate of water inflow into the drained soil layers increases due to the large hydrostatic pressure of different liquid levels, and the drainage system may simply not cope with such volumes of water inflow. In addition, the flow of water accelerates not only from above and from the sides, but also from below, which, with a wall drainage system, makes all efforts useless if the basement floor is not waterproofed or has defects.
And by the way, lowering the water level of an individual area is more difficult and expensive than restoring the drainage system of the area as a whole. If such a system in a dacha community once existed and over the years was broken or became unusable due to clogging of canals, or blocking of canals during construction, then efforts should first of all be directed to restoring this drainage system.
Choosing the type of drainage system for a site or house
A vertical dewatering system requires constant operation of powerful pumping equipment, so it is not suitable for our case.
A private owner does not have many options to choose from, given the limited financial capabilities - as a rule, they use:
- combined system;
- horizontal drainage from surface or shallow channels, trays, ditches, or drainage pipes.
Option 1 is used when groundwater lies deep enough to make shallow ditches and trays useless - at a depth of more than 0.5-0.8 m.
If you are the “lucky” owner of a site with high groundwater, which rises almost to the surface in the spring and during the rainy season, then choose option No. 2. It makes no sense to deepen drains in this situation because... they will still almost certainly not cope with the decline in groundwater levels - water will flow from below and from the sides faster than the drains will remove it, and there is simply nowhere to drain water in large volumes, because water is high everywhere in the area.
A closed system of drainage ditches is carried out as follows: ditches/trenches are dug with the bottom sloping towards the discharge of water. The depth of the ditch will correspond to the depth to which you want to lower the groundwater. Then they are filled with drainage material, sometimes using geotextiles.
Photo: open drainage ditch filled with rubble
for open trays - the main thing is that if you want to drain groundwater, and not surface water, the walls of the tray or ditch allow water to pass through well. To do this, the walls are either left without reinforcement or reinforced with large crushed stone.
The combined system is usually made of perforated pipes wrapped in geotextile material (to prevent silting of the holes), laid with a slope in a layer of crushed stone backfill. The pipes are brought down into vertical wells of small cross-section (collectors), usually made of corrugated plastic, and sometimes from metal/plastic barrels in order to save money. From where water is most often removed using a pump to places where drainage water is discharged.
The depth of installation of drainage pipes is influenced by two factors - the depth of soil freezing and the depth of the foundation (for wall drainage). If the drain freezes in winter, then when the snow melts it will not be able to remove excess moisture, and the efficiency of the system will tend to zero. To prevent this, the trench must be developed taking into account the climatic characteristics of a particular area. Calculating the depth of wall drainage is very simple: add 30 cm to the lowest point of the foundation. This will be enough to intercept groundwater during the rainy season or during a flood.
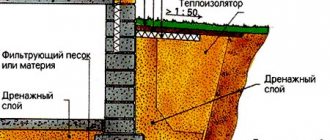
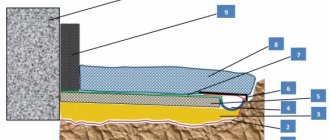
Scheme: wall drainage
As you can see, it is advisable to provide a layer of drainage material under the basement floor and along the outside walls to drain water to the pipes.
– a good video about a self-made combined wall drainage system around the perimeter of the house.
Materials and components for the drainage system
If we are talking about filling ditches with drainage material or sprinkling a drainage pipe, then crushed stone or ASG should be used. The larger the fraction of the stone material, the better its ability to pass water, and this is exactly what we need. Crushed stone is usually used in fractions of 20-40 mm. Sometimes drainage ditches are filled with broken bricks, construction waste, large branches - these options also work, but after a while they will lose their properties.
Photo: crushed stone for filling drains, fr. 20-40 mm
To ensure that the drainage backfill does not silt (dirt and silt will fill the voids between the backfill stones) and does not lose its properties over time, it is necessary to separate it from the soil mass with geotextile material - first lay geotextiles in the trench and then fill in crushed stone, after which the edges of the geotextile are wrapped on top. The perforated pipe is also wrapped in geotextile to prevent clogging of the holes.
There are a large number of types and manufacturers of geotextile materials. To limit your choice, pay attention to the following parameters:
- Density – at least 150, preferably 200 grams/m2;
- Purpose – filtering or universal geotextiles. The fact is that there are geotextiles such as membranes or impregnated fabrics that do not allow water to pass through well or at all - their purpose is to reinforce the soil mass or another.
Photo: geotextile with a density of 200 g/m2
– video review of geotextile materials
Perforated drainage pipes are usually made of corrugated plastic - HDPE or PVC of different diameters - from 100 mm to 300 or more. Can be single-layer or double-layer. They differ in rigidity - for greater depth, it is necessary to use more rigid pipes. There are pipes with a filter (wrapped in go-textile) or without a filter. Flexible pipes are most often supplied in coils.
Photo: corrugated drainage pipe in the filter
– video review of drainage pipes.
Rigid sewer pipes with hand-made slots work very well - a kind of homemade option, but the depth of such pipes should be no more than 1.5-2.0 m. The slots are made at 1/4-1/3 of the circle with a spacing around the perimeter or along the axis of the pipe. The cuts can be made with a grinder or even a hand hacksaw for wood.
Be careful when choosing a pipe - some geotextile pipe windings do not allow water to pass through well:
Collectors (aka drainage wells) - as a rule, corrugated plastic made of HDPE or other materials are used and can be equipped with plugs that form a blind bottom and couplings for connecting pipes (usually cut in place):
What can be dangerous about drainage?
The use of water reduction, especially in clayey and silty sandy soils, entails compaction and settlement of the drained soil layer. This phenomenon should be taken into account when designing drainage of existing facilities, as it can increase the deformation of buildings and structures. These deformations can be very extended in time and take a very long time to materialize.
For existing buildings, there is a risk that the load-bearing capacity of the foundation and basement walls will be compromised when excavating trenches along the walls - use extreme caution when carrying out and planning the work. The video below shows an amazing example of the consequences of doing things wrong with a happy ending:
Conclusion
We have not touched upon the issues of calculating the depth, cross-section and distances between ditches or pipes. This was not done by chance - the fact is that these calculations are quite complex, information on them is available on the Internet, but it will be difficult to figure it out at once - perhaps we will separate these issues into a separate article.
The article contained many links to videos because, as they say, it is better to see once than to hear a hundred times. It is better to provide a drainage system immediately during the construction of the building, but it is also possible to construct it later, although this is much more complicated. Good luck with your plot drainage!
Related Articles
- Choosing the depth of foundations
- Physics of the heaving process
- What are heaving soils?
- Groundwater and its influence on foundation soils
Do-it-yourself drainage installation around the house
It is quite possible to install drainage around the house yourself. For this, basic drawing knowledge and the ability to perform simple construction and installation work are sufficient.
Before starting work you must:
- conduct geodetic and geological surveys of the site;
- determine the type of future drainage system;
- draw up a project.
This work must be performed by specialists. Without the appropriate skills and equipment, drawing up a project yourself can lead to serious mistakes. As a result, all the work will have to be redone.
If drainage is built incorrectly under the foundation, this will lead to premature destruction of the building and the need to demolish and rebuild the house.
On topic: Site drainage, step-by-step instructions on how to do it yourself in 5 steps.
Selection of materials and their estimated cost
The selection and purchase of materials is carried out when the project is ready.
For a DIY drainage system around the house you will need:
- geotextiles with a density of 100 -150 g/m2; price from 17 rub./m;
- drains; price from 50 rubles per meter of plastic pipe;
- crushed stone or gravel larger than the size of the holes in the drains; from 200 rub/m3;
- sand; from 100 rub/m3;
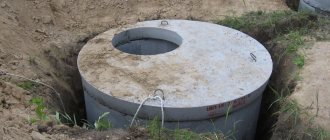
- plastic inspection well; from 950 rub.;
- plastic collector well; from 10,000 rub.;
- drainage sediment; submersible type from 3000 rub.;
- fitting.
Drains are made of plastic, asbestos-cement and ceramic. Preference should be given to pipes made of high-strength plastic that can withstand significant loads.
There are plastic drains on sale, wrapped in geotextile or coconut copra.
Asbestos-cement pipes are heavy and require special equipment for careful and correct installation. Ceramic ones have a high drainage capacity, however, they are fragile, difficult to install, and may not withstand the pressure of frozen soils.
What tools will you need?
Before you begin, you need to prepare your tools. You will need:
- bayonet and shovel shovels;
- garden wheelbarrow;
- level;
- roulette;
- manual rammer.
Groundwater and its dangers
Groundwater can also pose a danger to the site. If your house is located near a river, lake or even a swamp, then you can be sure that there are some on the site. The danger of groundwater lies in the fact that it lies in the depths of the earth. If water from the house flows there during heavy rains, then there is a high probability of disturbing the balance and stability of the house, which may subsequently lead to its collapse. It is for this reason that it is so important to properly drain rainwater from a residential building.
How to properly make drainage around the house. Step-by-step instruction
After completing the design work and purchasing everything you need, you can begin work.
- Clearing the area. Remove debris and anything that might interfere with work.
- Preparing the trench . Dig trenches while maintaining the slope. The minimum width is equal to the pipe diameter plus 30 cm. The slope is checked by level. Its size is 1-2 cm per 1 meter.
- Backfill. Fill the trenches with sand in a layer of at least 10 cm.
- The foundation is prepared for the wells . Make a platform of suitable size, filled with sand. If the groundwater level is high, the site for the well is concreted with a 10-centimeter layer on which the well is fixed.
- Cover the trenches with geotextiles . Its edges should extend beyond the top edges of the trenches.
- Laying drains . Crushed stone is poured onto the geotextile in a layer of 10-20 cm, leveled so that the thickness is the same and the angle of inclination does not change. Drains are laid, connecting them with fittings or sockets. Connect the pipes to the “inputs” of the well. For tightness, rubber O-rings are used.
- Backfilling of pipes . An even 20-centimeter layer of crushed stone is poured over the pipes and wrapped in geotextiles.
- Backfilling with sand . 20 cm of sand is poured on top of the geotextile, compacted, and covered with soil.
- Digging a well . The wells are buried and covered with lids.
If there is a large amount of precipitation in the region, especially in summer, storm drainage trays (storm drains) are located directly above the drains. They are laid on a sand cushion.
You can see an example of laying drainage around a house in this video.
Drainage of water from the foundation
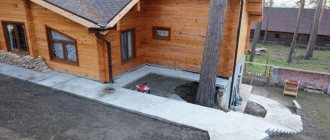
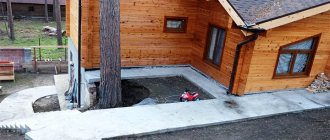
It is a very common fact that when constructing a system for removing water from the roof, builders do not take into account at all that water must also be drained from the foundation. It happens that water goes through the drainage structure immediately into the ground, directly next to the foundation. All this has a very negative effect on the foundation itself, because when water gets into loose soil, it is easily absorbed and subsequently freezes with the onset of cold weather, which causes significant harm to the concrete structure.
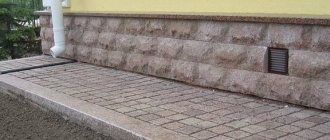
That is why, in order to preserve the foundation, it is necessary not only to make a blind area up to 100 cm wide, but also to make a structure for drainage of water from the foundation. You can do this in two ways:
- Having built drainage trays, making them is not at all difficult, and they will always be in sight, as a result of which it will be possible to make timely repairs;
- using point rainwater inlets - this system is a little more complicated, but also easy to use; it is enough to lay a pipe from the inlet into a trench from an existing drainage system.
However, it is worth making sure that the drainage system from the surface does not coincide with the drainage of the house, otherwise the foundation will always be damp.
Channels designed to drain water can be covered with special grilles with decorative elements to prevent debris and other particles from getting into them. These gratings will also help you walk and drive through the area without hindrance.
To connect storm sewer and surface drainage, special outlets are used, which can be installed both vertically and horizontally.
When installing water drainage along the surface, it is necessary to remember the slopes so that the water can flow freely into special places. This can be organized:
- taking into account the natural slope of the site;
- using special channels, inside of which a slope or special “steps” is provided.
However, surface drainage alone may not be enough to cope with constant flooding of the basement, as a result of which its walls become saturated with dampness. To do this, it is necessary to organize deep drainage.
Purpose of storm drain
A storm drain is installed to drain rain and melt water. It belongs to the point type. It is used as an independent structure and in combination with a drainage system.
Installing a storm drain is not difficult, but it is important to design the future system well.
Selection and calculation of materials for storm drains
When the project is ready, it is necessary to purchase building materials. You will need:
- sand;
- crushed stone;
- cement;
- sealant;
- storm drains;
- water collection tanks (storm water inlets);
- pipes;
- gutters;
- sand traps;
- gratings;
- observation wells for monitoring water levels;
- adapters for turns;
- plugs;
- brackets.
Drainage trays are made from asbestos cement, cast iron, stainless steel, and plastic. For self-installation, it is better to choose plastic. It is lightweight, pliable, and does not require complex equipment for installation.
The profile of the trays comes in the form of U, U and slotted. U-shaped is the most convenient for a private home. It is quite capacious and has no corners where dirt accumulates.
The calculation of materials for a stormwater system depends on the amount of precipitation, the design of the house, the area and characteristics of the land plot.
The diameter of the drains is chosen:
85 mm – for 10 l/s
100 mm – 20 l/s
150 mm – 50 l/s
200 mm – 80 l/s
The length of the gutters depends on the height of the house.
Drainage trays and gratings are calculated based on the linear footage of the storm drain using design calculations or tape measurements.
The volume of bulk materials can be approximately calculated using the formula:
V=abc
where a, b are the width and length of the trench, respectively,
c – layer height.
For sand, it is worth taking an amendment for compaction of about 20%. For crushed stone - about 5-10%.
Wells are selected based on the amount of precipitation. They are calculated using the formula:
M = (20A)Sk,
where M is the mass of precipitation;
20 – time, in minutes;
A – precipitation intensity over a period of 20 minutes;
S is the area from which water is collected;
k is the moisture absorption coefficient of the material.
The amount of sediment mass must also be known in order to correctly select the depth of drainage trays and their number on the site.
Do-it-yourself storm drain installation
Installation of storm drains is carried out after preparing the site (collecting garbage, eliminating all unnecessary things).
- Dig trenches up to 30-50 cm deep. The trenches must be clearly aligned with the projection of the location of the drains.
- Pits are dug under the drains. They are equipped with water intakes with a capacity of 5000-10,000 ml with special containers for collecting waste.
- Plastic rotary and inspection wells are installed.
- The trenches are filled with sand. Drainage trays are laid on the sand and grates are installed.
- Every 10 meters of a straight line, at all turns and at the exit from the tray system, sand traps are placed.
- The collected water is either discharged into a ditch/storm sewer outside the site, or collected in a container and watered with it in the garden. Draining rain and melt water into sewers for disposal of household wastewater is prohibited by SNiP.
If water is discharged outside the site, permission is required from the Department of Natural Surveillance, the Central State Hydrometeorological Service, the UPN, the Fisheries Department, and the Basin and Water Management Department. It is necessary to provide the stormwater drainage design to these services. Construction should begin only after its approval.
Is it legal to drain into a drainage ditch?
Flow stations or VOCs from leading manufacturers clean wastewater efficiently, so there will be no problems with the law when discharging into a ditch. Especially when using ultraviolet disinfection and a microfilter at the exit from the aeration station.
Expert opinion
Albert Lyushin
Engineer-technologist with more than 15 years of experience.
Ask a Question
There are some nuances with septic tanks made of concrete rings:
- firstly, through the seams of concrete rings, even if they are sealed, sooner or later its contents leak out and clog the soil;
- secondly, this design does not clean the wastewater in any way.
According to the law, this will be equivalent to waste dumping. In this case, administrative punishment is provided.
You can view the standards for the installation of autonomous sewage systems in the regulatory document SP 30.13330.2016 (Current edition of SNiP 2.04.01-85).
Where to complain if neighbors drain wastewater into a ditch, storm drain or onto the terrain
Neighbors should know that the federal law on sanitary and epidemiological welfare provides for administrative liability for such discharge of wastewater without prior disinfection. You can write a complaint to SNT Rospotrebnadzor, and then go to court with their written response. In practice, such cases occur extremely rarely.
Where to drain purified water if there is no ditch
Wastewater treated with a septic tank must be supplied for post-treatment in filtration fields or in a drainage well. But not everyone has the space to install them on their summer cottage. In this case, all that remains is to use the drive.
Is it possible to drain water into your garden for irrigation?
It is undesirable to water vegetable gardens even with clarified wastewater from a biological station. After energy-independent anaerobic septic tanks, water is not suitable not only for irrigation, but also for discharge onto the ground.
Turnkey installation of drainage around a private house
If you are not sure that you will be able to carry out proper drainage and storm drainage around the house with your own hands, you can order turnkey work. To do this, you need to choose a reliable contractor and find out the cost of the service in advance. You can buy all materials and components for installing a drainage system from a warehouse in Irkutsk.
How to choose a contractor
When choosing a contractor, you need to consider the following points.
- Famous name. The organization or team must have a certain reputation in a given locality/region.
- Positive feedback . It is necessary to find as many reviews and information about this contractor as possible.
- Official registration with tax and other authorities. Serious contractors have the status of individual entrepreneurs or legal entities. All information about them is transparent.
- Portfolio. The customer has the right to demand examples of work.
- Agreement. It is necessary to conclude an agreement. Before signing, the document is read carefully. All unclear points must be clarified immediately. If the conditions are not satisfactory, the customer must demand that they be changed, or refuse the services of this organization.
- Acceptance. Acceptance is made after inspection.
How much does high-quality turnkey drainage cost?
The cost of turnkey drainage depends on many factors. Before drawing up the project, no one will tell you the exact cost. The approximate price of a surface linear system is from 900 rubles/linear meter. Deep - from 1500 rubles/linear meter. Deep ring-shaped drainage costs from 3,000 rubles per linear meter. Storm drains – from 1200 rubles/linear meter.