A properly organized chicken coop will create optimal living conditions for chickens. Automates their maintenance. This will help maintain bird productivity at the proper level. And if necessary, breed and raise healthy offspring. There are several options. You can build a good poultry house from scratch. Or convert an existing barn into it. The next steps are to adjust the internal climate. And the functional placement of bird items. Details in the article.
Classification of chicken coops
Varieties
Before deciding how to set up a chicken coop inside for laying hens or broilers, you need to build it. To do this you need to prepare.
To effectively raise chickens, various types of poultry houses are used. Depending on the design features, chicken coops are classified according to the material of manufacture and the type of keeping the birds. And also in terms of capacity.
For example, a small wooden structure with compact placement of nests, perches and other things is suitable for 10 chickens.
And for 20 chickens you need a larger building, made of brick or foam block. Preferably on a foundation.
Construction type
The chicken coop can have an open or closed design.
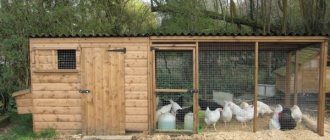
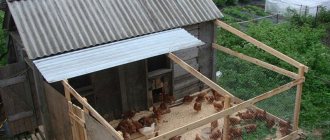
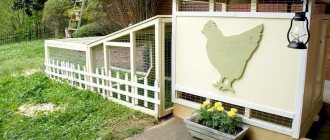
An open chicken coop provides for the construction of a comfortable house for chickens to live with free access to walk.
Closed structures involve the arrangement of a complex consisting of a mini house and a small enclosure. It is possible to keep birds in cages.
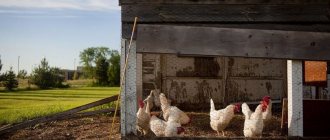
In private farmsteads, chicken coops are most often built for laying hens and open-type meat chickens. A warm room is used to set up a poultry house. Here the bird feels comfortable in the cold.
If there is not enough space, a closed poultry house is suitable. A good option for 10 chickens. And broilers can generally be kept in a small area in cage batteries.
Seasonality
The seasonality of cultivation is also important. To keep birds year-round, you will need to install a permanent chicken coop with high-quality ventilation and lighting.
The construction of a winter house is not economically justified if you plan to keep birds only in the summer. An excellent option would be a lightweight, collapsible structure that can be removed at the end of the season.
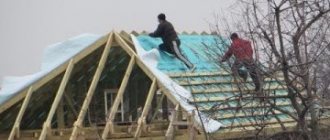
Now let's look at the main tricks in building and arranging a chicken coop.
Step-by-step instructions for building a chicken coop
Step 1 . Dig a trench half a meter deep to build the foundation. Build formwork from boards around the hole (around the perimeter). Place concrete in the foundation and set aside construction for a few days until it dries.
Foundation of the future chicken coop
Step 2 . Make a wall frame from timber. Connect the beams around the perimeter of the walls. Build several beams vertically if you want to build a large shed. From the outside, treat the frame with boards or cover it with plywood.
Chicken coop walls
Step 3 . For good thermal insulation, build double walls. Cover them with metal mesh. Leave room for windows if desired.
Covering poultry house walls with metal mesh
Step 4 . Make a frame roof. Connect the beams at an angle, attach the boards transversely and lay down roofing felt or any other similar roofing material.
Walls of a barn for keeping chickens
Step 5 . Lay a thermal insulator for the floor, for example, polystyrene foam. Next, arrange the flooring, but first reinforce the floors with metal mesh. Screed using concrete or cover the floor with wooden boards.
Floor insulation and tiling
Step 6 . Provide electricity. Consider the wiring layout. For heating, install fan heaters, stoves with a water boiler, or infrared lamps.
Electrics and fan heater for poultry house
Step 7 . Build ventilation. Take a household hood and a corrugated pipe. Exit the structure through the opening in the ceiling.
Incoming pipe for ventilation in the ceiling
Step 8 . Place nests in the chicken coop and equip perches. Place drinking bowls and feeders in a specially designated area.
Photo of a finished chicken coop built independently
Prices for chicken coops for birds
Chicken coops
Video - How to build your own chicken coop
How to equip a room in which chickens will be comfortable? An experienced farmer tells subscribers how to independently and competently build a good chicken coop. The farmer also shares other useful information. How to feed chickens correctly to get organic eggs?
Video - Mistakes when setting up a chicken coop
An experienced poultry farmer talks about building a poultry house for chickens. The author examines all the main mistakes associated with the arrangement of cages, walls and other structures and shares how to solve these problems. The farmer also talks about feeding and keeping domestic chickens.
Setting up a chicken coop yourself is a simple and quick task. Properly plan the room, defining the internal division into zones, if desired, make drawings and build the structure. Take care of your pets, and they will thank you with good health and high egg production.
Important preparation steps
What affects the size of a building
It is important to determine the number of chickens planned for permanent residence.
The dimensions of the chicken coop are chosen taking into account standard indicators. When kept outdoors - no more than 2-3 heads per 1 m². From here:
- for 10 chickens, the minimum size of the poultry house is 2 by 2 m (but it is better to do it with a reserve);
- for 20 chickens - 2 by 5 m.
When keeping birds in cages, a smaller room will be required.
About walking
To prevent the birds from flying away, the walking area requires a mesh fence at least 2 m high. To protect the chickens from attacks by predators, the walking area is covered with a net on top. Or they install a full-fledged roof.
The size of the paddock depends on the available land area. The main rule when arranging it is the free movement of chickens without crowding.
Ideally, an area of 8-10 m2 is allocated for 10 chickens.
For 20 chickens - 20-25 m2.
Broilers will require less space. And the fence is up to 1.8 m.
Find out more in the article “Building a Do-It-Yourself Chicken Pen.”
Preliminary plan
Having decided on the type of chicken coop, we begin to draw up a detailed plan. They make a drawing indicating the dimensions of the future building.
When planning, carefully consider the internal placement of feeders and drinkers. They should not make cleaning difficult.
It is better to place roosts for chickens away from the door.
Nests for laying hens are in the warmest corner, away from drafts.
The number of nests and the size of perches depend on the number of birds during the busy period.
The plan must indicate locations for windows, doors, ventilation, lighting, and heating appliances. As well as an area for a walking yard.
Comfortable spot
It doesn’t matter whether you plan to build a chicken coop for 10 chickens or more. In any case, you need to choose a suitable place.
Choose an area away from a busy road and people. This will prevent the chickens from becoming anxious and restless.
For construction, you will need a flat place, cleared of debris and excess vegetation. A slight slope promotes natural drainage, without installing storm drains.
It is better to avoid holes and lowlands. During periods of heavy rains and spring floods, flooding of the chicken coop is inevitable. In addition, a complex landscape requires preliminary leveling of the soil or pouring a foundation of complex shapes.
Important nuances
It is better to place the windows of the chicken coop on the east side. Chickens wake up early. And with this arrangement of windows you can save on lighting.
To avoid attacks by weasels, foxes and rats, you will need to install a deep foundation under the chicken coop and walking area.
The installation of tight doors is also a necessary security measure.
Chicken coop requirements
To determine where it is best to place the chicken coop, you should clearly know what it should be like. The building must meet the following basic requirements:
- No drafts and protection from strong winds. This condition is achieved by placing the building surrounded by dense green spaces or other buildings on the site.
- No excessive humidity. To do this, it is better to locate the room in areas with sandy soil. In addition, taking this point into account, it is better to locate the poultry house on a hill.
- Having enough space for the entire chicken population. As a rule, the minimum standard corresponds to 50 square centimeters per individual. To this they also add a certain area for placing feeders, drinking bowls, and perches.
- The presence of a walking area next to the chicken coop. This point must also be taken into account when choosing a site. The walking area must be fenced. In addition, it cannot be built in an area that is closed on all sides by tall trees or buildings. When a bird is allowed to walk in an excessively shaded area, it may develop stunted growth and other health problems.
- Remoteness from the roadway and other sources of strong noise. Loud noises are the main cause of stress in chickens. Accordingly, such prolonged exposure leads to a decrease in egg production in laying hens, a weakened immune system, and reduced growth rates. Therefore, the chicken coop must be placed as far as possible from the road.
When arranging the site, it is also recommended to build a small pond on the walking area. Covered booths are placed near the fence of the paddock, in which animals can escape from precipitation.
In addition, when planning the placement of a chicken coop on a site and its design, in addition to the comfort of the bird itself, it is important to consider the ease of maintenance of the building. The approach to the chicken coop should be convenient and spacious enough to make it easier to clean out manure and bring in straw. Also, the chosen location of the poultry house should not interfere with free access to neighboring buildings on the site.
What to consider during construction
Wall material
The chicken coop requires periodic disinfection of the walls and floor. Therefore, it is necessary to carefully select the material for the walls.
Previously, only materials common in the area were used for auxiliary objects.
Today there is no such problem. You can build a chicken coop with your own hands from any convenient material.
For the manufacture of permanent buildings, you can use wood, brick, and foam blocks. A chicken coop for year-round raising of chickens needs a foundation and high-quality wall insulation.
Wooden chicken coops are popular. They are easy to maintain, warm in winter and cool in summer. However, chicken droppings will eat away at the wood surface over time. To protect against moisture and mold, wood requires periodic treatment with antiseptic agents.
A lightweight summer chicken coop can be built from plywood, edged boards, chipboard, OSB boards, and polycarbonate.
Which floor to make
If you keep chickens in a chicken coop all year round, you will need to install a heated floor. For this, several options are used: jellied, clay, earthen, wooden.
Wooden flooring is most suitable. It is warm, easy to clean and disinfect. In addition, the service life of a wooden floor is longer than that of analogues made of clay or earth.
Concrete floors are strong and durable. But it is cold and requires thorough insulation.
Details in the article “What is the best material for making floors in a chicken coop?”
Summer keeping of birds is also possible on mesh floors. They make cleaning the room much easier. Prevents contact of birds with droppings and the development of many diseases.
Manhole arrangement
When planning a chicken coop, it is necessary to think over a convenient passage for chickens, allowing them to move freely from the walking area to the chicken coop.
The manhole is placed at a height of no more than 10 cm from the floor level. Average dimensions - no less than 40 by 40 cm.
The hole is covered with a thick door, protecting the room from the cold in winter. And at night - from predators.
Additional wall insulation
Thin load-bearing walls of a permanent chicken coop require insulation and finishing. To do this, install the frame and lay insulation. The top can be covered with any decorative material.
Polystyrene foam, mineral wool and even sawdust are used as thermal insulation materials.
For interior wall decoration, plywood, board or other material that is at hand is suitable.
Windows and doors also require high-quality insulation. Eliminating drafts and cracks will help retain heat inside the room for a long time.
Find out how to properly retain heat in the article “How to insulate a chicken coop for the winter with your own hands.”
Now let's figure out how to equip a barn for chickens according to all the rules.
Preliminary preparation
First of all, calculate the space required for the chicken coop. To do this, count the chickens that will live in the pen. Several pets should have at least one meter square. Comfortable indicators are 3 square meters per bird. Then sketch out a building plan on paper and adjust the footage to your area. Correctly arrange all additional rooms, designate where you will build nests, where perches, and where there will be a place for feeding and walking.
Chicken coop layout drawing
When choosing a location for future construction, pay attention to the hills. If the farm or summer cottage is located on a flat surface, create an artificial hill. To do this, pour a small hill of broken brick, crushed stone or soil. Cover the top with a thick layer of clay, after mixing it with broken glass, to protect your pets from rodents. The clay is covered with sand, turf or soil (at least 15 centimeters).
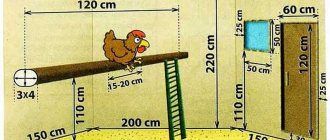
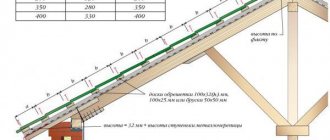
| Index | Values |
| Place of one hen on the roost | 30 centimeters |
| Beam spacing | minimum 40 centimeters |
| Distance between poles and walls | 30 centimeters |
| Perch height | 50 centimeters |
| House height | not less than 1.8 meters |
| Walk | minimum 1-3 square meters per individual |
| Nest equipment | 30x30x40 (where 40 is depth) |
Chicken coop drawing second option
How to build a chicken coop correctly?
The poultry house structure consists of a foundation (if desired), floor, walls and roof. To build a poultry house yourself, you do not need to purchase expensive materials. Outline the drawings, determine the exact dimensions of the premises and begin construction. During work you will need the following tools:
- screws and nails;
- screwdriver and hammer;
- saw or electric jigsaw;
- hinges on the door;
- level for calculations;
- shovel.
To create a more substantial room in which chickens will be kept all year round, you will also need window frames, an electric heater and glass wool. The list of specific tools and materials depends on the home improvement method you choose.
Tools for building a chicken coop
The basis of the structure is the foundation and floor
Each farmer independently decides whether or not to pour a foundation for the premises - the poultry house will function perfectly without it. If you still decide to build a foundation, give preference to a columnar or strip structure - they are cheaper and easier to implement. The easiest option is to equip a frame poultry house. Take several slabs of the same size in which you can cut out doors or windows. Make a fence of iron sheets around the perimeter of the barn, then place them in the ground (20-50 centimeters).
If the floor of the poultry house is made of bricks or wooden beams, cover it with insulating material. Foam and boards placed on top are ideal for these purposes. Before introducing birds, sprinkle sawdust or straw on the floor. If the chickens are kept on deep litter, treat the floor with lime, and also make the litter itself from sawdust and straw (no thinner than 10 centimeters). In cold weather, increase the layer, and also change it when it gets dirty.
Chicken coop floor
To make it easier to clean the floor of the poultry house from various contaminants (droppings, feathers, garbage), equip an opening in one of the walls (size - at least 50 centimeters in diameter). It can be closed with a lid that will open upward.
Poultry house wall arrangement
The most durable structure will be one with walls made of brick, cinder block and stone. This design will last a long time, but it needs to be additionally heated. Many farmers choose walls made of wooden beams or logs, but the construction of such a structure will take a long time. It is easier to use the frame option - install a frame, cover it with slabs and boards on the outside and inside, and also place insulation between them.
If you plan to keep birds in a building during the winter, the first step is to insulate the interior walls. Wooden boards and plywood are hammered onto the insulation on top. Before introducing birds, be sure to paint the walls of the poultry house with lime diluted in water - this is necessary to disinfect the room .
Chicken coop walls
Roof arrangement
You can build a lean-to structure, but it is best to make a gable roof, which will save the room from dampness, snow and rain. You will also have extra space where you can store various garden tools, building materials or food. Strengthen the ceiling beams, lay the ceiling with any boards. The main rule in building a roof is that it needs to be insulated. To do this, you can use roll insulation or cheaper expanded clay or coal slag.
Poultry house roof
Converting a barn into a chicken coop
There is a simple and quick way to have chickens at home. This is the conversion of an already built barn into a chicken coop.
The winter version requires careful insulation from the inside. A small room can be insulated from the outside. This will help save usable space.
Before insulating the walls, you must thoroughly clean the entire wooden surface from rotten chips. Caulk seams and cracks.
The shed is insulated and sheathed using a frame type.
If the shed does not have a window, you can do without it. However, such a room requires lighting from early morning. You can use 300-500 W incandescent lamps with aluminum reflectors.
If there is no floor in the barn, you need to pour a thick layer of sand. And lay hay, sawdust or dry leaves on top.
The ceiling is insulated from the outside by simply pouring a layer of earth. Or use polystyrene foam.
Details in the article “On keeping chickens in a barn.”
Chicken coop structure
The main condition when designing a building for keeping poultry is to create comfort. Here you need to take into account the climatic features in a particular region, think through the ventilation system, issues of maintaining optimal temperature indicators, supplying electricity, and arranging a walking area.
The process of raising chickens at home generally does not pose any particular difficulties if the chicken coop is prepared in accordance with the requirements for keeping poultry. Despite the type of building materials used for a homemade chicken coop, you need to take care of fire safety. In addition, in order to avoid future problems with chickens, it is necessary to take a number of measures to treat the premises from fungus and other pathogenic microorganisms.
Chicken coops, depending on the goals pursued by the owner of the personal plot, are classified into the following types:
Stationary version. This building for keeping laying hens is distinguished by capital manufacturing. It is perfect for all-season keeping of chickens and other poultry. Inside, such a structure is divided into 2-3 compartments (zones), where there is space for laying eggs, for laying hens to rest, for feeding, and for walking.
Among the positive characteristics of a stationary chicken coop are: safety of keeping chickens, protection of them from cold and precipitation, availability of space for storing tools and feed. Also, in such a chicken coop there are no difficulties with collecting chicken manure (poultry droppings), which is a valuable organic fertilizer.
Multi-tiered version of construction from scrap materials. This capital chicken coop has cages that can significantly increase the number of chickens in a poultry house with limited space. Such chicken coops are chosen because of the convenience of collecting eggs and rapid weight gain, since the birds are in limited conditions.
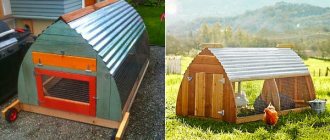
Mobile design. This structure, made from scrap materials, is very popular among summer residents; it is valued for its mobility, ease of manufacture, and the ability to change the walking area, choosing a more suitable area. In addition, such a building for keeping chickens does not require the use of additional bedding and makes it possible to provide reliable shelter for them in the event of wind or precipitation. The only drawback of the mobile structure is its small capacity, suitable for keeping only a maximum of 10 domestic chickens. A portable chicken coop is suitable only for the warm season.
Regarding the height of the chicken coop, poultry can quite normally live at a height of 2 m. Here, nests and perches are placed taking into account their preferences and ease of maintenance of this room.
We create the necessary conditions
Heating
In winter, for the normal functioning of chickens, the chicken coop will need to be properly equipped with a heating system.
Can be used:
- electric heaters;
- gas heating;
- steam heating;
- IR lamps;
- air convection oven;
- stove heating.
Heating automation makes it easier to control the temperature in the coop. Sensors detect a critical level and the heating turns on. When the standard temperatures are reached, the system turns off automatically.
You can do without heating the room. But then egg production and weight gain of chickens will decrease. Possible freezing of eggs, development of colds, frostbite of paws and scallops. And even case.
Lighting
Equipping a chicken coop for winter raising chickens requires lighting for 12-14 hours.
Birds do not need bright light. Weak, diffused lighting will be sufficient. Fluorescent or infrared lamps are suitable here.
The artificial lighting mode can be automated. For this purpose, a photo sensor is installed. It reacts quickly to any changes. And adjusts the lighting level.
When darkness falls, the sensor turns on diffused light. And turns it off on a timer.
Ventilation
When arranging the chicken coop inside with your own hands, you can make ventilation. The system will optimize air temperature and humidity. It will also rid the room of unpleasant odors.
The best option is to install an exhaust system made of small-diameter ventilation pipes.
If this is not possible, you will have to periodically ventilate the room through the door or vents on the windows.
The article “How to properly ventilate a chicken coop” describes in detail all the technological nuances.
Water supply
Setting up a chicken coop is impossible without a water supply. It is recommended to install a serious structure only when keeping large livestock. For 20 chickens, a can of 40-60 liters is enough. You can fill it with a hose connected to the house water supply.
Automatic watering is relevant. The essence of the system is the dosed supply of water into the drinking bowls from a large storage container. This ensures the bird has constant access to water in the required quantities.
Microclimate in the laying barn
Most chicken breeds do not tolerate winter cold well, especially since this period often coincides with seasonal molting, when the bird’s body is weakened. To regulate humidity, temperature and ensure the flow of fresh air in the chicken coop, you need to install ventilation. In winter, chickens need to artificially increase daylight hours - this is necessary to increase their productivity.
Important! You can keep the coop warm by forming high snowdrifts near the outer walls in winter. In the spring, it will need to be removed before the thaw to avoid flooding of the barn.
Ventilation
The type of ventilation must be selected at the construction stage: depending on the dimensions of the building and the number of seats.
There are 3 types of ventilation systems:
- elementary;
- supply and exhaust;
- mechanized.
A basic ventilation system involves ventilation by opening windows and doors. The main task is to position the window openings so that the bird does not suffer from a draft. It is best to make several fixed windows (that do not open) and one small dormer window with an adjustable sash, which will allow you to regulate the intensity of the air supply. The essence of the method is that oxygen enters the chicken coop through the door, and carbon dioxide, along with ammonia vapor, is discharged through the window. This technique can only be used for small livestock (up to 15 heads) kept in a small room.
A supply and exhaust system is the best option for a medium-sized capital building that houses more than 20 chickens. Involves the installation of supply and exhaust pipes in different parts of the chicken coop. To make it, you need to take 2 plastic pipes with a circular cross-section of 20 cm and a length of 2 m.
Step-by-step instructions for supply and exhaust system equipment:
- Fix the supply pipe so that it is located 35 cm above the roof level, and in the poultry house it is at a height of 25 cm from the floor.
- Attach the exhaust pipe as close as possible to the nesting area so that its lower end is 30 cm from the ceiling, and the upper end rises 1.5 m above the roof level.
- To prevent water from getting into the mechanisms, equip the ends located above the roof level with special metal umbrellas.
- To reduce the risk of room hypothermia, cover the lower end of the supply pipe with a mesh.
Video: installing fresh air ventilation in a chicken coop
The mechanized system is a network-powered fan. The easiest option is to install it in a window opening. To do this, you need to replace the glass with a sheet of plywood with a prepared hole for the fan. Such ventilation is advisable when keeping more than 40 chickens.
Additional lighting
Daylight hours for chickens in winter should last 12–14 hours. To ensure this mode, use infrared lamps. This excellent device will not only help extend daylight hours, but will also act as a heater. Such lamps do not dry out the air, and their soft light has a calming effect on chickens.
Important! Chickens should not extend daylight hours by more than 14 hours, as this will lead to an early decrease in productivity. In winter, the bird needs to regain strength after the active phase of egg production.
Temperature
The optimal room temperature for chickens in winter is +12…+17°C. Thermometers should be placed in different parts of the chicken coops in order to clearly monitor the temperature and quickly correct the situation if it drops significantly. If you need to heat a room, it is better to give preference to infrared heaters. They heat the surrounding objects, not the air, so the heat will last longer. There is no need to overheat the room. +17°C should be the maximum level, otherwise the chickens will start to get sick due to the strong temperature difference when going outside.
Internal "interior"
Perches
Comfortable roosts guarantee a restful sleep for chickens. They can be made from wood. Perches made of thin bars are inconvenient to use. And under the weight of birds they can break.
Perches are made from round sticks of medium diameter so that chickens can sit on them comfortably.
One individual needs 30 cm. This does not mean that 20 chickens will need a perch 6 m long. Multi-tiered structures can be installed. Or several pieces in the corners. The chickens will choose where they prefer to sleep.
Do not install perches too close to the floor. In winter it gets cold from there.
If you fix a metal sheet under the perches or put a piece of chipboard of a suitable size, you will get a tray for collecting droppings.
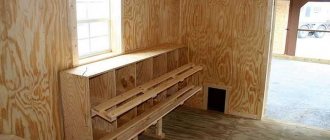
Nests
When setting up a chicken coop for laying hens, you need comfortable nests. For ten chickens, 3-4 pieces are enough.
DIY nests for laying hens are economical and durable. They are made from boards or plywood. But regular boxes lined with straw will also work.
If the nest is equipped with a passage hole and a tray is installed at the bottom, this will make it easier to collect eggs. Protects them from droppings and pecking by chickens.
It is irrational to place nests too high; this makes it difficult to collect eggs.
Litter
During the cold season, chickens are kept on deep litter. Any loose material will do: straw, dry leaves, sawdust, shavings.
First, a thin layer of lime is poured onto the floor. And only then - a bedding about 20 cm high. It perfectly insulates a cold floor. Reduces bird care time.
The top layer of litter is periodically updated. They are completely changed only in the spring. Or before buying a new batch of chickens.
Feeders with drinkers
It is convenient to feed chickens using a spacious bunker-type feeder. Birds easily get food from it without scattering it around or trampling it with their paws. Result: feed savings. And the chicken coop is dry and clean.
Constant access to clean water is required for the normal functioning of chickens. Wooden or plastic containers are used for drinking. Thin plastic drinkers break easily and can damage birds' larynxes.
A nipple drinking system for a chicken coop is an ideal option. It can be easily disassembled for cleaning and disinfection.
Other options are described in the article “Types of feeders and drinkers for chickens.”
Ash
It is mixed with sand, poured into a box and placed on the floor. By bathing in ash, chickens get rid of annoying ticks or fleas.
By settling on a wooden surface, ash helps to partially disinfect the room. Helps get rid of pungent odor.
Cells
Cage housing is used in small chicken coops. When there is very little space for walking chickens. Place the cells in two rows, carefully fixing them on top of each other.
Cages make bird care easier. Allows timely detection of any disease. They protect young animals from attacks by adults.
Ready-made cage options are used to keep chickens. Or they make it themselves from boards and metal mesh.
Interior arrangement of the chicken coop
The internal arrangement of the chicken coop begins with drawing up a drawing plan that shows the placement:
- perches;
- nests;
- feeders;
- drinking bowl;
- containers for receiving ash baths.
Perches
The constant presence of birds on the floor leads to the spread of infection, so perches are built for them to sleep. The warmest, shaded place in the chicken coop is selected for the poles. This allows you to maximally replicate the roosting conditions in the wild, when birds sleep on tree branches. The optimal length of the pole is equal to the width of the room. The thickness of the wooden beam is 4x4 cm.
The density of hens is 20–30 cm per bird. Based on this, you need to calculate how many poles will be installed in the room. The distance between them should be at least 25 cm. To save space, you can arrange the poles in steps, but not on top of each other, so that the chickens sitting above do not stain the ones below with droppings.
When installing the poles, keep in mind that the optimal height to which a chicken can rise without effort is 80 cm. The highest pole should be located at this height. The lowest one can be placed at a distance of 20 cm from the floor. Having decided on the height and number of perches, fixing elements are attached to the walls that will hold the beams. Iron corners will do.
Before fixing the pole itself, it must be processed with a plane and sanded with sandpaper. Paints and varnishes are not suitable for making them smooth, since their composition is unsafe for chickens. After processing, the structure is strengthened at the corners using a screwdriver or drill. It is advisable to attach ladders to perches located at a height of more than 30 cm, along which chickens can climb up.
Important! Only wood is suitable for constructing poles. The use of metal strips will lead to hypothermia of the bird's extremities in winter.
Nests
The number of nests in the chicken coop will depend on the productive direction of the chickens:
- For meat breeds, one nest per 5 females is enough;
- Meat and egg breeds will require one nest for 2-3 hens.
Recommended reading
How to make a nest with an egg collector with your own hands
Wooden containers for storing vegetables or baskets are perfect as nests. The main requirement for the size of nests is 40x40x35 cm. In order for females to get used to the nests faster, a thick layer of soft hay (about 20 cm) should be placed in them.
The nests should be placed in the farthest corner of the chicken coop, protected from drafts. It is important for laying hens to feel safe while laying eggs, so they try to lay eggs where no one will notice them. This factor must be taken into account when installing nests. The best placement option would be places where hens have already laid eggs on the floor. This approach will shorten the period of habituation to nests.
Feeders
The volume of the feeding bowl will depend entirely on the number of chickens. Each head should have 10–15 cm; for chickens, the area is halved. If the feeder is of a circular type, then 2–2.5 cm is enough for each bird. It is important that all birds have simultaneous access to food, otherwise weak individuals will remain hungry. When choosing a feeder or planning to make one yourself, pay attention to the material.
It should be safe for the bird and easy to clean. You will need several containers designed for different types of feed. For wet mash, you can build a hopper feeder from a plastic bucket. To make it you will also need an animal plate with dividers, a sharp knife and wire. The plate should be 5 cm larger in diameter than the bucket.
Recommended reading
How to make a bunker feeder for chickens with your own hands
Departing 0.5 cm from the bottom, holes are made in the walls of the bucket through which food will be served on the plate. There is no need to make them too large so that the chickens cannot stick their heads into them.
The optimal diameter is 5 cm. Then the bucket is attached to the plate using a wire, wrapping it around both containers and connecting the ends to the handle of the bucket. It is better to install the finished feeder on a small elevation, remove it immediately after the meal and wash it.
For dry food, a wooden bunker feeder is a good option. You can design a box with an arbitrary length (for example, 120 cm): the size of the sides will be 120x9 cm, and the size of two small blanks will be 20x12 cm. All these parts should be connected to each other using stainless steel corners. Along the entire length of the box, you need to install wooden poles at a distance of 10 cm from each other so that the bird cannot climb into the feeder.
Did you know? To announce to all the inhabitants of the chicken coop that it is time to get up, the rooster crows once at long intervals at high frequencies. If he has found food far from his home and wants to call females, then his crowing will be low-frequency and often repeated.
Drinking bowls
The best option for chickens is nipple drinkers.
For this you will need:
- nipples;
- transparent flexible hoses;
- drop eliminators;
- square PVC pipe;
- 20 liter bottle.
The bottle will act as a distributor.
Holes are made in the pipe into which hoses are inserted. Nipples are attached to the hoses, which, in turn, are attached to the walls. Drop eliminators must be placed under the nipples. You can do without them, but then all the liquid will be on the floor, resulting in increased humidity, which will lead to the spread of infection. Read more about how to make and install a nipple drinker for chickens with your own hands.
Containers for ash baths
Wooden boxes 20 cm high can be used as containers for ash baths. They contain a mixture of shell rock, wood ash and sand. The number of containers depends on the number of chickens. One box is enough for 5 heads. They can be placed around the entire perimeter of the chicken coop, excluding the nesting area.
Ash baths are necessary to maintain the immunity of chickens. With the help of sand and ash, the bird cleans its feathers, which reduces the risk of the spread of feather bugs and fleas. Chickens eat part of the shellfish, which effectively cleanses the gastric tract and improves digestion.
Feeders and drinkers for chickens
There are several types of chicken feeders. There are feeders for bulk feed (grain, grain mixtures) and for wet mash. The sizes of feeders depend on the size of the bird; for chickens or young animals, feeders are installed at a lower height and made in smaller volumes.
For bulk feed, the feeder is made from a sewer pipe with a diameter of 100 millimeters. A tee plugged from below with a plug is attached to the wall, the branch of which extends upward at 45 degrees. Grain is poured into the tee on top. The chicken has the ability to stick its head on top and peck the grain, but does not have the ability to climb into the feed with its paws. If you install an extension pipe on top of the tee, then several kilograms of grain can be poured into such a feeder, thereby providing the chickens with food for several days.
It is imperative to install such a feeder separately for small pebbles and stones.
Another option for a feeder for bulk feed is a bunker feeder. To make it, small holes are made in the bottom of a plastic bucket. Next, a sectional animal feeder is bolted to the bottom of the bucket. The bucket is turned upside down. The grain poured into the bucket will be poured out in small portions into the sectional feeder, from which the chickens will peck it. In a similar way, by selecting the appropriate containers (a small bucket and a flower saucer-pallet), a bunker feeder can be made of any size for birds of any age.
For wet mash, a sewer pipe with a diameter of 100 millimeters is fixed horizontally to the wall, and slots are made in the side surface of the pipe with a jigsaw through which the bird can get to the food. Similarly, a small narrow wooden trough is used as a feeder.
The design of drinking bowls for chickens is similar to that of feeders. As drinking bowls, use a plastic pipe with end caps and a cut out sidewall, or a plastic bottle installed above a saucer tray.
Note: It is very important to install feeders and drinkers so that the bird cannot climb into them with its paws and drop them.
How to build a chicken coop from scrap materials
You can build a chicken coop that is comfortable for poultry to live in from any available materials. Knowing the stages of execution, you can make a fully functional poultry house on your own plot, even without special construction skills.
Summer chicken coop made from improvised materials
To build a house for the summer keeping of laying hens from scrap materials, you need to prepare bars measuring 50x50 mm and edged boards 100x40 mm. In this poultry house, the space is divided into two zones, where one will be a place for rest, and the other for walking. If the number of poultry heads is 5-10, then 1.5 square meters must be allocated for a closed area. m, and open - 4.5.
The process looks like this step by step:
- Make a base frame from timber for walking chickens. It consists of bottom and side slats, roofing blanks. Place a cross beam between the intermediate posts. Fix it with self-tapping screws or nails, strengthening it with corners.
- Arrange the floor in the chicken coop. An edged board is suitable for flooring.
- Build a frame for the chicken coop, cover the walls with edged boards. Fix the longitudinal strips on the roof of the future chicken coop.
- Cover the building with polycarbonate sheets or reinforced film. For reliability, it is fixed with additional slats.
Winter chicken coop made from scrap materials
The simplest and relatively affordable option for a winter chicken coop made from scrap materials is a wooden frame, which is covered with clapboard and insulated with mineral wool. To make its base, a beam with a cross-section of 10×10 cm, treated with an antiseptic composition, is used. If the structure made from scrap materials is light, then a strip foundation is not relevant in this case. Pillars made of masonry blocks (40x20x20 cm) are quite suitable here. Installing a chicken coop on posts has its advantage - natural ventilation, which prevents the wood from rotting and becoming damp. In addition, unlike a strip foundation, the consumption of concrete is several times less.
Instructions for making a chicken coop with your own hands:
- Make a marking of the area for the chicken coop measuring 2x3 m. Dig holes for the posts 40 cm deep. Fill them with a mixture of crushed stone and sand, the layer thickness should be 20 cm, and compact it.
- Place blocks on cement mortar. Make a support frame for the chicken coop from timber with a cross-section of 10x10 cm. Attach a sheet of OSB to its lower part, on which the insulation will be laid. It is better to make nests for anchors “in place” by defining the frame on blocks. After the hole is made in the bars, you need to install a concrete drill in the hammer drill, dig it 15-20 cm into the block. Then remove the frame, and place threaded anchors in these recesses, sealing them with mortar. To make the foundation for a chicken coop made from scrap materials more durable, it needs to stand for several days. After this, a frame is installed on it and secured with anchors to the blocks in all corners.
- Start assembling the frame. In the corners in the middle part of the frame and in the area of the doorway, you need to install 7 vertical posts made of timber with a cross-section of 10x10 cm. They are mounted using steel corners. At the top of the future chicken coop, a timber frame is made from scrap materials, which will also serve as
- It is recommended to assemble the rafter system below on a flat surface. The rafters need to be joined at the ridge part using a steel plate. Instead of a ridge beam, an OSB sheet will be used, which can bind the roof frame well.
- Make the roof for the chicken coop from sheets of metal tiles, ondulin or bitumen tiles.
- For the floor, use a “thirty” board that has been treated with an antiseptic. OSB sheets are mounted on top. The inside of the frame is lined with waterproof plywood sheets. Then they begin to insulate the walls using
- Wooden or plastic lining is used on the outside of the chicken coop. For ventilation you will need to make a hole of the appropriate diameter. Upon completion of the arrangement of the chicken coop, work is carried out to supply electricity, ventilation, heating, and also install perches, feeders, and drinking bowls.
Choosing a site for construction
The first preparatory stage is choosing the location of the poultry house. Please note that it should be comfortable not only for the chickens, but also for you - an unpleasant odor may penetrate into the house. Birds, in turn, do not perceive invasions into their territory well and begin to lay eggs worse.
A chicken coop with a place for walking will ensure the health of the birds and good laying
The optimal place to place a chicken coop is considered to be the far corner of the site. You can place the poultry house in the barnyard, but remember that loud noise also negatively affects egg production. If there is a barn on the property, you can make a separate extension to it. Additionally, consider the walking area - preferably, it should be a fenced area and not the entire yard. A couple of square meters of walking area is enough for one head.
If you cannot fence off a large walking area, install metal mesh tunnels around the perimeter of the area.
The place for the house should be well lit and slightly shaded at the same time (the shade will protect the birds from excessive heat in the heat). It is best that this is a hill - it will not be flooded by rains during the rainy season. If it is not possible to place the chicken coop on a hill, create a good drainage ditch - it will remove excess moisture. You can make a slide with your own hands - from earth, gravel, crushed stone. The windows of the chicken coop are located on the south wall, since in this case the interior spaces will be better illuminated. Additionally, arrange a door, a hole, and build an enclosure.
Room layout
Proper organization of household items in the chicken coop
Calculate the dimensions of the poultry house:
- for 4 heads of egg breed you need at least 1 m2;
- to keep 15 chickens, allocate 1 m2;
- meat breeds need from 1m2 per 3 heads.
It is very advisable to make separate rooms for chickens, protected from adult birds, otherwise the young will always lack food. The chicks spend the night in a small box - brooders for broiler chickens.
If there is not enough space for the birds in the chicken coop, a stampede will begin.
So, taking into account the above, we determine the general design parameters:
- Area from 4 m2.
- Nests - no more than 4.
- The location of the feeders is opposite the perch and along the wall.
- Having access to the feeding system to clean it is a must.
- The distance between the feeder and drinking bowl from the floor level is from 50 cm.
- The floor is smooth, not slippery.
- The height of the perch is from 600 mm.
- % of window area - up to 10% of the floor area.
- The presence of an enclosure for walking is optional.
- There must be a ladder.
The exact layout of the future chicken coop depends on what you plan to place in it. In order to save internal space, a perch is made for perching (chickens love to sleep on it). Please note that the bird lays one egg every 1-2 days - if the perch is very low, the eggs may be damaged. Also, these structures should be located at a distance from the overnight roost - this will prevent contamination of the shell with droppings.
In accordance with sanitary standards, it is impossible to raise more than 40 chickens at the same time in one area. The distance from the chicken coop to the border of your property should be at least 4 m and at least 7 m to the front door of a residential building.
Construction
The process of arranging a chicken coop consists of the following stages - design, arrangement of the foundation, creation of partitions and walls, roofing, manufacturing of flooring. You will also need to “furnish” it, create a heating system and insulate the walls (if the structure is winter).
Foundation
A columnar foundation is the most cost-effective when building a chicken coop
Although the chicken coop is not a permanent structure, it should not be placed directly on the ground. Possible foundation options are slab, columnar, strip. First, markings are made using pegs and a cord (to indicate the perimeter of the future structure), then digging work is carried out (a layer of soil up to 350 mm is removed), the cushion is filled and compacted. Before pouring concrete, board formwork is installed around the perimeter of the foundation. The final stage of foundation construction is concrete work. First, a reinforced woven mesh of no more than 100*100 cm is placed on the bottom, then M200 grade cement is poured.
Walls
The walls should be made warm and not drafty; the choice of material for their arrangement depends on the foundation - foam blocks, cinder blocks, and brick are ideal for slab and strip structures. Such walls are classified as permanent, but they conduct heat quite strongly, so they require insulation from the inside and outside. For columnar foundations, timber beams are the ideal choice. In this case, a wooden frame is laid on top of the support pillars, on top of which the frame of the future structure is attached. Other options are practical polycarbonate for a chicken coop (not suitable for winter), adobe (bricks can be made from cut straw and clay yourself). To arrange walking areas you need a metal mesh.
Insulation
Lining the internal walls of the chicken coop with mineral wool
The simplest insulation option is mineral wool. To attach it, you need a 50*50 mm frame made of beams, which is attached vertically. The steps of laying the timber can be adjusted taking into account the width of the insulation layer. Wooden blanks are attached to the wall with dowels or self-tapping screws, and an additional layer of vapor barrier is installed - a plastic film should be placed between the wall and the mineral wool. The film is installed with an overlap of up to 150 mm.
For external insulation, it is optional to use penoplex or polystyrene foam. The material is secured using a plastic dowel with a cap. This method is optimal if the walls are made of blocks, bricks and other similar materials. The thermal insulation layer must be covered with a protective layer of plaster and facade mesh.
External insulation is not required in warm regions - it will be enough to cover the walls with plywood.
Roof
Roof arrangement diagram
For poultry houses, a gable roof is usually made, which helps to increase the height of the ceilings. If you provide high-quality insulation, you won’t have to fill the ceiling. The roof can be covered with slate or metal tiles.
Work order:
- Install rafters on top of the wall frame.
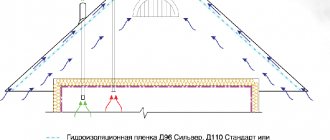
- Lay and nail a waterproofing sheet to the rafters (it will prevent the insulation from getting wet). Lay each strip up to 200 mm overlapping and glue with tape (the coating should be as airtight as possible).
- Fill the sheathing - this is done on top of the waterproofing. Calculate the pitch taking into account the type of flooring.
In cold regions, ceilings are usually insulated. Place mineral wool or other heat insulation in the space between the beams, and additionally secure a vapor barrier film (this can be done with a stapler). Hem the ceiling with plywood, plasterboard or clapboard.
Floors
Double floor with insulation will protect the bird from freezing
To raise broilers for meat, it is enough to make an uninsulated lightweight floor for the chicken coop . Attach the beams to the support frame - they will act as joists. Cover the bottom with boards (for example, mineral wool). Lay a finished plank floor on top. If the foundation is shallow and shallow, the floors can be made of adobe or earthen. For these purposes, a mixture of finely chopped straw and clay is laid in layers on the floor, tamping thoroughly. On a slab foundation, you usually simply build a wood deck on top of the concrete.
To protect the base from moisture, use roofing material - it guarantees reliable waterproofing.
Ventilation
Good ventilation is important in a chicken coop at any time of the year. If it is not there, the chickens begin to get sick, and there is a risk for humans - bird droppings release ammonia, which, with constant contact, has a serious toxic effect. Ventilation types:
- Mechanical - a forced system is best done with a large number of chickens and a large area of the chicken coop (that is, when a stable change of air is especially important). It is simple to implement - you need to choose a place to install the fan (wall, window, pipe), prepare a base for mounting (for example, a sheet of plywood), fasten the ventilation system with self-tapping screws, run the cable, place the wires in a protective corrugation.
- Natural ventilation is a simple and effective option, which most often consists of having a window and opening it periodically. The downside of this method is that it is not suitable for winter.