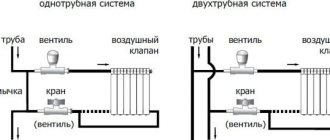
In this article, we will look at connection diagrams for heating radiators and you will understand which scheme to choose for you. Today the question is about choosing two schemes and two systems for the operation of radiator heating systems. The first is a gravity system that operates without forced circulation using a circulation pump. And the second system is precisely the system that operates forcibly using a circulation pump. But these systems can also cooperate with each other.
That is, we have a gravitational radiator heating circuit that works on its own, precisely according to the physical laws of heat and cold, but there is a forced system.
Operating principle of radiator heating systems
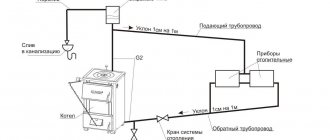
What could be simpler than heating radiator connection diagrams? There is a boiler: solid fuel, diesel, gas, etc. The coolant is heated in the boiler, which gets there under the action of a pump. The heated coolant goes into the radiator heating system; in the radiators, heat is transferred to the surrounding air. The coolant cools down and, already cooled, returns to the boiler, where it heats up again and so the circle is closed. Everything is very, very simple, but, nevertheless, in reality, schemes can be much more complex. Let's see what these schemes are and how they differ from each other, let's look at their advantages and disadvantages.
Selection of the optimal option
The choice of the appropriate method for connecting a heating radiator in a private home directly determines the uniformity of heating, so this issue should be taken seriously. Each type of connection has its own disadvantages and advantages:
Diagonal connection of a heating radiator - the input is connected to the top hole of the battery, and the return - to the opposite bottom. This scheme most effectively ensures that heat is evenly distributed throughout the radiator. It can be used when it is planned to install equipment with a significant number of sections. The level is 2%.
One-way - the input is connected to the hole located at the top, and the return - to the bottom, located on the same side. This option is suitable for apartments, but is rare in private houses. The pipeline there, as a rule, is single-pipe, located in one of the corners, and only one battery needs to be connected. This method is aesthetic and can be used to save material.
Saddle - the supply pipe is connected to the lower hole, and the outlet pipe is connected to the lower one, located on the opposite side. This scheme for installing heating radiators in private homes is not very common, since it has low efficiency. The level of heat loss in this case is about 15%. It is usually used when the pipeline is hidden in the thickness of the wall. Then you have to remove the bends and connect them to the pipes.
Bottom - entry and exit are performed at one point. This option is optimal when the pipes are hidden under baseboards, hidden in the wall or located in the floor. This heating radiator connection scheme is only suitable for panel or steel devices in private homes. In principle, bimetallic units that are monolithic can also be connected in this way. But it also has a significant drawback - significant heat loss, amounting to about 20%.
Spider radiator connection diagram
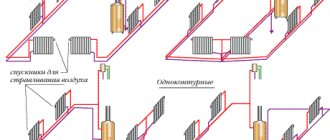
Let’s figuratively imagine a boiler from which we take a pipeline and bring it somewhere to the center of the house. Usually such a system is called a spider. We lower the risers and collect them, sending it all to the return line. We connect radiators to the pipes. The coolant rises up according to its natural physical laws. That is, the hot coolant goes up, and on the second pipe in the middle it leaves and falls down. It passes through the radiator, cools and enters the return line.
Please note that the lower pipes are sloped. This is the only problem, that you need to do slopes. But it is precisely in today’s time that many are again switching to these old systems, as problems with energy resources begin. For example, the electricity is often turned off, and the pump will not work. The system will just stop. But such a system works for you all the time. The boiler can be any: gas, coal, diesel and even electric. This whole system will work.
This system is very cumbersome. It must be practically brought out onto the roof and into the attic. Therefore, not everyone can master it.
Types of radiators
Radiators for the manufacture of heating pipelines are popularly called batteries. New models are made from different metals, which are superior in technical characteristics and aesthetics to cast iron products. Types of radiators:
- Aluminum batteries are efficient batteries that are installed in new multi-story buildings. They quickly fail if the coolant contains alkalis and acids.
- Steel - there are sectional and tubular. The level of heat transfer does not depend on the shape of the battery.
- Bimetallic ones are the most effective in heating rooms. Made from a mixture of aluminum and steel.
Any of the presented types is relevant when assembling a heating circuit with polypropylene pipes.
Connection diagram "Leningradka"
Let's consider the second system. When we take the feed from the boiler and then lower it down. We carry it out at the level of the radiators and then return it back to the boiler. Here, too, it is necessary to observe the slope. Figuratively, this is called a radiator heating system, since 2-3 radiators are mounted along the length. That is, the first one enters the hot coolant, some part goes down the return line cooled, and the hot part goes to the next radiator. This connection diagram for heating radiators is also called “classic Leningrad”. The only thing is to raise the pipes a little upward to create acceleration. Then the water will go down the slope, here they are also very important. This is not always convenient to do, because the doors will get in the way. Also, the fewer taps, the better this system works. If you do not follow this rule, you can plant the entire system.
Leningradka can work with a pump. He crashes into the return line. Due to it, the speed increases and the system works more efficiently. The only drawback of this system is the large diameter of the pipes. If in a forced connection scheme for heating radiators we take pipes with a diameter of 32, we will install a pump and it will push everything everywhere. Here, for the system to work, the pipes must be large. Therefore, these are very good systems now. In new buildings, we always recommend making just such a diagram for connecting heating radiators if there are problems with the electricity supply. And here you can heat the stove or even gas boilers. Now there are non-volatile systems with temperature control.
Two-pipe
In this system, liquid circulates through two dedicated lines: supply (coolant outlet from the boiler) and return (to the boiler). Two pipes are connected to the water heater. Installation is carried out using vertical or horizontal wiring method. Horizontal - performed in three schemes: flow, dead-end, collector.
With a flow-through circuit, the movement of water occurs sequentially , first the liquid leaves the first convector, then the second and subsequent elements are connected to the main line, then the water returns to the boiler. The coolant in the supply and return pipes, in this case, moves in the same direction.
Dead-end wiring is characterized by the opposite direction of water in the pipes, that is, water comes out of the first battery and rushes to the boiler in the opposite direction, similarly from other heaters.
With radial or collector wiring, the heated liquid is supplied to the collector, from which pipes extend to the convectors. This option is more expensive, but is distinguished by the ability to precisely adjust the water pressure.
Leningrad heating system diagram, connection options, pros and cons. How to make a one-pipe heating system for a private house with your own hands, read the recommendations.
Advantages of Rehau underfloor heating at https://klimatlab.com/otoplenie/tepliy-pol/nemeckoe-kachestvo-i-nadezhnost-rexau.html
Advantages:
- Parallel connection of convectors , failure of one element does not affect the operation of the entire circuit;
- Possibility of installing thermostats ;
- Minimum heat loss;
- Operation of the system in rooms of any size.
The disadvantages of this scheme are a more complex installation system and high consumption of materials.
Single-pipe forced circuit
The simplest heating radiator connection scheme that is used in practice is a single-pipe system. The good thing about it is that it is simple and requires fewer pipes on the routes. It is because of this that it was often used back in Soviet times, precisely to save material.
However, this advantage of the “single-tube” looks dubious against the background of its disadvantages. The main one is parallel threads. The coolant enters the radiator, gives off heat to the surrounding air, and then returns to its own flow. But, since the coolant in the radiator has cooled a little, the flow temperature decreases slightly. That is, the coolant enters the second radiator cooler than the one that entered the first. The second radiator gives off heat again, the coolant has cooled again and is again mixed with the coolant that comes from the boiler and from the first radiator. It comes to the third radiator even colder than to the second. If the system is long enough, then temperature changes on the last radiator will be quite noticeable.
How can you correct the situation when different radiators heat differently? The only solution is to increase the size of the latest radiators. And the easiest way is not to use a single-pipe scheme, but to choose some other one. Which one? We will look at this further.
How to properly connect a bimetallic radiator?
Very often, and in the fall almost every day, on the most popular forum in RuNet on the topic of installation, mastergrad.com, topics or messages appear asking about problems connecting bimetallic radiators in apartments, and I am very sorry that in our time, when there is access to any information in networks, many people are faced with this problem when turning to “specialists” to replace radiators who do not have the slightest idea how this installation is performed. And the question is not only that the radiators do not warm up completely or completely, which casts doubt on the feasibility of such a replacement, but also that installation is also often carried out with serious violations of the design conditions of the heating system, which seriously affect its reliability, thereby The life and health of residents is in serious danger. In this topic, by posting photos of my work, I will try to give simple advice on how to connect radiators so that all building codes are observed and new heating devices are fully heated.
Which pipes should I choose for installing radiators?
Firstly, I would like to immediately decide on the type of pipeline material with which the new radiator is connected: if in the house according to the project the risers of the heating system are made of black steel pipe, then the inlets to the radiator should also be made of steel. Options made of plastic pipes (polypropylene, metal-plastic) are significantly inferior in reliability to steel pipes and are categorically unacceptable in systems designed from steel, especially with open installation, which is unacceptable according to SNiP requirements; connecting a radiator with copper pipes and stainless steel pipes, I personally consider inappropriate for economic and aesthetic reasons, as well as due to decreased reliability of the pipe due to the significantly smaller wall thickness.
Secondly, it’s worth determining the type of connection for the pipeline; it’s hard to argue that gas welding is optimal, both for reasons of reliability (with threaded connections there is always a weak point, a snag) and from the aesthetic side due to the absence of threaded fittings. It is also important that risers installed by house builders rarely have the correct geometry relative to the walls and floor, but with gas welding, installers can easily correct all the unevenness left by the builders.
Two-pipe radiator connection diagram
It is very simple: all devices in this heating radiator connection diagram are connected in parallel to each other. Like everything that moves, liquid, of course, chooses the path that is easiest for it. With a two-pipe design, it is easier for the coolant to flow through the first radiator. Further on, on the second radiator, the pressure will be weaker, so there will be less flow through it. On the third radiator there will be even less pressure, and so on throughout the network. If there are a lot of radiators, then there is a high probability that with such a scheme nothing will flow through the last radiator at all.
It turns out that the first radiator heats the best, the second heats worse, the third even worse, the fourth heats very poorly, and the last does not heat at all. The problem is similar to what we observed in the single-pipe circuit; it can be partially solved by increasing the area of the last radiator.
Both systems are bad because they are very poorly balanced. We can struggle for a long time with the fact that one radiator heats us, but the other does not. If we close one, the first one starts to heat up. We close the first one, the second one starts heating, but the first one stops heating. This kind of nonsense happens in two-pipe connection diagrams for heating radiators. It happens that there are two radiators next to each other, there is a flow through one, but there is no flow through the other. That's all. No matter how you fight, no matter how you adjust, either one or the other warms, but never together. Therefore, if you use such a system, then use it in very small spaces.
How to install a radiator correctly?
To properly install a heating radiator, you will need a level and a hammer drill or impact drill, depending on the type of wall on which you will hang the fasteners. If you have a brick wall, then a drill will be enough, but if it is concrete, then you will need a hammer drill.
Now you need to choose a place to install and connect the radiator. The distance from the radiator to the floor should be approximately 10-15 centimeters, and to the wall - 1-2 centimeters. Next, you need to install the radiator on some kind of stand 10 cm from the floor and place a level on top of it. After the radiator is level, you need to mark the places where the fasteners will be installed. A radiator that consists of 7 or fewer sections requires approximately 2-3 fasteners. One fastener must be installed between the first and second sections, the second fastener - between the penultimate and last, and the third - in the center from the bottom.
After all the places for fastenings have been marked, you need to drill holes and screw fastenings into them. After hanging the radiator on the brackets, you need to set it exactly level, bending the brackets down or up, after which the radiator is packed.
Two adapter couplings are screwed in and after that the pipe soldering begins.
To do this, you need to clean the pipe using a special stripper and solder it into the lower and then into the upper coupling. When soldering, do not forget to apply a level to the pipe so that it stands level.
We take measurements.
After this, you need to solder the angle at 90 degrees.
To do this, the soldered area with the American wire is removed and a corner is soldered onto it. Next, you need to wait a little until everything cools down and solder up.
When a corner is soldered into a pipe, you need to immediately screw on the American one until the soldering area has cooled down. Using the same method, the radiator is connected from below.
Now you know how to connect a heating radiator with your own hands. Good luck!
Tichelman scheme: all radiators in the same conditions
As the name implies, this heating radiator connection diagram is quite simple, but at the same time tricky. The first radiator is located closest to the pump, but farthest from the return pipe, and the last is located farthest from the pump, but closest to the return pipe. It turns out that the resistance on each radiator, or the pressure on each radiator, is the same. The flow through all radiators is the same. If we take and shut off any of these radiators, the rest will work as they did, the system balances itself. It seems like there are more pipes here, but in fact, if these radiators are located in a circle around the building, then the design turns out to be much lighter, simpler, and more elegant than the previous ones. The Tichelman loop can be tied around two or even three floors. Moreover, if you close all the radiators on one floor, they will continue to heat normally on the other.
The importance of a competent approach to choosing a connection diagram
First of all, always pay attention to the radiator installation diagram. As a rule, it affects the functionality of the heating device and its efficiency. In addition, if the installation is performed incorrectly, thermoregulation will be disrupted and the pressure in the battery will increase, which will inevitably lead to operational problems. If you do the installation yourself, without the appropriate skills, you will encounter many problems and, most likely, ruin the interior of the room.
Radiator bottom connection unit
By giving preference to the lower connection, prepare for a slight decrease in the efficiency of the entire heating system. Although this is a small thing when compared with convenience and hiding the pipes. If you connect radiators correctly, they will save heating costs in the future and will serve you for many years!
Radial diagram for connecting heating radiators
Let's consider a scheme in which a collector is used. The coolant from the boiler approaches the collector, and from the collector to each of the radiators there is its own pair of pipes: direct and return. If these pipes are hidden in the floor, for example, in the insulation of a heated floor screed, or even placed between the “subfloor” and the finished floor, then a room without pipes will look very aesthetically pleasing. Pipes to another floor can be routed along the ceiling. With this scheme, each of the radiators can also be turned off, but the others will continue to work.
Single-pipe
The operating principle of a single-pipe heating system is circular circulation of liquid along one line. The heated coolant leaves the boiler and passes sequentially through each connected convector.
Each subsequent one receives water from the previous one; as it passes through, part of the heat is lost as a result of cooling. The further the battery is from the boiler, the lower its temperature. If one element fails, the operation of the entire circuit is disrupted.
To avoid this, it is recommended to install the wiring with a bypass path.
Installation is carried out horizontally or vertically ; in the second case, it is optimal to install the boiler at the lower level to ensure natural circulation of liquid.
Advantages of a single-pipe scheme: ease of installation, low cost of consumables, aesthetics (with horizontal wiring, the pipe can be hidden, for example, mounted under the floor).
Flaws:
- Interconnection of circuit elements - failure of one radiator leads to disruption of the entire system;
- High heat loss;
- Inability to control the heating of individual elements of the system;
- Limited heating area (up to 150 m2).
However, for a one-story house with a small area, it is more rational to choose this type of heating.
What and where should I finally use it?
Let's summarize. If you live in central cities and you do not have problems with energy, gas, electricity and others, we recommend using a two-pipe system, with counter movement, circular movement and forced circulation. Because then we save on the diameter of the pipes and the volume of coolant. Accordingly, the less water is needed, the less energy is required to heat it.
If you have problems with energy resources or emergency situations often arise, then you should consider connection diagrams for gravity-type heating radiators with natural circulation. Just in case, you can also embed a pump there, only it is embedded around the pipe so that it does not interfere with the main passage. For the time when you have electricity, you will drive it with a pump, because the speed increases, the radiators are all at a uniform temperature. The efficiency of the pump increases by 30-50%. When there is no electricity, this system will continue to work for you. You already know which radiators you have chosen, their number and size. Accordingly, you can now calculate what is needed in order to connect them. Let me remind you that in the first case, large, large diameters are needed; large valves can be used. And of course, in this case it is difficult to regulate the temperature. Of course there are options, we will definitely consider them in a more detailed review.
Radiator installation
radiator installation
Radiators should be installed in places with the greatest temperature difference , that is, near windows and doors. It is necessary to place the heater under the window in such a way that their centers coincide. The distance from the device to the floor must be at least 120 mm, to the window sill - 100 mm, to the wall - 20-50 mm.
Installation of the battery to the pipeline is carried out using fittings (angle, coupling combined with thread) and an American ball valve, using soldering or welding. An air outlet (Mayevsky valve) is installed on one of the other holes, and the remaining hole is closed with a plug.
Before filling the system, carry out a first test run to clean it and check for leaks. The water should be left for several hours, then drained. After this, fill the system again, increase the pressure using the pump and bleed air from the radiator until water appears, then turn on the boiler and begin heating the room.
Common installation errors: incorrect placement of the convector (close to the floor and wall), mismatch in the number of heater sections and connection type (side connection type for batteries with more than 15 sections) - in this case, the room will be heated with less heat transfer.
Liquid splashing out of the tank indicates its excess, noise in the circulation pump indicates the presence of air - these problems are eliminated using a Mayevsky tap.
Radiator connection methods
A classic multi-section radiator consists of several sections that transfer heat from the coolant to the surrounding air. When assembling the radiator, thanks to a threaded connection, the upper and lower manifold of each section are hermetically connected to each other, increasing the total length. A closed system is formed that uses the coolant as an energy source.
There are 3 schemes for connecting a heating battery to the system:
- Lateral.
- Bottom.
- Diagonal.
Let's look at each option in detail.
Radiator location
In the vast majority of cases, radiators are installed under windows, and this location is completely justified. The fact is that there is always a flow of cold air from the windows - and the heated air masses rising from the radiator prevent them from entering the room. In addition, heated air prevents condensation from forming on the glass.
To know exactly how to properly connect a heating battery in an apartment, you need to take into account the following rules and follow them when designing and installing a heating system:
- Normal prevention of cold from entering windows and the formation of condensation on them is only possible if the dimensions of the radiator occupy at least 70% of the width of the window opening. This factor must be taken into account at the stage of selecting radiators.
- It is recommended to install heating radiators at a height of about 10 cm from the floor level. A large deviation from this indicator will lead to insufficient heating of the lower level of the room or will cause difficulties during cleaning. The distance to the window sill should be about 10-12 cm - this value allows the air to freely go around the obstacle and fully warm the window.
- The distance between the battery and the wall should be about 3-5 cm. With this placement, heated air masses freely pass through the space behind the battery, resulting in improved room heating efficiency.
Lateral connection of radiators
In the case of lateral connection of radiators, the inlet and outlet pipes occur on the same side. Most often, hot coolant enters through the entry point at the top of the battery, and spent coolant exits through the lower connection point. But there are exceptions when the connection is made the other way around. It is assumed that the coolant flows evenly along the entire length of the radiator, then goes down and exits. But in reality this is not the case; the coolant passes through the sections closest to the exit much faster than through those further away.
This is due to the length of the path, if for the near section it is 8-10 cm of the section width, vertical pipeline and 8-10 cm to the exit, then for the far section this path is many times longer. During the time it takes for the coolant to reach the far section and then return, two to three times more volume can pass through the near section. Because of this, the heating process of the battery occurs unevenly; the distant sections may be slightly warm, while those closest to the input and output will be hot.
There is also a diagram for the side connection of heating radiators, only from the bottom. With this scheme, the hot coolant comes from below and, in theory, rises evenly upward. But in reality we have the same thing as with the top connection: the first sections warm up perfectly. The rest are getting smaller and smaller.
Other types of connection
There are more profitable options than the bottom connection, which reduce heat loss:
- Diagonal. All experts have long come to the conclusion that this type of connection is ideal regardless of the piping scheme in which it is used. The only system where this type cannot be used is a horizontal bottom single-pipe system. That is, the same Leningrad woman. What is the essence of a diagonal connection? The coolant moves diagonally inside the radiator - from the upper pipe to the lower. It turns out that hot water is evenly distributed throughout the entire internal volume of the device, falling from top to bottom, that is, naturally. And since the speed of water movement is not very high during natural circulation, the heat transfer will be high. Heat loss in this case is only 2%.
- Lateral, or one-sided. This type is very often used in apartment buildings. The connection is made to the side pipes on one side. Experts believe that this type is one of the most effective, but only if the system has coolant circulation under pressure. There are no problems with this in city apartments. And to provide it in a private house, you will have to install a circulation pump.
What is the advantage of one type over others? In fact, correct connection is the key to effective heat transfer and reduced heat loss. But in order to connect the battery correctly, you need to prioritize.
Take, for example, a two-story private house. What to prefer in this case? Here are several options:
Two and one pipe systems
- Install a one-pipe system with side connection.
- Install a two-pipe system with a diagonal connection.
- Use a single-pipe scheme with lower wiring on the first floor and upper wiring on the second.
So you can always find options for connection diagrams. Of course, you will have to take into account some nuances, for example, the location of the premises, the presence of a basement or attic
But in any case, it is important to correctly distribute the radiators among the rooms, taking into account the number of their sections. That is, the power of the heating system will have to be taken into account even with such an issue as the correct connection of radiators
In a one-story private house, connecting the battery correctly will not be very difficult, given the length of the heating circuit. If this is a single-pipe Leningrad circuit, then only a lower connection is possible. If it is a two-pipe scheme, then you can use a collector system or a solar one. Both options are based on the principle of connecting one radiator to two circuits - coolant supply and return. In this case, top pipe distribution is most often used, where distribution along the circuits is carried out in the attic.
By the way, this option is considered optimal both in terms of operation and during the repair process. Each circuit can be disconnected from the system without turning off the latter. To do this, a shut-off valve is installed at the point where the pipes are separated. Exactly the same one is mounted after the radiator on the return pipe. You just have to close both valves to cut off the circuit. After draining the coolant, you can safely carry out repairs. In this case, all other circuits will operate normally.
Bottom connection of radiators
Quite often there is such a scheme for connecting heating radiators, when the incoming coolant flow is connected to the lower collector, while the output flow is connected to the lower collector from the other edge of the radiator battery.
Hot water has a lower density and, due to this, must rise upward, and the already cooled coolant must sink down. Thanks to this circulation, the coolant is replaced with a hotter one. But according to manufacturers’ calculations, with this type of battery connection, 10 to 20 percent of the coolant simply flows past the vertical pipelines and does not participate in heat exchange. This is due to the fact that the narrow channel does not facilitate effective circulation and the process of displacing the cooled coolant can occur very slowly. Naturally, when salts and scale are deposited on the vertical radiator pipes, the circulation speed will deteriorate and the efficiency will drop even more.
Other types of connection
There are more profitable options than the bottom connection, which reduce heat loss:
- Diagonal. All experts have long come to the conclusion that this type of connection is ideal regardless of the piping scheme in which it is used. The only system where this type cannot be used is a horizontal bottom single-pipe system. That is, the same Leningrad woman. What is the essence of a diagonal connection? The coolant moves diagonally inside the radiator - from the upper pipe to the lower. It turns out that hot water is evenly distributed throughout the entire internal volume of the device, falling from top to bottom, that is, naturally. And since the speed of water movement is not very high during natural circulation, the heat transfer will be high. Heat loss in this case is only 2%.
- Lateral, or one-sided. This type is very often used in apartment buildings. The connection is made to the side pipes on one side. Experts believe that this type is one of the most effective, but only if the system has coolant circulation under pressure. There are no problems with this in city apartments. And to provide it in a private house, you will have to install a circulation pump.
What is the advantage of one type over others? In fact, correct connection is the key to effective heat transfer and reduced heat loss. But in order to connect the battery correctly, you need to prioritize.
Take, for example, a two-story private house. What to prefer in this case? Here are several options:
Two and one pipe systems
- Install a one-pipe system with side connection.
- Install a two-pipe system with a diagonal connection.
- Use a single-pipe scheme with lower wiring on the first floor and upper wiring on the second.
So you can always find options for connection diagrams. Of course, you will have to take into account some nuances, for example, the location of the premises, the presence of a basement or attic
But in any case, it is important to correctly distribute the radiators among the rooms, taking into account the number of their sections. That is, the power of the heating system will have to be taken into account even with such an issue as the correct connection of radiators
In a one-story private house, connecting the battery correctly will not be very difficult, given the length of the heating circuit. If this is a single-pipe Leningrad circuit, then only a lower connection is possible. If it is a two-pipe scheme, then you can use a collector system or a solar one. Both options are based on the principle of connecting one radiator to two circuits - coolant supply and return. In this case, top pipe distribution is most often used, where distribution along the circuits is carried out in the attic.
By the way, this option is considered optimal both in terms of operation and during the repair process. Each circuit can be disconnected from the system without turning off the latter. To do this, a shut-off valve is installed at the point where the pipes are separated. Exactly the same one is mounted after the radiator on the return pipe. You just have to close both valves to cut off the circuit. After draining the coolant, you can safely carry out repairs. In this case, all other circuits will operate normally.
Diagonal battery connection
The most effective scheme for connecting a heating battery to the heating network. In this case, the incoming flow is connected to the upper collector, and the output flow is connected to the lower collector on the opposite side. The coolant flow moves diagonally and all sections are involved in effective heat exchange. This ensures maximum efficiency in the use of coolant and reduces losses.
Connection options
Methods for connecting the radiator to the pipeline:
- Upper . The coolant enters the heater from above and exits in the same way. This type of installation is characterized by uneven heating, since the coolant does not heat the bottom of the device, so using this method in homes is irrational.
- Lower. The coolant enters and exits at the bottom and has a small heat loss (up to 15%). The advantage of this method is the ability to mount the pipe under the floor.
- One-sided or lateral . The supply and return pipes are connected to one side of the convector (top and bottom). This ensures good circulation, which reduces heat loss. This type of installation is not suitable for convectors with a large number of sections (more than 15), since in this case the far part will not heat up well.
- Cross (diagonal). The supply and return pipes are connected from different sides of the radiator diagonally (top and bottom). Advantages: minimal heat loss (up to 2%) and the ability to connect a device with a large number of sections.
The way radiators are connected to the pipeline affects the quality of heating of the room.
Do you know which pipes are better to choose for underfloor heating? The operating principle of the fan coil unit is described in our article at https://klimatlab.com/ventilyaciya/kondicionirovanie/princip-raboty-fankojla.html
Everything about boilers running on fuel, gas and electricity is in our article.