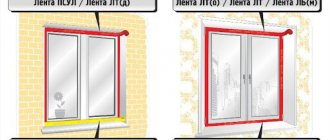
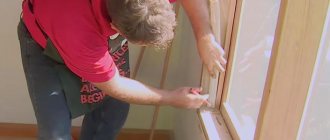
Plastic windows have become a part of the lives of Russians. Today it is difficult to meet a person who has never encountered them. Everyone also knows that windows need to be looked after regularly: washed and lubricated, and sometimes adjusted. Some call specialists, others try to do everything themselves.
Practice shows that home craftsmen are not always able to adjust plastic windows with their own hands. There are some nuances that prevent you from achieving the intended result. Let's talk about them in detail.
What is window adjustment
According to science, regulation is understood as the process of influencing an object in order to eliminate deviations from specified parameters.
Let's translate the above into normal language understandable to a non-specialist: adjusting window fittings and the tilt-and-turn mechanism is a process during which faults are not simply eliminated and the working condition is returned, but the parameters that were developed and implemented by the manufacturer during the manufacturing process of the window are restored. And this is not to tighten the screws and hinges, as many people think (they have a modest auxiliary role), but a whole set of measures to restore the service life of the window unit.
This means that it is important not only to eliminate, for example, the sash clinging to the frame, but also to recreate the previous geometry of the window. And this is much more difficult. But if you do not do this, the problem will return, and quite quickly, as described in the “Window Diagnostics” section.
Errors during adjustment
You should not put a newly installed double-glazed window into the “winter” position. Sudden pressure on a new rubber seal can cause it to become irreversibly deformed; once the load is released, it will not return to its original shape.
Uneven pressure. After all the work has been completed, you need to check the degree of fit of the window around the entire perimeter using the same sheet of paper or visually. Uneven load in different areas will also lead to deformation of the gasket and the appearance of drafts.
With the onset of summer, it is necessary to loosen the seal, since all materials expand at higher temperatures, and, accordingly, the pressure between the parts of the glass unit increases.
As you can see, adjusting the seasonal position of the window does not present any difficulties. Any person without preparation can cope with the task. You will need the simplest tools that are found in any home. Changing modes allows you to provide the most comfortable microclimate in the room and reduce the degree of wear of the seal and fasteners, thus significantly extending the service life of window structures.
In addition to the described adjustments to the position of the window, do not forget about the basic rules of care and operation: lubricate the hinges with machine oil, the seal with special silicone grease, do not load the open sashes, and turn the handle all the way when opening. This will help prevent major damage to the fittings and the entire structure.
Useful video on caring for fittings:
When necessary
Employees of the StroyGuru website have repeatedly observed how the foreman of a company installing metal-plastic windows approached the owner (the “weakest link”) with an offer to conclude a 5-year contract for their maintenance and adjustment. Eloquence, a convincing tone and an offer to give such a wonderful hostess significant discounts did their job: the contract was concluded.
The arguments that this was a waste of money did not work. As a result, only after the contract expired did the owners realize that they had really paid for nothing. The most that was done during maintenance was to lubricate the seals 3 years after installation.
Indeed, why bother with adjustments if the sash opens easily, does not leak, and the handle works normally.
You need to take up the tools only if problems arise:
- the sash does not close well: there is resistance from the frame or impost, traces of friction have appeared on the surface of the plastic;
- it began to seep through the cracks between the frame and the sash. This is especially unpleasant in winter - heat loss increases sharply;
- creaks appeared;
- the handle came loose;
- the handle does not fix the sash in the “Closed” position - it jams or turns tightly;
- The sash does not stay in place - you need to lift it a little.
For each example given, there are many causes and therefore many troubleshooting methods.
Poor closure with a working mechanism
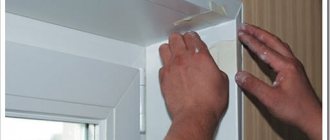
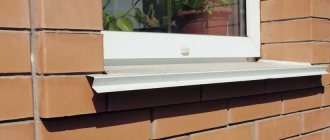
Sometimes checking the window structure does not reveal any problems, and all mechanisms do their job properly. However, when I try to return the sash to its original closed position, the window still does not close. The cause may be an interfering drainage strip . It is installed on the outside of the window with a symmetrical arrangement. When the bar moves, a mechanical obstacle to closing arises. The error is corrected by returning the bar to its original position.
All the options described earlier relate to the main problems with fittings that homeowners can eliminate. However, there are other reasons for the improper operation of the structure, which will require certain experience and special knowledge in the field of window manufacturing. If the problem cannot be solved on its own, you will need to change the entire mechanism completely.
Avoiding annoying misunderstandings when opening and closing windows will allow you to contact only trusted manufacturers of plastic structures and purchase windows made from high-quality components. In addition, a more expensive window most often has a longer warranty period.
Reasons for adjustment
There are many articles on the Internet devoted to adjusting plastic windows. In them, the authors conscientiously try to indicate the reasons for this or that problem. But if you delve deeper into the topic, it turns out that these are not causes, but consequences.
What then are the reasons? There are two of them: the material of the seals and the weight of the sash.
Seals
On our website, in the work “How to replace a rubber seal on plastic windows?”, all types of seals for PVC windows, their strengths and weaknesses are considered. Despite the fact that different materials are used to make this window element (rubber, silicone, plastic polymers, polyethylene with filler), they have a common drawback: they dry over time, decrease in size, and lose elasticity.
As a result, after strong compression, the elastic bands can no longer take their previous shape. Manufacturers took this point into account and in the first years do not recommend, literally at all, changing the pressing force of the sashes. And only when the seal has dried out a little and cannot take its previous shape, it is necessary to adjust the winter-summer plastic windows.
Those who take the time to look at the link will receive a bonus. It turns out that if you wash and lubricate the seals immediately after installing the windows in spring and autumn, then you can forget about seasonal adjustment of plastic windows for 10 years.
Sash weight
Transparent glass convincingly deceives the brain. How can something be heavy if the eyes only see the plastic of the sash? But it can. The weight of 1 m2 of glass with a thickness of only 1 mm is 2.5 kg. The package contains 3 glasses of 4 mm thickness. The glazing area is about 0.35 m2. Then the glass unit weight will be more than 10 kg.
Now imagine the situation: the window is wide open and a 10-liter bucket of water is pressing on the fasteners. And the doors are attached to plastic and a thin metal profile. Metal is not eternal, it deforms under loads (bends, stretches, twists, etc.), as Yulia Drunina wrote beautifully and figuratively: “but everything is very simple: the metal gets tired, And the bridge collapses - span after span.” As a result, the corner of the sash sags on the side of the impost - problems arise when opening and closing, and a draft appears from above.
In practice, this means that if there is no load on the fasteners, then there is no reason for the sash to sag. The load appears only when the window is open horizontally, and not necessarily wide open. In ventilation mode (the sash opens vertically), the weight of the glass is taken by the bottom of the frame, not the hinges.
Conclusion: if you don’t open the windows wide, then most likely you won’t have to adjust anything: the plastic frame will serve its life without additional tightening of the adjusting screws.
Types of adjustment
All work on setting up a window can be combined into 3 blocks, depending on the causes of problems. This:
- adjustment for winter-summer mode. The procedure is aimed at extending the service life of seals. After all, in winter the window should be closed tightly so as not to blow. In summer, the load on the seal is removed by reducing the downforce - the rubber bands should be restored in volume and size;
- adjustment of the tilt and turn mechanism. Several problems are solved here:
- the horizontal and vertical position of the glass unit plane changes when the geometry is violated: the sash rises, falls, moves to the right, left, or simultaneously in two directions;
- the distance between the sash and the frame increases or decreases - the double-glazed window moves toward/away from itself;
- micro-ventilation is adjusted.
- repair of locking fittings - everything related to the handle falls into this section: replacement, repair, adjustment.
Pressure density adjustment
Setting the pressure on a plastic window is quite simple if you follow a simple sequence of actions. Find in the area of the handle, located at the side end, a system of eccentrics that serve as the main adjustment tool.
Winter and summer mode can be adjusted using trunnions
Their external design may be slightly different depending on the window manufacturer, but the principle of operation is the same, whatever their type.
Options for the appearance of eccentrics
Using a hex wrench or pliers, the desired degree of pressing of the sash is adjusted by rotating the eccentrics. In the summer, manufacturers recommend setting weak modes, switching to strong ones closer to winter. Read more about this in the article about converting windows to seasonal modes.
When it is necessary to adjust the pressure on the side of the window hinges, you need to refer to the adjusting screw located on the bottom of the hinges. For tilt-and-turn sashes, additional adjustments are made using the top hinge.
In order to successfully get to the adjustment bolt located on the scissors next to the top hinge, you need to open the window, press the locking tab and set the handle to the ventilation mode. When it is necessary to press the sash against the window frame, the bolt rotates clockwise. Rotating in the opposite direction will weaken the seal.
By adjusting the tilt-and-turn scissors, you can adjust the degree of window pressure.
The method of adjusting window fittings depends on the manufacturer, since there are varieties that are adjusted with screwdrivers located on the side of the handles.
Others only fit hexagons. In order to increase the pressure, the bar is carefully shifted to the street side. If you look at the hinges, you will notice retractable clamping elements. A smaller extension will provide a loose fit, while a larger extension will press the sash tightly against the frame.
Diagnostics of accessories
Prevention is the best method of fighting the disease. The same applies fully to window blocks. Some home craftsmen may object: the sash, in principle, closes normally and does not creak anywhere. How to determine where to twist, tighten, turn. On the one hand, they are right. You can't interfere with a well-functioning mechanism. At the same time, some deviations in the operation of the locking and tilting mechanism can be detected at an early stage and eliminated without causing serious problems.
For example, a slight loss of geometry during the first period does not affect the operation of the sash in any way: it does not jam anywhere and closes easily. But on the other hand, the load on the upper hinge increases greatly due to a change in the center of gravity, which moves towards the impost (a shift of 0.1 mm is sufficient). This loop, in turn, acts with even greater force to separate it from the metal profile inside the frame. In this case, a snowball effect is observed: the further the center of gravity moves away from the hinges, the greater the load on the frame; the greater the load on the frame, the greater the deformation of the metal. And so on until the sash sat on the lower PVC profile.
If you return the center of gravity to its place in time, the window will work for a long time without any adjustments. After all, the frame has already reacted with its deformation to the weight of the sash with the center of gravity in the original place and it has a reserve.
The same situation applies to clamping force. If you switch to winter-summer adjustment in a timely manner, the life of the seals can be significantly extended.
The theory is over. Let's move on to practice.
1. Check the clamping density. The clamping force depends on two factors:
- natural aging of seals;
- movement of the sash from the frame as a result of deformation of the fittings.
Naturally, different methods of checking and adjustment are needed.
Method one. Checking the seals. To check the seals, perform the following operations:
- all trunnions are moved to the neutral position (what this is and how it is done, see the instructions on how to adjust plastic windows yourself for winter or summer);
- the window closes;
- a lit match or lighter is brought to a closed window. Deflection of the flame in any direction (the air flow can be not only from the street, but also from the apartment) indicates that the shutters need to be switched to seasonal mode.
There is another way:
- the clamp is set to the neutral position;
- a standard A4 sheet is inserted between the frame and the sash;
- the window closes;
- the sheet is pulled out.
If the paper is pinched and ready to tear, the seals are in good condition and do not require additional adjustments.
Method two. Checking the tightness of the fittings. The sash may also move away from the frame for other reasons, for example, due to scissors. This is checked in the same ways as given above, but with some clarifications:
- with the help of trunnions, the sash is switched to winter, the tightest mode;
- the window closes;
- a lit candle is brought to the closed door. Here, attention, you need to check not in one place, as in the previous case, but along the entire perimeter, because the problem may be in some corner or between the frame and the sash. By the way, the hallmark of low-quality windows is precisely the draft between the hinges.
It's the same with paper. Every corner and gap between the frame and the sash is checked. If it blows or the sheet is easily pulled out, the problem is eliminated, which will be discussed in detail later.
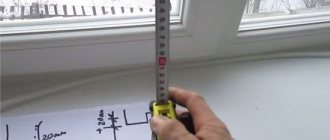
2. Geometry check. You can find out whether the window is starting to sag or whether the sash profile is skewing with the help of a simple pencil and a tape measure. To do this, you need to either circle the closed sash around the perimeter, or mark the position of its corners and middle on the frame and impost. You can see how to do this in the photo below (red arrows show pencil marks).
After this, the window is opened and a tape measure is used to measure how much the sash profile covers the frame. The normal amount of overlap is 8 mm. Deviations require intervention:
- 1-2 mm on the frame in the upper corner - the position of the window is adjusted vertically and horizontally using special screws located in the hinges;
- 1-2 mm on the impost while maintaining a rectangular pencil mark - the sash is moved horizontally from the impost to the frame using adjusting screws in the hinges;
- 3 mm or more - the geometry of the glass unit is checked, and if necessary, the rectangular shape is restored.
The editors of the site recommend that in any case you check the length of the diagonal using a thread or tape measure. After all, even a minimum deviation of 1 mm in the upper corner can be caused by the skew of the glass unit. We especially note that the manufacturer allows a difference in the length of the diagonals of 1 mm. If the deviation is larger, the geometry must be corrected, which we will discuss below.
Attention: this diagnosis is carried out only if the window closes and opens without problems. If it starts to jam in some places, then adjustments are first made, and then the quality of the repair work performed is checked using the above method. You need to turn the screws until there is 8 mm everywhere. If you stop halfway, problems will not resolve on their own. The service life of the window will simply be sharply reduced.
Step-by-step instructions for adjusting plastic windows
Step-by-step instructions for adjusting double-glazed windows are not difficult. Here it is important to follow the recommendations of specialists and act carefully.
Switching to “winter-summer” mode
Window adjustments may be necessary after installers install new double-glazed windows. The pre-design will have neutral locking settings, all positions adjustable to maintain optimal system function.
Important! The settings are adjusted periodically, optimally - twice a year, before the change of seasons.
Very often, consumers forget about the need for seasonal adjustment of window systems. Therefore, the design is in a neutral position, which is not optimal. This is a violation of operating rules that can affect the occurrence of the following negative consequences:
- drafts that are constantly present;
- summer mode will not allow the locking mechanism to function fully, which will cause heat loss;
- Leaving a constant winter position causes constant pressure from the sash on the seal. This leads to a rapid deterioration in its quality indicators;
- the lack of seasonal adjustment disrupts the internal microclimate of the room, which causes an increase in humidity levels and condensation appears on the glass.
When severe frosts appear, apartment residents begin to think about what is wrong with the window structure and how the current situation can be changed. Adjusting the mechanisms involves changing the position of the trunnions, special elements that are present among other metal fittings. Such an effect can change the force of pressing the doors to the frame, which changes the fit and contributes to the supply or cessation of air supply from outside to the room.
The adjustment includes the following manipulations:
- find special eccentrics with the help of which manipulations are carried out to adjust the degree of pressure (if they are missing, the procedure will not work);
- the required mechanism is located inside the sash, usually in the center and along the edges;
- inspect the position of the device, rotate each element 45 degrees;
- carefully close the transom;
- Even by feeling, you can understand that the stroke of the handle has changed, as well as the degree of pressure on the seal. Now the entire structure will more effectively contain air penetration;
- if a visible result could not be achieved, then the elements need to be turned in the opposite direction. To do this, you should repeat all the manipulations from the very beginning.
To correctly switch between modes, you need to use a special tool. It is not allowed to turn the eccentrics to the maximum level of compression; the load will be excessive. This will cause the destruction of the sealing material, which will lead to the loss of the glass unit's thermal insulation characteristics.
Adjusting the hinges
Adjusting windows may be a necessary step when problems arise with closing or opening the device. Most often, the cause will be the incorrect position of one or several loops at once.
In such a situation, the transom will tilt to one side. This problem is not major and can be easily fixed on your own. The hinges are adjusted using ordinary tools, which can be found at every owner.
Step-by-step instructions for fixing the problem:
- open the double-glazed window;
- find a hole in the area of the upper hinge where a hex wrench fits;
- insert the hexagon into the groove (you need to select the appropriate key size);
- Unscrew clockwise;
- adjust the bottom loop;
- monitor whether the position of the sash is aligned;
- To achieve an ideal result, check the correctness of the actions performed using a building level.
This instruction allows you to carry out adjustments with metal-plastic structures from brands such as Veka, Rehau, KBE. Other manufacturers have different fittings, here the setup scheme will be different, and the structure of the hinges will also be different.
However, most mechanisms have equal features and operate on the same principles. The main thing is to find the points of contact, the elements of the mechanism necessary to influence and carefully adjust their operation.
Handle repair
During the hot season, people strive to let as much fresh air inside their apartment as possible. Therefore, they often begin to open and close windows indoors. Such active use (especially in comparison with winter mode) leads to the fact that the mechanisms begin to actively wear out. Therefore, the need for adjustment may arise quite quickly.
Signs of a broken handle may include the following factors:
- the disappearance of the silent, calm opening of the transom;
- jamming of mechanisms;
- window stuck in ventilation mode;
- complete failure of the handle to function.
Important! Repair work must begin after the slightest defects arise, before these minor problems develop into serious ones, disrupting the operation of the entire double-glazed window.
You can adjust the handle with your own hands; there are no special requirements or the need for special skills. The work process looks like this:
- open the window;
- update the lubrication level of the handle locking mechanism;
- check the position of the blocker (it is located on the sash, where the opening element itself is located);
- if it is not triggered in a timely manner, the blocker is pressed into the desired position. After this, the handle is turned horizontally;
- to check the serviceability of the mechanism located inside, remove the element using a screwdriver;
- lift the plastic plug (sometimes the problem is immediately visible and can be easily corrected, for example, one of the elements has taken the wrong position);
- use a screwdriver to fix the malfunction, the main thing is not to act too harshly or forcefully, so as not to disrupt the operation of the device;
- remove dirt, if any (sometimes the mechanism refuses to function due to the fact that small particles of dirt and dust have stuck to it).
If all of the above manipulations did not produce a positive result, perhaps the problem lies deeper and it will not be possible to cope with it on your own. Here you will have to invite a specialist to help, and independent experiments will have to be put aside so as not to further disrupt the operation of the double-glazed window.
Replacing the seal
It is necessary to change the sealing material when it loses its physical properties or wears out under the influence of long-term use.
This can be seen from the many cracks that form on its surface. Replacing the seal is a mandatory procedure; if you neglect it, there is a high probability that air, dust, and extraneous sounds from the street will easily pass into the room.
The seal is replaced as follows:
- open the window;
- carefully remove the old canvas, starting work from the upper or lower corner;
- carefully process the groove, removing all dust, fabric debris, dirt, and any foreign particles;
- starting from the top edge, insert a new sheet around the entire perimeter;
- make sure that the seal fits tightly into the groove;
- fasten the fabric vertically, checking the position of the corners; the rubber cannot be stretched, this may lead to the corners not matching;
- secure the bottom horizontal line;
- check the position of the canvas around the entire perimeter.
To preserve the safety of the new blade as much as possible, you should not turn the eccentrics as much as possible during adjustment. Over-tensioning the rubber will cause it to weaken and crack.
Window adjustment points
Adjusting the window itself is simple. But if you start twisting and turning in the wrong place, you can come to a sad ending. Therefore, we will briefly describe which units (parts) in the fittings and tilt-and-turn mechanism are responsible for what. But first, let's give a diagram of their location (see figure below).
Layout of fittings and tilt-and-turn mechanism for a metal-plastic window.
As can be seen from the figure, a metal-plastic window is a complex engineering structure, although you cannot tell this by looking at the sash. It has many adjustment points, allowing you to shift the position of the plane alternately in any direction. In addition, you can adjust the clamping force.
1. Adjustment screw in the strike plate (Roto Contro fittings). Allows you to raise and lower the bar by 1 mm. Turn it after adjusting the sash in height if it begins to close poorly.
Attention: almost all materials devoted to window settings say that this screw adjusts the clamping force. This is wrong. By tightening the screw on the striker to change the distance between the frame and the sash, you can ensure that the window stops closing altogether. Then it will take a long time to look for the reason.
2. Adjustment screw in scissors. Makes it possible to attract or move away from the frame the upper corner of the sash in the hinge area by 1 mm.
3. Trunnion. Changes the clamping force. The adjustment amplitude is approximately ±0.8 mm.
4.Bottom loop:
- vertical screw. Moves the sash up/down: raises the height by 2.5 mm, lowers it by 2.0 mm;
- horizontal screw. Moves the window plane to the right/left by ±2.0 mm.
5. Top loop. Attracts or removes the upper corner of the sash to the frame horizontally by +3 mm –2 mm.
Attention: with Roto fittings, the adjusting screw for the top hinge is sometimes located not at the back of the sash, but on it. In this case, it can be screwed both towards the frame and towards the impost. Therefore, before setting up, you need to understand how to turn it: clockwise or counterclockwise.
We showed the locations of the adjusting screws. But not everything is as simple as it might seem. It must be taken into account that the double-glazed window is held on two hinges. And if you carry out any manipulations on one of them, the position of the sash as a whole, each of its corners in relation to the frame and hinges, changes (the exception is the height adjustment of the glass unit using the lower hinge adjusting screw).
Only one corner moves in a large arc, the rest in a small one. Therefore, all control units are activated simultaneously. Otherwise, the center of gravity will not be restored to its original position, which leads to a high risk of critical deformations, which will require not adjustment and repair, but replacement of the window.
Horizontal and vertical adjustment
On the horizontal side, the sash is subject to adjustment in the event of a bevel of the frame caused by shrinkage of the structure, incorrect opening of the window or loose fastenings of the fittings. To fix the problem, you need to insert a hex key into the upper window hinge, turning it clockwise until the sash moves a sufficient distance away.
Adjusting the top canopy
In this case, the lower part of the opposite element should drop noticeably. The lower hinge is adjusted from the outside. The shifts average 2 mm.
Diagram of the main position correction points
The window can be adjusted vertically using the hinge located at the bottom of the frame. The protective cap is removed from the loop and the rotational movements of the tuning mechanism begin. Moving the tool in a clockwise direction will raise the sash, moving it in the opposite direction will lower it.
Adjusting the height of the sash
Adjustment of plastic structures should occur smoothly so that the mechanisms move no more than 1 mm in one approach.
Required Tools
Adjusting PVC windows yourself is impossible without a few simple tools:
- hex wrench;
- pairs of Phillips head screwdrivers, sizes TX and T;
- narrow slotted screwdriver (4-5 mm);
- pliers or pliers.
What hex wrench is needed?
You can buy a key for adjusting plastic windows either in a furniture hypermarket or in a spare parts store for cars and motorcycles. It costs from 70 to 150 rubles. Diameter - 4 mm. That’s why the name is furniture key No. 4.
Please note that it does not fit all profiles. Sometimes you need star keys (official name Torx T15), and for Aubi fittings a special key (see photo).
Furniture key No. 4.
Star key.
Key for “Aubi” fittings.
Seasonal adjustment
Adjusting plastic windows for winter and summer independently is one of the simplest types of adjustment. But in order to carry it out, you need to know: what it is done for, with the help of what elements of fittings it is carried out, what tools are required.
Why do you need adjustment for winter and summer? To prevent penetration through the cracks between the glass unit and the frame, seals are glued to them. Over time, they dry, shrink in size, and lose their elasticity (this is the nature of rubber and plastic). If you do not take measures, then in winter it will blow so much that the heating will not cope with heating the apartment or house. Window manufacturers found a solution by changing the pressing force of the sash to the frame.
To extend the service life of the seals during the first years of operation, an average distance is set between the profiles of the double-glazed window and the window block, which experts call neutral. With annual maintenance, the service life of the rubber bands increases overall, and the time shifts upward when the sash needs to be pressed harder against the frame in winter.
Which fittings are responsible for seasonal adjustment. The window is closed using strikers and trunnions (sometimes called eccentrics), which are a metal protrusion on the side edges of the glass unit. When the handle is turned, they engage or disengage with the bar.
The number of trunnions on one leaf depends on the manufacturer of the fittings and can be from 4 to 8 pieces. (locations can be seen in the diagram). The clamping force changes due to the oval shape of the trunnion or the offset center of attachment to the locking plate (we have an eccentric). By changing the position of the axle, the sash is either pressed against the frame or moved away from it.
Standard trunnion arrangement.
The slats are attached to the frame and impost, the trunnions are built into the tilt-and-turn mechanism. Together with the handle, strikers and lock, they represent a window locking device.
Trunnions can be:
- with a rotating head (indicated by the letter “R”). Adjustable with a No. 4 hex wrench, Phillips or slotted screwdriver. The distance of the sash to the frame changes by ±1.2 mm (Internica fittings);
- static - have the index “E” (“Roto”). Turned with a furniture key with a diameter of 4 mm. Pressure adjustment ±0.8 mm;
- with an eccentric roller (“Winkhaus”). Setting is done manually, without any tools. A special notch allows you to determine by touch how the adjustment has been made. The leaf changes position within ±0.8 mm;
- roller (“Siegenia”). To change the position by ±1 mm, you need either a slotted screwdriver or a furniture hexagon to adjust the fittings (No. 4);
- oval (considered standard). The ellipsoidal “Maco” trunnion is found on KBE, “Rehau”, “Veka” windows. Adjustment is made with a wrench or pliers. The pressure varies within ±1.5 mm.
Winter adjustment
The simplest type of adjustment is to switch plastic windows to winter mode after summer. To do this, all trunnions are switched to maximum pressure mode:
- oval - placed horizontally with pliers;
- round - turn counterclockwise with a hexagon or screwdriver until the mark (cut or hole) faces the street.
Important: when adjusting PVC windows for the winter, you need to simultaneously turn all the pins: front, top, bottom and back. If you miss even one, the window may become skewed and the shut-off valves may fail.
Seasonal adjustment.
Adjustment for summer
During the winter period, the seals were subjected to severe deformation. During the warm season they should regain their volume and size. To ensure that nothing interferes with the process of restoring the rubber bands, the technologists provided a weak clamp, which they called adjustment for the summer. To do this, the oval trunnions are moved to a vertical position, the round ones are rotated clockwise by 180° (the marks should look towards the apartment). And again, all trunnions must be reconfigured at the same time.
Procedure
You should immediately warn that if you do not have experience in repairs, it is better to call a specialist.
Each malfunction can have a variety of sources, which requires a thorough study of the problem, even when very simple actions need to be performed. A structure with double-glazed windows can be quite heavy, up to one hundred kilograms. Incorrect adjustment and malfunction of the mechanism can lead to complete glass falling out in any direction - outside or inside the room. This will have more serious consequences for the client.
Expert commentary
Vladislav Dobronravov
Leading technical specialist at Okna-Media company
If the purchased structures are under warranty, it would be best to contact a specialized service center. Then professional craftsmen will perform work to restore the working condition free of charge, within the framework of the warranty card.
If the mechanism is jammed and the sash cannot close, in order to avoid breaking the fittings, there is no need to try to force the handle back to its original position.
What to do if the window handle is jammed
In order to prevent accidental failure, erroneous action blockers are often installed in window structures. It is designed to prevent the sash from opening in the folding position. The operation of a low-quality locator sometimes leads to jamming, which makes it impossible to turn the handle from the folding position to the side opening option.
Expert commentary
Vladislav Dobronravov
Leading technical specialist at Okna-Media company
It is strictly forbidden to use force if the turning mechanism in the window structure is jammed.
The most common source of the problem is a loose fit of the sash to the frame when opening from the side. The mechanism, which has not yet had time to move from the folding position, closes too early. The situation threatens to block the handle, while the entire window section is forced to rest on a single support hinge at the bottom of the structure. Repair actions do not involve removing the sash. It is enough to make simple adjustments to the operation of the blocker.
Blitz survey: Do you lubricate the fittings of your plastic window? From our previous article you can find out how and with what plastic windows are lubricated.
The location of the blocker is at the bottom of the closing block. You need to find it and move the handle to a vertical position, while simultaneously clamping the spring. The upper left part of the sash is pressed against the frame, moving the handle down. Complete failure of the blocker requires calling a window technician to avoid the risk of more serious malfunctions of the plastic product.
Poor closure of the handle and jamming in most cases can be resolved by lubricating the rotation mechanism or loosening the clamping mechanism. To ensure that the seal is not pressed too tightly around the perimeter of the flaps, no effort is required, and to lubricate the handle, you will need to remove and disassemble the flap.
Actions to take if the window sash is sagging
The heavy weight of massive wide sashes often leads to sagging of the sashes. The source of the problem is errors during the installation of the window product and the irregularity of the structural adjustments made.
The basis for fixing the sashes are hinges, and with constant use of the window, there is a risk of sagging. As a result, homeowners face difficulties when closing the doors. Adjusting the hinges will help get rid of sagging . Adjustment can be made by removing the decorative trims from the hinges. There are special gaps on the hinges themselves, which vary in appearance for different manufacturers. To work, you will need a Phillips screwdriver or a hex key. Tighten each hole on all hinges. For adjustment, as a rule, it is enough to move only 1 mm. Correct execution of the procedure will help get rid of sagging sashes.
What to do if the scissors fly out of the grooves
In the absence of a blocker, careless opening of the window can lead to opening in two directions at once - vertical and horizontal. As a result, the entire window structure is attached to a single hinge. To eliminate the malfunction, remove the sash from its hinges. Remove the plastic pads and press on the hinge pin. Once the pin is carefully pulled out, the window section is removed.
After the sash is removed, the handle turns upward. If jamming occurs, press on the window blocker and repeat the action. If this does not help to turn the handle, the scissors are inserted into the required grooves. The scissor system can be found at the top of the hinged window section. In the working position, the scissors are tightly pressed against the sealing rubber. By pressing the blocker, the handle turns and the scissors begin to move.
They are adjusted so that as the scissors move, they smoothly enter the grooves. Anyone can determine the location of the grooves. The next step is to check the operation of the handle without a blocker. Proper functioning of the handle without a lock means the problem has been eliminated. The sash can be reinstalled on the frame.
links to materials that complement this article: How to remove the handle from PVC windows. A few tips
What and how do you lubricate a plastic window?
Windows definitely need proper care!
Correcting the clinging of sashes to frames
If during operation the sashes begin to cling to the frame, sagging may be the source of the problem. You can get rid of it by simply adjusting the window hinges, as described earlier.
There are situations when the adjustment has been made, but the problem continues to bother residents. This becomes possible in case of more serious violations - deformation of the sash or frame structure. In this case, repairs cannot be done without calling a professional technician. If the deformation is caused by a manufacturing defect, the mechanism cannot be corrected. Most likely, the entire window will have to be completely replaced.
Adjustment depending on the problem
Let's move on to more complex settings. Here we will consider all the situations when a plastic window does not close well. Sash:
- sags and catches at an angle on the frame or impost;
- sat down - you need to lift it to close it;
- there was a draft between the hinges. At the same time, the double-glazed window began to cling to the impost;
- the upper corner opposite the handle has moved away from the frame.
The sash is sagging
Typically, sash sagging occurs due to the weight of the glass when the window is in the "Open" position. As noted above, the mass of the glass unit presses on the hinges. At the same time, at the top the fastener pulls the profile wall outward, at the bottom, on the contrary, it presses the metal inward. According to the laws of mechanics, greater forces act on the upper hinge than on the bottom of the sash.
That is why the picture is observed when the upper corner on the side of the handle sags greatly. It's rare, but it happens when the lower corner drops more. In both cases the settings are the same:
- decorative overlays are removed from the hinges;
- the window opens;
- the adjusting screw of the upper hinge tightens the sash to the frame;
Attention: there must be 4-7 mm left from the hinge to the sash for the tilt and turn mechanism to engage.
Top hinge adjustment.
- raised by a vertical screw in the lower hinge.
Adjustments in the bottom loop.
In both cases you need to twist clockwise. The fittings are the opposite; the top screw rotates counterclockwise. After each turn of the key 180o, the window closes. Its fit onto the frame and impost is checked.
If there is no deformation of the metal profile below, then with these two screws you can achieve the exact geometry of the glass unit. If there are minor problems with fastening the lower hinge (this is when the lower corner has sagged more), the sash is moved away from the frame using the lower adjusting screw, which is responsible for the width settings.
Village door
A situation occurs when the same profile deformation occurs in the area of both loops. In such cases, the window shrank but retained its vertical position. The adjustment in this case is as simple as switching the pressure to seasonal mode:
- the upper part of the decorative protection is removed from the lower loop;
- using the key clockwise, the glass unit rises until it covers the frame at the top by 8 mm;
- decorative protection returns to its place.
Important: after adjusting the height, the window may not close properly. What to do in this case, see the section “The sash does not close.”
Draft between hinges
For various reasons (poor-quality fittings, errors in the initial settings, deformation of the glass unit), the sash may move away from the frame in the hinge area. As a result, drafts appear in this place, and on the side of the handle, plastic profiles can cling to each other.
Restoring the original settings is carried out using the horizontal adjustment screws located in the upper and lower hinges. You need to turn it clockwise, constantly checking how the window closes and opens. You need to move the sash until it overlaps the impost by 8 mm - these are standard adjustment parameters.
Horizontal adjustment diagram.
Elimination of uneven pressure
A common problem is a draft in the top corner near the hinge. You can find it using a burning candle - the deviation of the flame will signal. Do-it-yourself repairs are not classified as difficult. The step-by-step work algorithm is as follows:
- the handle is placed in a horizontal position, the sash opens;
- the handle rises vertically, the window reclines;
Important: in some models of fittings, the handle will turn upward when the window is open only after removing the lock (see how this is done in the next section).
- there is an adjusting screw on the scissors;
- with a hexagon it rotates clockwise 180o;
- the sash is pressed against the frame;
- the handle is moved to a horizontal position;
- the window is pressed to the frame and closed;
- Using a burning candle or match, check the tightness of the seals.
If the flame does not deviate, the settings are completed. If there is a draft, everything is repeated in the exact sequence until the corner of the glass unit is pressed tightly against the frame.
How to adjust a plastic window so it doesn't blow
In some cases, adjusting the window trunnion does not allow achieving the tightest possible pressure, and the closed sash continues to blow. This occurs when the sash moves vertically or horizontally. As a result, part of the trunnions may not completely extend beyond the mating part.
To determine the place where incomplete pressure is created, you need to remember the locations of the trunnions or make corresponding marks on the inside of the sash profile. After this, you need to close the window and, in the marked places, try to press the sash away from the frame with your hands. If it remains motionless, then the trunnion is working properly. If the sash moves, and a gap appears at the point where the force is applied, then the trunnion does not completely fit into the mating part. In such cases, additional adjustment of the plastic window sash horizontally and/or vertically is required.
Adjusting the plastic window horizontally
To eliminate slight distortion and displacement of the sash in the horizontal plane, you need to adjust the plastic window horizontally. This adjustment can be made on the upper and lower hinges, which have special hexagon sockets. Therefore, you can adjust the position of the sash using the same 4 mm hex key that was used to adjust the trunnions on plastic windows.
On the bottom hinge, access to the hexagon socket is available from the outside and inside. Thanks to this, you can adjust the window both open and closed. When you turn the key clockwise, the sash will move in the direction opposite to the hinge, while its lower corner on this side will rise. Turning the key counterclockwise causes the sash to move towards the hinge, and the lower corner on the opposite side is slightly lowered.
Horizontal adjustment of the plastic window sash can also be done on the top hinge. In this case, work is carried out only with the window open. On the hinge you need to find the hexagon socket and turn it with a key in the same way as working with the lower hinge.
These manipulations will allow you to move the upper or lower part of the sash horizontally up to 2 mm. It is recommended to adjust the sash with limited displacements - no more than 1 mm per turn of the key.
Adjusting the plastic window vertically
Self-adjustment of plastic windows vertically is performed on the lower hinge. The required hexagon hole is located at the top of the hinge, so to access it you need to remove the decorative plastic cap. For ease of adjustment, it is recommended to switch the window to ventilation mode. Turning the key clockwise raises the sash, and counterclockwise causes it to lower.
As with the horizontal adjustment, the window sash movement range is 2 mm.
Adjusting the micro-ventilation system
Modern plastic windows can perfectly perform the function of a window: provide constant air exchange without drafts and overcooling the room. There are two modes for this:
- ventilation - the upper part of the sash is tilted far from the frame, as a result of which air exchange takes place intensively while simultaneously cooling the room. Therefore, after a short ventilation, the window has to be closed;
- micro-ventilation - the sash overhang is minimal, and, consequently, the air flow is insignificant, which allows you to keep the window in this position around the clock.
To switch to the specified mode, the knob, in the first case, needs to be turned 180o, in the second - 135o, which is clearly visible in the figure below.
The layout of the handle in different window modes.
When the weather changes, the size of the gap can be changed: increased or decreased. To do this, there is an adjusting screw on the scissors (the sliding mechanism of the micro-ventilation system), which is responsible for the force of pressing the corner to the frame. It turns out that it also has another function: to change the angle of the sash during micro-ventilation. The step-by-step algorithm of work is the same as when adjusting the pressing force of the sash angle in the area of the upper hinge. Reminder:
- the handle is moved to the “Open” position, the window opens slightly;
- the locking mechanism is removed. The handle is moved to a vertical position;
- the sash opens;
- there is an adjusting screw. Tightening it with a hexagon reduces the tilt angle to several millimeters, twisting it increases it to 2 cm;
- the sash is pressed close to the frame, after which the handle is moved to a horizontal position;
- After a little pressure, the sash snaps into place. The handle goes down.
After this, the window can be switched to any mode.
When to switch modes
Adjustment of plastic windows is carried out 2 times a year - on the eve of winter and summer. This should be done in early spring and mid-autumn, focusing on the weather in the current season and your own feelings. Moreover, the temperature outside should be above zero – optimally 7–10 degrees. General recommendations for adjustment are as follows:
- In mid-April, plastic windows are switched to “Summer” mode.
- In mid-October, the windows are set to “Winter” mode.
Switching is quite accessible with your own hands - the procedure will take 10–15 minutes, so there is no need to call a specialist. Moreover, if an invited specialist, along with switching, suggests changing the fittings on a “young” window (less than 10 years), it is better to consult with another specialist. Most likely, he is trying to artificially inflate the cost of the service.
Adjusting fittings
More difficult in setting up a window is adjusting the fittings. It includes repairing or adjusting the operation of the locking mechanism (handle and strikers).
Pen
The window handle has one function - using hooks (trunnions) on the locking strip, fix the sash on the frame in the strike strips or, conversely, remove the trunnions from them to open the window. Therefore, it has no adjustments. She can only:
- break;
- to become loose;
- jam;
- hard to turn.
All of these faults can be corrected by the apartment owner himself.
The handle is broken
To replace the handle, just pull the decorative strip covering the trim towards you and turn 90o (see photo). Use a Phillips screwdriver to unscrew the mounting screws and remove the broken handle. Install the new handle in the reverse order:
- insert a working handle in the same position as the old one;
- tighten the mounting screws;
- put the bar in place.
Replacing the handle.
Has become loose
It’s even simpler here: move the cover and tighten the screws.
Jammed
The most unpleasant situation is when the handle does not turn - it is jammed. This happens due to careless opening of the sash: the window was opened too abruptly, as a result of which the locking mechanism did not have time to operate.
A lock is installed on each window to protect the locking mechanism from accidental turning of the handle in the open position, which leads to damage to the fittings. Blockers are installed at the end of the sash on the front side immediately below the handle and prevent the movement of the trunnions (there are modifications of the fittings where the blocker is located on the lower or upper trunnion). They are different for different hardware manufacturers, which is clearly visible in the photo.
Plastic window blockers.
You can disable the lock when the sash is open. On the fittings, you need to press the tongue of the locking plate and move it to the “parallel to the sash” position, then change the position of the handle. With other types of locking mechanisms, it is enough to press the locking latch against the sash and turn the handle.
It's hard to turn
The tight movement of the handle indicates a lack of lubrication in the bolt mechanism. The problem is eliminated after performing preventive maintenance of the fittings, during which all metal parts are cleaned of dirt and lubricated. Lubrication of PVC windows is discussed in detail in the work “How and how to properly lubricate plastic windows?”.
Attention: if the handle turns tightly in the final part of the “Closed” position, you need to adjust the trunnions or strikers - the sash is pressed tightly against the frame. Loosening the pressure will weaken the movement of the handle (it will also save the seals from premature wear).
The sash does not close
The most complex settings are carried out if the window does not close. There are several reasons for poor performance of the locking system:
- wear of fittings - replaced with new ones;
- the height of the sash was adjusted, as a result of which the trunnions rose higher and simply did not go beyond the striker (experts say: “return”);
- the geometry of the glass unit is broken.
Adjusting strikers
The window may not close properly due to the strikers. This happens in two cases.
1. The sagging sash squeezed the slats down by 1-2 mm, and after restoring the original position, the trunnions simply do not reach them. This can be detected visually or after a little diagnostics:
- open the window;
- Place pencil marks opposite each answer on the impost and frame;
- close the sash;
- try to pull it towards yourself with your hands opposite each mark, but without fanaticism. Where there has been a minimal push of the sash from the frame, the bar does not hold.
The solution to the problem is simple: use the adjusting screw to raise the strike plate. If it doesn’t help, move it higher by 3-4 mm. To do this, unscrew the screw, slide the bar up in the slot and screw in the fixing hardware again.
2. The lowered trunnion is located in the area of the striker, but does not reach it due to the fact that the profile of the sash has bent inside the glass unit (in other words, a gap has formed between the trunnion and the striker in the closed position). For this case, the guide to regulating plastic windows provides the following recommendations:
- A lining is cut out of white plastic 3-4 mm thick for each plank;
- screws are unscrewed;
- A gasket is placed under the bar. You can have one large one or two small ones: below and on the side. This will move the answer approximately 3 mm inside the window opening;
- the self-tapping screw is screwed in;
- the window closes;
- The operation of the constipations is checked.
If everything is fine, use a knife to cut off the plastic protruding from under the bar. It happens that the adjustments made do not help. Only the use of a radical method helps: restoring the geometry of the sash.
Restoring the sash geometry
There is a technological gap between the plastic profile of the sash and the glass unit. The geometry of the structure is supported by straightening plates, which are installed in certain places (see figure).
Installation diagram of support gaskets between the double-glazed window and the sash profile. a - fixed window b - opens in 2 positions c - rotating d - tilting
For various reasons, the sash profile leads. It is not always possible to compensate for the resulting gap using shims. In this case, you need to straighten the sash edge. This can be done using additional gaskets between the profile and the glass unit. This work is performed step by step in the following sequence:
- The side bead is removed from the sash (one on the gap side is enough). How to remove them correctly and put them in place, see the article “Replacing a double-glazed window in a plastic window with your own hands”;
- the amount of deformation is determined: a level or any long, even object is applied to the side of the sash and the amount of the gap is measured;
- a gasket is selected between the sash and the glass unit - its thickness should compensate for the size of the gap;
- Using a smooth and thin plastic or wooden object (not a spatula), the sash profile is carefully pressed away from the glass unit just below the installation site of the gasket;
- a gasket is placed in the resulting gap;
- the glazing bead returns to its place.
Replacing the handle and adjusting the fittings of a plastic window
In addition to insufficient pressure and airflow, other problems may arise in the operation of a plastic window. Often during operation, problems may arise with turning the handle, which moves slowly when switching modes or even gets stuck in a certain position. Therefore, owners need to know how to properly adjust plastic windows themselves in such cases.
One of the common causes of such problems is a faulty handle. Most often it just becomes loose and starts to wobble. In case of such a malfunction, it is enough to tighten the fastening screws. To access the screws, you need to pry the decorative plastic trim on the handle body from above and below with your fingers and turn it horizontally.
Stiffness of the handle can be caused by clogging of its mechanism. To remove dirt, the handle must be removed by unscrewing the fastening screws and cleaned with a brush or vacuum cleaner. It is recommended to lubricate the seat of the handle inside the door with WD-40 aerosol lubricant with a nozzle. Another reason why the handle turns tightly may be that the sash is being pressed tightly. If it is not necessary to maintain maximum pressure, it is recommended to adjust the trunnions by reducing the force.
If the handle does not turn at all, this is most often due to incorrect operation of the lock, which is designed to prevent it from turning when the sash is open. To unlock the handle, you need to find the lock and release it. Depending on the model of fittings used, the blocker can be made in the form of a clip that fits onto the seal, or in the form of a shaped plate screwed at an angle to the seal.
The solution to the problem in case of severe wear is to replace the handle. You can find a new part in almost any hardware store or order it from a window manufacturing company. All handles have a standard design, so there will be no problems with selecting a suitable element. After this, you just need to dismantle the old handle and put a new one in its place.
Other preventative measures
In order for windows to serve for a long time without losing their characteristics, before the start of the new season they must be:
- thoroughly remove dust and dirt and then wash. First, remove dirt from the drainage channel with a toothpick, and with a hard-bristled brush from the fittings. Then the slopes, profiles, double-glazed windows and window sill are washed. The glass unit and profiles are washed from both sides: from the street and indoors. Detergents without abrasive materials and aggressive chemicals (alkali, weak acid solution, etc.) can be dissolved in water. Glass requires special removers. Wipe plastic with a soft sponge, and glass with paper or a rubber scraper;
- After drying, lubricate the shut-off valves and window seals. In the work “What and how to properly lubricate plastic windows?” shows where, with what and how PVC windows are lubricated;
- adjust the trunnions for the coming season.
The fittings for plastic windows from Rehau, Veko and other manufacturers are almost identical, and therefore the preparation for the start of the season is the same. If any difficulties arise in preventive maintenance or adjustment, you can always look at the manufacturer’s instructions, which describe how to properly handle and adjust their products.
Is there a difference with adjusting balcony doors?
The principle of operation of the fittings for a metal-plastic door leading to a balcony or loggia is the same as for a PVC window. Therefore, the adjustments are almost identical.
Horizontal movement of the door to the right or left is carried out by tightening the adjusting screw located in each hinge (there are 3 of them on the doors) under the decorative trim. If the door leaf clings to the doorway along its entire length from the handle side, you need to tighten the screw 1-2 turns clockwise in the upper, middle and lower hinge. If the door at the corner farthest from the hinges catches the threshold, you need to turn the screws clockwise in the top hinge - 1-2 turns, and in the middle - 180-360o.
Vertical adjustment changes the position of the door in relation to the opening in height. To do this, tighten the vertical adjusting screw in the lower loop. Turning the furniture key counterclockwise moves the door down, clockwise moves it up. Unlike the window, you need a hexagon with a diameter of 5 mm. After lifting the door two full turns, you need to lift all the strikers on the sides of the door frame. After this, you will have to lift the main and additional locking bars.
The front adjustment is responsible for the pressing force of the balcony door to the door frame. For these purposes, the trunnions are rotated, as in a plastic window.
At the end of the article, we present a video with a lesson for dummies on how to set up accessories from Mako and other manufacturers.
When do you need to adjust plastic windows?
Adjustment of windows is required in case of any violations of their normal operation. The following signs may indicate the need for its implementation:
- Tight movement of the valves;
- Visible subsidence or distortion of the sashes;
- Violations of the tightness of the closure - cracks appear, blowing from the window;
- Switching modes is difficult;
- Loose or jammed handles;
If such signs are detected, it is not recommended to delay taking action. In most cases, you can adjust the plastic windows yourself and quickly restore their normal operation. If you do not make adjustments in a timely manner, soon enough you may encounter a serious malfunction of the window structure, which will cause a lot of inconvenience and require significant repair costs.
The plastic window closes tightly
This problem often occurs due to mechanical misalignment of the sash. To fix this, you need to adjust the window vertically or horizontally. You can do this as follows:
- carefully examine the window itself and determine where the distortion occurred: usually it happens from the bottom or side of the side that is located directly opposite the hinge;
- in the case when the sash is in contact with the window frame from below, you need to move it upward, and then towards the corner that aligns with the upper hinge;
- open the sash and turn the top hinge screw clockwise once;
- then you need to close it, remove the cap and insert the hexagon into the lower loop, namely into the adjustment hole;
- turn clockwise several times;
- check whether the sash works or whether its functioning is still problematic.
For additional adjustments, you may need pliers to separate some parts of the plastic frame and a screwdriver to help tighten the elements. Therefore, it is advisable to have the entire set of tools at hand.