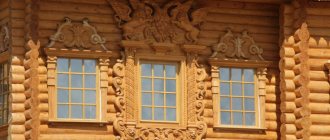
Plastic windows, which are common now, are still inferior in quality to wooden ones. Proper installation eliminates the shortcomings of natural windows in terms of tightness, and the use of valuable tree species and installation of double-glazed windows in the frame makes the windows high-quality and environmentally friendly products.
Wooden windows are more demanding for proper installation than plastic ones. Properly carried out work will provide high-quality insulation from street noise and will keep the interior of the house warm or cool.
Basic DIY installation steps
The production of wooden window products sold on construction markets is of high quality and meets international standards. Often these products have a high cost, but the technology of installing wooden windows yourself is a simple process and reduces costs by up to 10%.
To install a window in compliance with building codes, you need to know the stages of work on installing window frames. Its quality benefits and service life depend on how correctly we install the window.
The recommended stages of work on installing window structures are set out in the product manufacturer's instructions, but there are many nuances that you need to know in order to install wooden windows efficiently. The main features of installing wooden windows are the following:
- dismantling the old frame;
- cleaning the window opening;
- taking correct measurements;
- installation of window sills and ebbs;
- installing a window in the opening;
- fixing the box in the opening;
- insulating the space between the frame and the opening;
- setting and adjusting window closing/opening elements;
- design of window perimeter slopes;
- finishing of the outer perimeter.
Measuring dimensions and preparing the window opening
After dismantling the old frame, it is necessary to clean the window opening to an even rectangle. In a stone house, the plaster and old slopes are carefully knocked down. Then you need to eliminate cracks, large potholes, distortions and remove construction debris. The presence and condition of the lintel is carefully examined. In houses made of reinforced concrete monoliths there are no ceilings, since the window itself in the apartment is part of the reinforced concrete slab.
Particular attention should be paid to the strength of mortgages, if any. These are wooden beams embedded in the walls, intended for the installation of window blocks. Unstable mortgages require replacement. The absence of mortgages does not affect the installation of wooden windows in accordance with GOST - they were used in old and wooden houses.
It is easier to take measurements with empty window openings; it is more difficult to determine dimensions if there are old structures.
The principles of the measurement process are different for brick and panel, new and old wooden houses. For example, a quarter of the outer part of the wall is missing in a house made of wood, the windows are mounted from the outside, and finishing is limited to installing a platband.
The measurement begins by determining the width of the outer part of the opening - the distance between the quarters. If you have an old window, you need to open it and take measurements from the outside with a tape measure. Measuring the width of the internal opening - determining the distance between the slopes. Then we calculate the difference between these measurements.
For example, the width of the external slope is 1260 mm, and the internal slope is 1400 mm, the resulting difference is 140 mm. Determining the required width of the quarters is calculated by dividing the result by 2 - we get the size of the quarters, which is 70 mm. To find out the width of the window to be installed, you need to add 30 mm to each side of the outer quarter. In our case it is 1260+30+30=1320. The size of the installation seam is planned to be 30 mm.
Vertical dimensions are determined similarly, but the thickness of the window sill is taken into account. The lower part is measured by external ebb tides. When taking measurements in an apartment in a panel building, quarter openings are taken into account, since there are external projections of the walls on the sides and at the top of the opening. If a wooden house has a rough frame, then measurements are taken in its interior.
It is advisable to take measurements using a laser tape measure, but without it you can draw lines above and on the side of the window using levels, draw these lines a second time, measure the diagonals and take all measurements using a construction tape measure. The width of the gap is carefully determined, the thickness of the frame can be from 120 mm to 220 mm, the internal slope - more than 170 mm, and the external slope - more than 100 mm. A gap of up to 50 mm is left under the window frame.
Window selection
When buying them, you need to pay attention to the following parameters.
- Wood. It is important to look not at the type of wood, but at the manufacturing features. It is better to choose products that are not made from the heartwood. It is also worth inspecting the material so that there are no noticeable resin pockets, serrations or knots on it. This indicates low quality products.
- Frame. The corner connection is also worth carefully considering, since the dovetail connection is one of the most unreliable. The glazing beads should have a slight overlap on the frame, and the lower parts of the sashes should be covered with aluminum plates.
- Wood coating. When touched, no roughness is noticeable on a good product. You can visually determine whether the thickness of the coating differs in different places.
- Double-glazed window. For more effective protection from the cold, energy-saving double-glazed windows are chosen. They are not much more expensive than regular ones, but they reduce heat loss.
- Accessories. If you decide to save money, it is better to choose cheaper wood, but not fittings. It must be of high quality, so it is better to buy products made in Germany or Austria.
They also pay attention to the price. If it is significantly lower than the cost of other wooden window units, this may indicate that the manufacturer has saved on fittings or other structural elements.
Pass-through installation method
Installation of windows should begin with the installation of a window sill, for which a cement pad is made, aligned horizontally. Attached window sills are installed after the window is installed. The average thickness of window sills is about 30-50 mm. With greater thickness, the gap between it and the frame must be increased. Mount the window sill board with several dowels if the wall is stone, or with several nails if there is a lower mortgage. The masonry and quarter are insulated with roofing felt or polyurethane foam.
In most cases (in a house made of brick, cinder blocks or shell rock, as well as with a flat opening), windows are installed using the through-installation method, using dowels and self-tapping screws. First, the glazing beads, glass (glazed windows) and sashes are removed from the new window. Holes are drilled in the frame at a distance of 600-800 mm (for a frame measuring about 1.5 m - 3 on each side, for larger sizes - 4). When drilling holes, move up to 200 mm away from the corners.
The frame is installed in the window opening using screws that are not fully tightened and its position is leveled with small blocks. Then, inside these holes, the locations of the dowels in the window opening are marked. The frame is removed again to drill holes for the dowels in the opening, taking into account their length and diameter.
After preliminary drilling of holes and installation of dowels, the window is inserted into the opening and finally secured with self-tapping screws (fastening cannot be done through the blocks). The frame can be nailed to the window sill. At this point, the installation is complete, you can pull out the blocks (between the frame and the opening) and seal the cracks with polyurethane foam.
Installation using metal plates
It is recommended to install windows in skewed openings using the anchor method. Anchors are metal plates with holes that you can buy or make yourself from tin or galvanized strips. Sometimes small fastening strips are attached to the frame before installation, but more often they are used by professionals for large volumes of work. Installing one or two windows does not require such fasteners.
Anchor strips are attached to the outer part of the frame with the same position of the holes as with the through method. Then the frame is installed in the opening and leveled using blocks. Mark (through holes in the anchors) the locations of the fasteners on the window opening. Dowels are driven into the walls, and the window is installed in the opening using anchors.
Having finally installed the frame, the blocks must be removed from the opening so that the window is held only by anchors without rigid connections. The anchor installation method involves installing the window sill after installing the frame.
Casing - pads - installation in a wooden house
For a good carpenter, it will not be difficult to manufacture and install wooden windows with your own hands in a log house. A special feature is the shrinkage of timber buildings, which lasts about a year and is approximately 200 mm. The exception is houses made of dry laminated veneer lumber, their shrinkage is about 20 mm. The dry version of the hut (brick or block house) allows you to install frames on blocks.
To ensure that the windows in the new frame do not become deformed (they can be squeezed out by a vertical load), and the fastenings do not move or come off, casing blocks are used, installed on the wall in the window opening. Thanks to them, the uniform shrinkage of the logs is maintained, the reliable functioning of the window sashes is maintained, and the formation of gaps and cracks in the walls is prevented.
The casing structure is also called a casing.
It is attached without dowels or self-tapping screws: grooves are made inside the wall logs, and the casing board is reinforced with embedded bars. For greater strength, liquid nails are used. You cannot attach the pigtail directly to the wall; the boards of its box are interlocked with the load-bearing elements. The siege box consists of a top, bottom and side boards.
Casing diagram:
The installation of windows in a wooden frame begins with the installation of the casing. First, grooves are made in the logs of the window opening with a chain saw and the bottom is laid, which is installed on the seal (usually fabric). Then the side frames are installed, gradually sawing out and adjusting the adhesion to the walls. The upper part of the window opening should have a gap of about 50 mm, filled with a compression seal.
The casing is often made from wooden boards; laminated wood and combined materials are used less frequently. Technologically, frames can be made not only with the help of embedded bars and grooves in the log house, but also with the use of a U-shaped deck, which is installed on spikes in the corresponding part of the opening.
The “tenon” method is also used - with a T-shaped beam.
The casing must move freely when the structure shrinks, so polyurethane foam is not used to seal it. The casing is insulated with natural sealants (fabric, tow, mineral wool, etc.).
Some tips
To ensure high-quality installation work, the following rules should be adhered to:
- installation of wooden windows is carried out at a temperature of 15ºС and above;
- when removing glass, all glazing beads are numbered;
- window frames should not hang on dowels;
- To avoid bending of the window profile, the screws are not tightened too tightly.
To prevent condensation from appearing inside the windows, you should correctly determine the depth of their installation in the opening. The dew point inside the window should be within 10ºС.
Video about installing wooden windows:
Final insulation and installation of slopes and ebbs
After installing the window frame, the window sill and slopes around the window are installed. During installation, the window sill is placed under the frame, placing several bars underneath. Using a level, level its position and remove it to treat the surface underneath with polyurethane foam. Then the window sill is inserted into place, filling the voids underneath with sealant. To fix the position, place a weight and leave it for a day.
Then all seams are carefully sealed. Various sealing materials are used, most often foam is used when installing window frames. The slots pass several times from the middle inward and from the middle outward. It is necessary to ensure uniform pressure when the sealant swells, so as not to disturb the fixed position of the frame.
It is necessary to leave the work for a day after applying the foam to harden.
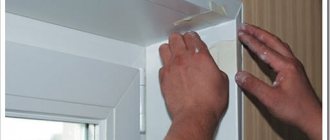
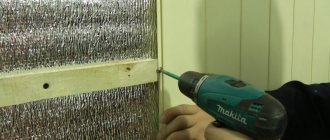
Foam that has hardened and increased in volume must be cut off. To minimize the thermal conductivity of the window structure, you can cover the foam-treated seams with foil-reinforced tape around the entire perimeter, photo below:
The ebbs on the outside of the window protect the wood of the frame from the negative effects of atmospheric moisture. Durable, moisture-resistant materials are used for their manufacture: aluminum, galvanized metal and PVC. Wood flashings for wooden window frames look harmonious. It is advisable to choose a tree for the slopes of the same type as the frame. You can use moisture-resistant and durable FSF plywood. Wooden slopes are coated with polyurethane varnish to eliminate subsequent release of resin.
Aluminum castings are durable and strong. When powder coated, their range pleases with an abundance of colors, including brown and beige (to match the color of wood). Galvanized materials are sold with a polymer coating in different colors. They are preferable to aluminum ones, as they do not create noise effects when exposed to atmospheric conditions.
Plastic ebbs have a long service life, but require proper installation because they emit unnecessary noise in the wind.
The material for the casting is cut to the required length, taking into account a margin of 30 mm on each side (the excess can then be folded). The ebb is attached from the outside to the bottom of the frame with self-tapping screws, and is fixed inside with mounting foam.
A day after installing the window frame, window sill and insulating the seams, you can finish the window opening with slopes.
First you need to moisten the material for the slope and the surface of the wall opening with water, then apply mounting foam to one of these parts and press the finishing material to the wall. The slope that is being installed must be secured using mounting tape.
When finishing slopes, materials such as plasterboard, wood, cork and plaster are used. It is advisable not to use PVC for wooden frames. To make panels, you can take various materials, but the most popular are: plastic, plaster, drywall, cork and wood.
Plaster is an inexpensive method of interior and exterior finishing. The walls are pre-primed and a plaster mixture and reinforcing mesh are applied in several layers. The process is completed by sanding and painting the surface. The disadvantage of plaster slopes is their low thermal insulation properties. The use of plasterboard for slopes is also characterized by a simple technology, but it also does not retain heat well. Cork materials are expensive, but high-quality products in a wide range of colors.
Preparation
Before installing wooden windows, preparatory work should be carried out. To do this, we process the opening, collect the necessary tools and materials, and make or buy a window. The wooden material should not contain cracks or depressions - only uniformity will guarantee the absence of distortions and other defects.
If there is still an old window in the opening, work begins by dismantling it. Paint and dirt must be thoroughly removed from the surface.
Distortions: how to prevent them?
How to install a wooden window without distortions? First of all, you need to take the correct measurements. You will need two identical indicators - change the first from the inside, the second from the outside. If the window will be installed on the second floor, you need to measure from the inside, but being outside this work is easier to do, so for one-story buildings you can use a street staircase.
What places do we measure: in the middle of opposite sides, extreme sides.
If the inside of the building is larger than the outside, the error in this case is allowed up to 4 cm. The window is inserted so that from the outside it fits tightly to the wall, but inside you can leave a gap, which will subsequently be carefully filled with polyurethane foam.
To enlarge the window, you can take an additional profile. This may be relevant if it was purchased in advance, but during the installation process it turned out to be too small. This method is useful when there is a large imbalance. With this, the profile is inserted either partially or completely, but with correction of the dimensions of this profile.
If you do not know how to install wooden windows with a significant distortion, it is better to turn to professionals so that gaps do not form under the structure. They will certainly make themselves felt in the winter, and will also affect the service life of the product.
Window drawings
The drawings indicate the exact dimensions, designate the partitions, the distance between them and different sides. First you will have to make a drawing on a draft, and then repeat it on a clean copy.
Gaps up to 2 mm wide are left between the sash and the frame. This will allow the doors to move smoothly and fully.
Wooden material is purchased depending on the dimensions indicated on the final drawing. The beams should be cut based on the size of +10 cm. This will allow you to play it safe so as not to make a mistake.
Making a window
How to install a wooden window that you made yourself? Very simple. In addition, making a window does not require much effort or special knowledge.
Step-by-step instruction:
- Let's start creating the frame. We saw the slats. They must be executed perfectly. The maximum permissible deviation is no more than 1 mm. A binding is created on each slate. These elements are needed for connection. They are also replaced with silicone fasteners - these are offered in ready-made versions in hardware stores. The distance between the placement of fasteners is 1 cm.
- We cut out the glazing beads. We work straight, avoiding distortions or tilts. Connecting the elements.
- The next step is installation of double-glazed windows. This is very dangerous and responsible, but if the work is done correctly, the risk is minimal. The main thing is to be careful not to get hurt.
How to install a wooden window yourself if you can’t buy a ready-made structure? There are important tips for this work:
- We wash and clean the glass before installation. Work is carried out only with perfectly clean double-glazed windows.
- You need to cut the glass after applying a line of oil. When cutting, be sure to hold both parts with one hand; it is better to cut continuously, calmly, and do the work from start to finish at once.
- Sharp parts need to be sanded with sandpaper. It is better to perform this action along the entire perimeter of the cuts, even those that were created without your participation.
- Make sure the glass matches the size of the frame. If it is large, carefully file off the excess with sandpaper.
- Install the frame first, then insert the glass into it. Before inserting a double-glazed window, treat the elements with a sealant purchased in advance. Particular attention should be paid to the internal grooves.
- Glass is secured with glazing beads - they are used along with screws or screws.
- It is better to start fastening from the middle, moving up, then from the middle down.
- If there is a goal of insulation, then before placing the glass in the frame, you need to add a sealant. This will extend the life of the window and save you from excess cold in frosty weather.
- The doors, handles, hinges and other fittings are attached at the final stage.
How to install a wooden window yourself so that it is as reliable as possible in winter? Preliminary insulation and painting will help improve thermal insulation performance. You can also paint it a wooden color, but in general it doesn’t matter much whether there is paint on the surface or not. If you decide to paint the coating, this must be done before installation.
Tools and materials for window installation
How to install a wooden window correctly? First of all, it is important to collect all the necessary tools and materials. You will need the following:
- ruffs;
- nails;
- hammer;
- window block;
- accessories;
- wedges;
- insulation material.
If painting is needed, it is recommended to immediately purchase paint, since this process is carried out before installation.
Equipment
The window block consists of the following elements:
- box;
- window, if necessary;
- doors;
- windowsill;
- drain
This is a complete kit that must be supplied to obtain a complete window.
GOSTs and requirements
When carrying out work, a necessary condition is the installation of wooden windows, taking into account national standards, the requirements of the state standard GOST 24700-99 (reflecting the description of mandatory technological work, the permissibility of the materials used and typical installation junction units). Installation must be carried out at a temperature of at least +15°C.
The width of the frame varies in regions with different climates and ranges from 120 to 220 mm, the main thing for these dimensions is the thickness of the wall, but the window sill must have a width of at least 170 mm, and the slope must be at least 100 mm.
Mounting blocks (slats or boards) are used from materials with a thickness of 50 to 150 mm (according to the size of the gap between the clean opening and the frame).
Deviations in vertical and horizontal planes should be no higher than 1.5 mm per meter and no higher than 3 mm across the width of the window.
The gaps in the side parts are calculated at 15-25 mm, at the top and bottom - up to 60 mm. The frame angles must be strictly 90°. It is important to ensure reliable sealing of the gaps between the frame and the ebb, the angle of inclination of which should be at least 10°.
When the difference in diagonals is no more than 10 mm per meter of length, the through installation method is used, for values larger - using metal plates. The anchor method involves increasing the dimensions of the frame so that they are greater than the maximum levels of the outer perimeter by 10-20 mm in height and up to 40 mm in width.
Fasteners must be installed taking into account a distance of 800 mm between them. Recommended dowel sizes are diameter 6 mm, length 80 mm + frame thickness + gap width. For example, if the frame is 40mm wide and the gap is 20mm, then the length of the construction nails should be 140mm.
The width of the casing parts should not be more than 250 mm, this is due to the possible appearance of cracks in larger boards.
The humidity of the solid wood materials used must be at least 12%. All natural elements of wooden window structures must be impregnated with antiseptic agents.
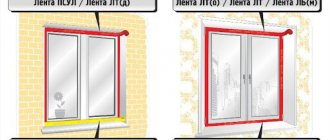
Insulating materials must meet the requirements of sanitary and epidemiological standards. When choosing materials, compliance with hygienic standards is checked: mineral wool, polyurethane foam, compressor belts, polyurethane foam cords. The use of high-quality materials for sealing seams increases noise and heat insulation, prevents the penetration of moisture into the gaps and the occurrence of fungal and mold defects. The tightness and quality of insulation work must comply with the State Standards:
- 30971-2002 — “Mounting seams of joints connecting window blocks to wall openings”;
- R 52749-2007 - “Window installation joints with self-expanding vapor-permeable tapes.”
Average prices for installation in Moscow
If it is not possible to build a window yourself, high-quality installation can be provided by professionals from numerous construction companies. The work is carried out in compliance with all technical standards, the installation of wooden windows in accordance with GOST and the necessary standards, long-term operation, and free elimination of defects during this period are guaranteed. To find out how much it costs to install wooden windows in Moscow, just check the price lists on the websites of these companies.
Along with the basic average prices, the cost of installing window structures includes prices for the following services:
- dismantling a window without preserving the frame (180-220 rubles/sq.m);
- dismantling the window while preserving the frame (480-550 rubles/sq.m);
- preparation of openings (600-800 rub./rm);
- installation in a panel house, new building, cottage (2200-2800 rubles/sq.m);
- installation in a Stalinist building (2300-3000 rubles/sq.m);
- production and installation of a casing box in a wooden frame (1200-1500 rub./rm);
- installation of a window sill (RUB 700-900/rm);
- production and installation of drip tides (960-1100 rub./rm);
- production and installation of canopies (960-1100 rub./rm);
- production and installation of flashings (800-1000 rubles/linear meter);
- finishing of internal plaster slopes (800-1000 rub./rm);
- finishing with wooden slopes (1250-1500 rub./rm);
- finishing of external slopes (600-750 rub./rm);
- removal of construction waste - cost of ordering a container (RUB 750-850/piece);
- loading construction waste into containers (1200-1300 rubles/piece).
The cost of installing windows can be reduced by refusing those types of work that can be done independently (removal of construction waste, finishing elements, etc.), the minimum amount spent on installation can be from 1200 to 1500 rubles / sq.m., average the price of turnkey installation ranges from 2000 to 3000 rubles/sq.m.
Good video in English:
Preparatory work
First you need to start preparing the openings where the window frames will be inserted. They must be characterized by the absence of:
- quite large cracks;
- any distortions;
- other defects.
For high-quality installation of wooden windows, the opening must have right angles. If old windows are dismantled, the structure is thoroughly cleaned of dirty stains, dust and various debris.
At the next stage, the opening is measured. The further progress of work largely depends on its correct implementation. Measurements are taken in three parts of parallel sides of the opening:
- along the top edge;
- in the middle;
- along the bottom edge.
If there is a significant distortion, you will have to increase the size of the opening, which should be larger than the window frame:
- by 1.5-2.5 cm in the upper part and on the sides of the opening;
- 5.5-6.5 cm at the bottom of the structure.
Only by observing such measures can one prevent the occurrence of cracks that appear between the window frame and the opening in places with fairly strong distortions. When carrying out thermal insulation work, the internal dimensions of the openings must exceed the dimensions of the window frame by 2.5-3 cm.
The wooden windows themselves must have a quality certificate and a warranty period of up to 10 years. These products include window fittings produced by MACO and ROTO companies. Criteria for choosing wooden windows in the video: