Low tide is an important and integral part of the window system. This simple device, which is not expensive, allows you to prevent the penetration of moisture formed under the influence of precipitation from penetrating into the wall. The design extends the service life of buildings, eliminates the appearance of dampness, moisture, mold, and eliminates a number of problems associated with high humidity. The installation of these elements is not subject to regulation through the requirements of GOST or SNiPs. If you are planning to carry out this work yourself, you should familiarize yourself with the experience of specialists and adopt some subtleties and useful tips.
Design and purpose of external drip vents for plastic windows
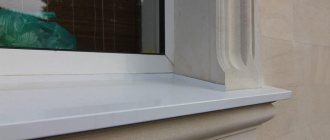
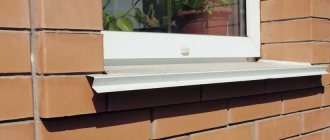
Ebbs for wooden windows or systems made of polyvinyl chloride are a kind of window sill mounted on the street side. It is located on the top or bottom of windows, balconies, loggias.
Regardless of the type of structure chosen, they all consist of the same elements:
- top shelf;
- bottom drip;
- drainage
The top shelf is of particular importance; it must be selected in such a size that there are no obstacles in the way of moisture drainage through special holes.
Functions of window sills:
- aesthetic frame that creates the finished appearance of the window unit;
- protection of the frame and window sill from moisture penetration;
- removal of water from the glass surface;
- protecting walls from getting wet during rain and snow.
Important! The sill must be made for each specific window; it must be created according to individual measurements, only in this way can it fully perform all the functions assigned to it.
The main nuances of making and installing a metal ebb with your own hands
In order not to return to repairing the external window sill in a few years, you should take into account some advice from professional craftsmen:
- When marking a metal product, an allowance for slopes of at least 2 cm should be taken into account, while the edges should be folded upward. This will significantly extend its service life and also prevent the formation of condensation in winter;
- the protruding part beyond the window sill must be at least 4-6 cm, the angle of inclination must be at least 10°. This will allow water to flow freely from the external window sill;
- The width of the window sill should also be 2-3 cm larger, otherwise water will get inside the structure. You can pre-glue the slopes with vapor-permeable tape. It will remove excess moisture from wall surfaces. The tape needs to be placed on the slope with one edge, and on the cleaned window sill with the other;
- metal ebbs should be 4-7 cm into the side wall surfaces of the facade. This will not only securely secure the structure, but also protect against water leaks;
- if the slopes are finished with mortar, it is necessary to embed the external window sill into them at a distance of at least 1 cm. This will prevent the formation of leaks and preserve the exterior finish;
- It is important during installation to check the level of the tide using a level. This is necessary to prevent precipitation from accumulating in one place;
- Fastening to the window frame with rivets or self-tapping screws should be done from the middle. This will prevent its deformation and displacement. The distance between the rivets should be about 20-30 cm from each other;
- To seal butt joints, you should choose acrylic-based silicone sealant.
In order to properly drain water from the window and the facade of the building, window sills must be installed correctly, and in order to correctly install an external window sill, it is necessary not only to adhere to the installation technology, but also to take correct measurements. As a rule, measurements are taken by a company that will manufacture and install window sills, but if the owner wants to carry out the installation himself, he will also have to take measurements himself.
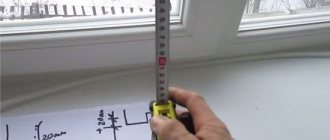
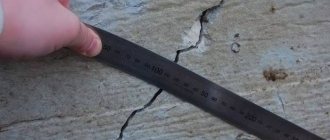
Taking measurements for the manufacture of drainage systems is a responsible task that requires certain knowledge, since in case of errors in the calculations, you will have to order production again, and this entails additional costs. So, how to take tide measurements:
1. The length of the drainage is measured. In the process of taking measurements, you must clearly decide for yourself whether end caps will be installed, since they will affect the dimensions of the metal structure. If the window sill requires the presence of plugs, then its length will be calculated using the formula: Ln.o. = Lpr.-20mm, where Ln.o. is the length of the outer tide, and Lpr. - opening width.
ATTENTION! Depending on the thickness of the wall, the width of the opening can vary, so you must be extremely careful when taking measurements. In addition, metal slopes can expand, and this must also be taken into account.
2. The width of the external window sill is measured: Hn.o.= Gext.+30mm(40mm), where Hn.o. is the width of the window sill, and Gext. - thickness of the outer wall. Here it is very important to accurately take measurements, without a margin, since a too protruding edge of the ebb looks unsightly and spoils the appearance of the facade, and an edge located close to the wall does not provide normal drainage, and water will flow down the wall, which will negatively affect the condition of the facade and building foundation. Ideally, the ebb should protrude from the wall no more than 5 cm.
3. Calculate the number of support brackets (crutches for low tide). If the length of the window sill does not exceed 1.3 m, you can do without brackets, but if it is longer, then they must be installed to ensure the sill's reliability and resistance to wind and snow loads. The distance between the brackets should be no more than 65cm. This must also be taken into account if three or more brackets are installed, otherwise in the center between the supports the structure will sag over time and will not drain water well.
Thus, when ordering production, or making additional elements for decorating the lower part of the window opening yourself, it is very important to take the measurements correctly. This will save time, money, and will also allow for high-quality installation and ensure effective drainage from the window and wall of the building.
Ebb tides for plastic windows are installed to remove moisture from the structure and protect it from destruction. Also, with the help of these elements, building materials involved in the design of the facade are preserved. A correctly selected ebb will decorate the window and extend the life of the building.
A window sill is a board installed on the street side in the lower or upper part of the window and balcony. Regardless of the type, the design consists of the same components:
- top shelf;
- drainage;
- bottom drip.
The top shelf is the main element that you need to pay attention to when choosing a product. Its size is selected in such a way that there is no obstacle to the drainage of water through special holes.
Window sill plays not only an aesthetic role, giving the window unit a finished look, but also performs a number of other functions:
- protects the window sill and frame from moisture;
- removes water from glass;
- prevents walls from getting wet from rain and snow.
For each specific window, the sill must be made according to individual measurements so that it can fully fulfill the tasks assigned to it.
How to choose the right ebb for plastic windows?
In order for the external ebb to fully cope with all functions, it must be carefully selected. If you purchase this device quickly, without attention to detail, there is a high probability that it simply will not fit the window opening, after which you will have to dismantle it and purchase a new model.
You should choose a low tide only after preliminary measurements, be sure to pay attention to a number of parameters: length, width, shape and depth. It is important to take into account the materials from which the structure is constructed and its type. For example, a frame house will need one product, and a panel house will need a completely different one.
We must not forget about external compatibility: the color of the external element must be in harmony with the overall scheme of the facade and window frame. White structures require decoration with appropriate tints, colored ones can have the same color or a similar tone (preferably a little darker).
Installation steps
Installation of ebb and flow is the final phase of the installation of structures, so it is carried out carefully so as not to damage the frame and maintain the aesthetics of the entire structure.
First, the window sills are adjusted to size. This is followed by giving the required shape.
If necessary, the lower outer slope of the wall is prepared. For this, cement-sand mortar or special frost-resistant facade glue is used. You should check that the slope has a slope within 10 degrees, so that there is no distortion during installation.
Installation occurs in the following sequence:
- Based on the measured size of the slope, markings are made on the canvas;
- Using the available marks, the tide is bent;
- In places of kinks, trimming is done with a grinder or metal scissors;
- Using self-tapping screws, the bend of the window sill is attached to the base of the frame.
This simple procedure requires extreme care, accuracy and caution.
Selection of material for casting
Window sills can be made from a variety of materials; this must be taken into account when planning to make such a purchase. If this rule is not followed, a situation may arise when corrosion processes occur, which will cause the appearance of dark, unattractive streaks on the facade.
Therefore, it is important to know which materials are suitable for the design of window sills. In order to clarify these points, you need to understand the characteristics of each type of raw material.
These structures can be made from:
- polyester coating;
- polyvinyl chloride;
- aluminum;
- galvanized steel.
On the market you can find structures made of copper and titanium, but their cost will be much higher than those mentioned above. It is important to choose the type of material that would match its own characteristics to the operating conditions of the product.
Plastic casting
Flashings for wooden windows or plastic systems must be created from the same materials from which the block itself is made. This is a general rule, whether to follow it or not is up to each owner.
PVC materials are distinguished by high qualities of wear resistance, practicality, and they are practically free of disadvantages.
Advantages of raw materials:
- resistance to moisture, any atmospheric influence (be it wind, snow, heat, frost);
- lack of response to low temperatures;
- aesthetic appearance;
- the ability to fit into any exterior;
- undemanding to care measures;
- quiet, even raindrops will not be heard;
- ease of installation work.
Plastic is used to frame the lower and upper ebbs. It appeared on the building materials market (as a material for forming external window sills) not so long ago, so it has not yet fallen in love with buyers. The only thing is that when increased strength indicators are required, this type of raw material may not be the most suitable.
In addition, polyvinyl chloride structures do not behave very well when exposed to sunlight. Constantly exposed to bright rays, they can become fragile, after which they can crack even from the slightest blow. In this case, the structure may, if not break completely, then gradually become clogged with dust penetrating into microcracks. In addition, the white color, under constant exposure to the environment and the rays of the sun, can turn yellow and gray, which is difficult to correct even with the help of a strong detergent.
Important! PVC raw materials are best used for equipping private houses, where the risk of damaging them will be minimal.
PVC is characterized by its high flammability; if a spark or ash accidentally hits its surface, unattractive marks will immediately form. It is impossible to get rid of them.
Important! You should choose plastic when the entire window system is made of the same material.
Metal casting
Metal elements have long-lasting performance characteristics. They are strong and easy to install.
Among the most common are:
- galvanized;
- aluminum;
- made of sheet steel.
Galvanized flashings
Galvanized options are the most common. Their operation can exceed ten years.
These products are produced in brown or white colors, or with a stylization like natural wood. Recently, powder dyes have been actively used, allowing these objects to be given any desired shade.
Galvanized products are produced from alloy steel having a thickness of 0.55 mm. This material gives the model a high level of strength and resistance to precipitation. The top polymer layer protects the composition from the adverse effects of an acidic environment.
Galvanization has an affordable pricing policy, which explains its popularity among the population.
Disadvantages of raw materials:
- painting with a powder composition can lead to the fact that over time the product will crack, crumble, and begin to fade under the influence of sunlight;
- steel is characterized by a high level of noise emitted; any impacts on its surface, even the sound of rain, will be clearly audible.
To reduce the noise of the material, it is additionally coated with plastisol. This option reduces noise levels, but is expensive. However, its additional advantage is the production of any smooth or textured surface (it is possible to create the effect of leather with embossing). On the sides of such ebb, end caps made of plastic of a suitable color must be installed.
Aluminum ebbs
Window sills made of aluminum alloy are distinguished by high quality wear resistance and other performance qualities. They are distinguished by a large selection of sizes, which allows you to choose a model that ideally fits your existing parameters. The width can reach thirty-five centimeters.
The most common shades are brown and white. However, galvanized types can be coated with powder dyes, due to which they will take on any shade.
Aluminum raw materials are absolutely not susceptible to corrosion, so even the absence of additional coating does not in any way affect the quality of the product. The only downside is that it's loud, so the slightest touch invariably causes an audible knock.
Sheet steel castings
Window products made from sheet steel are not widely in demand. They are highly susceptible to corrosion processes, so they quickly lose their appearance and rust. This disadvantage is especially pronounced in cities, where it often rains with high acidity of moisture. The only solution may be to coat the steel casting with special polymers, which will protect it from corrosion and also reduce the noise level.
Advantages of using sheet steel:
- strength;
- resistance to changes in air temperature and precipitation;
- the ability to create models according to individual parameters;
- ease of installation and subsequent maintenance;
- variety of color palette.
The only drawback is the strong heating of the plane in hot weather.
Types of products
A drip sill is installed on the outside of any window structure. This is a special part installed at the bottom of the window opening. It is necessary for the drainage of rain or melt water. This may be why this element is sometimes called drainage. Products can be made from various materials:
- metal (aluminum, galvanized, copper);
- concrete;
- facade tiles;
- plastic;
- stone (granite, marble).
Today, window drains are almost never made of concrete . More precisely, they are made, but covered on top with a plastic or metal structure. Of course, concrete slopes can be whitewashed, as they did before. However, today such design is quite rare.
Quite exotic are stone structures made from marble or granite. These materials look attractive and do not create noise. In addition, their cost is not affordable for every average citizen.
There is another option for finishing a water drain - facade tiles. Such a device will organically fit into the exterior of the building with both plastic and wooden windows. If the entire building or the ground floor is decorated in this way, such tiles on the windows will look very organic. Slopes are quite simple to make: the material is cut so that it protrudes beyond the wall by 1-2 cm. Then, using the solution, the required slope is made. It is permissible to treat seams with cement laitance or hydrophobic impregnation. Installation of structures is best suited for exterior wall decoration.
Despite the fact that slopes can be made from various materials, home owners mainly choose metal or plastic structures. Each option has its advantages and disadvantages, which should be considered in detail.
Dimensions of ebb tides for plastic windows
As a rule, metal structures are sold in single pieces, the length of which is 6 meters. You can cut a piece of the size you need right in the store, or buy a full cut and use it in the household for other needs.
When choosing this product, it is important to take all the necessary measurements in advance:
- the length is equal to the same parameter of the window opening, only measurements are taken along wall sections. Add from 2 to 4 cm to the resulting figure;
- The width is measured taking into account the drip edge; it should be placed 2-3 cm relative to the vertical plane of the wall. This parameter corresponds to the width of the window, add 3 to 4 cm on top (for the protrusion);
- the bend angle of the product is a minimum of 110 and a maximum of 135 degrees;
- when the length of the product exceeds 170 cm, it is selected with compensation gaps (5-8 mm) located at the end ends (they are filled with sealant).
Approximate cost for installation by specialists
The final cost of installing window sills consists of the cost of individual specialist services.
Fastening is best done with a screwdriver, which will significantly speed up the installation process.
With a quick analysis of these types of construction services, the average cost of installing a low tide system will consist of the following costs:
- preparation and installation – from 350 – 400 rubles;
- reinstallation and alteration – 500 rubles;
- treatment of the seam with polyurethane foam – 250 rubles;
- seam treatment with sealant – 250 rubles;
- cleaning windows and seams from foam – 300 rubles.
Thus, attaching the ebb to a plastic window can cost from 1,150 rubles in the simplest version, without additional insulation and finishing.
Technical requirements for installing low tide
There are no special norms or rules defining the installation process of these structures. The specific type of installation work depends on the type of structure and personal preferences. It is very important to follow all steps of the installation process step by step. If any errors occur, it will not be visible immediately, but only after some time, when the product is actively used.
The following points should be considered during installation:
- after completion of the installation process, high-quality sealing of each joint should be carried out;
- When installing the window sill, at the point of contact with the wall, the edges should be slightly raised upward. This will protect the wall surface from moisture;
- The ebb should be located strictly horizontally, which should be checked using a level. This will avoid the problem of water stagnation in one plane;
- to further strengthen the casting board, its base is made of cement mortar;
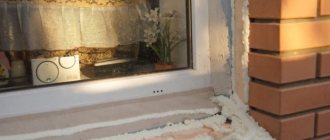
- When the decision is made to mount a PVC product, before cutting it into the wall, preliminary treatment of all edges with sealant is required. A layer of film is laid between the ebb and its base, its edge should hang over the wall.
Important! If you take into account all these subtleties, then you will be able to cope with the installation work without the need to invite a specialist, only with your own hands.
Pros and cons of plastic
Plastic window slopes are quieter. They make virtually no sound when raindrops fall. In addition, the products are inexpensive, which is especially important if you have a limited budget. It will be a little cheaper to buy structures made of unpainted galvanized steel, but after a few years its appearance will lose its attractiveness. In addition, paint does not adhere well to galvanized steel.
The disadvantage of plastic structures is that the material loses its elasticity when exposed to sunlight: it becomes brittle and can crack under heavy loads. Even in the absence of large cracks, there are always microcracks. The latter are formed during operation. They get clogged with dust particles. After a few years, the initially snow-white plastic structures acquire a grayish or yellowish tint, which cannot be removed. If the procedure for installing window sills every 7-10 years does not frighten the owners, they can be used.
Another significant disadvantage is flammability and expansion under the influence of heat. Structures melt due to temperature exposure. If a cigarette butt falls on a slope, it will definitely make a hole in the material. Thermal expansion can occur if the installation of window structures is rigid, that is, the strip is secured with self-tapping screws. Then, on hot summer days, the products “go in waves,” and in the evening they take on their usual shape.
To avoid such problems, you need to make oblong holes in the edge, for which the ebb will be fixed. When tightening the screws, you should not press down the product too much, otherwise the structure will not move under the influence of thermal expansion.
Another important aspect: you need to leave a special thermal gap on the sides, first filling it with moisture-resistant silicone sealant. In this case, waves will not appear under the influence of heat. The product will expand slightly, compressing the sealant, but will soon return to normal.
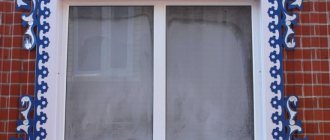
Window sill design
The appearance of casting boards is a personal matter of the owner. It plays only a decorative role, which is why it is selected in accordance with the shade of the facade and the texture of the materials from which the house is built.
Manufacturers create a wide variety of colors; they can be either standard or brown or even have bright, unusual shades. You can even order a product that has a “wood” appearance, which will allow you to avoid additional costs for natural wood, which, moreover, is not very durable and able to withstand precipitation.
Installation and fastening technology
Installing window treatments is a step-by-step process and can be done in almost any weather condition.
An example of correct and incorrect installation relative to the window frame
Installation of ebb tides for plastic windows is carried out as follows:
- Checking for product compliance in size and color. Visual inspection for defects and visible damage.
- We cut the ebb in accordance with the dimensions of the end caps. We measure the required size on the product, and use a marker or pencil to draw a cutting line. The strict perpendicularity of this line can be checked with a square. We cut the material along the line using metal scissors.
- We take a drill and a 3.2 mm drill bit and make holes on the front side of the strip for fastening. The spacing of the holes should not exceed 45 cm. A distance of 5-10 cm should be removed from the end of the mounting shelf. Position the holes so that the attached ebb hangs 3-4 cm above the facade wall.
- We glue the side covers to our ebb with silicone sealant. The joint between the side slope of the outer wall and the overlay itself should not be more than 0.5 cm. Silicone sealant must be applied where the overlays adhere to the wall.
If the support bracket is not installed, a layer of noise-insulating material is attached under the drainage
Attaching the ebb to the window ends with a diffusion tape. Let's look at this point in more detail:
- We determine the place for applying polyurethane foam - this is the area under the stand profile, as well as the junction of this profile with the product. We moisten this area and then foam it;
- It is very important that the foam covers the stand profile along its entire height. We apply foam under the surface and along the entire length of the middle part of the ebb. Do not allow the foam to extend beyond the plane of the wall;
- we attach the ebb to the stand profile using screws;
- press on the surface of the product with your hands so that the foam underneath fills the entire area;
- We treat the joints between the slopes and end caps with silicone sealant.
Installation of ebb tides on plastic windows
It is not at all difficult to install sills for plastic windows with your own hands. To do this, you need to follow the following steps step by step:
- Checking the conformity of all elements of the product, inspecting for defects.
- Cement mortar is mixed and used to create a base that has a slope.
- When the base dries, smooth out all the irregularities.
- If the casting board differs in dimensions exceeding the required ones, it is cut out according to the specified parameters.
- Using a marker, mark the cut lines on the surface.
- With scissors, which are used for cutting metal products, the sheet is cut in strictly perpendicular lines. Be sure to leave an allowance of 2 cm.
- The edges and sides of the ebb are folded up to the width of the allowances.
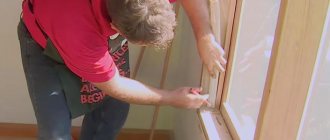
- The product is attached to the frame with self-tapping screws; as a rule, there is already a place for them in the structure.
- The joints are sealed with sealant.
- To increase sound insulation performance, polyurethane foam is poured under the lower part. Before it hardens, place a weight on top.
Required tools for installation
To properly install this structure, it is especially important to prepare and have on hand a number of necessary tools:
- hammer;
- building level;
- drill;
- screwdriver (an attachment that allows you to work even under a ledge);
- scissors capable of cutting metal, they will help cut the necessary pieces from a solid sheet;
- marker to mark the length;
- self-tapping screws that will be used to fix the products (if the windows are metal-plastic, then they must be equipped with a special drill tip).
This set of tools will help you easily and simply install drip sills with your own hands, without the need to involve third-party specialists and pay for their services.
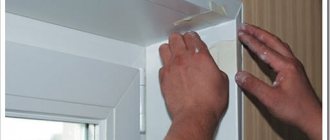
Slopes
Slopes are the elements of window frames on the outside and inside of rooms that cover the seams between the frame and the window opening. This is the final touch in the decoration of window openings, giving them a complete and elegant appearance.
Slopes can be plaster or overhead; in plastic windows, overhead structures of two varieties have become widespread:
- hollow plastic panel (panelite) having internal stiffening ribs 10 by 250 mm. Used for slope widths ≤ 25 cm;
- sandwich panel with a total thickness of 9 mm, in which there is foam insulation between two 3 mm sheets of plastic. Available for any slope depth.
Advantages of plastic slopes:
- strength, durability (more than 20 years), moisture resistance and low flammability;
- environmental friendliness and safety for the health of residents and the environment;
- reliably protecting the assembly seams from external influences, they completely coincide with the design of the windows in terms of material and color;
- coating of external surfaces with special melamine resins makes the panels more resistant to scratches and chemical influences;
- providing additional sound and thermal insulation;
- there is no need for additional painting, varnishing or repairs;
- long-term resistance to ultraviolet exposure and fading;
- Easy to maintain, just regular wiping with a damp cloth is enough.
Scope of work when performing cladding:
- removing old plaster layers, leveling surfaces with cement mortar or putties;
- cleaning with dust removal;
- insulation with isover or other insulation;
- sealing installation joints under window sills;
- installation of slopes, first the element is installed at the top. The voids between the panel and the opening are filled with mounting foam, the panel is pressed tightly against the surface of the opening and fixed in several places using construction tape. The sidewalls are mounted in the same way using polyurethane foam. Fastening can be achieved temporarily by installing wooden spacers. The spacers and tape are removed after a day, when the foam has hardened;
- decorating openings with plastic corners fixed with special glue;
- cleaning the work site and collecting waste in plastic bags.