If you or someone you know has previously used the services of companies installing double-glazed windows, then you know that installation can be normal and in accordance with GOST. The second option is more expensive, but if all the requirements are met, the quality will be much higher than in the first (you can read more about the standards in GOST 30971-02).
Do-it-yourself installation of plastic windows
Do-it-yourself installation of plastic windows consists of several stages.
- Measurements. Accurate measurement is half the success
- Removing the old window.
Removing the old window - Preparatory work.
- Installation.
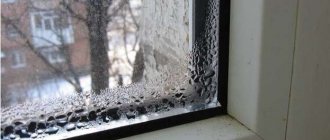
Note! For self-installation, manufacturers do not provide a guarantee if the measurements were not carried out by their employees. If installed incorrectly, the windows will soon begin to freeze, and if even the slightest mistake was made in the calculations, the structure simply will not fit into the opening.
However, if you study all the intricacies of the process, then no difficulties will arise during installation. Moreover, this way you can save a decent amount of money.
Video - Installation of PVC windows according to GOST
Stage 1. Measurements
In most apartments there are openings without a quarter.
Note! A quarter is an internal frame 6 cm wide (or ¼ brick, hence the name) that prevents the window from falling out and strengthens the structure as a whole.
If there is no quarter, then the frame will be installed on anchors, and the foam will be covered with special covers. Determining the presence of a quarter is quite simple: if the internal and external widths of the frame are different, then there is still a quarter.
How to measure windows correctly
- First, the width of the opening is determined (the distance between the slopes). It is recommended to remove the plaster for a more accurate result.
- Next, the height is measured (the distance between the slope above and the window sill).
Note! The measurements must be repeated several times and the lowest result taken.
To determine the width of the window, two installation gaps are subtracted from the width of the opening. To determine the height, the same two gaps plus the height of the profile for the stand are subtracted from the height of the opening.
Accurate measurements of the opening guarantee the ideal combination of aesthetic perception and ease of use of a plastic window
The symmetry and straightness of the opening are checked, for which a mounting level and plumb line are used. All defects and irregularities must be indicated in the drawing.
To determine the width of the drainage, add 5 cm to the existing drainage for bending. Also, the width of the insulation and cladding is taken into account (subject to subsequent finishing of the facade).
Window measurements
The dimensions of the window sill are determined as follows: the width of the opening is added to the size of the overhang, and the width of the frame is subtracted from the resulting figure. Regarding the offset, it should cover the heating radiator by a third.
Note! Slopes are measured after installation is completed.
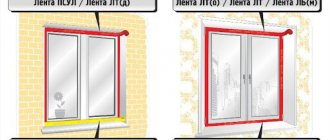
Installation seam of PVC window according to GOST standards
Let's look at what the installation seam looks like (Figure 1):
I - outer waterproofing, vapor-permeable layer; II - central thermal insulation layer; III - internal vapor barrier layer
Figure 1 — Schematic diagram of the installation seam
As mentioned earlier, there are three layers in the installation seam. The first, located outside, is designed to insulate the structure from moisture and steam. It is followed by a central one, designed to prevent heat from leaking into the external environment. The very last, inner layer, helps protect the structure from the formation and accumulation of steam.
Much depends on when the installation work is carried out. If the team works in the summer, it is necessary to use appropriate summer materials. These allow construction activities to be carried out in a temperature range from +35 to +5 degrees. If it is necessary to install a plastic window in winter, preference is given to winter-grade materials. They are used at temperatures from +5 degrees and below.
Let's look at some insulating materials that are recommended according to GOST.
When performing installation work recommended by GOST, you need to use materials that help prevent the appearance of moisture and mold in the room. This is one of the many reasons why it is necessary to adhere to systematic and thorough work in order not to violate the requirements of GOST. One of the most important requirements for materials of the above-mentioned type is service life: they must provide about 20 years of use while maintaining all their properties.
Let's look at the main types of insulating materials:
- Waterproofing tape. It is used to eliminate moisture from the window opening space, insulate and compensate for possible subsequent deviations of the installation seam due to shrinkage of the house. If you do not use such tape, over time, condensation will form within the seam due to temperature differences, which will have a positive effect on the development of mold in the room.
- Thermal insulation tape. Fabric material based on rubber. This type of tape is attached to the window opening. Its purpose is to protect the window structure from moisture and prevent heat transfer to the seam area.
- The vapor barrier tape is placed from the inside, and for its correct installation it is necessary to ensure that the material lays smoothly and does not form wrinkles. You need to calculate the length, taking into account the angles of the block itself. It is also necessary to correctly calculate the overlap - approximately 1/2 of the entire width of the material. There are two types of tape that prevents steam from penetrating into the block: with a coating applied inside and outside. The first option is most often used, however, if it is necessary to lay the tape directly under the plaster, it is better to choose an external material, otherwise it will be difficult to achieve high adhesion.
Return to content
Stage 2. Order
After measurements, the finished drawing should be taken to the window manufacturer, where all the necessary fittings will be selected. It is worth remembering that installation can be performed in one of two existing ways:
- through the frame in the installation plane;
- by means of support fittings equipped during manufacture.
Order windows
In the first option, you will have to pull the package out of the frame, insert it into the opening and install the glass back. In the second case, the entire structure is attached as a whole. Each option has disadvantages - if you pull out the package, it may be damaged; and vice versa, if the window is installed assembled, it can be damaged due to its heavy weight.
Prices for a popular line of windows
Window
Stage 3. Preparation
This stage of installation begins only after delivery of the ordered windows. First, the workplace is cleared, all furniture is covered with plastic wrap (there will be a lot of dust).
It is better to remove all the furniture from the room, as there will be a lot of dust.
The film will protect the walls and remaining furniture from dirt
Step 1. If required, the glass unit is removed from the window. To do this, the glazing bead is slightly pryed with a staple and pulled out. First of all, the vertical beads are removed, then the horizontal ones. They must be numbered, otherwise gaps will form after installation.
Step 2. Next, the frame is tilted slightly and the glass is removed.
Window preparation
How to remove glass
How to remove glass
Step 3. The bolts are unscrewed after the plugs are removed from the canopies. The handle is turned to the “ventilation mode” (in the center), the window is opened slightly and removed. All that remains is the frame with imposts.
Note! Imposts are special jumpers designed to separate the sashes.
Then you need to make a marking for the anchors and make holes along it - two on the bottom/top and three on each side. To do this, you will need ø1 cm anchors and a drill of the required diameter.
If the material from which the walls are made is not dense (for example, cellular concrete), then fastening is carried out using anchor suspensions. The latter should be fixed to the wall and frame with hardened self-tapping screws (eight pieces for each).
Note! To avoid the formation of a thermal bridge in the window sill profile, it should be filled with foam the day before installation. This way the element will not freeze.
Cost of windows with turnkey installation
| Turnkey Proplex Basis window Description:
Conditions:
Window cost: RUB 19,500* * The price is indicated for a panel house. |
| Rehau Blitz turnkey window Description:
Conditions:
Window cost: RUB 21,100* * The price is indicated for a panel house. |
Stage 4. Dismantling work
This procedure is recommended to be carried out immediately before installing a new window. In most cases, the old ones are thrown away, so the structure can be torn out along with the fastening, and if necessary, the frame can be sawed.
Removing an old window
Window dismantling
Step 1. First, the seal and thermal insulation are removed.
Step 2. Next, the plaster is removed from the slopes. To do this, it is better to use a hammer drill with an appropriate attachment (it is called a “shovel”).
Step 3. The window sill is removed and the cement layer underneath is cleaned off.
Step 4. Adjacent surfaces are treated with a primer material (by the way, many installers forget about this). In the case of a wooden opening, a layer of waterproofing material is laid around the perimeter.
The window has been dismantled
Old window
Note! Installation can be carried out at a temperature not lower than -15ᵒC. Polyurethane foam must be frost-resistant.
Installation of PVC windows. Installation according to GOST
GOST for the installation of PVC windows, unfortunately, in most cases is only advisory in nature, however, some rules should be followed during the installation of windows. First of all, this concerns preliminary measurements. We determine the type of window opening - with or without a quarter. Below is a visual example of a schematic view of an opening with a quarter (A), without a quarter (B).
Scheme 1 - Window opening with and without a quarter
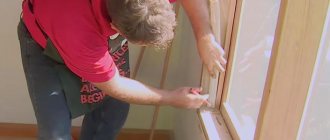
Stage 5. Installation of a plastic window
Installing a plastic window
Step 1. First, wooden wedges are placed around the entire perimeter, the window is installed on them (this will make it easier to level the structure), only after that it is attached to the wall. You can leave the backings - they will serve as additional fasteners.
Installation diagram of a plastic window
An example of connecting a window from below to an opening
Step 2. The absence of a support profile can be considered a gross violation of GOST standards, since it is not only needed for stability, but also makes it possible to install a low sill with a window sill. In the absence of a profile, they are attached directly to the frame, which violates its tightness.
The correct location of the stand profile is shown in the diagram.
Window installation diagram
Step 3. Next, the evenness of the window is checked in three planes, for which a mounting level and plumb line are used. It is typical that traditional bubble levels are not suitable for this due to insufficient measurement accuracy, so it is better to use a laser one.
Seals
Level check Frame fastening
Foaming
Step 4. If the window is level, then it is secured with anchors. To do this, a wall is drilled using a hammer drill through pre-prepared holes in the structure (approximately 6-10 cm). The lower anchors are fixed (not completely), the evenness of the package is checked again, after which the remaining points are attached.
Note! The final screed is made only after the final inspection. Do not tighten too much, otherwise the structure will “skew”.
Prices for mounting foams and cleaning gun cleaners
Polyurethane foams and cleaners for construction guns
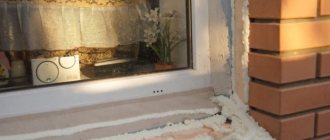
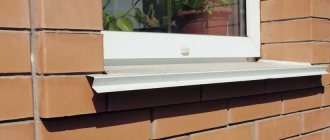
Installation of PVC window sill
Installation of a PVC window sill completes the installation of new window blocks.
The length and width of most window sills are standard.
In any case, you need to take a window sill with a margin in length and width. The excess can be easily trimmed with a grinder.
Work progress:
Place the window sill under the window and level it using wooden wedges or any other durable material at hand.
The window sill should extend into the wall at least 1.5 cm.
Before final installation, make sure that the window sill does not sag by pressing in several places.
The slope of the window sill relative to the window should not exceed 3°.
We fill the cavity under the window sill with construction foam.
The surface of the window sill must be evenly loaded for at least 12 hours so that the expanding foam does not affect the installation angle of the window sill.
A day later, the remaining foam is removed with a utility knife, and the joint between the window and the sill is treated with sealant.
Scheme 4 - Window sill installation
All that remains is to install the slopes on the PVC windows - and you're done!
Stage 6. Drainage
Window drainage device
The drainage is attached to the stand profile with self-tapping screws from the outside. The joints are carefully sealed with sealant to prevent moisture from penetrating into the structure.
Drainage installation
The edges of the ebb are recessed several centimeters into the walls, having previously made indentations using a hammer drill.
Note! Before installation, the bottom gap is also sealed.
It is recommended to glue the lower part of the ebb with a strip of soundproofing material (for example, “Linotherm”) or form a “cushion” of polyurethane foam - this will reduce the sound from the rain.
Stage 7. Window assembly
Window assembly
Installation of plastic windows
After attaching the anchors, the glass unit is inserted back.
Step 1. The glass is inserted and fixed with glazing beads (the latter should snap into place, for which you can lightly tap them with a rubber hammer).
Step 2. The doors are opened and their tightness is checked. In the open position, arbitrary opening/closing of the sash cannot happen if the window is installed level.
Step 3. The assembly seam is sealed on the sides. Polyurethane foam will provide high-quality waterproofing and prevent glass fogging. Before and after sealing, the seams are sprayed with water to improve polymerization.
Note! The seams are filled to no more than 90%, otherwise the structure will “lead.” If everything is done correctly, after drying the foam will protrude out a few centimeters.
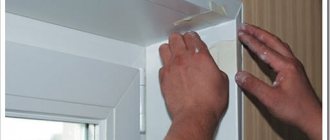
Step 4. The perimeter of the window is glued with a special vapor barrier tape, and material with a foil surface is used underneath.
Stage 8. Installation of the window sill
Installing a window sill
Step 1. The window sill is cut so that it fits into the opening and at the same time rests against the lining profile. There remains a small gap (about 1 cm) for thermal expansion. In the future, the gap is hidden by plastic slopes.
Step 2. Wooden wedges are placed under the window sill. It needs to be laid with a slight slope towards the room, and then applied with something heavy until the foam dries. Additionally, the window sill can be fixed with anchor plates.
Window installed
Video - Instructions for installing plastic windows
How to install a window sill
It is embedded in the following way: it is necessary that it fits into the opening, but also rests against the lining profile. A slight gap will be visible - approximately 1 cm. It is provided for thermal expansion. Then it will be hidden by a plastic slope.
Wooden wedges should be placed under the windowsill. The window sill is laid taking into account a slight slope towards the room and pressed for a while using any heavy object. You should wait until the foam dries. To ensure more reliable stability of the window sill, it is fixed with anchor plates.
Installation of a plastic window sill
After learning all the intricacies of installing plastic windows, you can begin to act. All installed elements will need to be rechecked after installation. But do not immediately carry out the final check, but after a day, so that the foam has time to “set.”
Read here how to make a wooden door using a hand router.
Using the same scheme, you can glaze the balcony, but you will have to take into account some additional nuances. For example, you will need to install a parapet to create partitions.
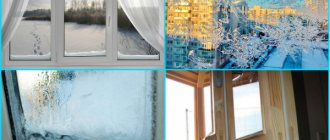
Video: Installing plastic windows with your own hands:
(No Ratings Yet)
conclusions
Now you know how plastic windows are installed, so you can safely get to work. The final check of all elements can be carried out only 24 hours after completion of installation (then the foam will have already “set”).
The described technology is quite applicable to balcony glazing, although it also has its own nuances - such as, for example, installing a parapet to create a partition.
Plastic windows
Installation of a plastic balcony block
Installation of a plastic balcony block
Installation of a plastic balcony block
Installation of a plastic balcony block
Installation of a plastic balcony block
Installation of a plastic balcony block
Find out how to properly make slopes on windows with your own hands from our new article.