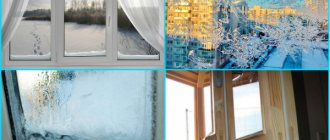
No. 1. Why do plastic windows need insulation?
In the first few years, well-made and installed plastic windows will certainly be a reliable barrier to cold air, drafts and noise. Over the years, of course, problems can arise, and often the user himself is to blame. If installation is done incorrectly, various defects can make themselves felt in the first season.
The most common reasons for additional thermal insulation of plastic windows:
- installation performed in violation of technology;
- shrinkage of the building, which is especially typical for new buildings;
- wear of rubber insulation. Responsible manufacturers and installers inform the user about the rules for caring for the rubber seal, but few follow the rules and regularly inspect the condition of this structural element. Lack of proper care leads to an accelerated process of thinning and drying of the rubber, the appearance of microcracks in its structure, the result is a decrease in the tightness of the fit to the frame and deterioration of thermal insulation;
- incorrectly installed slopes.
A window of poor quality or with technical characteristics that do not correspond to climatic conditions will also not be able to provide normal thermal insulation, which is why it is so important to be able to choose the right plastic window and immediately decide on a suitable double-glazed window.
No. 2. We identify weak points
To effectively insulate plastic windows, you must first understand where the seal is broken. The only thing you can immediately remove from the list of suspects is the frame: multi-chamber plastic is a good heat insulator, it does not dry out, unlike wood.
Cold air can penetrate through the following structural elements:
- clamping elements that tend to loosen over time;
- a detached glazing bead that holds the glass unit in place;
- worn out seal;
- polyurethane foam, if it was applied in violation of technology;
- windowsill;
- slopes.
A double-glazed window rarely causes a violation of thermal insulation (the exception is its depressurization), but it can also be additionally insulated. “Extra” heat in winter will not hurt.
to identify leaky window - just run your palm along and across the entire structure, and you will feel that there is a decent amount of wind in some places. Some people recommend using a lighter for this purpose. If you light a flame and pass it around the perimeter of the window, maintaining a safe distance, it will tilt in those places where there is even a small draft. Be extremely careful with this method!
As a rule, work on insulating a plastic window can be done with your own hands. The exception is when it is necessary to insulate the slopes from the outside, and the apartment is located above the second floor. You need to be prepared that comprehensive insulation may be needed if several zones of warm air leaks are found, but first things first.
Step-by-step instructions for do-it-yourself insulation
All work on insulating plastic windows can be done independently. It is enough to prepare all the necessary tools and materials, carefully familiarize yourself with the technology and the sequence of work.
Clamping mechanism
The adjustable elements of the pressing mechanism are protruding eccentrics of cylindrical or oval shape, located at the end of the sash in increments of no more than 70 cm. Additionally, one at a time is placed on the ventilation mechanism (if equipped) and on the hinge side. The cylinders have a notch to facilitate adjustment and set all eccentrics to the same position.
Depending on the brand of fittings, to adjust the cylindrical pin you will need a 4 mm hexagon, an asterisk or a flat-head screwdriver. The oval eccentric is adjusted using a screwdriver.
Clamping mechanism adjustment diagram
To press the sash more tightly to the frame, use a wrench to turn the trunnions alternately clockwise. The pressure of the upper and lower hinges is adjusted with the screws located on them.
After adjustment, the marks on all eccentrics should be at the same level, the handle should be closed all the way.
When the house shrinks or the sash sags, the rubber seals may adhere unevenly to the surface of the frame. In this case, it is necessary to adjust the position of the sash relative to the frame. To do this, there are “left-right” screws in both hinges and, additionally, “up-down” screws in the bottom hinge.
Video: how to adjust the window yourself so that it doesn’t blow from it
Replacing the seal
The sealant is purchased from the same company or an analogue with an identical profile.
For ease of work, the sash is removed. For this:
- The window is closed with a lock and the decorative trim of the top hinge is removed;
- After removing the retaining ring, remove the pin;
- The window is opened, the sash is released from the upper hinge by moving it towards you, and removed from the lower hinge by an upward movement (for large dimensions and weight, the sash is dismantled by two people);
- Remove the handle by turning the plastic cover at the base and unscrewing 2 screws with a screwdriver;
- The sash is laid on a horizontal surface.
Using a knife, the rubber band is removed from the groove. The groove is cleaned of dirt and debris and degreased so that the new seal stays in it securely and for a long time.
The end of the new seal is cut evenly with a knife and pressed into the groove with a bend towards the sash. In this way, a rubber profile is placed around the entire perimeter.
The rubber seal on the windows must be replaced if necessary.
The end of the seal is cut 0.2–0.5 cm longer than required and, squeezing, pressed into the profile.
It is important! Both ends of the seal can be glued together.
When installed correctly, the ends of the seal are located tightly to each other without gaps. If one edge sticks out, it is removed, cut off a little and inserted into place.
Video: replacing the seal on a plastic window
The seal on the frame is also changed.
The sash with the handle installed is mounted in place in the reverse order of removal:
- Insert into the bottom loop;
- Using a “pull” movement, the parts of the upper loop are connected;
- A pin is inserted into the upper loop and a retaining ring is installed;
- Put on a decorative overlay.
The sash is locked and the seal is checked for cracks. If necessary, the pressing density is adjusted using trunnions and screws on the hinges.
It is important! Before and after the winter season, the seal is cleaned, wiped dry and coated with silicone grease.
Slopes
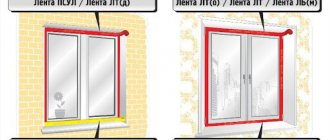
Often, adjusting the sash pressure is not enough; cold air blows from the windows. In this case, it is necessary to insulate the window slopes. It is recommended to do this both outside and inside. Then the windows will be reliably protected, and the room will maintain a comfortable temperature.
It is important! Since the insulation of slopes is carried out in several stages, it is recommended to carry out the work in summer in dry weather. In winter, for external insulation it is necessary to use materials designed for work at low temperatures.
For the simplest insulation of slopes you will need:
- Polyurethane foam;
- Insulation;
- Silicone sealant or liquid plastic;
- Drywall;
- Hammer;
- Hammer;
- Spatula, trowel;
- Construction tape;
- Adhesive for foam plastic (highly elastic);
- Perforated corner;
- Polymer reinforcing mesh;
- Primer;
- Plaster and putty for interior and facade work.
Polyurethane foam is selected for winter or summer, depending on the time of work.
The insulation can be polystyrene foam or polystyrene foam. Polystyrene foam can absorb moisture and retain it for a long time. Expanded polystyrene is more expensive than its counterpart, but surpasses it in all respects.
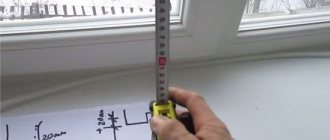
The thickness of the insulation is selected so that it completely covers the installation seam and extends 1–2 cm onto the frame.
To insulate slopes from the inside, you can use different materials
If the width of the installation seam is large, first apply a layer of plaster of the required size.
Insulation from the inside
Initially, the thickness of the insulation and drywall is calculated so that the new slope fits onto the frame, but does not interfere with the opening of the sashes.
The work is carried out in the following sequence:
- The existing old decorative coating is knocked down to the slab or brick with a hammer drill, and cleaned of dust and debris with a brush.
- Detected voids in the mounting layer are filled with polyurethane foam. Excess frozen foam is cut off with a knife. The foam should have low secondary expansion.
- The walls around the entire perimeter are generously primed. Modern primer has antiseptic properties, protecting the surface from the formation of mold and mildew.
- If the surface of the slopes has protrusions and depressions, it is leveled with a layer of plaster. After drying, cover again with a layer of primer for better adhesion to the glue.
- Cut foam blanks according to the dimensions of the slope with a margin of 3–5 mm in width. Both sides are treated with coarse sandpaper, making the surfaces rough.
- The insulation is glued from bottom to top. The glue is applied with a spatula or trowel in a continuous, uniform layer to the slope area and the workpiece. It is better to apply the composition to the foam with a notched trowel. The insulation is pressed against the slope and fixed. The insulation can be glued to the slopes with polyurethane foam. To do this, it is applied in zigzags over the entire surface of the slope and the foam is lightly fixed.
- After the glue has hardened, the prepared drywall blanks are secured on top of the foam with dowel nails of such length that they enter the wall 4–5 cm.
- The joints between the slope and the window frame are coated with silicone or liquid plastic.
- Excess foam and drywall protruding beyond the plane of the wall are cut off with a knife.
- A perforated corner is fixed to the angle between the slope and the wall with putty. After hardening, the excess is removed with fine sandpaper.
- The slope and section of the wall are puttied and, if desired, painted with water-based paint.
It is important! At each stage of work, verticals and horizontals are controlled by the building level.
Video: do-it-yourself slopes made of polystyrene foam
Outside
Polyurethane foam on the outside is especially vulnerable, so it requires careful inspection, removal of the worn-out foam, application of new foam, and filling of voids. Particular attention should be paid to the area under low tide.
Further work is carried out in this order:
- Excess hardened foam is removed, the slope is cleaned of old plaster, paint, dust, and covered with a layer of primer.
- Level with façade plaster. Mixtures for interior work crack due to temperature changes, so they are not used outside. Treat with primer again.
- The prepared insulation is glued to the slope and additionally secured with “fungi” - plastic dowels with wide caps. Trim off excess foam with a knife.
- A layer of glue is applied on top of the insulation. Immediately lay the reinforcing mesh so that it extends onto the wall, and press it into the glue with a spatula.
- A perforated corner (preferably metal) is attached to the junction of the slope and the wall using glue.
- A layer of plaster is applied on top.
- Install the tide.
It is important! Over time, a gap will form between the plaster and the frame, so it is recommended to use a spatula to make a groove 5 mm deep in this place and fill it with silicone.
No. 3. Debugging the clamping mechanism
House shrinkage and weather factors can lead to slight distortion of the window sashes and slight deformation of the sealing rubber. This leads to deterioration of thermal insulation, but in this case, returning the former tightness is a matter of a couple of minutes, however, knowledge of the design of a plastic window and skills in working with tools will be needed.
The clamping mechanism can be adjusted using special eccentrics located along the perimeter of the sashes. To ensure a tighter fit of the sash, the eccentric must be turned clockwise using a 4 mm hex key. Focus on the serif located on each such element. When it is directed towards the street, the pressure is weakened; when it is directed towards the seal, it is strengthened. The video shows everything well.
adjustment of the hinges , which also have their own mechanism responsible for the pressure density, helps to insulate a plastic window Here the regulation is carried out using a hexagon. You should follow a simple rule: if the tongue is pushed out strongly, then the sash fits well. To pull it out, you need to turn the hex counterclockwise if the hinges are on the left, and clockwise if on the right.
Things are even simpler with glazing beads . It is enough to pry off the old, loose glazing bead with a thin spatula, and install a new one in its place, which can be bought from the same company that sold and installed your windows.
After adjustment, check whether the tightness of the structure has improved using your palm or a lighter. If everything is done correctly, but there is still a draft, you will most likely have to change the seal.
Silicone based sealant
The silicone agent is applied to the junction of the glass and the seat. To make the seam beautiful and tight, you need to press on the bottle/gun with the same force. Before starting work, windows should be washed and degreased.
The sealant is inexpensive (about 200 rubles per package), and it is easy to use. The only drawback is that it does not protect from the wind between the frames.
No. 4. Replacing the seal
Ideally, a rubber seal can last quite a long time, but for this to happen, certain conditions must be met. According to the operating rules for plastic windows, the seal must be regularly lubricated with special substances, but which of us does this? So it turns out that after 5 years the rubber dries out and begins to let in the cold breeze from the street. The problem may be in the seal, which is located under the glass, or in what is located along the contour of the sash. Replacing the seal in a plastic window is not so difficult as it is responsible. If you doubt your skills, it is better to call a specialist.
Procedure for replacing the window seal:
- removing the bead;
- dismantling the lining and glass unit;
- dismantling a worn seal;
- installing a new seal through the groove. It is better to cut the tape in advance, which is 3-5 cm longer than the required length. The new seal is placed in its proper place, while acting as carefully as possible and without straining the material. The excess is carefully cut off. If desired, and for guarantee, the seal can be additionally fixed with adhesive;
- installation of double-glazed windows, linings and glazing beads. Glazing beads are fragile parts, so they must be removed and installed with extreme caution so as not to break them. Otherwise you will have to buy new ones.
The seal, which is located along the contour of the sash, may also need replacement . In this case, it is better to remove the sash. First, the decorative overlays are removed from the hinges, and then the pin is pulled out of the hinge using a mounting handle or screwdriver. All that remains is to carefully remove the sash, and only then it is very easy to remove the old seal from it. It is better to start installing a new seal from the top of the sash, gently pressing it, but not stretching it. It is better to secure the beginning and end of the sealing tape with glue. All! All that remains is to hang the sash back: you can install the pin with your bare hands, and then return the decorative trim to its place. The video shows and describes everything very well.
Types of seals for plastic windows
There are different types of sealed window inserts. These are EPDM, silicone rubber, carbon black rubber. The color of the layer between the plastic can be from light to black, but this does not affect operation. Professionals advise taking into account the property of elasticity - the softer the structure, the longer the elastic will last.
Any seal requires maintenance - wet wiping or washing with a weak soap solution. There is a product on sale - silicone gel intended for lubrication.
Rubber
The service life of EPDM rubber corresponds to the service recommendations of PVC - 10-20 years. This advantage is justified by its high resistance to the negative influence of environmental factors and adverse weather conditions. This seal can withstand temperatures from -60 to +100 degrees.
The rubber seal is not subject to cracking or mechanical stress, and can restore its original appearance. This material is elastic even after excessive loads, and is resistant to ultraviolet radiation. Among the negative characteristics is the presence of a specific odor.
Seals made of rubber after vulcanization are high-quality sealing insulators against extraneous noise. Such gaskets, like any rubber structures, are modified over time.
The quality of rubber gaskets depends on the manufacturer. To change the properties of the material, it is possible to add third-party fillers that increase or decrease the physical properties of the gasket.
Silicone
This VMQ seal occupies a leading position among similar products in terms of quality, but is rarely used due to its high cost. Gaskets of the presented group include methyl and vinyl-substituted groups of compounds.
Among the positive characteristics is the resistance of silicone to wet conditions. The material does not absorb it.
Silicone gaskets do not change their properties in any weather and are characterized by resistance to ozone. Its cost is high, and there is poor resistance to mechanical stress.
Polymer
Modern seals are made on a polymer basis. The latter components are either organic or non-organic. They are united by their structure - long chains of monomers consisting of simple molecules. In general terms, polymers are plastics, polyethylene or rubber.
Thermoplastic elastomer (TEP) varieties
This is a polymer sealant based on synthetic substances that retains its properties and operating qualities under all conditions. The periphery tolerates temperature changes and weather changes well, and fits tightly to the profile. The service life is up to 20 years. TPE products are rarely used due to complex manufacturing, but there is a promising future for implementation.
PVC and foam seals
Modified polyvinyl chloride is chosen if a sealant is used that can withstand welding and low or too high temperatures - 40, +70 degrees.
The material based on polyvinyl chloride represents a group of thermoelastopolymers and is characterized by high shock absorption and springiness. Such PVC rubber is affordable, weakly elastic, and does not withstand serious mechanical loads.
The material is not recommended for use in cold regions because PVC is less elastic at low temperatures.
Reliable manufacturers provide high-quality sealing of window blocks. There is one truth - the cheaper the windows, the worse the use of rubber in the construction.
Foam elements help restore the compressed shape after closing the window structures. This ensures the tightness of the gaps between plastic or metal structures.
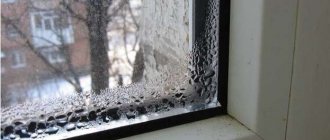
No. 5. Window sill insulation
The installation of a plastic window is often associated with significant damage, which is especially significant in the area between the wall and the window sill. Some installers fill the cracks with cement and construction debris. No comments here. It is better, of course, when the space under the window sill is filled with polyurethane foam, but this option is not ideal. Over time, the foam can shrink or even dry out, forming decent gaps through which cold air enters the house.
To insulate a plastic window, you will have to get rid of the old foam and fill in new one. Keep in mind that it tends to expand as it hardens. After complete hardening, the excess is cut off; some builders recommend additionally filling small cracks with silicone sealant. This is followed by plastering work and the application of decorative coating.
If possible, the window sill area can be additionally insulated from the outside. Polyurethane foam is also used for this, but sometimes polystyrene foam is also used. Everything is plastered on top using a mesh and finished off.
Cleaning from dirt and lubricating VHS window fittings
Start insulating VHS windows for the winter by inspecting the window fittings. Remove dirt, especially from the top of the window sash. All folds must be cleaned of deposits and dirt, especially cement and plaster residues. Direct exposure of the fittings to moisture and contact with cleaning agents should be avoided. Then lubricate the window fittings VHS (VHS). The lubrication points of the Vhs (vhs) window are marked with special markings. How to lubricate a Vhs (vhs) plastic window? The most common ones are WD-40, machine oil, grease. Do not under any circumstances lubricate with sunflower oil or olive oil or anything else! Edible oils dry quickly into a sticky substance that will break the window mechanism. After this, rotate the fittings in different modes several times to distribute the lubricant. Wipe off excess oil from the VHS window.
No. 6. Insulation of slopes
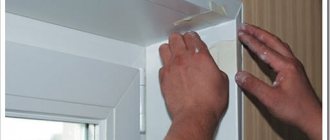
Today, often when installing plastic windows, slopes are additionally installed, smooth, beautiful, made of dense plastic. It often happens that there is a large crack between the decorative strip and the wall, which perfectly allows cold and wind into the apartment, therefore, to improve the thermal insulation of plastic windows, it is recommended to insulate the slopes from the inside or outside.
The procedure is as follows:
- dismantling unnecessary parts of polyurethane foam;
- if the surface is very uneven, you can plaster it;
- treating the slope with a primer, you can use antibacterial compounds to prevent the development of mold;
- A fragment corresponding to the slope is cut out of foam plastic. To make it stick to the surface better, you can slightly scratch it on the back side. All that remains is to apply assembly glue and press firmly to the surface of the slope; to guarantee, you can install several dowels;
- All that remains is to mount the corner, putty the surface and secure the casing.