If you decide to putty the walls with your own hands and not resort to the help of a specialist, then in this article you will find a lot of useful information for yourself. Let's figure out how to properly putty walls for wallpaper and painting. The matter is certainly not simple and requires skill, but we will try to understand as much as possible the question “how to putty walls?” I will not teach you how to hold a spatula or how to move it in any special way; you will learn all this yourself in the process of puttying. If any question is not covered, do not hesitate to ask it in the comments.
What is putty
Putty is a finishing material that is used to smooth out minor defects and create a uniform surface structure. Mainly consists of gypsum, acrylic and polymer materials.
Why putty the walls?
The walls are puttied in order to remove and level out minor surface defects and improve adhesion. Putty performs very well the function of preparation for finishing. In addition to its leveling qualities, the putty is environmentally friendly, vapor-permeable and can be easily processed or sanded.
Putty or putty, which is correct?
Especially for those who argue over correct spelling. In dictionaries, the words putty and putty have the same lexical meanings, so both options are correct. But there is one thing, but... Most construction literature and official information sources use the option (putty). It’s up to you to decide which option is more convenient for use, but still, it’s more fair to say – putty! But in this article, for certain reasons, I will use two options.
Types of putty for walls
And how to make the right choice when purchasing. First, let's figure out what types there are. Let us roughly divide the types of putties into 4 types. For convenience, we will consider them in this form:
- Starting
- Finishing
- Putties for special applications
- Facade
To understand what kind of putty you need and in what quantity, you need to start from two factors:
- What kind of surface is there
- What kind of finish will there be at the finish?
We will consider all possible options below, but for now let’s talk about the types of putty
Starting putty
Designed for rough leveling of small defects indoors with moderate humidity. The starting putty fills small and deep cracks well and does not shrink much when drying. The composition mainly includes gypsum and acrylic additives. It covers plastered surfaces well, and is well suited for preparing under wallpaper or fiberglass (cobwebs).
Finishing putty
Designed for final leveling of small defects indoors with moderate humidity. B consists mainly of polymers, so it does not have coarse grains. When filling deep scratches, it shrinks significantly after drying. It is used mainly on final layers in preparation for painting, decorative fine coatings. Well suited for fiberglass mesh reinforcement.
Putties for special applications
To this type we include all other varieties that will be useful to us in repairs. These are putties for sealing factory and non-factory drywall seams, for reinforcing and filling various joints and cracks. They dry quickly for ease of use, practically do not shrink, and have increased strength.
Facade putty
The scope of their application is clear from the name. It contains cement, so it has a greenish tint and is often called cement putty. It is used in damp rooms, loggias, basements and on facades. Frost-resistant when dried and has increased strength.
Types of building mixtures
The mixture can be dry (sold in bags) or diluted to the desired consistency - a ready-to-use paste. Both of them have a number of advantages and a number of disadvantages over each other. How to understand all the intricacies yourself if you have never putty before?
The binding component is the basis of all putty putties. The division of all mixtures into:
- cement putties;
- gypsum putties;
- polymer (acrylic).
Cement
It is clear that the binding component in these mixtures is cement, which imparts its best qualities to the putty: moisture resistance, durability, and resistance to the external environment. This material is indispensable for finishing rooms with high humidity and sudden temperature changes (kitchens, bathrooms, etc.)
This is an excellent material for walls outside buildings, but then lime (cement-lime putty) is added to its composition. The main disadvantage is the high degree of shrinkage.
Plaster
The second name is gypsum plaster. The advantages include:
- quick “setting” of the composition;
- plasticity and ease of use when plastering walls and ceilings;
- formation of a smooth, durable surface after drying;
- does not shrink.
The main advantage is that gypsum wall putty will be fully included in the affordable estimate. The disadvantage is that the material is not resistant to water, which means it cannot be used in wet areas.
Polymer (acrylic)
The most modern and convenient option for putty mixtures. In terms of adhesion, non-shrinkage, uniform drying, and complete absence of shrinkage, it has no equal. Thanks to its fine-grained structure, which gives a very smooth and high-quality strong surface, acrylic putty can be used not only when repairing walls, but also for mating parts of different compositions.
The mixture is capable of holding glass and stone, plastic and fabric, brick and drywall, and any surface to be puttied. Ideal for finishing. This is a universal option for plastering walls! The downside is that the price is steep.
However, the quality of the putty must correspond to the quality of the materials used in construction. Only with this combination can full interaction of materials and high quality work be achieved.
Technical characteristics, methods of use and the expiration date must be indicated by the manufacturer on the packaging.
Which putty to choose
So, which putty to choose? A few words about the composition and frequently asked questions.
Selecting putty based on composition
Here I will tell you what putties come in composition and which of the above mentioned types I can classify them as. At the same time, I will answer frequently asked questions. I think everything will fall into place here.
Gypsum putty
The main composition is gypsum, the rest is plasticizers and all kinds of additives. Gypsum itself has a coarse fraction compared to other types of putties. Therefore, it belongs to the type of starting finishing materials, well suited for preparation for wallpaper, cobwebs and rough decorative finishing.
Acrylic putty
Acrylic is such a multifaceted material that can be used in the production of putties of any kind, both starting dry and finishing in buckets. Acrylic putties are also widely used in wood processing of automobile bodies, etc. Therefore, it is probably not correct to use the term “acrylic putty” for a specific application. In this case, it can be either the start or the finish. Very often used in the production of wood putty.
Latex putty
Think about it, latex is rubber. Therefore, putty for finishing walls cannot be rubber; it simply contains a latex component. This putty is very flexible and can be used in damp rooms, although it all depends on the manufacturer.
Polymer putty
Basically these are all finishing putties, except gypsum. Acrylic and vinyl are also polymers, so acrylic and vinyl putty can also be called polymer.
Dry putty for walls
This is a starting material, mainly gypsum and acrylic. Again, suitable for preparation under wallpaper, cobwebs and decorative materials.
Which putty to choose for painting
The wall is prepared for painting as follows:
If there is plaster on the wall - 2 layers of starting gypsum putty, prime, if necessary, glue cobwebs or reinforcing mesh and 3 layers of finished finished putty, grind and you're done. If you are interested in specifics, then I use acryl-putz starting at the beginning and rotband pasta or sheetrock at the finish. This is about quality painting. If high-quality painting is not needed, then you can fill 3 layers with starting putty, grind and paint.
Which putty to choose for wallpaper
Under the wallpaper I use starting putty, which comes dry in bags. If we putty the plaster, then 3 layers of gypsum or acrylic starting putty are usually enough. I can recommend acryl-putz, prospectors, typhoon, knauf. (if they are sold in your regions). Pay attention to the price, cheap material is almost always bad. We'll talk about how to putty walls under wallpaper a little later.
Start-finish putty
Positioned as a universal putty. Very well suited for preparing wallpaper, cobwebs and rough painting. This mixture is not suitable as a finishing putty for spider webs, and I also do not recommend it for finishing the painting of ceilings and slopes. The finishing putty should be prepared in polymer-based buckets, not dry. There are no universal putties that perform their function well everywhere.
The best finishing putty
For a long time working in the finishing industry, I tried to work with different brands. I used them in different conditions and on different surfaces. As for the finishing putty, I can safely say that you need to take Knauf rotband pasta, sheetrock, Bostik finspakel (hardens very much). Finishing putty is often called “ready-made putty for walls”
Summing up the choice
A short selection of putty. For those who are too lazy to read the whole article, who just need to know the number of layers and what putty to buy:
| Type of preparation | Work order |
| under the wallpaper | 3 layers starting |
| for painting | 2 layers starting, web, 3 layers finishing |
| for decorative coating rough | 2 layers of starter, mesh reinforcement, 1 layer of starter |
| finely dispersed for decorative coating | 2 layers starting, reinforcement, 3 layers finishing |
| slopes | 2 start, web, 3 finish |
| GKL for painting | finishing of seams with special putties, cobwebs, 3 layers of finishing |
| GKL for wallpaper | finishing seams, finishing seams with finishing putty |
| loggia | 3 layers of façade (if you really need to putty and it’s damp on the balcony) |
| basement | if it is very damp façade putty 3 layers. |
| bathroom | although not recommended, I use conventional technology, as in other rooms. But you can paint it with moisture-resistant paint. |
We'll talk about this in more detail in the following chapters.
Calculation and consumption of putty for different surfaces
And so, how to calculate putty for walls... First, let's figure out what kind of surface we have, if these are plastered walls, then the consumption will increase significantly. Plasterboard walls will not require a lot of putty, but they will require a special putty for fugen and uniflot joints.
Putty consumption per m2
The average consumption of starting putty, indicated by the manufacturers, is 1kg-1.2kg per m2 of wall with a layer thickness of 0.6-3mm. Putty consumption per 1 m2 of wall is a very approximate parameter.
The consumption mainly depends on the characteristics of the wall (condition, porosity), and the experience of the “specialist” also plays an important role.
The consumption of finishing putty per m2 of wall is slightly less, 0.3-0.5 kg with a layer thickness of 0.5 mm. Again, it all depends on the surface being treated. For example, the consumption of putty on a cobweb will be significantly more than stated and will be approximately 0.5 kg per m2.
You won’t be able to calculate the exact amount of putty, so we take the average values, multiply by the number of layers (mm thickness) and multiply by the square footage of the walls. For example, if the total area of the walls of a room is 40 m2 and we need to prepare it for wallpaper, then take the indicator 1 kg, multiply it by the number of layers (3 layers of 0.6 mm = 1.8 mm) and multiply by 40 m2
1kg*1.8mm*40m2= 72kg
One bag of putty usually weighs 25kg, so we need 3 bags of dry starting putty for a 40m2 room.
Calculation of putty for sealing plasterboard joints “Fugenfüller” and “Uniflot”
I recommend sealing the factory seams with fugen knauf, and not the factory seams (cut) with uniflot. There are usually not so many non-factory seams, so we buy the smallest volume of “uniflot” 5 kg. As for factory seams, the consumption of “fugenfüller” is approximately 1 kg per 4 m2 of installed drywall.
Consumption per 1 m2 for plaster
The consumption of putties is influenced by the thickness of the layer, as well as the constituent components included in the product; their density may vary. Each putty may have its own consumption, indicated on the packaging. But we can distinguish the following standard indicators per square meter:
- Cement products for facades – 1.2-1.5 kg/sq.m. m.;
- Gypsum – 0.8-1 kg/sq. m;
- Polymer – 0.6 kg/sq. m.
The putties are not distributed in a thick layer. For the starting putty mixture the norm is up to 3 mm, for the finishing mixture up to 1 mm.
The consumption of putties is influenced by the thickness of the layer, as well as the constituent components included in the product; their density may vary.
The article talked about whether it is possible to putty on plaster, the answer is yes. This is the recommended step to get a level base ready for finishing. It is important to choose the right product and act step by step. The process itself is simple and can be done with your own hands.
How to putty walls (tool)
How to putty the walls? The main things we need from the tool:
- Spatula 10 cm
- Spatula 35 cm or metal grater, smoother.
- Mixer, whisk
- Roller and brush for primer
- Grinding grater, sandpaper
- Masking tape, knife, blades
- Water container
- Lighting, spotlight
- Vacuum cleaner
Paying attention! All spatulas, smoothers, handles for rollers must be non-rusting. This way they will serve you much longer and there will be no problems with rusty stains on the walls.
Preparation for putty
Any leveling of walls with putty begins with preparation. Preparing the wall is a very important stage; it will determine how well subsequent finishing materials will hold up. The surface must be well cleaned of debris, old wallpaper, and anything that does not adhere well and crumbles. All nails and protruding mortar are removed if it is plaster.
Next comes the priming of the surface, the wall should be well soaked with a deep penetration primer and wait until it dries completely, it is advisable to wait at least four hours, or even better, continue working the next day. The primer must not only absorb and dry, but also polymerize.
How to remove old putty from walls
If you need to remove old putty because it doesn’t stick well, then a 10 cm spatula and, for example, a hatchet are enough. If the putty holds well, you can try to wet it several times with water. It’s good to write it down and try to remove it with a spatula again.
If the putty is well primed and is not removed or soaked, then there are only two options.
- Knock down with a hammer until the plaster is finished (you will need to plaster the surface later)
- The second option is to make notches with a hatchet, prime with a deep-penetrating primer, wait until it dries completely, and then cover the entire wall with primer (sandy soil)
Putty of various surfaces for different finishes
Puttying various surfaces is essentially the same process, the only difference is in the preparation and the number of layers. I’ll talk about the filling technique itself in another chapter, but in this one we’ll talk about preparation and the number of layers.
How to putty drywall
We’ll talk more about the puttying technology itself in the chapter “Do-it-yourself puttying of walls (step-by-step instructions).” We start by preparing the drywall. Preparation includes sealing the seams with sickle tape or paper tape. At this stage, we will need putty for a special application (this is mainly the application of sealing gypsum board seams). To seal factory gypsum board seams, we use knauf fugen. For non-factory seams we use knauf uniflot.
Primer of drywall before puttying
Apply the primer evenly to the wall using a roller, be sure to apply it evenly and without smudges, prime all seams and corners with a brush. Waiting for it to dry completely!
Puttying drywall joints with fugen and uniflot putties
This is a special putty for drywall developed by Knauf, which practically does not shrink and performs its function very well. We glue serpyanka tape onto the factory seams, coat the factory seams with fugen knauf, and not the factory seams with uniflot knauf. If we use paper tape, then first coat the seams with putty, then glue the tape and use a spatula to push it deep into the layer. Non-factory seams should have expansion gaps, and the cardboard at the edges should be cut at 45 degrees on each side.
Read on the packaging how to properly knead fugenfüller. Please note that you need to knead only in clean water and only by hand.
Puttying drywall before wallpapering
We wait for the sealed seams to dry completely, clean 35 cm of excess and small sagging with a spatula. Mix the starting putty and go through all the seams again. We wait for it to dry completely, then we clean all the seams with coarse sandpaper 80P-100P. Then we prime the entire wall again.
Do I need to putty drywall before wallpapering? Usually, the sealed seams should be enough for subsequent wallpapering (be sure to fill the seams with starting putty after fugen has dried). But, if you have very thin wallpaper, then it is advisable to putty the entire gypsum board wall with ready-made finishing putty in three layers. I recommend using knauf rotband paste or sheetrock finishing putty. We clean it with 140-180P abrasive, remove dust with a vacuum cleaner and re-prime it.
Plasterboard putty for painting
The seams are sealed using the above method. The seams must be cleaned and the entire wall primed. For high-quality painting, we use cobwebs, glue them with Bostik glue (I wrote about this in the article about gluing cobwebs). Then we putty the cobwebs into three layers and sand them with 180-240R sandpaper. Instead of cobwebs, you can glue a painting mesh with a 2x2 cell.
If you are not very interested in quality, but want to save money, then you can simply clean the seams and paint with a long-nap roller. It will work out a little better if you putty on 2 more layers with finishing putty and clean it with 180 rubles.
Putty walls for painting
The technology itself for puttingtying walls for painting is no different from others, only the number of layers, the presence of reinforcing material (if the painting is high-quality), and the number of sandpaper when sanding the putty are different.
If the surface is plastered, then the sequence of work should look like this:
- Preparation, priming
- 2-3 layers of starting putty (depending on the quality of the plaster)
- Rough sanding with 80R sandpaper
- Dust off, prime
- Fiberglass (cobweb) or reinforcing mesh is glued (glued to the finishing putty)
- Then 2-3 layers of finishing putty
- Grinding with sandpaper 180-240R
- Remove dust, vacuum, prime (white primer)
Fiberglass putty before painting
Many people wonder whether it is possible to putty fiberglass? Essentially, these are glass wallpapers and many people simply paint them, but I’ll tell you that this is complete nonsense. Practice shows that it is not only possible to putty on cobwebs, but also necessary!
Here only ready-made wall putty (finish) will be used. We putty the first layer of putty “to tear it off”, smooth the putty into all the pores of the web in different directions and completely remove it. We putty under good lighting, making sure that there are no gaps. We try not to move the spatula for too long; if the web is of poor quality, it will get wet and drag on the spatula. The next two applications of putty are applied in a thin, neat layer.
How to properly putty walls under wallpaper
Puttying walls under wallpaper is the easiest preparation, in my opinion. No reinforcement is required if the wallpaper is thick; finishing putty is not even required. Easily rubbed with coarse sandpaper. The main thing is to follow the minimum technology, which I will describe below.
- Clean and dust the wall
- Prime and wait for it to dry completely
- Large holes and cracks are sealed separately
- The first layer is applied
- After drying, the wall is cleaned with a spatula to remove excess debris.
- Apply 2 layers
- Cleaned with sandpaper 100-120R
- Removes dust
- Prime with white primer and wait for it to dry completely.
I recommend buying thick non-woven wallpaper, they are easier to apply and better hide small nuances of the walls. Finishing putty for wallpaper is needed if the wallpaper is very thin and any defects will be visible. This also applies to photo wallpapers; it is also advisable to use finishing putty under them.
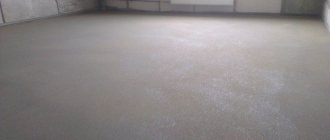
Puttying concrete walls
Puttying concrete walls without plaster is acceptable in panel houses with relatively smooth walls; in other cases, plastering of the surfaces is required. It is enough to prepare well, remove all excess from the wall, and prime it. Then, using 3 layers of starting putty, prepare it for the wallpaper.
Putty on penoplex (how to putty on penoplex)
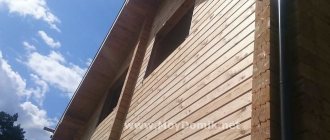
I don’t know what kind of situation a person must have in order for him to need to putty penoplex, but we often receive such questions in the mail. Most likely, a person does not understand what putty is and has no idea how penoplex is finished. Or maybe he just needs to finish the facade, or the loggia, and he calls it all penoplex putty... I don’t know, but I’ll write a few words about this.
Penoplex cannot be putty with materials for interior decoration, and in this article we are talking about it. Consider the option of a loggia, for example, we have it insulated with polystyrene foam, timbered and we need to prepare the surface for painting.
We cover all the holes and dowel-nail heads with insulation glue. We glue the façade mesh and rub it all over with plaster. After complete drying, prime. Now the walls can be filled with cement façade putty. Personally, I recommend not to putty with cheap facade mixtures, but in this case it is best to use decorative plaster (for example, 1.5mm pebble)
The façade putty must be rubbed down immediately after complete drying. If you wait a couple of days, the emery abrasive will not take it.
Putty on plastered walls
The plastered wall needs to be thoroughly cleaned with a 35cm spatula, removing all sagging and everything that crumbles. Then you should prime the entire wall well and wait until it dries completely. If we are preparing it for wallpaper, then we apply 3 layers of starting putty. We coat all the cracks well with the first layer, fill in all the unevenness of the plaster, often this first layer is called “scraping putty.” Then follow 2 layers approximately 1mm thick. After drying, grind and prime (if under wallpaper). If it is for painting, then we prepare the wall further; I will describe it in more detail in the chapter “putty for painting”
Is it possible to putty over paint?
It is not advisable to putty on paint. If you need to putty acrylic paint, you first need to make sure that it adheres well, then prime it well and wait until it dries completely. Now it is permissible to fill it with several layers of finishing putty.
If you need to putty oil paint and there are no other options, then you need to cover it with sandy primer (for example, Caparol Putzgrund 610), after which you can putty the surface in several layers. I repeat, it is not advisable to putty the paint; it is recommended to remove it.
Putty without plaster
If you don’t want to level the walls with plaster, but simply putty the walls with your own hands and stick wallpaper, then first check how crooked the walls are. This can be done using a level or a rule. If the distortions are not very large and the quality of the wallpaper is of little interest to you, then you can simply putty on 3 layers and sand with coarse sandpaper 80R. We use only starting putty.
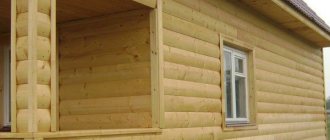
How to putty a balcony (loggia)
Such cold rooms are usually finished with facade materials, so facade putty is suitable for us. The facade putty contains cement, so it has a fairly large fraction. I recommend using high-quality, expensive material (for example, Caparol). Cheap - when rubbed with sandpaper, it becomes stained and behaves poorly when applied. If you need to decorate a loggia, it is better to use decorative plaster on the walls.
How to putty the corners of walls
It is not for nothing that this is the most critical stage of work. Experienced craftsmen can do this even with an ordinary spatula. However, for a beginner it will be difficult to process the internal and external corners of walls without a corner spatula. It has a perfect angle, so after applying the mixture, you just need to swipe it over the surface, remove the excess and create a perfectly even angle.
We looked at how to putty a wall with your own hands. This is not a difficult task, but it requires care and compliance with all recommendations. This way you can save on repairs and spend that money wisely. The main thing is to choose a suitable putty, complete all the preparatory work and start processing the walls. And educational videos will help you better understand this issue.
Do-it-yourself wall putty (step-by-step instructions)
Here we will talk about how to putty walls with your own hands step by step. We have already talked about preparing different surfaces, etc. In subsequent chapters, we’ll look at the putty technology itself in a little more detail and talk again about preparation for wallpaper, painting, and learn how to apply putty correctly.
We carry out work in dry rooms with temperatures from +5 to +25. The material is transported at the same temperature.
Step 1: preparing the walls
I already wrote about the preparation of walls above in the chapter “preparation for putty”; here I will repeat myself a little so as not to confuse everything even more. We clean the walls with a 35cm spatula (preferably an old one). After such cleaning, the spatula is not very suitable for subsequent putty. We clean the corners well, often after plastering the corners are slightly rounded. Pay attention to the connection to the ceiling and floor. The plane should be flat and neatly adjacent to adjacent walls and ceiling.
Step 2: priming the walls before puttying
Which primer is best? The soil should be coarse, I recommend Caparol Tiefgrund, ceresit st17. Although any concentrated deep impregnation primer is not bad. We dilute the primer according to the instructions, pour it into a bucket or bath and use a brush to saturate all the corners and junctions of the wall. Then, using a roller, apply primer to all surfaces that require puttying. The walls are primed for putty evenly. We wait for complete drying from four hours, but preferably a day.
Step 3: how to thin the putty
Pour approximately 2 liters of clean water into a bucket and add 5 kg of dry putty (all figures depend on the manufacturer). Then use a mixer or a whisk with a drill, mix everything until smooth. If necessary, add water or putty to achieve the desired thickness. If you take the putty on a 10cm spatula and turn it over, it should not flow down. Also, the solution should not be very thick, but rather elastic. After the first stirring, wait 3-4 minutes and stir again. After which the solution is ready for use. The solution should resemble thick sour cream.
If you need to putty with a ready-made finishing putty, I recommend adding 0.5 liters of clean water to a 10 liter bucket and mixing with a mixer. The putty will become more elastic and more convenient to apply.
Step 4: putty technology
Finishing and starting putty are applied in essentially the same way, the only difference is in the thickness of the application.
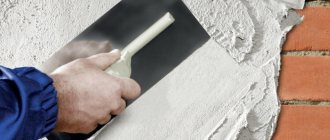
How to apply putty
If there are large potholes and cracks on the wall, then we putty them in advance and wait until everything dries. Then we apply the putty in an even layer on a 35cm spatula and, starting from the corner, begin to apply the putty on the wall. If the wall is plastered, then after application we remove the putty “by scraping” with a spatula so that the first layer penetrates only into all small cracks and irregularities.
Don’t forget that we are leveling the walls with putty, so we try to fill all the holes and small irregularities
After the first layer has dried, we clean the wall again with a spatula to remove particles of excess putty, sand from plaster and other debris. Then we evenly apply the second layer of putty, but we do not remove it completely, but apply approximately a 0.5 mm layer; in places of unevenness, the layer can reach up to 5 mm.
We must putty with good lighting, preferably under a spotlight or light bulb.
The third layer can be applied without waiting for the second layer to dry completely. We apply each layer in different directions so that the final movement of the spatula does not coincide with the direction of the next one. The third layer can be applied generally in a fan-like manner, smoothing with arc-shaped movements.
Pay attention to the back of the spatula. Periodically remove dry particles of putty and debris from it.
How to apply finishing putty (liquid putty for walls)
Wash your instrument frequently to prevent it from becoming completely overgrown. To do this, you need to have a bucket of water and dish sponges on hand.
The finished finishing putty is applied in exactly the same way as the starting putty (described above). We try to apply a thinner layer. Be sure to putty the walls so that there is good lateral illumination. Finishing putty has the property of strong shrinkage, so it is better not to level it with layers of 2-3 mm.
Step 5: how to putty corners
Puttying the corners of the walls is an important step; you need to make sure that the corners are well filled with putty and that dark empty cracks do not show through.
Internal corner
The inner corner of the adjacent ones is puttied alternately. First, one wall, wait for it to dry completely, remove excess putty particles from the corner with a spatula, then putty the adjacent wall.
Outside corner
In modern renovations, perforated corners have long been used; aluminum corners are used for painting work. They are leveled; after drying, the corner should be pulled off on both sides with putty. (I recommend pulling the fugen knauf, it gives a little shrinkage)
Puttying drywall corners
The inner corner of the gypsum board is glued with sickle tape or special paper tape and pulled back with “uniflot” or “fugen” putty. If you use sickle tape, then thoroughly press the putty into the seams of the drywall. If the tape is paper, then the seams are filled before applying the tape, the excess putty is pressed through and removed with a spatula. The outer corner is also placed on the “fugenfüller” and pulled out on both sides. (in some cases the corner is pulled twice)
Reinforcement
Reinforcement during putty usually occurs at the stage when our wall is puttied in 1-3 layers. Reinforcement such as painting mesh and cobwebs protects the wall only from small cracks. In addition to the reinforcing effect, the web creates a uniform surface and smoothes out minor irregularities.
Cobweb (fiberglass)
In one of the articles, I described the detailed technology for gluing cobwebs, so I will describe it briefly here.
- 2-3 layers of starting putty, sanded with 80P sandpaper\
- Prime and wait for it to dry completely
- Apply glue with a roller (I recommend glue from Bostik or Oskar)
- Fiberglass is applied and smoothed with a spatula
- Reapply a layer of glue with a roller
- Smooth it out with a 35cm spatula, as if we were putting it with glue.
- Subsequent strips of fiberglass are glued end-to-end, or cut with a knife at the joints
Painting mesh
Autumn protects walls well from small cracks and is great for preparing for painting or decorative finishes.
- 1-2 layers of starting putty (wait for complete drying
- Cleaning the wall with a spatula
- Apply the mesh and smooth the top with finishing putty
- Excess is trimmed with a paint knife
- After which 2 more layers of finishing putty are applied
How long does it take for putty to dry on walls?
The putty dries in about 6 hours, it all depends on the temperature and humidity of the room. It is advisable to wait a day and then start sanding. It is not recommended to wait several days; some brands of putty harden greatly.
Applying the starting layer
Now the putty is applied to the walls. This is the main work process, which is performed using a wide and narrow spatula. The base layer allows you to prepare the surface for subsequent work. You need to scoop up the putty with a narrow spatula and transfer it to a wide spatula. Afterwards the mixture is transferred to the wall.
All work starts from one corner, moving from bottom to top. The movements are smooth, you don’t need to press hard on the spatula. It is held at an angle of 45°. Thanks to this, the material will be applied evenly, and there will be no marks left on the surface from the tool.
Each subsequent strip is applied with an overlap of 7–8 cm. Having processed a certain area, you can check the evenness using the rule. You can't press too hard. Excess composition will collect on the instrument, and pits will appear on the surface.
Advice! To see all the irregularities, you need to point the light source at the wall at an angle.
All differences are eliminated. Particular attention is paid to corners. This is often a weak point in alignment. An angled spatula will help here. The starting layer does not always turn out perfectly smooth. Small imperfections are allowed, as we will eliminate them with finishing putty. When the work is completed, all that remains is to wait for it to dry. You can find out how long it takes for the putty to dry on the walls on the packaging from the manufacturer. When it is dry, start grouting.
How to sand walls after puttying? A grinder will get the job done much faster than using a grater by hand. But not everyone has the opportunity to buy a unit. In both the first and second cases, sanding the walls will help eliminate protrusions and irregularities. The surface should be rubbed using spiral movements. You cannot leave gaps. However, you also don’t need to overdo it, so as not to erase the surface.
If after applying the base layer the unevenness reaches more than 2.5 mm, you need to apply another starting layer.
Attention! Why do you need a painting mesh for putty? Its main task is to prevent the formation of cracks. This is especially true for surfaces where the layer is large. The putty mesh is embedded in the layer applied to the wall and hidden under the second layer.
Sanding walls after puttying
So we figured out how to properly putty the walls, now we will answer the question of how to sand the walls after puttying. There is nothing complicated in grinding, there are only a few small nuances, which I will talk about now. Hand sanding
In manual sanding, a “hand grater” is used - this is a tool for sanding walls after puttying; I recommend purchasing one made of white plastic because... black ones leave streaks in the corners when sanded. It is better to use sandpaper that is not the cheapest. The most important thing and the very first thing to say is to remember to use a respirator!
Sanding the walls after puttying occurs exclusively in circular movements and under the illumination of a spotlight!
If we use a household vacuum cleaner, there is a possibility of damaging the equipment. Therefore, we first remove large debris with a spatula and sweep. And we vacuum up the remaining dust.
| Surface | Abrasive |
| under the wallpaper | 80-120r |
| for painting | 180-240r |
| for decorative finishing | 120-180r |
Mesh for grouting putty
Personally, I don’t use mesh; the ones sold in my region are of poor quality and scratch the surface. As far as I know, it can be used with special graters that are connected to a vacuum cleaner. You only need to connect industrial devices, for example, bosch gas50.
What tools are needed for the job?
Beginners are recommended to use high-quality tools in their work. This makes it easier to learn how to master the process. For example, with a rough or crooked spatula, the material will constantly stick not to the wall, but to the tool.
Required:
- At least 2 spatulas - wide and narrow. With a short tool, the putty will be applied to a long one. Only then is it stretched across the wall. Spatulas can have straight and shaped handles, semicircular side edges.
- If you have experience, you can move on to smoothers - tools for smoothing surfaces.
- Rule for controlling the evenness of the wall. This is a hand tool in the form of a flat aluminum strip.
- Plastic container for mixing the solution.
- Sandpaper to eliminate transitions between layers and small bumps.
- Brushes, rollers - for priming walls.
- Painting mesh.
- Putty in powder form or an already prepared composition.
- Primer.
- A drill with a mixer attachment will help make the mixture perfectly homogeneous.
Important
It is necessary to prepare, in addition to tools and materials, work clothes. When applying putty, you need to protect your hair and skin. Thick rubber gloves are put on your hands; A scarf is tied on the head. A respirator will prevent dust from entering your respiratory tract.