What should be done first: window sills or slopes?
Installing window sills and slopes on windows is hard work, which requires special knowledge and skills, as well as the availability of specialized tools.
In combination with all the above factors, it is possible to achieve the desired results.
It should be noted that window sills and slopes are those objects without which plastic windows cannot be imagined.
The key purpose of slopes is to decorate window openings, hide traces of installation and enhance the insulation of the window opening, as well as its tightness.
Window sills, along with slopes, are a hot topic. They reached their peak of popularity during the construction of houses in the second half of the 20th century. They were made from laminated laminated wood, which was painted with oil-based paint and water emulsion, or from a sanded asbestos cement board.
Often similar window sills are now installed in new houses. They are nailed with nails to wooden plugs that are installed in the wall - this, of course, does not have an ideal appearance. The disadvantages of this design are that it requires constant maintenance and repair work.
There is also a variety of stone window sills made from artificial or natural material. This design, despite its beauty and originality, is affordable due to its price criterion. Another disadvantage is that installation of such material is not always possible due to its heavy weight.
The main advantage of the material is its strength, durability and practicality.
At the same time as the rapid introduction of PVC windows into the modern market, sales of plastic window sills also started. Around the same time, society also learned about laminated window sills made of chipboard and MDF. But only plastic products expressed the best properties and captured the main market share.
Plastic windows form an excellent combination with PVC window sills and slopes. This combination creates a unified style and a high level of practicality, as well as efficiency. Installation of plastic products takes a small part of working time and guarantees a high-quality result.
The installation specialist, as well as the window manufacturer, recommend installing window sills and slopes in the following order: first the window sills, and then the slopes. This recommendation will be necessary for everyone, regardless of the material you choose.
The most popular materials are:
- Plastic . The most popular material for plastic windows is PVC slopes. Their advantages are expressed in light weight, favorable price, durability, and ease of maintenance. Thanks to these qualities, plastic is the most popular material in the construction of new houses and in the renovation of houses that have already been put into operation.
- Plaster . Decorative decoration of window sills can be done using plaster and putty, followed by painting. This material is used quite rarely due to the labor-intensive installation process. As a rule, when installing slopes, the walls are covered with plaster, this makes them more reliable and more resistant to various types of damage. Moisture-resistant wallpaper can also be applied to a plaster slope.
- Mosaic and tiles. The facing of the opening is often made of tiles or mosaic tiles. Such decoration looks impressive and original, which explains the popularity of this material in interior decoration.
- Drywall . An excellent combination in renovation is considered to be a composition of plasterboard and PVC windows; this design, due to its favorable cost, helps to save money on the purchase of plastic. It should be noted that these products are difficult to install due to the different materials.
Photo report 1: installation of slopes from sandwich panels without starting profiles
This method is suitable when the window is installed so that the distance from the window frame to the opening wall is too small. In this case, installation with a starting profile (see below) is either very difficult or - usually from the hinge side - completely impossible.
After installing the plastic window, the following picture was observed.
Picture after installing PVC windows
The installation of slopes for plastic windows begins with preparing the opening: we cut off the remaining foam with a stationery knife. It is easy to cut, just don’t overdo it, cut it flush and don’t cut it out - the foam both holds and insulates the frame. Pieces of plaster that interfere and protrude are also removed. If they hold up well and do not protrude beyond the plane of the future slope, you can leave them - the foam will slide less.
Then, around the perimeter of the window we nail (we place it on dowels if the wall is concrete) a thin strip - 10 * 40 mm - with the wide side facing the slope.
Nailed around the perimeter of the rail
Usually they don’t level it, they nail it as is, but if you want, you can make it level by placing pieces of plywood, thin boards, etc. in the right places.
Groove for plastic sandwich panel
Next, we cut the foam around the perimeter of the frame so that the sandwich panel fits there. It should go in about 1 cm. We cut off the foam carefully so that there are no residues on the frame, but without damaging the plastic.
Now you need to cut the plastic panels correctly. You can do it in a standard way: using measurements, you can make a stencil. It seems easier with a stencil. Take a sheet of paper larger than your window (I had old wallpaper). Apply to the slope, crimp, bending the excess. Cut along the curved lines, try on, adjust as necessary.
It is more convenient to start from the upper part of the opening. Having made a paper stencil, we outline it on the plastic. Considering that about 1 cm will go into the foam groove, add this centimeter along the edge that will be inserted there. We cut it out with a small margin - it’s easier to cut it off than to cover it up later.
We cut it with a hacksaw and a metal blade, try it on, adjust it so that the plastic stands up straight, without bending. We level it so that the panel is flush with the plaster. The edge turns out to be almost even; where necessary, we trim it with a file.
Inserted plastic slope top
Having removed the tried-on and adjusted strip, along the outer edge that will be nailed to the plank, we drill holes according to the thickness of the nails, retreating about 0.5 cm from the edge. This will make it easier to attach and will not damage the plastic.
We put it in place again, take a balloon with mounting foam and short “sprays” to fill the gap with foam. We try to get as deep as possible, but don’t pour too much: when it swells, it can distort the plastic.
Fill it out like this
There are several points to consider when working with polyurethane foam. If the plastic is smooth, the foam does not have a very good grip on it. To improve it, either treat the surface that faces the wall with sandpaper, and/or prime it with something to improve adhesion. The second nuance: for normal polymerization of the foam, moisture is needed. Therefore, before installing the plastic, the slope is sprayed with water from a spray bottle. Naturally, there should be no dust on the wall - it should be swept away with a brush or removed with a vacuum cleaner. If the plaster or mortar is loose, the opening is pre-treated with a penetrating primer, which will bind the concrete particles together.
Then we lift the panel, pressing down the foam, insert the nails into the holes and fasten the outer edge to the bar. The inner one rests against the window frame.
Fixed top plastic panel on the window slope
Using the same technology - cut out a paper template, try it on, transfer it to plastic - cut out a plastic side. Here you need to be especially precise so that the gap between the slope panel and the window sill (upper slope) is minimal. To do this, the edge will have to be sanded. To make the edge smooth it is easier, it is more convenient to process it with sandpaper attached to a smooth block, a file or a sharpening stone (half a circle, as in the photo).
Processing the edge of a plastic panel
We adjust it until it matches perfectly (as best as possible) at the top and bottom, and install it in place, driving one edge into the groove near the window. When the result is satisfactory, we level the outer vertical edge to the same level as the wall plaster. You can do this with a stationery knife on the spot, or you can draw a line on the panel (with a pencil, a thin marker, scratch it with something sharp) and then modify it with whatever is convenient.
Having removed it, we also drill holes for nails along the outer edge. We install the panel in place, take foam, and fill the gap from bottom to top. Too much foam is not good here either, as it can bend the plastic. Therefore, we fill it in short portions, trying to fill it as deeply as possible.
On the vertical parts of the slopes, you can do it differently: apply foam to the panel ready for installation along the far edge, which goes under the frame, before installation. The strip is made continuous or applied as a small snake. Only you need to do this not from the very edge, but stepping back a little. Then the plastic part is inserted into the cut-out groove, positioned as needed, and the rest of the gap is filled with foam (do not forget to wet the wall before installation). Once filled, press, level, and secure with nails into the bar.
The upper and lower joints are fixed with masking tape until the foam polymerizes.
To prevent the foam from moving the edges of the slope during the polymerization process, tape the joint at the top and bottom with masking tape. No matter how hard you try to adjust the plastic evenly, gaps, albeit small ones, remain. They can be covered with acrylic. It is sold in foam-type tubes and placed in the same mounting gun.
Squeeze the strip into the gap, rub it, level it, remove the excess with a damp soft cloth or sponge. This operation needs to be done in small areas and wiped carefully - completely clean. As long as the acrylic has not hardened, it cleans up well. Then - with great difficulty. It is more convenient to start sealing cracks from the top - immediately - the horizontal panel of the slope, then the joints, then move down first along one side, then along the other. The last to be sealed are the joints with the window sill.
After drying - 12-24 hours, depending on the sealant (written on the tube), acrylic can be pulled into the seam - this is if the cracks are large. Go through all these places a second time using the same method. After the second layer has dried, if there are any roughness or unevenness, they can be smoothed out with fine-grain sandpaper, folded in half. In general, it is better to carefully level it while it is still wet, otherwise you may scratch the plastic.
Installed plastic slopes
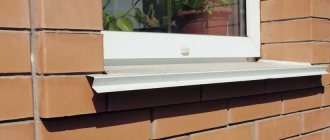
That's it, the plastic slopes are installed. After the final polymerization of the foam, the bevels must be puttied, leveling with the surface of the walls. After this, you can remove the protective blue film. As a result, the window will look something like this.
Window with plastic slopes (sandwich panels)
When installing these plastic slopes, sandwich panels were used. These are two layers of plastic, between which there is a layer of foamed propylene foam. Using the same technology, you can make a window frame from inexpensive plastic window sills or white PVC wall panels. The most unreliable material is panels: even wall panels are pressed through quite easily, and if the front layer of plastic is thin (cheap), then the jumpers are visible in the light. This is not the case with sandwich panels and plastic window sills. And it takes a lot of effort to push through, and there are no jumpers even for clearance.
Installation of plastic windows is described here.
Step-by-step installation of slopes and window sills using plaster
Not in all cases they are installed from scratch. Often people use the service of replacing these two elements of the window space. For example, if the windows in the apartment are in good condition, but the window sills and slopes are in a sad state and restoration will not save them, then you can replace these elements with new ones and install identical or more modern material.
At the final stage of wall finishing, plastic window sills are installed, then the slopes are finished. This sequence is determined by the task of securely fixing the slab under the window and preventing it from moving. When decorating an opening, it is necessary, in accordance with the rules, to attach a board under the opening inside.
The desired effect can be achieved using load-bearing pads, polyurethane foam and adhesives. During the installation process, the window sill must be brought “under zero”, and the opening itself must be equipped with insulating materials. In the case when the slopes are finished first, and not the window sills, the latter have an unacceptable property in this matter - displacement.
Self-installation of a window sill for a plastic window
During the installation process, you will need to monitor the condition of the window sill to prevent mechanical damage. As a rule, to protect the surface, manufacturers use a protective film, which is removed only after completion of all installation work.
The window sill is attached to the window using mortar or glue, only in rare cases screws are used.
It is important to remember that the length of the window sill should be 20 cm greater than the length of the window and 7 cm greater than the width of the window opening. A sufficient distance should be left from the radiator of the heating system to the window sill.
A window without a window sill will look ridiculous, so even a minimal-sized decorative area should be attached under the window. After installing the window sill, it is necessary to decorate the bottom of the window opening in one of three ways - lining it with tiles, wood or plastic.
The superiority of plastic window sills and slopes
Advantages of plastic products:
- Installation does not require special physical effort and a lot of time, and there is no need to use professional equipment and this process can be carried out simultaneously with the installation of windows.
- Practicality and wear resistance. The service life of plastic products is up to 25 years, while these elements do not lose their operating properties and appearance.
- Fire safety, the surface is resistant to mechanical stress, ultraviolet rays, unstable temperatures, and high humidity levels.
- Ease of use due to the high-pressure structure of the plastic. This material does not tend to accumulate dirt and dust, and can be easily washed using detergents and cleaning agents.
- Wide variety of colors and structures. Thanks to the use of film material, plastic products can be given any color, taking into account the style of the house or apartment. When changing the interior, the film can be easily removed and replaced with a different color or texture, thereby getting another plus - saving money and physical resources.
Materials for window sills
For internal window sills, it is recommended to choose durable materials that are easy to use. The most popular materials are wood, natural stones, laminated boards, PVC and more.
Window sills are an integral part of the interior; they complement the design of the room and allow you to place color accents. No one will ever decide to change window sills as often as fashion trends change. It turns out that the selection of material needs to be approached wisely. The following are the most popular materials for window sills in an apartment:
- PVC window sills.
Window sills made of PVC are a hollow multi-chamber structure inside, which is formed by diagonal and vertical stiffening ribs. This structure is covered on the outside with melamine foil or PVC film. There are many options for single-color window sills, but most consumers still prefer white or a color that imitates the structure of stone or wood. The edges of PVC window sills can be straight or have an end wall 4 cm high.
- Wooden window sills.
Wood is a material that quickly responds to changes in temperature or humidity. As a result, it may crack or become deformed. To prevent damage, it is important that the window sill is made of laminated, milled or tongue-and-groove wood with a moisture content of more than 10%
Most often, preference is given to local varieties of wood - oak, pine, beech, and occasionally exotic species.
Wood is easy to process, and such a window sill can be given an unusual original shape; after installation, the surface will need to be covered with a layer of wax, varnish or oil.
- Window sills made of natural stone
In addition to the high strength of stone products, their advantage is originality due to the heterogeneity of the block intended for cutting window sill panels. To fully highlight the shade and structure of the stone, it is ground and polished. Most often, granite, marble, syenite, etc. are used to create window sills.
In addition to the original surface, stone window sills can be given various fancy shapes. This is possible using waterjet cutting of stone using high pressure. The edges of the product may be sharp, so to increase safety they are rounded, but in addition to the edges, the corners are also rounded.
Plastic window sill
Do-it-yourself installation of PVC window sills and slopes
There is a window between the cold air of the street and the warm air of the room. If the window frame is not installed, external moisture will enter the cracks of the window, flow along the walls and destroy the entire structure. Installing windows requires the knowledge and skills of specialists, but installing PVC window sills and slopes is easy to do with your own hands.
The first step is to install the window sill; for this purpose, it is necessary that several holes are made in the wall near the slopes, after which you can begin finishing them.
DIY window sill installation steps
- Calculation of the appropriate length of the window sill.
- Joining the window sill and the recesses prepared for it. The window sill must be held, filling the voids with foam. After it has completely dried, you will need to immediately cut off all excess.
- Using tile adhesive, you can begin plastering the space under the window. If you need to hang wallpaper, then acrylic primer is first applied to the wall, and putty is applied before painting.
- After completing the above measures, you can remove the protective film, put plugs on the ends of the window sill and begin attaching the slopes.
A few tips on how to install a plastic window sill with your own hands
- Before attaching the window sill from the back side, it should be moistened; the same should be done at the base of the bottom of the window opening. Polymerization of polyurethane foam completes faster with increasing humidity. In addition, the foam holds wet surfaces together better. You can wet the surface using a spray bottle, for example, which is used when caring for flowers or when moistening linen during ironing.
- Do not be too zealous with foam - this will not make installation easier, but on the contrary, it can only worsen the situation. The space is not filled completely - indents should be left between the stripes. Thus, the window sill will be protected from upward blasting, and it will also save sealant.
Finished window sill
PVC window sill installation
During the installation of a plastic window sill, you need to closely monitor the integrity of its parts. Avoid scratches and other damage. For these purposes, the manufacturer often wraps the window sill in a film covering, which must be removed at the final stage of all work.
This part is fastened using various construction or adhesive solutions, but sometimes screw materials can also be used. It must be taken into account that the product itself must be 20 cm longer than the window itself. The part that protrudes directly from the wall should be no more than 8 cm.
It should also be remembered that the distance between the radiator and the heating system must be sufficient.
The next stage is installing the window sill. As stated earlier, the product should be slightly longer than the window, because of this, all the recesses are attached directly directly to the wall. The top layer must be cleaned in advance from the previous solution and other products. The window sill can be installed either perpendicular to the loggia or with a slight slope in the other direction from the window structure. In the second solution, water and excess moisture will not be able to linger near the window surface; it will roll down and dry out.
Thus, we need to calculate the length of the window sill, then we need to insert the product into the recesses. After which it is necessary to hold the structure and fill the cracks and voids below with foam, and after complete drying, cut off all excess material.
Afterwards, using slab adhesive, you need to plaster the entire surface of the wall at the bottom of the window. If you need to paste wallpaper or other material, then apply an acrylic solution to the wall in advance, and use putty immediately before painting.
Next, after all the manipulations performed, we remove the film that protects the window sill from damage and attach professional plastic plugs. And only after this you can begin finishing the slopes.
Internal and external finishing of slopes
How to install slopes
Installing plastic windows is not all the work that will allow you to obtain a reliable and aesthetically pleasing design. If you do not provide complete protection to the polyurethane foam, it will absorb moisture and succumb to deformation during temperature fluctuations. This problem can be solved using slopes. Thanks to them, it is possible to protect against condensation on windows, mask defects and increase sound and heat insulation. But you can learn how to tighten plastic windows for winter mode from the article at the link.
Preparatory work
The first step is to eliminate all the cracks on the street side that were created during the installation of PVC windows. This will seal the external assembly seam and protect the foam from the harmful effects of the sun's rays. Any solution that can be used for outdoor work is suitable for these purposes. Then paint the spring slopes.
Frame for panels
The first step is to create a frame on which the plastic panels will be fastened. To give the plastic rigidity, it is necessary to attach wooden slats around the perimeter of the slope. Self-tapping screws are suitable for these purposes. The fastening of the rail should be flush to the wall. Make sure it doesn't stick out. Fixation must occur strictly vertically. In this case, you can focus on wooden blocks and a level.
Setting the starting line
At this stage, it is necessary to attach the starting strip around the perimeter of the window. It is necessary for the installation of PVC panels. For these purposes, self-tapping screws “bugs” are used. In this case, it is important to pre-mark, which will help fill the strip evenly.
Installing a starting strip on a slope
In addition to horizontal and vertical, you also have to monitor the degree of adherence of the strip to the inner corner of the structure. Then you can remove the protective film placed on the windowsill and window, since no further dusty work will be carried out.
It will also be interesting to learn more about how to change the seal on plastic windows.
Installation of F-shaped strip
You can proceed to making the edging using an F-shaped strip. It will allow you to mask the defective area of the window opening. To do this, the strip should be trimmed a little, taking into account the overlap that will be formed after its installation. The places where the profile joints come should be cut at an angle of 45 degrees. It is removed upon completion of the work using metal scissors.
The F-shaped profile is fastened using one parallel edge to a wooden batten, starting from the top of the part. A stapler is perfect for these purposes.
Installation of slopes
When installing PVC slopes, it is necessary to take into account the following requirements:
- The space that is formed between the panel and the base must be at least 20 mm.
- The angle of the side parts of the window slope should be equal on the right and left sides. For measurements it is worth using a square.
- Using a mounting knife, trim the panels that protrude above the opening.
In the video, do-it-yourself installation of slopes on plastic windows:
You can proceed to installing the plastic to the base. First, make the top panel, and then the left and right. Place the plastic in the grooves of the starting strip, and lay a layer of insulation behind it. Mount the panel in an F-shaped profile. In this case, be sure to monitor the work using a level. If cracks have formed during the work, they can be eliminated using white construction silicone.
It is also worth paying attention to how rubber seals in plastic windows are replaced.
Exterior finishing works
In standard situations, surface work is easier to carry out than internal work. To ensure quality work, you need to clean the walls near the window from various debris generated during construction or repairs. We cut the foam so that the levels of the wall and the foam are the same. We use the same material to fill cracks and voids.
You can also use ceramic tile mortar for this.
Next, you need to use soil for construction on the wall; it is better to treat the walls in several layers to improve the bonding qualities. The following work in finishing this surface is carried out using materials used to decorate the outer wall of the house.
It is also necessary to take into account the fact that all materials used in repairs must be produced specifically for external work, otherwise their service life will be much lower than that regulated by the manufacturer. Next, we level the surfaces, sand them, apply coloring materials or putty for decorations.
Before working with finishing materials, you must carefully study the instructions and, as carefully as possible, the section that indicates the method and frequency of applying layers. Due to the last point and the quality of materials, finishing of external surfaces may take a couple of days.
The most difficult block in exterior finishing is leveling surfaces. In order to reduce this complexity, you need to use a professional reinforced mesh; it is much easier to apply the construction mixture on top of it.
It is necessary to check in detail all surfaces, including walls and coverings, for the presence of lyes and voids; if any are found, they must be covered up immediately. Otherwise, insects and moisture may enter these voids, and they will also be exposed to climatic conditions - this can lead to an unfavorable outcome of the overall repair result.
Preparatory work
In construction and repair work, it is impossible to avoid thorough preparation for them. The same applies to the process of installing a window sill. The standard approach is important here:
- the lower part of the window opening is cleared of debris that remains after dismantling;
- The cleaned surface is coated with a primer, after which it must be allowed to dry completely.
Other preparations are as follows:
- check the quality of foaming of the window frame to prevent possible drafts, and if the need arises, deficiencies must be urgently eliminated.
The last piece of advice is very important to follow, especially in situations where the installation of a window sill is not associated with the complete installation of a new window unit.
If there are ready-made slopes, they should be trimmed so that the window sill panel goes under them. This is done in different ways, but it is important to try to damage the slope as little as possible. This will allow you to easily restore it in the future. Next, it is important to prepare the window sill itself.
Installed wooden window sill
Interior finishing work
The work on decorating the internal slopes, of course, is more responsible, since it is carried out in the living room, which you see every day. Based on this, you need to very carefully select finishing materials and perform the work as accurately as possible.
The sequence of finishing internal slopes is the same: it is necessary to clean the surface by removing old building materials; If necessary, cut off excess foam and make the slopes yourself. If there are voids in the wall, fill them with mortar, insulating material or another substance that performs a similar function.
Methods for installing window slopes
Slopes are made not only from the inside of the room, but also from the outside. This is necessary to reliably protect the window from precipitation, wind, and other natural influences, and also helps to improve the external characteristics of the structure. Slopes will help extend the life of the structure and reliably insulate the room from the cold, as they will close the joints.
Products can be made of different materials. The easiest way is to use plastic window panels sold in stores. You can use either a regular or a sandwich panel, the latter is relevant for brick and block buildings.
You will need the following items:
- Several U- and F-shaped plastic strips.
- The slats are made of wood, the thickness of which is 15 mm.
- Construction stapler.
- Hammer or powerful drill.
- Building level.
- Insulation.
- Fastening elements.
- Silicone sealant.
- Metal scissors or grinder.
- Knife.
Don’t be intimidated by the long list: installing slopes and window sills is a simple process, completely doable.
Tip: plastic panels have a protective film. Do not remove it until the work is completed.
You can make the slopes yourself. Read more about this in our article “Finishing window slopes inside an apartment.” How to choose slopes for PVC windows and consumer opinions in our material “Choosing the most “correct” slopes for plastic windows.” If you install slopes yourself, do not forget to insulate the slopes of plastic windows. This will make the apartment warmer.