How to make a roof for an extension to a house
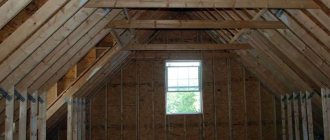
A lightweight roofing structure, which consists of only one inclined slope, is usually called a shed roof. Let's look at how to make a roof on an extension to a house, what are the nuances and features of construction. This design includes a rafter system, gables, sheathing and finishing roofing material. A special feature of attaching a pitched roof to a house is the need to secure it to one of the load-bearing walls of the main building.
The structural elements of a pitched roof of this type are as follows:
- Mauerlat . This is the main support beam, which bears the main weight of all rafter structures and roofing material. It also redistributes the load on the load-bearing walls and foundation of the building. To lay this element, hard wood treated with antiseptics is used. When deciding to build a pitched roof for an extension to a house with your own hands, one beam of the Mauerlat is fixed on the load-bearing wall of the building, and the second is fixed on vertical supports.
- Rafters . These elements support the roofing material and transfer its mass further to the mauerlat beam. To create rafter legs, use a board with a section of 50×150 or 100×150 mm. To fasten them to the support beam, cuts are made at both ends of the rafters.
- Struts . These are additional supporting elements of the frame that support the rafter legs if the length of the slope exceeds 4 m. One end of them rests on the rafters, and the other on the mauerlat.
- Lathing . For its arrangement, boards measuring 40×150 mm are used. They are piled on top of the rafters at a certain pitch to create support for laying the finishing coating. A continuous sheathing of plywood or particle boards is used for soft roofing.
It is worth noting that the drawing of a shed with a pitched roof attached to a house can be done independently, since this design is the simplest of all possible. This does not require complex mathematical calculations. True, special attention should be paid to the method of joining the roof of the extension to the main building. It is important to ensure reliable waterproofing of the seam to avoid leaks.
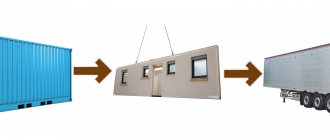
What to make an extension from
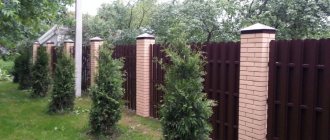
Wooden houses have always been and remain popular. Undoubtedly, wood harmonizes with a wooden building. But an extension made from a different material can only emphasize style and originality.
By looking at the photos of the best options for extensions to wooden houses, you can be convinced of this. Before deciding what can be used to build an extension, decide on the purpose of the room.
Types of materials for extensions:
- wooden beam;
- brick;
- frame;
- foam block;
- gas block
For the construction of light buildings: summer kitchen, veranda, terrace, a frame structure is suitable.
Living rooms with heating and communications are built from timber, logs, bricks, foam blocks, gas blocks. A garage can also be built using foam blocks or gas blocks.
Design calculations and drawing of a pitched roof
Of course, in order for the finished structure to be durable and not cause problems during rainfall or the cold season, before starting construction you need to draw up a design for a shed with a pitched roof that will be adjacent to the house. In this case, it will be necessary to calculate the surface area of the slope, its slope, the length of the rafter legs and the difference in the height of the supports. All this should be included in the house roof project. Correct calculations will ensure the durability of the roof and its efficiency. You can determine the necessary parameters using ready-made calculator programs or using formulas.
Manually, the required quantities are calculated as follows:
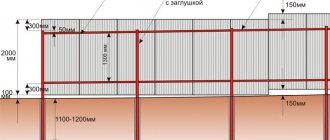
- The angle of inclination of the roof is determined by dividing the difference in the height of the support pillars by the width of the structure. As a rule, it is within 15-40º and is determined based on the weather conditions of the area and the requirements of roofing material manufacturers.
- For a given slope slope, the difference in the heights of the support pillars can be calculated by multiplying the angle by the width of the extension. These parameters are calculated so that when constructing a pitched roof for an extension to a house, the required slope can be maintained.
- To determine the length of the rafters, it is necessary to divide the difference in the height of the supports by the sine of the slope of the slope. The resulting value will allow you to calculate the amount of material required to create a rafter system for an extension to a house.
- You can calculate the surface area by multiplying the length and width of the slope - the parameter is used to determine the amount of roofing and waterproofing materials for the roof. Please note that you need to purchase them with a 15-20% margin for trimming and overlaps.
The weather conditions of the area significantly affect the durability of the roof. So, if significant snow loads are expected, it is better to make the slopes steeper, and if windy weather prevails, flatter, with a slope of less than 15º.
What materials are needed for a barn roof?
Let's think about how to cheaply cover the roof of a barn to reduce costs. The most reasonable thing from the point of view of safety from wind and heavy rainfall would be to build a shed with a pitched roof, since fairly inexpensive materials will be needed. In addition, you will not have any problems purchasing them - everything is freely available in stores. And the number of consumables will be much less than for roofs of a more complex design.
During the construction of the roof of an extension to the house you will need:
- Wood . You will need pine beams with a cross-section of 100×100 or 150×150 mm, edged boards 50×150 mm, unedged boards 40×150 mm and a lath with a cross-section of 25×50 mm for the construction of the rafter system. The moisture content of the material should not exceed 15-16%, and its surface should be free of chips, cracks and stains. Using deep penetration antiseptics, you can avoid rotting and mold formation due to penetrating moisture.
- Roofing covering . You can select a suitable material in terms of quality and cost from a wide range of varieties on the market. A budget option would be slate, corrugated sheeting or roofing felt. A higher quality and visually presentable material – soft roofing, ondulin, metal tiles – will cost twice as much. If we are talking about covering a winter garden, greenhouse or veranda, you can use polycarbonate - a transparent material that perfectly transmits sunlight, a thermal insulating material.
- Waterproofing . This layer is designed to protect the wooden truss system of the roof of the extension from moisture penetration and, as a result, damage to the structure. For this, roofing material, film or diffuse membrane can be used. However, in practice, roofing material has shown itself to be the best, since it is the most durable of the above.
- Fastenings . There are many options for fastening consumables when installing a roof - self-tapping screws with rubber washers, nails, anchors, metal corners. In the case of self-tapping screws, their consumption per 1 m2 of area is about 10 pieces. So, to calculate the quantity, the consumption rate must be multiplied by the area.
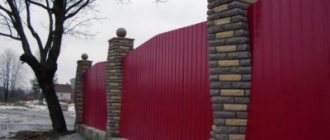
Please note that choosing a roof covering similar to the main building will make the extension a harmonious continuation of the house. However, if this is not possible due to financial capabilities, it is worth choosing a material that is as close as possible in color. The choice of lightweight materials (ondulin, roofing felt or corrugated sheets) will make it possible to create a lightweight, simple frame.
Barn base and floor
It is quite difficult to define the limit of size and quality of construction at which a barn turns into a change house or a mediocre workshop. It is believed that a building with an area of 4–5 m2 is sufficient to store gardening tools, several bicycles and all kinds of accessories. However, everyone’s appetites are different, including the degree of isolation from the street.
For light frame buildings it is not necessary to build a permanent foundation. MZLF on a properly constructed bed of sand and gravel will be sufficient. If you plan to lay stone walls with a load on the base of more than 300 kg/m.p., the tape should be made normally buried with correctly distributed reinforcement.
The need for a belt surrounding the perimeter of the barn is dictated by the requirement to install a dry floor inside. The tape provides insulation of the soil inside from surface water; therefore, in the shed it will be possible to store materials and tools for which high humidity is detrimental. At the same time, it becomes much easier to arrange the floor, regardless of its type: from clay with a gravel embankment to a more substantial one made of paved brick or concrete screed.
The width of the foundation should allow the walls to be placed on it at their actual thickness, so that there are protrusions of 50–70 and 100 mm, respectively, on the outer and inner sides. They are necessary for the correct connection of the basement ebb and the possibility of installing a frame wooden floor on the ground inside. If you plan to build on a metal frame, its rack elements are concreted first, and only after that a connecting belt is poured, raised above the ground by 150–200 mm.
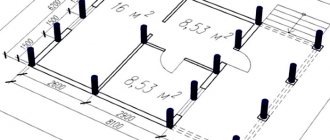
Foundation diagram for a barn: 1 - shallow strip foundation with simple reinforcement; 2 - logs; 3 - gravel backfill; 4 - sand cushion
To reduce the impact of soil heaving on the base of the shed, the trench under the tape is dug a little deeper and partially filled with compacted sand and gravel mixture. It will be better if the bottom layer of the backfill is made of gravel of a fraction of 20–30 mm, and a layer of sand up to 5 cm is poured on top. In this case, the walls of the trench must be cut in advance so that the crumbling soil does not get under the concrete. The formwork of the underground part is the trench itself, and the above-ground part is a box of two boards on an edge, knocked together at the top with jumpers every 50–60 cm, and tied together with wire at the bottom. Due to the small size of the tape, it is recommended to place an insulating film inside before installing the reinforcement, which will limit the release of cement laitance from the concrete.
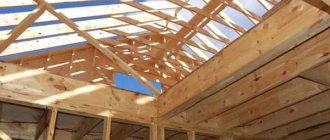
Methods for constructing a roof structure with your own hands
So, if you decide to build the roof of the house extension with your own hands, after designing and purchasing materials, you can begin construction. To work, you will need a hacksaw or grinder, a screwdriver, a plane, a drill, a stapler, a ruler, a marker and some string.
Construction is carried out in several stages:
- Using anchor bolts or metal studs, the first Mauerlat beam is installed on the load-bearing wall of the house. The rafter legs will be laid on it, so the fixation must be reliable.
- The second beam of the Mauerlat is mounted either on the load-bearing wall of the future extension or on support posts. Their height must be lower than the main load-bearing wall of the house to ensure the required roof slope. The beam is fastened on the posts with studs, and on the load-bearing wall with anchor bolts.
- Next, the calculated number of rafter legs of the same length is made and cuts are made in each of them for laying on the mauerlat. The outer rafters are attached first, then a cord is pulled between them, and all the remaining legs are attached to this level.
- Waterproofing is laid over the rafters. The roofing material at the junction of the extension with the main house is brought 15-20 cm onto the wall and melted to it using a gas burner.
- The waterproofing layer is fastened with a counter batten nailed to the rafters. The main sheathing under the roofing material is mounted perpendicular to the counter-lattice in increments of 10-15 cm.
- The last step will be laying the roofing covering on the sheathing. You need to start the flooring from right to left and from bottom to top, laying sheets with an overlap of 10-15 cm. On flat roofs, the overlap of the material is increased, and the joints are additionally coated with a sealing compound.
It is worth noting that the movement of water along a pitched roof will only occur in one direction, therefore it is necessary to install high-quality gutters. Lastly, you can begin insulation work and the final filing of the gables.