A real owner knows how to grow a rich harvest at his dacha, which pleases his household and guests. However, in winter, difficulties may arise with the preservation of fruits. Listen to the advice from the article, and you will have fresh fruits and vegetables on your table all year round. By choosing the right place to build a cellar with your own hands and following the technological process, you will save yourself from troubles during operation. The seemingly simple design of the cellar has its own construction secrets that must be taken into account, especially if your site has a fairly high groundwater level.
We measure the groundwater level
The first step is to find out the level of groundwater, its temperature, the content of dissolved salts in the water and the frequency of rise. Hydrogeological studies can be carried out on your own, without involving expensive specialists.
Drilling the soil to determine the water level
In the spring, when the groundwater level reaches its peak, exploration is done with a drill. The drill must be more than 2000 mm in length. This is considered to be the standard depth for laying a cellar. If the excavated soil is dry at this depth, we can say that you are very lucky. Make several such holes in the place where you plan to build a cellar, and wait a day. If groundwater is close, then it will definitely appear in the drilled hole.
If water appears in the hole, it is necessary to measure the height of the water column. To do this, take any suitable rod, lower it into the hole and use a tape measure to measure the distance from the end of the rod to the wet line. The level of the water column can change during the day, so measurements must be taken over several days. We take the highest mark as a basis.
Ground water level
You need to make sure that this is the groundwater level, and not the surface water. The high water can be located at a level of 5 m underground; at this depth there can be soils through which melt or rain water does not seep. It is necessary to measure the distance to water in nearby wells. If the distance to the water in the well is greater than in the drill hole, then this is perched water. Ring drainage will help here. But if it is an aquifer, then everything is much more complicated.
Geodetic rules will help to more accurately determine the groundwater situation at the site:
- perched water is a frequent companion of clayey or loamy soils;
- excess moisture occurs during prolonged rains and when water levels in lakes and rivers rise;
- groundwater has clearly defined boundaries, although water levels may vary;
- groundwater is always constant, but high water is treacherous and unpredictable.
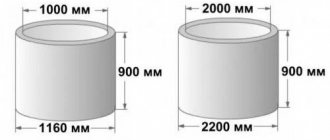
How to mount and install an iron box for a cellar at a high groundwater level
It is not necessary to make a container the entire height of the cellar. It can be made in the form of a trough with low sides, the dimensions of which depend on specific conditions and the extent of flooding. On the sides of such a container there must be fastening wings, by which the “trough” can be removed from the cellar and lowered into it.
Construction of a cellar in places with a high ground level: 1- trough-type box made of sheet steel; 2 – a piece of half-inch pipe; 3 – tap; 4 – mounting wings; 5 – fastening the box to the ground.
At the bottom of the box, in one of its corners, you need to weld a pipe with a tap built into it. This locking element of the structure must be located at the end of the pipe, the height of which must be at least half a meter. Next, they begin to disinfect and paint the box. To do this, it is first treated with orthophosphoric acid, then coated with red lead for iron.
On the outside, additional waterproofing is carried out to prevent rust: a layer of bitumen is applied to the surface of the box. If everything is done correctly and carefully, such a container will last for many years and will not give a single leak.
Upon completion of the work, they begin to lower the box into the pit that was dug to construct the cellar. In conditions of high water and high groundwater level, the pit will always be filled with water. If formwork was not installed along the walls of the pit, the height of the iron container should be greater than the depth of the pit. Otherwise, if the groundwater level is high, the walls of the pit will quickly be washed away by water. The box is lowered into it after opening the tap. It will gradually sink and sink to the bottom, as water will flow into its interior.
After the container is firmly in place, its position is fixed by concreting the outer wings. After this, the water is pumped out using any powerful pump. Upon completion, close the tap. All that remains is to complete the simplest work: make a cellar lid and install a staircase. In a similar way, you can make a viewing hole for a car if the garage is located in an area with a high groundwater level.
https://youtube.com/watch?v=eKg24j5LKg8
Ring drainage device
When soil waters are close to each other, excavation work is complicated by the fact that the soil becomes heavy and viscous. The first step is to lower the height of groundwater below the bottom of the pit to at least half a meter.
Country cellar drainage system
- We mark the outline of the pit. We dig a trench along the outer contour of the future foundation pit, going 30 cm below the base of the future foundation.
- We pour sand at the bottom and crushed stone on top. We lay geotextiles in such a way that after laying the drainage pipes, we can wrap them around the drainage.
Waterproofing device - We lay drainage pipes at a slope to the storage tank. We are installing two wells: an inspection well and a storage well. If there is a body of water nearby, then you can put a pipe with drainage there.
- We wrap geotextiles, a layer of sand and a layer of gravel on top, and then fill the entire trench with the excavated soil and compact it.
- When the water begins to recede, we begin digging a pit.
Advice. The drainage system will remove a huge part of the water and prevent it from quickly leaking into the cellar. The structure will be protected by waterproofing the cellar.
What should an owner who is planning to build a cellar know?
Cellars can be recessed, semi-recessed and above ground. Depending on their location, they are made autonomous (free-standing) or in the form of an extension to the building. The choice of design type depends on the following factors:
- Climatic conditions of the area. Above-ground and semi-buried cellars are dependent on the effects of external temperatures. In cold regions they freeze in winter, and in the south the walls of buildings allow heat to pass through in summer. In both cases, the stored products will be lost. If the region experiences extremely low or high temperatures, the walls and roof of the cellar are insulated with thermal insulation or a buried construction is preferred.
- Ground water level. The factor is considered one of the important ones when choosing the type of cellar. If there is a high location of underground water layers or annual seasonal flooding of the site, a ground-based building is chosen. A recessed and semi-recessed cellar is erected provided that the distance from the floor level to the groundwater level is at least 0.5 m. Research is carried out independently, making holes in the area with a garden drill.
- Family characteristics. It is advisable to select the design of the cellar for the people who will use it. If these are old people or disabled people, then they give preference to above-ground construction. Descending stairs into a sunken or semi-buried cellar is difficult for people with disabilities.
The size of the cellar is calculated based on the expected amount of food storage. This takes into account the number of people living, the area of the vegetable garden and garden. For example, for a family of two people with a garden of 3-4 acres, a cellar measuring 2x2 m is enough.
Internal drainage device
If you have a small landscaped area and don’t want to destroy everything to build a cellar, then installing internal drainage is a way out of such a difficult situation. This method is suitable for a free-standing cellar, since the internal system collects water that has already penetrated into the basement.
- Drainage is laid at the base of the cellar, and is not installed along the outer perimeter. The sequence of work is the same as in the previous method: sand cushion, geotextile and crushed stone.
- The pipes are laid with a slope towards the storage tank, which is located on the outside of the cellar. The container can be concrete or plastic.
Laying drainage pipes - A pump with a float sensor is mounted in the storage well. The pump will turn on automatically when the container is filled and pump water into the sewer or outside the site.
- External and internal drainage can be combined. For example, after heavy, prolonged rains, the external system may not be able to cope with the intense influx of water. To avoid such cases, it is so important to study the hydrogeological map of your area.
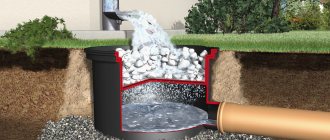
Basement waterproofing
Basements and cellars need good waterproofing. This measure will prevent flooding and groundwater from flooding the lower premises. Also, in most cases it is necessary to properly arrange ventilation. To waterproof your basement, you will need to follow simple instructions.
Wall processing is carried out using different methods:
- Penetrating waterproofing. It is a special solution that penetrates the structure of a concrete wall, closing the smallest pores. All gaps and microcapillary channels are filled with a sprayed mixture, which then crystallizes. This allows you to create a reliable barrier to water.
- Injection waterproofing. The method is very similar to penetrating, however, it differs in the material that is applied to the surface of the wall. The material used is a special gel that has good fluidity.
- Liquid glass. The basement walls are insulated from moisture using a mixture of soda, sand and sodium silicate.
- Liquid rubber. The method in which it is used is reminiscent of waterproofing using liquid glass. Its difference lies in the use of liquid rubber - a special composition, characterized by ease of application and long service life.
Such products are used not only for external, but also for internal waterproofing of the basement. Each of them provides good protection from groundwater and moisture penetrating from the surface. It is worth learning more about the design of internal basement waterproofing.
Construction of a caisson cellar
This method is justified when groundwater is close to the groundwater level. The only drawback is the high cost of the caisson. This can be a box made of stainless steel or plastic. The metal box looks like a trough with sides. There are fasteners on the sides by which the caisson can be removed or lowered.
- In the corner of the caisson, a pipe, at least half a meter long, with a shut-off valve is welded vertically.
- The inside of the box is coated with special iron paints, and the outside is additionally waterproofed with bitumen.
Cellar-caisson - The caisson is lowered into the pit by opening the tap in advance. Water will flow through the pipe into the box. When the caisson reaches the bottom, the outer wings are concreted, the water is pumped out, and the tap is closed.
- After this, the stairs, ventilation and cellar lid are installed.
Advice. When building walls and floors, decide in advance where the ventilation pipes and electrical wiring will be placed so that you don’t have to drill additional holes in the walls later.
Advantages of a semi-buried cellar with high groundwater level
Any structure created on its site has positive qualities. Advantages of the most common construction option - a semi-buried cellar:
- Most of the structure does not go deep into the soil, which is why excess water never penetrates inside.
- It is much easier to install this type of storage, in contrast to other suitable buildings.
- Improvement, as well as cost (such structures are less expensive, unlike other buildings).
- You can build it yourself using available materials that are present on the site.
- There is less chance that the structure will be deformed or settle during spring floods and autumn rains.
Important. Semi-buried cellars are currently used quite often, however, if there is a large amount of groundwater on the site, then preference should be given to a solid structure made of metal or plastic.
Groundwater is one of the problems when developing a storage area for vegetables and canning. To prevent the problem from interfering on a regular basis, you should use a number of recommendations and create reliable protection for the cellar, which will prevent large amounts of moisture from penetrating into the structure.
Construction of a monolithic concrete cellar
You can build a waterproof concrete cellar, either semi-buried or completely buried in the ground, as follows.
When the water level drops, we dig a pit for the cellar. If the depth of the pit is more than two meters, then we must install formwork to avoid unexpected ground collapses.
- We level the bottom and lay waterproofing material.
- We pour a layer of sand 10 cm high onto the waterproofing and compact it, add crushed stone on top and compact it tightly.
- We cover the formwork along its entire height with thick film or roofing felt.
Construction of a concrete cellar - At a distance of 10 cm from the first formwork we install the second. We cover the walls with waterproofing material. We lay reinforcement between the formwork and pour concrete.
- We pour concrete in a circle, gradually increasing the formwork and reinforcement.
- After a week, the formwork is dismantled, the floor surface is reinforced with mesh and filled with concrete. Additional waterproofing is carried out after the concrete gains strength.
You can build a concrete hydraulic lock in a slightly different way:
- a pit is dug, the bottom is leveled and a cushion is made of sand and crushed stone with obligatory compaction;
- formwork is made and 10 cm thick walls and floors are cast from concrete;
Concrete formwork
- after 14 days, the entire surface of the concrete is thoroughly coated with hot bitumen and waterproofing is glued in two layers: along and across;
- The formwork is erected again, reinforced and a solution 8 cm thick is poured.
Advice. Add special hydrophobic additives to the concrete solution, which will give the composition water-repellent properties.
Monolithic concrete cellar
As soon as there is no water on the site, you need to dig a hole for the cellar of the required depth. It is necessary to take into account that when deepening by more than 2 meters, formwork will have to be made to strengthen the walls of the pit. It will also be required in cases where the soil is clayey. Landslides are very common in wet soil.
Completely cast concrete structure.
Making the base
Having dug a pit to the required depth, it is necessary to level the bottom. Before building a cellar on land with a high groundwater level, you need to think about the material for its floor.
The first step is to lay a moisture-proof material (any modern one will do), after which it is covered with several layers of roofing felt or durable cellophane. At the next stage, sand and gravel filling is carried out. The first layer is 5–10 cm, the second – a little more. Gravel and sand must be compacted well. If compaction is done poorly, this will negatively affect the operation of the cellar in the future. Therefore, each stage of construction should be given due attention.
The formwork must be made to the very top of the pit. After its construction, the walls must be covered with polyethylene or roofing felt. It is best to cover with an overlap of about 10-15 cm. Ruberoid should be laid clockwise, because this approach will simplify pouring concrete.
Additional internal formwork must be installed next to the walls that support the soil. It must be lined with waterproofing materials from the inside. There is no need to immediately make high internal formwork, because with a low height it will be more convenient to pour the mortar and lay the reinforcing material.
We concrete the walls
At the next stage, the walls of the pit are concreted: the opening between the formwork and the wall is filled with pre-prepared concrete mortar. The proportions of such a solution are quite standard: cement and sand in a ratio of 1:3. To increase the strength of concrete, a reinforcement network must be laid inside the formwork. Reinforcement with a diameter of 10-12 mm is enough. If the reinforcing mesh is not used, this can result in very disastrous consequences: after a few years, under pressure, the cement will begin to collapse, which in the future can lead to flooding of the cellar or destruction of the walls.
Filling should be done in a circle and layer by layer. With this approach, the concrete will better press the roofing material sheets, thereby increasing the waterproofing of the walls to a high level.
As soon as the first layer has set, it will be possible to build up the formwork, lay down new elements of the reinforcing mesh and continue concreting. The formwork can be dismantled a week after completion of the work.
Fill the bottom
At the final stage, the bottom of the future cellar is concreted. The base is also reinforced with iron mesh. Of course, this action does not cause nearly as many difficulties as installing formwork. After the concrete has dried and acquired a working appearance, it is recommended to additionally coat the bottom with a special waterproofing mastic, which can be purchased at any hardware store.
If for some reason it was not possible to make a drainage system for the site in advance, then you should take a closer look at the following method that will help drain water from the cellar: a so-called drainage well is dug a few meters from the pit. Its depth should slightly exceed the depth of the cellar. Both pits must be connected with a drainage pipe. Then a pump is installed, which must be turned on as needed. This simple solution will allow you to keep the cellar, located in the ground with a high groundwater level, dry and tidy throughout its entire operation.
Semi-buried cellar
If the groundwater level is very high, and there is little money to build a cellar with your own hands, then it is better to build a semi-buried cellar.
- The top fertile soil is removed, then a hole up to a meter deep is dug.
- The bottom is leveling out. Sand is poured 10 cm thick and compacted well, after which a 15 cm layer of crushed stone is laid and also compacted.
- Reinforcement is laid on the crushed stone and formwork is built.
Layout: semi-buried cellar - Concrete is poured in a layer of 8 cm.
- Waterproofing is laid on the floor surface and a screed is made.
- The walls are built of brick. Wall height 2 m.
- The roof is made monolithic.
- The walls are sheathed on the outside with extruded polystyrene.
- Additionally, the entire structure is waterproofed with rolled bitumen materials.
- The cellar is filled with earth, leaving only the entrance open. The land can be planted with grass or ornamental plants.
Semi-buried cellar in a summer cottage
Bulk cellar
It is not so difficult to build a bulk cellar with your own hands if the groundwater level is high. It is better to choose an elevated location, as far as possible from the nearest body of water. The entrance is best oriented to the north.
How to build a bulk cellar with your own hands if the groundwater is close to the surface:
- Construction should begin by clearing the site and removing the top layer of soil. It is advisable to deepen the base of the cellar to a depth not exceeding 50 cm.
- Level the bottom of the basement, lay a mixture of sand and crushed stone, compact it and fill it with bitumen. This will give the necessary waterproofness to the floor. You can use other waterproofing materials.
- Build walls from bricks, blocks or wood. The inside and outside of the walls are also covered with bitumen or other material to protect against moisture. Arrange an entrance opening.
- Mount the basement roof from boards or timber 40-50 mm thick, treated with special compounds to prevent rotting. Additionally cover with a layer of bitumen.
- The outside of the entire structure is treated with bitumen and covered with roofing felt in 2 layers.
- Install thermal insulation from clay or mineral wool.
- Cover the entire building with a layer of earth - 70-120 cm, with a sufficient clay content, and give the structure the shape of a hill.
- Carry out final work on installing doors and interior decoration.
DIY floor slab
You can buy a factory-made floor slab, or you can make it yourself. The slab will rest on the walls of the cellar.
We produce wooden formwork. We place the I-beam and lay asbestos-cement sheets. We pour a layer of crushed stone on top of them and support a reinforcing mesh of wire with a diameter of 10 mm on the I-beam and walls. We tie the wire so that we get cells measuring 10 x 10 cm. Fill it with concrete and, after complete hardening, waterproof it.
Creating a concrete floor over the cellar
Waterproofing and thermal insulation of walls in the cellar
After the ceiling was done, we moved on to waterproofing - the outer walls were covered with 2 layers of mastic (bitumen).
To prevent the cellar from freezing, peat was used as insulation, prudently dried in the summer (in the beginning they wanted to resort to slag from the bakery for insulation, but we were dissuaded from this decision by our neighbors, whose walls did not save from freezing, and they took “our own” nearby material, fortunately finding peat in a swamp is not difficult). A layer of peat was laid at sixty centimeters, which is quite enough for central Russia.
To prevent the peat poured for insulation from spilling out, it was necessary to build a support wall. It was made from old slate sheets, which were assembled on a welded frame from old metal corners lying around idle in the yard.
Ventilation device
High-quality ventilation will prevent the formation of mold, rotting of root crops and ensure optimal humidity in the cellar. Otherwise, only souvenir photos will be left of the harvest.
You will need two plastic or galvanized pipes with a diameter of 15 cm. One pipe will provide air flow, and the second will provide exhaust. Exhaust occurs naturally when there is a difference in air temperature between the cellar and the street. The pipes are located in different corners of the cellar.
Cellar ventilation
The exhaust pipe is installed under the ceiling of the cellar, the upper end is located 50 cm above the roof level. The supply pipe is mounted 10 - 15 cm above the floor level, the upper end is located 30 cm above the ground level. Valves are installed in the pipes to regulate air flow and meshes to prevent rodents from entering the room from the street.
For large cellars, the cross-section of the pipes is calculated using the formula; it is possible that forced ventilation will even be required.
The process of creating an earthen cellar
Where to start
Although the design is considered simple, the question “how to make an earthen cellar?” still remains relevant. To do this, you don’t have to be a professional builder, since even beginners could cope with this task. You should start by creating a drawing/sketch, and it should be done taking into account the scale, and also indicate on it all the dimensions of the cellar and its elements.
Here it is important to remember the following important factors:
- The internal dimensions of the building should be indicated.
- There should be a distance between the pit and the cellars - at least 50 cm more. In the future, this gap can be filled with clay, which must be mixed with straw - this will create a side lock that will prevent the walls from getting wet and liquid from seeping from the soil into the basement.
- Typically, they try to make the entrance to an earthen basement from the north side in order to minimize the loss of cooled air when opening the door in the summer.
- Be sure to provide for the provision of electricity to the basement, and in the construction plan, draw the electrical wiring and take care of the input and connection.
- For such a structure, ventilation is also required. It should also be developed during design.
- The thickness of the embankment on the outside should also be calculated at the planning stage. But the thickness should be selected taking into account the climate in the region, precipitation levels and wind strength.
You should know that it is best to carry out such construction in the summer, when the groundwater level is at a minimum and nothing will interfere with the work.
Creating a Foundation
So, when everything has been verified and calculated, and the location has been chosen, you can begin the construction itself. You should start by digging a base - a hole/pit, which will act as a storage area for fruits and vegetables.
For a cellar, you can dig a hole without using special equipment, since it is usually made in a small size - approximately 200*200*300 cm. You can reduce the height, this is especially true when the groundwater lies close to the surface (150 cm).
It is also important to remember that the pit itself needs to be 50 cm larger than the construction site. When digging by hand, you can maintain the density and topography of the soil and thanks to this the walls will not crumble. The shape, namely an inverted trapezoid, will also help protect the basement surfaces from collapse: the distance between the opposing walls should be less at the bottom than at the top.
Now let's think about how to make a floor in an earthen cellar. It can be different:
- An earthen floor in a cellar is considered the most economically advantageous, since no materials are needed for its construction. But such a floor is appropriate only when the soil is dense and dry and lends itself well to compaction (clay soil is an excellent option). And yet, the owner must assess the risks and understand that during spring floods there is a high probability of groundwater rising and the floor getting wet. In this case, you will have to pump out the water and make shelving on a hill. But the advantage of a rammed floor is that it will perfectly maintain temperature and humidity levels, and the vegetables inside the cellar will be fresh and beautiful.
are the best option. The fact is that clay is an ecological material, and unlike earth, it will not allow mold and mildew to develop, and will not allow moisture to pass through even during floods. But making such floors is difficult, since the process is long and labor-intensive, and good quality clay is not easy to find.
Clay floors- Concrete screed on this list is the most popular option for any type of basement. The screed is simple to make: you need to fill the bottom of the cellar with a cushion of gravel and sand, and then spread polyethylene in several layers or roll out strips of roofing felt. Such insulation can be poured on top with concrete, which must be more than 40 mm thick, otherwise the screed may spread. The simplest option is to fill it with beacons, which can be metal or wooden slats. Afterwards, the concrete is leveled using a rule, and the next day the beacons are removed and the voids are sealed with a concrete mixture. Such a floor will perfectly protect the earthen cellar from moisture - groundwater will not penetrate inside, and there will also be no capillary seepage of water.
- A brick floor in a cellar, or a floor made of natural stone, looks beautiful, but such a pleasure will cost you dearly. In order to implement the idea, lay stone material on the floor of the cellar, and then fill it with liquid clay or use a stiff brush to hammer cement mortar into the cracks. Such floors are no worse in efficiency than concrete floors.
- Wood is very rarely used to create a floor in an earthen cellar, since this material is susceptible to rotting. But in a dry basement you can also use it in the form of boards. First, make a sand and gravel cushion, then lay waterproofing, lay beams/joists and boards on top. All wooden elements should be treated with an antiseptic in advance.
Advice! If in this case the earthen floors get wet, then make all the pallets and racks on a hill.
For example, you can assemble wooden gratings and put boxes and drawers on them.
Walls for an earthen cellar
When everything is decided with the foundation, you can begin to build the walls. The ideal option is to leave earthen walls, but this method is only available to those who have dense and dry soil on the site, and even in this case they will have to deal with waterproofing and protection from crumbling.
It will be much cheaper to cover the walls with boards, wicker or slabs. First you need to drive wooden piles - these are logs that should be at least 0.5 m deep in the ground.
Please note that when constructing concrete or stone floors, the supports should be poured before the foundation is poured.
After this, you can begin to nail cross beams around the perimeter of the base, which will hold the supports and serve as an excellent base for the sheathing. It is best to use boards that have previously been knocked down into small shields for this purpose. With this design, it will be possible to dismantle the sheathing in the summer to check the condition of the walls, dry the wood and treat it with an antiseptic.
Often, to create a permanent earthen cellar at the dacha with your own hands, it is sheathed not just with wood, but in addition, insulation is used. Wall insulation can be made with any slab materials, for example, stone wool or extruded polystyrene foam.
Often such basements are lined with bricks during external finishing. In this case, laying half a brick will be sufficient, but then both surfaces of the walls will have to be insulated with bitumen mastic or roofing felt.
Important! Gas silicate brick, foam concrete, cinder block and other porous materials are not suitable for cladding, since after some time water will seep through them, which can cause the walls to be destroyed.
Roof of an earthen cellar
Most of the heat loss occurs through the roof and ceiling of the cellar, and for this reason it is important to pay as much attention as possible to this element of the building. The ceiling needs to be strengthened so that it does not collapse. In bulk basements, wood poles or woven vines are often used for this, but more durable materials, such as boards or stone, can be used.
But you will have to tinker with the roof, and first insulate it. The structure above the earthen basement should be made gable. Thanks to this, rainwater will drain quickly and will not penetrate into the cellar. Insulation and waterproofing should be laid on the base itself under the roof. By the way, roofing felt is perfect for insulation, and the roof can be insulated with any material that is not afraid of moisture (foam plastic, mineral/stone wool, glass wool, etc.).
Moisture-resistant plywood, metal sheet or OSB should be placed on the roof. The angles on the slopes should be 45 degrees. For the best protection of the basement from freezing, it is recommended to pour a layer of peat (about 25 cm) onto its roof, and then cover it with another insulation (roofing felt or film) and cover 12 cm of fertile soil.
Helpful advice! If you sow low-growing grass like lawn grass or moss into the ground, you can provide the roof with additional protection from cold and getting wet. In addition, greenery will make the roof spectacular and give it an unusual, sophisticated antique look.
Ventilation
As with all storage facilities, even an earthen cellar must be equipped with a ventilation system. If this is not done, then there will be stale air inside, and it will be impossible to store vegetables there, since it is in such conditions that fungus and mold feel best. The rules for creating ventilation in an earthen cellar at the dacha are as follows:
- Use metal or plastic pipes with a diameter greater than 10 cm. You can make ventilation ducts from wood.
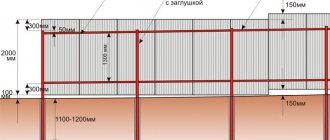
- The supply pipe should be located slightly above the floor level, and exit from the outside no lower than 0.5 m above the ground.
- The hood should be located right under the ceiling, and the outer edge should be 150 cm from the ground level.
- Both pipes must be covered with a protective cap, which will prevent atmospheric moisture from entering inside.
It is important that in a small cellar you can install only one supply and exhaust pipe.
Finishing the basement from the inside
In the very earthen basement at the dacha, everything can be arranged the way its owner wants, since everyone has different needs: someone stores potatoes in it, while others want storage for wine. In this case, the storage is usually divided into two zones - on the right are bins, where there are wooden boxes/compartments for apples and other things, and on the left are racks for canning and wine. The shelves should be 0.5 m apart, but the size may vary depending on the height of the cans.
The material of the shelves can be different - metal, wood. In the first case, the racks should be protected from corrosion by regular painting, and in the second, the wood should be treated with antiseptic agents or coated with oil enamel in a timely manner.
An indispensable attribute is a ladder. It must be safe and durable, and it must also be processed in a timely manner so that there is no corrosion or rotting.
The final stage is supplying electricity. Do not forget about the microclimate and safety standards - in such rooms only lamps with a low voltage level should be installed!
Additional waterproofing
For internal waterproofing of cellar wall and floor surfaces, special penetrating compounds are used; they are best applied to slightly damp concrete. Penetrating waterproofing contains substances that react chemically with water and multiply on the concrete base like crystals. These “growths” seal capillaries, pores and microscopic damage, protecting the concrete from water half a meter deep. They are not afraid of any mechanical influences. Chips and scratches do not in any way affect the tightness of surfaces treated with such penetrating compounds.
Cellar walls after applying waterproofing liquid rubber
Basement structures
The foundation for a house with a basement is usually strip or slab. The latter will be much more expensive. This is due to the high consumption of reinforced concrete. To choose the type of foundation, it is worth learning more about the condition of the soil. The recommendations of experienced geologists should be taken into account. Experts can assess the condition of the site based on the results of soil tests.
The design features of the foundations are largely determined by the material from which they are constructed. The most common types are:
- Concrete blocks. It will not be easy to build such a foundation without the help of special equipment. Lifting them is quite difficult, so you will have to use several people and a winch to work. However, the speed of construction of such a foundation is quite high. The blocks are stacked on top of each other and secured with mortar. To increase the stability of the foundation, they must be tied with wire. The main disadvantage of such a foundation is the need for increased waterproofing. This is especially important to think about when building a deep basement.
- Monolithic reinforced concrete. Its walls are made of concrete, which is reinforced with metal rods. The main advantage of monolithic reinforced concrete is its increased reliability. It can be developed in areas with different types of soil. Monolithic strip foundations are also made of reinforced concrete. The solution is poured into the prepared formwork with installed rods. The walls of the structure should have a width 0.3 m greater than the width of the walls of the house.
- Brick foundation. When building such foundations, you need to buy special bricks that do not allow water to pass through. The upper part of the foundation is made of concrete.
- Foam concrete. This option is most similar to a concrete block foundation. However, its main difference is the high speed of construction. To build it, you do not need to use special equipment. Also, such a foundation is the most economical type of structure. You can build it yourself.
These types of materials are most often chosen. They are reliable and durable. Such basement foundations can serve for decades without requiring special operating conditions. When arranging such premises, you should not use boards and beams as the main elements. Wood deteriorates very quickly when exposed to dampness.
Lighting
Electrical wiring in the cellar is carried out externally. The wires must be placed in cable channels. Experts recommend using double-insulated copper wiring for the cellar. The switch is placed in a dry place, usually at the entrance. Sockets in the cellar cannot be installed categorically. The lamp must have a moisture-proof lamp with a degree of protection against moisture of at least IP44. If the basement is damp, then the lighting should be safe. Install a 220/12 Volt step-down transformer and a 10 mA RCD. If the ceiling is low, it is more advisable to place the lampshade on the wall of the cellar.