Due to their cheapness and practicality, fences made of corrugated sheets are gaining popularity among the population. They are, of course, not a masterpiece of architecture, but they cope with their task perfectly.
The specificity of fences of this type lies in their low mass and at the same time large windage. Therefore, if the material for the support pillars is incorrectly selected or installed incorrectly, the structure may collapse, the corrugated sheets may be bent in an arc, or some other trouble may occur.
The article will discuss which fence posts are best to choose, the rules for their installation, the advantages and disadvantages of different types of posts will be discussed.
Types of support posts for a fence with photos
When installing fences made of corrugated sheets, the following types of supports are used:
- metal fence posts made from round or rectangular pipes;
- concrete or brick structures;
- wooden supports;
- asbestos-cement pipes.
In terms of price-quality ratio, it is best to choose a metal structure; wooden poles are installed only in conditions of austerity - they do not last long even after treatment with an antiseptic and paint.
If strong winds often blow in the area where you plan to install the fence, then a wise decision would be to make massive concrete or brick supports. Asbestos-cement pipes are not often used due to their low mechanical strength.
How to place pillars correctly
The installation of pillars has a general algorithm, the only difference is in the methods of fixing them in the ground. There are three options: direct driving, partial or full concreting with the installation of a strip foundation.
The choice of installation type depends on the soil characteristics of the site, its topography and groundwater level. In addition, the choice of installation method depends on the windage of the fence. It is clear that if you plan to use a mesh as a fence, there is no need to install powerful supports, such as reinforced concrete pillars.
If you choose too weak a method of fixing the supports in the ground, the wind may simply tear down your fence
Returning to the quality of the soil, it should be noted that simply driving in pillars is not suitable for clayey, heaving soil, which will simply push them out after the first winter, and the wind will finish what it started. In addition, driving is not suitable for installing heavy metal sheets. Thus, it turns out that this type of fixation is only suitable for hard soils, low and relatively light fences, permeable to the wind.
All concreting options are more reliable and durable. Such fences will last for at least half a century without causing you any trouble. In addition, concreting supports is suitable for all types of soil, as well as any type of canvas in terms of weight and windage.
If you are planning to install a fence, study the soil characteristics and decide for yourself how long you want to forget about problems with the fence
Advice! Before installing a fence, have tea with your neighbors. It is the fence that most often causes conflict situations. Discuss with them the installation location and the material of the canvas.
Metal supports
Depending on the width of the span and the height of the fence, the diameter of the steel pipes acting as a support is selected. Accordingly, their diameter should be larger, the wider the span or the higher the structure.
The following types of rolled metal can serve as support pillars:
- round steel pipes;
- profile rectangular or square pipe;
- metal corner;
- I-beams and channels.
The most preferred are pipes and angles with a metal thickness of at least 3 mm. The corners are not welded together provided that the metal thickness is at least 6 mm. The supports are dug into the ground based on their height.
A third of the height on the surface must be in the ground, for example, with a fence height of 1.5 meters, at least half a meter of height must be concreted into the ground.
Installation of metal poles
Depending on the design load, the supports are secured in various ways: by butting, driving into the ground, full or partial concreting. Combined installation can be used, for example, driving with butting or driving with partial concreting.
ways to install metal fence posts
Butting
A simple and reliable way to install metal supports that do not experience heavy loads. The fillings are made of chain-link mesh, picket fence and other breathable lightweight materials.
For butting the following are used:
- gravel;
- crushed stone;
- broken bricks or other building materials.
The work is carried out in the following sequence:
- In the places where the supports are installed, dig or drill holes 70-120 cm deep and 15-20 cm larger than the cross-section of the supports. When drilling, first turn the hand drill in one direction, then in the opposite direction, and remove a portion of the soil.
- Pour a layer of gravel and compact it with a crowbar.
- Install the stand and fix it strictly vertically.
- Fill the hole layer by layer with a mixture of gravel and sand, compacting each layer well and spilling with water.
- The installation site can be sprinkled with earth on top.
To ensure reliable adhesion of the particles to each other, it is recommended to impregnate the layers with a clay solution. It plays the role of a binder and gives the base solidity.
If there is a large amount of work to be done, you can rent a drill with a gasoline engine. With its help, well preparation will take very little time.
Hammering
This is an easy way to install metal fence posts without doing a lot of digging. But no less physical effort will be required. You will need a sledgehammer, with which the pipe is manually driven into the ground, a jackhammer or a special device - a “headstock”. It is attached to the top of a pole and delivers cyclic blows using a falling weight. It is recommended to weld a reinforcing pad to the end of the pipe.
The driving technology is as follows:
- Before installation, dig pits 30 cm deep at the points marked for the posts.
- Place the pole vertically, applying several gentle blows.
- Drive the post to the required depth, constantly monitoring the position.
- Fill the pit with crushed stone and sand and compact it.
The advantages of driving are economical consumption of materials, readiness for installing sections immediately after installation of the supports.
Concreting
This is a more complex, but reliable method for any soil and any load without restrictions. For concreting, M150-M200 mortar is used. One support will require no more than 30-40 liters of concrete.
Full concreting
This method is used when installing heavy brick or concrete pillars. The pit is filled with mortar to its entire depth, which ensures high load-bearing capacity of the support.
If the site has loose or dry sandy soil, it is recommended to use waterproofing made of roofing felt or dense film. The waterproof material is rolled into a tube and placed inside the well. This measure will help avoid rapid dehydration of concrete and a decrease in its strength.
The technology for completely concreting a fence support includes:
- Drilling a well or digging a pit to a depth of 0.7-1.2 m.
- Adding drainage materials - crushed stone, sand, gravel - with a tamper.
- Installation of formwork in the above-ground part. This is necessary to strengthen the weakest point - the area where the pillar emerges from the ground. For a tighter grip in this place, scraps of reinforcement or steel profile are welded to the post.
- Installing the pole and securing it in a vertical position. If there is no assistant, the pipe is fixed in pieces of brick, supports or other devices.
- Filling the pit with concrete. To release air bubbles, the mixture is compacted with a crowbar or reinforcement.
During the process of filling the well, the position of the support can be adjusted. To continue work, you need to wait until the mixture has completely hardened. Depending on weather conditions, this period is 5-10 days.
Partial concreting with a collar device
The method is similar to the previous one, but requires less cement consumption. There are 2 options for installing a post with partial concreting:
- The first method is used on non-heaving soils - sandy loam, sand. The well is drilled to 1/2-1/3 of the required immersion depth of the support. The post is mounted by hammering. The pit is filled with concrete, forming a “collar”. For reinforcement, cross members made of steel rods and profiles are welded into the concreted part.
- The second method is more labor-intensive, but allows you to avoid frost heaving on clay soils. The well is dug below the freezing point and filled with concrete to a depth of 0.7 m. Crushed stone is poured from above to ground level. It is recommended to weld reinforcement at the bottom of the column to ensure strong adhesion of the concrete to the support.
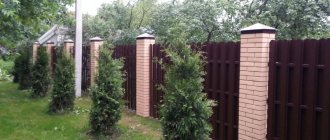
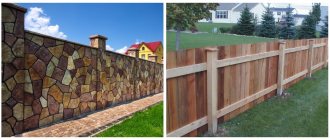
Brick pillars
This design, despite its high cost and labor intensity, looks very solid, durable and adds massiveness to the fence. The following types of bricks are used to build supports:
- ceramic hollow and solid;
- silicate;
- facing.
To give the support rigidity, a profile pipe of square or rectangular cross-section is placed inside it, concreted into the ground.
A square pipe would be more convenient. Cross sections and corrugated sheets are attached to it, the length of the pipe is selected according to the cut of the brick. The entire support structure is made on a columnar foundation, going deep to a level below the depth of soil freezing.
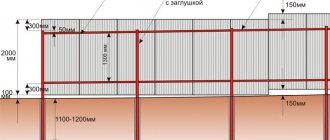
Calculation of the number of pillars and the distance between them
The distance between pillars must be at least 2.5 m
The number of fence supports is calculated taking into account not so much the wind load as the width of the corrugated sheet. On average, its total width is 120 cm, and its working width is 115 cm. However, there are brands for which these values are 115 and 110 cm.
When installing on a fence, the overlap when laying corrugated sheets is minimal - 5 cm. If the run consists of 2 sheets, its length will be 2.35 m, if 3 - then 3.5 m. This value from the point of view of windage is very large, therefore, for example, when When using brick pillars, the length of the run is 2.35 m.
If the posts are made of metal pipes, the length of the run is often 3 m. Installation along the axes of the posts is optimal, but only if the fence logs are laid overlapping on the posts. In addition, it is important that a pipe with a cross-section of 40*20 mm and a wall thickness of at least 1.5 mm is used for the crossbars. If the profile is smaller in cross-section, it is better to reduce the distance between the pillars.
If the logs on iron pillars are butt welded, the calculations are performed as for brick pillars.
You also need to take into account the height of the fence. The above calculations are relevant for a fence height of 2 m, that is, horizontal laying of sheets. If this value is higher and the sheets are mounted vertically, the distance between the posts will have to be reduced.
Pole installation depth
The depth of posts for a fence made of corrugated sheets depends mainly on the nature of the soil. Corrugated sheeting is lightweight, such fencing does not place a large load on the posts. Windage is much more important, but it has a greater influence on the distance between the pillars and the nature of the supports.
- When installed in dense clay soil by driving or backfilling, the immersion depth rarely exceeds 100 cm. A recess of 80 cm is considered optimal with a run length of 2.5 m and a height of 2 m.
- Additive soil has a much lower density. When calculating, soil subsidence must be taken into account. On average, when installing a lightweight fence, the support is driven in 1/3 of its total height. Heavy structures will require support on the horizontal, that is, the installation of a reinforced concrete foundation.
- Heaving or too wet soils suggest only 2 installation options. The depth of the posts for a fence made of light corrugated sheets depends on the depth of groundwater. On average, the value is 50-60 cm. However, due to the mobility of the soil, it is impossible to simply bury the post. A hole is dug for support. They put a pipe in it and concrete it.
You can use screw piles: they are screwed into the ground below the freezing horizon.
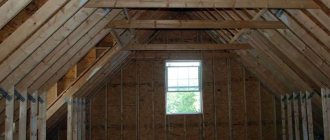
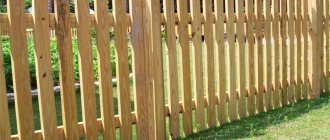
Wooden pillars
To ensure the reliability of the structure, you will need a beam with a cross-section of at least 10x10 cm, or a rounded beam with a diameter of 12 cm or more. The supports are treated with fire protection and concreted into the ground.
The part located in the ground can be additionally treated with tar or bitumen mastic. Coniferous species - pine, spruce, or larch - are suitable as materials for pillars, since they are less susceptible to rotting.
The service life of the supports can be significantly extended by driving the lower part of them into pre-concrete steel pipes and protecting the wood from rotting.
The corrugated sheeting is attached to the supports using self-tapping screws. Thus, the structure looks solid from the outside.
Welding of metal structuresFeatures of cold rolled sheets - production technology, features, dimensions, properties and markings
Technical features of hot-rolled sheet - classification, manufacturing method, application options and processing features
Manufacturing technology of fence blocks
There are two ways to make individual blocks. They were already mentioned at the beginning of the article; these are cast concrete blocks and pressed ones. Both types are fairly easy to make at home. You just need to make a shape, but difficulties may arise if you want to decorate the plate with patterns.
Concrete
Fence blocks are made by vibration casting by molding concrete mixtures. To make such elements with your own hands you will need: sand, gravel, expanded clay, cement, plasticizer, any coloring pigment, marble or quartz chips.
Plasticizer for concrete
To make a reliable and durable concrete block, you need not only high-quality raw materials, but also special equipment and devices:
- a vibrating table with a drive to create maximum structural density and remove voids from the solution;
- special forms;
- a concrete mixer that ensures thorough mixing of the components;
- auxiliary materials: tampers, trowels and water tanks.
The usual square shape is not suitable for making blocks. She must have:
- framework;
- steel inner insert;
- four fiberglass plates;
- external bolts;
- texture elements with grooves.
Sequence of work:
- the assembled form is laid out on a vibrating table;
- We make concrete for pouring fence posts in the following proportions: 2 parts sand, 1 part cement grade 400–500 and the required amount of plasticizer;
- to give a decorative effect, you can add 2 parts of granite screenings, small crushed stone, etc.;
- for high-quality preparation of the mixture you need a concrete mixer;
- the volume of the mold is filled and air bubbles are eliminated;
- the filled forms are placed on the table for drying;
- After three days, the form is removed, and the finished concrete block is left to dry completely.
Important! The modules must dry well. Wet structures and elements with voids are considered unreliable. Such blocks cannot be used to build a fence.
Pressed
The process has significant differences. The most important thing is that one form is enough to work.
- as in the case of concrete mortar, prepare the mixture in the same proportions: 2 parts sand, 1 part cement grade 400–500;
- add 2.5-3 liters of water;
- mix the mixture well using a concrete mixer;
- gradually filling the volume of the mold, make tamping;
- remove the form;
- leave the blocks to dry.
Recommendations for block production
- the solution must be compacted very well;
- stands for forms when concreting must be sprinkled with sand or covered with polyethylene;
- After removal from the mold, the blocks are dried on each side for 2–3 days.
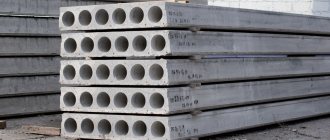
Asbestos-cement supports
An asbestos cement pipe is concreted into the ground according to the same rules as a metal one. For the reliability of the structure, after installation is completed, it is recommended to fill the cavity in the asbestos-cement pipe with concrete; this will be more than enough to make reliable fence posts from corrugated board.
It is recommended to anchor the part located in the ground - drill holes in the pipe and insert strips of reinforcement into them. Such a simple structure, after filling the hole with concrete, will work as an anchor.
The crossbars are attached to the post using a bolted connection. Holes for bolts are drilled in the pipe for these purposes. With a span width of less than 3 meters, a 40x40 mm profile can be used as the material for the crossbars. The corrugated sheet is attached to the profile using self-tapping screws.
Foundation structure
The essence of the work is that pillars made of profile pipes are installed in special recesses dug at the same distance from each other. Then the pits are filled with cement mortar or concrete. To avoid swelling of the soil during frost, the hole at the bottom is made wider.
In order to complete this work, you need to prepare the necessary tools and materials:
- shovel;
- leg-split;
- roulette, level;
- gravel and sand;
- concrete solution;
- wooden pegs;
- pillars (most often from profile pipes, but wooden or asbestos-cement can be used).
At the first stage, it is necessary to carry out correct calculations, calculate the number of supports, their dimensions, and cross-sectional diameter. It is necessary to analyze the load that the support will bear. The volume of mortar needed for construction, and even the grade of concrete, will depend on this.
Installation of asbestos cement fence posts
Asbestos-cement pillars for the type of fence you have chosen also have their own installation subtleties:
- This support is only suitable for lightweight structures. If installed correctly, it can stand for decades without shifting or losing its appearance.
- The depth of such a support at its height of 200 cm is 80 cm.
- The dug hole is filled with concrete, the walls are reinforced with a special tube made of roofing felt so that it protrudes by 15 cm. Then wooden formwork is made around its upper part, the hole is not filled to the brim with concrete and an iron pin slightly shorter than the support itself is inserted until the solution completely hardens. .
- After the solution has hardened, put a pole on the pin and fill the remaining holes to the edges of the formwork with concrete.
- For greater durability, the solution is also poured into the pillar itself to the very edge.
- If the fence is very light or the pillars have a decorative function, you can simply bury the hollow supports into the soil, strengthen them and pour concrete inside.
Important! If the fence posts are installed incorrectly, then soon the entire structure will become unusable. If it is necessary to correct the error after the solution has hardened, you will have to completely dismantle the support.