Strengthening the truss structure of complex roofs is carried out using truss systems with strut or thrust units; most often, this work is carried out during roof installation. Sprengel is a support beam with a stand that serves as the basis for the rafters. Installation of the truss structure is carried out on the mauerlat or joint connecting two external walls. Truss trusses are designed to strengthen rafters located at a distance from the supporting corners. That is, complicated pitched roofs require a special rafter design that ensures increased strength. Wooden or metal trusses can serve as material for truss systems.
| For an affordable price, we offer you: High service Excellent quality Reliable guarantees | ||
| We are proud of our work ! | ||
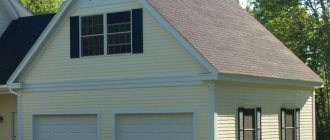
What is a hip roof?
This roofing option has four slopes. Its two long inclined surfaces have a trapezoidal shape, and the other two, smaller ones, have the shape of a triangle - they are called hips. They are located along the gables of the building and connect the ridge to the cornice. Trapezoidal planes have a large area and a slope, also located from the upper horizontal edge to the cornice.
The hip roof has several different designs:
- Traditional with two trapezoidal slopes and two hips, it is called a “Dutch” roof.
- Tent - has triangular-shaped slopes of the same size. Ideal for square-shaped buildings.
- Half-hip - the hips cover only the upper part of the end no more than to the middle. Suitable for the construction of houses with an attic; it is called “Scandinavian” roofing.
- Semi-hip - the hips are not triangular in shape, but are in the shape of small trapezoids. Such a roof provides a large attic space; it is also called a “Danish” roof.
Like any other type, the hip roof type has a frame and rafter system - the entire structure rests on them.
How to calculate the area of a hipped roof?
A hip roof type can be schematically represented by one rectangle, which is the base, two trapezoids - the edges of the structure, and two isosceles triangles.
Based on this representation of the design, calculations can be carried out easily and without errors.
For any roof, during the design process, the angle of inclination is first determined.
This parameter is selected based on a number of factors and is the value from which all other calculations are made.
Algorithm for calculating the area of a structure:
- The first formula that will be needed in the calculations is h = b / 2 * tanA . In this formula b is the width of the building, A is the angle of inclination of the slope, h is the height of the ridge. Using the table of tangents, the value of this angle is found out and the calculation is carried out.
- Using the cosine value of the same slope angle, the length of the corner rafters is determined . The formula for calculations is c = b / 2 * cosA , the designations are similar.
- In order to find out the length of the hip rafters , you need to calculate the square root from the following formula: d = h2 + b2 / 2 , the designations are similar.
- The area of the entire roof is found by adding up all conventionally divided structural elements, namely: trapezoid, triangles and rectangle. The formula for calculations is as follows: S = 2 * (c * b) + 2 (a - b) * c = 2 * c * (b + a - b) = 2 * c * a .
After carrying out the calculations, it is recommended to check all values. This will help avoid inaccuracies and errors in construction.
Area calculation
Construction of the rafter system
The rafter system is the main component of the entire roof structure.
Unlike a gable roof, the structure of the supporting structure of a hip roof is more complex.
Regardless of whether the building is rectangular or square, the shape of the slopes will not change.
Considering the structure of the hip roof rafter system, we can determine that it consists of several elements:
- Mauerlat is the base for the rafters, the connecting link between the load-bearing walls and the rafter system.
- Oblique or diagonal supports - have the greatest length and carry the greatest load.
- Central rafters - serve to connect the ridge with the mauerlat on the sides of the slopes, converge at the corners of the ridge on 3 sides.
- Intermediate rafters - connect the ridge and cornice.
- Struts - create not only rigidity, but also provide confrontation to wind loads from the gables of the building, located at different angles to the rafters.
- Narozhniki are the shortest rafters.
- Sprengels or truss trusses - enhance the load-bearing capacity of the roof structure. They are a beam made of timber located at the corner of connecting external walls.
- Racks - give the legs of the supports additional stability; they are installed at the junction of two rafters and a ridge beam.
- Corner rafter (rib) - located at a smaller angle than the intermediate elements of the system.
- Short rafter legs - fixed to a corner support board.
- Horse.
- Tightening - performs the function of a floor beam.
- Wind beam - attached with a slope on the windy side of the roof.
- Purlins - the distance between the connection of supports to the ridge.
Characteristic features of hip roofs
Hip roofs differ from their gable counterparts in that there are no vertical gable walls in their design. The place of the pediments was taken by triangular slopes located at the ends, significantly reducing the real and visual volume of the roof.
The economic effect of reducing volume is a controversial issue. When cutting large-sheet material into hip slopes, costs, on the contrary, increase. For example, laying corrugated sheets or installing metal tiles will force you to fork out for the purchase of a coating one and a half times more than for the installation of a standard pitched structure.
Purchasing piece material will allow you to reduce the construction budget, because you won’t have to spend money on cladding the ends of the roof.
By analogy with any building structure, a hip roof can be divided into simple geometric shapes. In the simplest version, without mates and valleys, it has two pairs of symmetrical slopes: two triangles and two trapezoids. On this basis, the hip roof received the parallel name “hippable”.
Viewed from the front, its cut resembles an ordinary triangular gable roof. In profile, the structure has a trapezoidal configuration, which can also be divided into a rectangle with two mirror-image triangles on the sides.
The shape of the trapezoid depends on the architectural preferences of the owner. It is determined by the ratio of the length of the eaves overhang to the length of the ridge. The part of the structure, limited by a rectangle, is constructed in accordance with hanging or layered roofing technology standards.
The hips that replaced the gables are installed at a certain angle to the horizon, because they must adjoin the inclined sides of the trapezoid. It is in their design that the main problem with the hip rafter system lies, because it will not be possible to install it using the usual pitched method. After all, the ridge run does not completely cover the slope. Therefore, the rafter legs of the hips and the triangular parts of the large slopes associated with them literally have nothing to rest their upper heels on.
The support for them will be special slanted rafter legs connecting the ridge girder with the corners of the structure. If you look at the hip rafter structure from above, the slanted rafters will look like diagonals.
The installation direction was the reason for receiving the second technological name - “diagonal”. Naturally, rafter legs of different lengths will rest on the diagonals, because They are installed perpendicular to the roof overhangs. They have their own name - narozhniki.
Summarizing the information, we get that the construction of a rafter frame for a hip roof will involve:
- Ordinary rafter legs resting with the lower part on the mauerlat or on the floor beams. Depending on the type of support, they can be hanging or layered.
- Diagonal rafters connecting the corners of the roof and the edges of the ridge purlin. Note that they are used not only in the construction of convex corners of hip roofs, but also in the construction of concave corners of valleys.
- Rags , forming the planes of the hips and parts of large slopes adjacent to the sloped rafters.
The installation of hanging and layered rafter legs is carried out according to the rules according to which the rafter system of a gable roof is constructed. We will deal with their diagonal brothers and the rafter half-legs.
Diagonal rafter legs
Taking into account the diagonal arrangement, it is easy to guess that the length of the slopes is longer than the length of ordinary rafter legs. In addition, they serve as supports for narodniks. As a result, sloped rafters are loaded one and a half times more than ordinary analogues. Therefore, it is customary to make them paired from two boards with a cross-section equal to the same size of material for ordinary rafter legs.
Pairing sloping rafters simultaneously solves three technical problems:
- Allows you to increase the load without risk due to the double cross-section of the load-bearing element.
- Provides the opportunity to obtain a diagonal structural element of any length without areas weakened by extension.
- Eliminates the need for targeted purchase of timber for sloped rafters.
Due to their length, diagonal rafters require additional supports, the number of which depends on the length of the rafter leg.
Supports for diagonal rafters
Regardless of the scale of construction, any scheme for a hip roof rafter system includes supports to strengthen the diagonal rafter legs. If the design size of the slope is more than 9 m, i.e. it covers a span of equal meters, its stability is ensured by two additional supports. For smaller spans, one support located in the upper span zone is sufficient.
The following can be used to support a diagonal rafter:
- Rack installed vertically directly on the ceiling. A piece of waterproofing is laid between it and the ceiling if the rack is to rest against a reinforced concrete slab.
- Strut . It is installed, as befits braced rafters, at an angle, the size of which can vary from 45º to 53º. The magnitude of the slope is not particularly important. It is important that the strut itself supports the rafters in the most loaded area. The lower heel of the strut is rested on the bed.
- Sprengel . It is a T-shaped short beam made of timber, turned upside down. Used in the construction of large spans that require two or more reinforcing supports. The truss is installed so that its base is perpendicular to the rafter. It is located at the bottom of a large span closer to the corner of the roof. Instead of a truss, a regular short stand can be used.
Additional supports are made, again from a double board or block, and installed at the most loaded points.
The video review will introduce you to the nuances of installing supports for a hip roof frame:
The nuances of supporting rafters
The top heel of the diagonal rafter rests on the ridge purlin in various ways. The choice of method depends on the design features of the rafter system:
- In rafter structures with one purlin along the central axis of the roof, the diagonal rafter legs rest directly on the purlin consoles.
- In rafter systems with two purlins and plank rafter legs, the diagonal rafters rest on a truss, which in turn rests on both purlins.
- In rafter frames with two purlins and rafters made of timber, in addition to the sprengel, a sprengel is used - a short piece of board that sews together ordinary rafter legs in the ridge area. The thickness of the reinforcing short is 5 cm or more.
The heel of the diagonal rafters for landing on one of the listed upper stops is trimmed in fact. Fastening is done with nails. If necessary, you can strengthen the fixation with wire twists or metal clamps.
The lower heels of the slopes can be rested against the corner of the mauerlat or a specially installed corner beam. You can simply lean on them. The diagonal rafter legs are fastened with metal brackets, nails on top of a wooden overlay, or corners.
Narozhniki and methods of their construction
Narozhniki form the hips and triangular parts of large slopes. The top of the half-leg rests on a slanted rafter, the lower heel on a mauerlat, a mortise beam or a wooden floor beam.
Installation of spigots can be carried out:
- By means of cutting . In slopes, nests are chosen so that the half-legs of adjacent slopes are not located opposite each other. It is recommended that the distance between cuts be at least 20cm. Therefore, during the installation step, the setters are allowed to move so as not to cut out the nests at one point.
- By installing cranial bars , which serve as supports for the half-legs. 50x50mm bars are built up along the lower edges on both sides of the diagonal rafter. Their presence makes it possible to avoid notches that significantly weaken the load-bearing element.
The second option is easier to work with and is preferable due to the increased rigidity of the structure. In addition, it absolutely does not oblige you to change the installation pitch of the half-rafters: they can be located opposite each other. The frames are attached to the mauerlat or beams using the same method as was used to install ordinary rafters.
Installation of rafters
Once the type of roof has been determined and all the necessary building materials have been purchased, you can proceed directly to the construction of the frame.
Before starting the construction of a supporting structure, it is necessary to draw up its design and drawing.
So, the design of the support system consists of several stages:
- Before starting construction, a wooden beam should be laid around the perimeter of the outer wall - a mauerlat. To lay it, it is necessary to equip a reinforced belt of reinforced concrete structure, which enhances the load-bearing capacity of the walls. You should pay attention to ensure that the Mauerlat is securely fastened, preventing the slightest movement.
- If the walls are made of stone or brick, formwork is erected on top of them, into which a reinforced frame is mounted using galvanized threaded rods with a caliber of at least 10 mm. The upper part of the studs should protrude 4-5 cm from the base for the supports (mauerlat).
- After installing the frame, fill it with cement mortar.
- Then, as the concrete hardens, its surface is covered with bitumen and covered with a layer of roofing felt or other waterproofing materials.
- Beams with drilled holes are placed on the protruding part of the studs. Secure the structure with nuts.
- The Mauerlat is made from 10*15 or 15*15 cm pine needles, dried and impregnated with anti-corrosion and fire-retardant agents. The humidity of the wood should not exceed 20%.
- The next step is to install the central beam on the mauerlat, which is located parallel to the ridge. Stands are attached to it. These posts serve as support for a specific part of the support system.
When starting work, you need to check and double-check everything step by step. This is the only way to protect yourself from mistakes and ultimately achieve the most durable structure possible.
What affects it
Depending on the slope of the roof slopes, the features of its operation depend.
It is customary to distinguish 4 types of roofs:
- high, with an angle of 45-60 degrees;
- pitched, with a slope of 30 to 45 degrees;
- flat, the slope angle is 10-30 degrees;
- flat. Slope of 10 degrees or less.
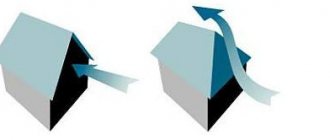
Wind load
Strong winds place the greatest pressure on high roofs.
Because such roofs, due to the large angle of inclination, have a very large area.
A large surface area has a very high windage.
Accordingly, the load on the entire structure of the rafter system is very high.
And if you decide to install a high roof with a very large slope, then you should take care of a very solid foundation.
However, in areas where strong winds prevail, it is unsafe to install flat roofs.
With this type of roofing, increased pressure will be exerted on the lower part of the slope in strong winds.
And if the roof fastening is weakened, the entire structure may fail.
Therefore, in areas where strong winds often occur, it is recommended to install pitched roofs with a slope of 25 - 30 degrees.
If the wind force is small, then the roof slope can be 30-45 degrees.
Snow load
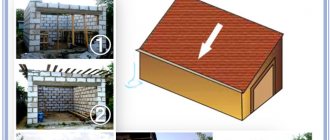
If in the area where the house is being built there is heavy snowfall during the cold season, then the roof should be built with a large slope angle.
In this case, the high roof is beyond competition.
On roofs with a large slope, snow does not linger.
It is for this reason that in all northern countries the roofs on buildings are very high (Sweden, Finland, Norway, etc.).
The smaller the roof slope, the longer the fallen snow will remain on the slopes.
The more weight will affect the entire structure.
If the design of the rafter system is made with a large margin of safety, then a certain layer of snow on the roof is not bad.
It provides a little extra insulation.
However, if the design of the structure's rafter system is not designed for heavy loads, then big problems can arise.
Types of hip roof rafters
Hip roof supports are divided into two types:
- Hanging - beams are located on the beam of the ceiling of two external walls without additional support.
- Layered - along the upper edge of the internal walls there is a horizontal beam, to which vertical supports are attached. The basis for the end part of the beam is the external walls.
The layered type of supports is suitable for buildings with an intermediate supporting wall or columns.
This supporting structure has more base points, so it can be made much easier.
If the building has two load-bearing walls, a screed is installed to support the rafter legs and distribute the load across all vertical supports.
For a hip roof type, a layered system is considered the most suitable, giving greater strength and facilitating the roof structure.
This modification is used when constructing an attic or mansard roof.
What information do builders receive?
Professional developers also actively use such calculators in their work. What does this give them?
Rafter parameters
The most important loaded elements of any roof are the rafters; all the main operational characteristics are directly dependent on them. Each rafter is designated by its individual number, and its length is calculated. This applies to all types of both ordinary and slanted rafters, and splices. Now the developer can correctly mark the rafters and can easily navigate the further use of short sections.
A detailed plan makes it possible to correctly mark and install rafters
But that’s not all, the calculator produces a very detailed detailed drawing, on which you can see the technology for sawing the junction points of the rafters:
- the distance from the top of the leg to the bottom. This parameter makes it possible to make the required angle of inclination of the junction of elements;
- the corners of the side cuts - these planes are used to fix the splices to the layered rafters.
Accurate calculation helps to correctly perform rafter junction nodes
Now, when cutting off each rafter leg, there is no need to use squares.
Not every developer knows how to handle such measuring tools, which increases the likelihood of errors. They are difficult to correct; subsequent correct adjustment reduces the length of the board, and it can no longer be installed in the planned location. Accordingly, it is necessary to change the angles of adjacent planes, and this again can cause an error.
General data of hip roof
Last, but not least, a block of information. For a general idea, the roof area, length of eaves and ridge are given. Based on data on the total area, the developer calculates roofing materials based on their type. There is a list of all elements of the rafter system, their length and quantity. The data is summarized, giving the total footage of the rafter legs and the volume of required lumber based on their width and thickness.
Using online calculations, the developer receives the exact amount of roofing covering
As for the lathing, here too the calculator provides significant assistance to developers - they know the length of each batten depending on the row of its fixation. Workpieces can be cut on the ground and already fitted slats can be placed on the roof, reducing the amount of waste and speeding up work. In addition, the safety of construction work is significantly increased; sawing on the ground is easier than doing it at height in an awkward position. Using the sheathing, the total length and cubic capacity of the lumber are also calculated.
Based on the calculation results, the required volume of lumber for the rafter system is purchased
Video - Hip roof calculator
The calculation on the calculator allows you to see the design drawings of the slopes and sheathing, and find out the required amount of building materials. Based on the information received, the developer can find out the cost of a hip roof and determine a specific estimate for materials. If you do not have your own experience in arranging rafter systems, then it is advisable to additionally consult with professionals. To complete the information, you need to understand the technology for constructing such roofs; a detailed description is available on the pages of our website.
How to calculate the rafter system of a hip roof
Calculation of the supporting structure is the main stage of roof design. The slightest miscalculation can cause deformation or destruction of the roof.
After studying the roof structure, it is necessary to calculate the angle of inclination of the rafter system. The higher it is, the more the roof is exposed to winds, but it clears itself of snow and ice on its own.
The angle of inclination of the slopes can be 5-60 degrees, it depends on the load of wind and snow.
After determining the angle of inclination, calculations should begin to determine the main loads to which the roof is exposed. These include the weight of the roof itself and natural phenomena - wind and precipitation.
The total weight of the supporting structure, sheathing, covering and insulation is divided by the area of all inclined planes. The resulting value shows the load per 1 m2 of roofing. For a residential building, it must withstand a load of 45-50 kg/m2. This figure is the same for any area.
Sediment loads vary depending on the area and range from 80-150 kg/m2. This value can be found using the “Building Codes and Regulations”.
The load value must be multiplied by the correction factor:
- At 1.0, when the angle of inclination does not exceed 25 degrees;
- By 0.7 if the angle is 25-60 degrees.
If the roof is subject to regular heavy snowfalls, it is recommended to install double supports or continuous sheathing.
Determining the wind load involves using the wind pressure coefficient.
The load indicator (wind and snow) is multiplied by an index equal to the rafter pitch value. The pitch of the rafters is determined in meters.
The final stage is the calculation of the quantity and criteria of materials.
After calculating all the loads per 1 m2 and the area of the entire roof, determine the cross-section of the supports (smallest values):
- Mauerlat – 10*10 cm.
- Tightenings and purlins – 5*15 cm.
- Fillers, struts, crossbars – 10*10, 15*15 cm.
The number of beams on which the sheathing and additional elements are attached is calculated by the length of the roof. For example, the length of the roof is 12 m, the pitch between the rafters is 1 m. Based on this, you will need 24 construction legs, 12 on each side.
When carrying out calculations for large-scale projects, it is recommended to use special computer programs for design.
All obtained indicators must be plotted on the drawing.
Calculator for calculating the hip roof rafter system
It makes it possible to obtain technical design data with a drawing. This is very important information for builders.
First you need to enter the following data into the calculator:
- roof height from ceiling to ridge;
- length and width of the building;
- planned roof overhang at the eaves (soffit);
- width and thickness of rafter legs;
- distance between rafters;
- width and thickness of materials for sheathing under roofing;
- sheathing step.
Each parameter has a letter designation
This is standard data for most calculation calculators. Data can be entered in centimeters or millimeters; instructions for using the calculator specify the feed parameters.
For the convenience of entering the required values, there is a basic schematic drawing of a hip roof with letter designations for each size. It allows developers to navigate and avoid mistakes when entering initial data. In addition, this drawing explains the format in which the calculator produces calculation results.
The calculator gives a schematic drawing in which each element has its own designation
Without a calculator, the developer was forced to carefully draw a sketch of the structure, determine the length and methods of cutting each element. There was a problem with waste; it was difficult to use pieces of different lengths, and there are a lot of them when building a hip roof. Sometimes it was necessary to throw away expensive lumber due to a lack of understanding of the algorithm for its further use.
How to Sketch a Hip Roof
Nodes
Precisely calculated components make it possible to achieve strength and an attractive appearance of the roof.
The connection of roofing structural elements is carried out in accordance with certain requirements.
Main components of the supporting structure:
- ridge unit - a pair of supports are fastened with nails or bolts, and reinforced with bolted beams;
- the support unit for the beams on the mauerlat is reinforced with metal corners, construction staples, nails or bolts;
- rafter connection unit with a tightening, which is located in the middle of the rafter - carried out using nails or bolts;
- the combination of the strut, rack and support is done using a die cut and reinforced with construction staples.
What is a hip
Before you start talking about how a drawing of a hip roof truss system is drawn up, it’s worth getting acquainted with the structure itself. What is a hip and why is this roofing option so popular?
Any design has its own “specific” elements. The same applies to the roof option discussed in the article. The special detail here is the hip. And what is it? The hip is a triangular part of the roof located at the end of the building. An ordinary hipped roof has triangular sides. In the case of the hip version, the main two slopes have a trapezoidal shape.
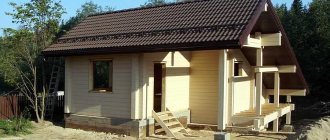
Basic principles of creating a hip roof for a house
This roof option is not used so often, but it still enjoys a good reputation. A hip roof has its pros and cons. Experts attribute the following to the advantages of this design:
- the hip, unlike the pediment, has low wind resistance. Such a roof can even withstand hurricanes;
- The rafter system of such a roof is durable and resistant to external influences. This is achieved by installing corner ribs, which act as stiffeners;
- the hip roof makes it possible to create wide overhangs on all sides of the house, which reliably protects the walls from precipitation;
- Don't forget about the appearance. A hip roof can significantly decorate any building.
But it also has its drawbacks. If we talk about the disadvantages, then first of all, experts remind you of the complexity of the drawings of the rafter system of a hip roof. The design has many elements that need to be installed correctly. It can be quite difficult to do this without the necessary skills. In addition, a large number of elements significantly increases the cost of the entire structure.
There are other difficulties. If you decide to make an attic room, you will definitely come across them. Firstly, the attic space under a hip roof is smaller than when using a conventional gable roof. Secondly, you will have to install special windows, which can be quite expensive.
Rafter system
The quality of the roof directly depends on the frame and base for the roof deck. The supporting structure of the roof serves as the basis and determines its service life.
Rafter system for mansard hip roof
This support system is resistant to strong wind loads due to the absence of a roof façade wall.
A roof of this form makes it possible to build large plumbs that protect the walls and foundation of the house from rain, snow and ice.
Components of the attic roof rafter system:
- Mauerlat.
- Ridge and side girders.
- Support beams.
- Layered and hanging rafters.
- Struts.
- Support posts.
- Diagonal rafters.
A distinctive feature of the mansard hip roof is the use of layered and hanging rafters in its design. The upper slope is made from hanging rafters supported on racks or a side girder.
To avoid bending, they are equipped with drawstrings. When installing the lower slope, layered rafters with a base on the Mauerlat are used, and a horizontal beam connecting the rafter system in its middle part.
The lower sloping surfaces have an inclination angle of about 60 degrees, and the upper ones – at least 30 degrees.
Roof structure
A hip roof is a hipped structure. Its sides are made in the shape of a trapezoid, and the end slopes have a triangular structure. All parts of the device are located at the same angle to the base.
To carry out correct calculations of the hip roof structure, all its main components should be taken into account:
- The top is a ridge. The device is a beam that is fixed at the highest point of the horizontal plane of the roof. It is slightly smaller than the total length of the building and serves to connect the elements of the rafter system.
- Central rafters. Such load-bearing elements of the roof structure are placed along the height and length of the slopes, as well as the ridge.
- Corner rafters. Such bars are located at an angle. Their installation starts from the ridge and ends at the edge of the building.
- Hips. Such inclined elements are connected on one side to the ridge, and on the other to the corner rafters.
- Mauerlat. This element allows you to connect the rafter system to the walls of the building. This connection is carried out along the entire perimeter of the building.
- Overhangs. Typically, this protective structure is an elongated part of the rafter legs. Hip roofs are characterized by eaves overhangs, which help protect the walls of the house from moisture.
- Lathing. Such a device is necessary to secure the roofing material, as well as the waterproofing layer and insulation. The lathing can be sparse or continuous. Its type depends on the type of roofing.
When calculating online roofing, its coverage is taken into account.
The material can be in the form of rolls, individual modules or sheets. Hip roofs do not have gables. Their main advantage is the rigidity of the entire structure and good streamlining of the coating. But it is quite difficult to design a reliable roof of this type without a large amount of waste material. Therefore, the best assistant when drawing up a roof construction plan is a calculator, which, when entering all the data, will provide reliable calculations of the hip roof with a drawing.
Strengthening the rafter system
To ensure the strength and durability of a hip roof, it is not enough to manufacture a rafter system; it must also be strengthened.
The most common methods of strengthening are:
- Installation of trusses at the corners of the roof with a stand supporting the diagonal support. If the truss is located far from the corner, it is best to attach a truss truss to it.
- Installation of racks connected from above by a beam on the ceiling (reinforced concrete) or tightening. They act as supports and ensure even distribution of the load on the house.
- The use of double beams instead of one beam if the diagonal rafters are too long.
- Using wooden boards 40*40 or 50*50 mm to construct the sheathing.
Roofing materials
If you plan to use expensive roofing materials, then from an economic point of view, a roof with a slight angle of inclination will be cheaper. This is due to the fact that its area will be smaller. Therefore, in order to save money, it is recommended to give preference to this option.
For any questions related to the choice of the angle of inclination of the hipped roof of a one-story house, call us at the phone number listed on the website ForBuilders.rf.
Tools for building a hip roof
The design of the roof and the methods for arranging the components determine the set of tools that should be prepared before starting work.
To work with wood you will need: a level, a hacksaw, a hammer, a tape measure, a marking cord, and a stapler.
To work with metal structures you will need an electric drill, a riveter, and cutting shears.
Tools and consumables must be prepared in advance, because... The complex installation of a hip roof rafter system requires a large number of cuts and installation of nails.
To simplify measurements and be able to make all parts the same size, craftsmen advise replacing the tape measure with a measuring rod. The measuring rod is made of plywood 50 mm wide, onto which the main dimensions are applied.
How to saw the rafters of a hip roof
The slopes of a hip roof can be positioned with different slopes, but such a system is complex both to calculate and implement. It is much easier to build an equiangular roof, where all the slopes have the same angle of inclination.
In equal-slope hip roofs, the projections of the diagonal rafters intersect with the mauerlat at an angle of 45°. This makes it much easier to cut down the ends of shortened rafters, since the horizontal angle is already known. The main rafters are always perpendicular to the mauerlat, so their processing is no different from gable systems.
In order to cut the spigots correctly the first time, you need to accurately maintain 4 parameters:
- length up to mm;
- vertical slope angle of the rafters (measured using a square or calculated using geometric formulas);
- horizontal angle (determined in relation to the diagonal beam).
To measure the slope of the slope, you can use an application on your smartphone. It is enough to align it with the axis of the rafter, the program will calculate this angle.
Now you need to prepare templates for the upper and lower cuts. Since the rafters adjoin the diagonal beam symmetrically, the second template is cut in a mirror image.
If the angles are different, then the boards are cut locally. The position of the rafters on the mauerlat and diagonal beam with the accepted pitch is marked. A cut is made in the lower part to place the rafters on the mauerlat.
The top of the splice is applied to the diagonal beam and approximately sawed along its plane. By finishing with a saw in several cuts, a tight connection of the two parts is achieved. Using this cut, a template is made on the board and used to cut down the remaining shortened rafters.
How to make a hip roof with your own hands: step-by-step instructions
Installation can be carried out in two ways - element by element or by entire semi-trusses, which are assembled on the ground and installed using the rotary method with the help of 4-5 people. One such element consists of 2 rafter legs, a tie, 2 braces and a suspension.
When constructing a hip roof with your own hands, one method is most often used, that is, element-by-element production and sequential installation.
Construction stages:
- preparation of the base;
- installation of the mauerlat and bed frames;
- laying the beam system;
- installation of a support frame with a ridge girder;
- rafter fastening;
- installation of sheathing;
- waterproofing and thermal insulation device.
The roofing work is completed by laying a decorative protective coating.
Installation of the Mauerlat and beds
The support beam, through which the load from the roof is transferred to the walls, is laid along the entire perimeter of the building.
In brick and block houses, it is recommended to install a monolithic armored belt that binds the masonry together and evenly distributes the load on the supports.
Unlike single-pitch or gable roofs, where the mauerlat is installed on embedded studs, the timber is not fastened immediately. First you need to draw all the diagonals and determine the place where the rafter legs will rest. But heels can interfere with this.
To avoid moisture in the wood when it comes into contact with concrete, the Mauerlat is laid on a waterproofing pad - 2 layers of roofing material, coated with mastic. The bench is installed on internal load-bearing walls.
In wooden and frame buildings, the upper crown or strapping beam serves as the mauerlat. It is additionally connected to the lower wall elements to increase the resistance of the upper chord to lateral loads.
Beam web device
The floor beams of the upper floor are laid on the mauerlat and floors. In this case, it is important to comply with the required extension of the cornice. As a rule, it ranges from 0.4 to 0.8 m, but can be more depending on the design solution.
At this stage it is convenient to immediately hem the cornice. The boards are marked and screwed directly from the floor beams. Whereas to hem an already finished roof, you need to arrange high scaffolding or scaffolding.
Frame installation
The frame of racks and ridge girder is made of 50x200 mm boards and attached to the floor beams.
If there are bay windows in the roof, then a centering element is installed on the support, where all the bay window rafters will converge. This will greatly facilitate subsequent installation.
Laying rafters and frames
At this stage, 2 people fasten the rafters at 2 points - at the top on the ridge girder and at the bottom on the mauerlat.
If standard 6 m long boards are not enough, you will have to join them. It is better to place the joint in the upper third, where the effort is minimal.
Next, corner rafters are installed (end beams, slanted rafters). Then the main roof and hips were trimmed. If the slope is flat, the cross-section of the boards needs to be increased.
The junction angles of the rafters are marked using a Svenson square and filed down. Once the main rafters and frames are in place, you can begin installing the rafters for the bay windows.
Installation of stiffening links
To give the frame stability, spacers, hangers, tie-downs, and supports are installed. This stage is very important. The section of the board for auxiliary elements is 50x50, 50x150, 50x200 mm, depending on the perceived load. If the project provides for an attic, then the tie will play the role of floor beams for lining the ceiling.
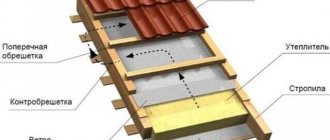
Lathing
Depending on the chosen roofing material, sparse or continuous plank flooring is laid. Under metal coverings, the lathing is supplemented with a counter-batten to create a ventilated gap and ensure free air circulation.
Under the soft roof, which is attached by gluing, a sheathing is made of boards with a gap of up to 100 mm or slabs of waterproof plywood, OSB. The sheathing of bay windows and other adjacent structures is laid last.
Waterproofing
In roofs made of corrugated sheets or metal tiles, the function of waterproofing is to protect against condensation getting on the rafter system and insulation, as well as against the wind blowing away thermal insulation fibers. To ensure ventilation of the insulation, films or membranes with vapor-permeable properties are used. They are mounted on top of the rafters and clamped with counter-lattice bars. Subsequently, the sheathing for the roofing is laid on them.
In soft roofs made from bitumen shingles or roll materials, the waterproofing is mounted directly on the continuous deck. It is arranged depending on the slope of the slopes:
- at an angle of more than 20°, the waterproofing carpet is laid on the eaves, valleys, ridges and ribs of the roof, along the gables;
- with a lower slope, the entire roof surface is subject to waterproofing.
It is necessary to maintain overlaps of at least 10-20 cm, and also fix the edges with nails. Instead of roll waterproofing, it is allowed to use coating, which is applied in 3 layers with a break for drying. Only after this can you begin installing the roofing material.