Fences
When building a fence, the posts play the most important role: they must be beautiful and firmly hold the fence. Many factors influence reliability, so before deciding what distance between corrugated fence posts to make, many people first collect information and conduct research. To begin with, it would be good to decide on the pillars themselves, what type to use?
Screw post
Basics of calculation
To prevent a fence built with your own hands from becoming a source of severe headaches for you, you must carry out all the calculations correctly.
It is important not only to calculate the design, but also to determine:
- optimal distance between pillars;
- the depth to which they need to be installed in the ground;
- parameters of pillars and sections, that is, height, thickness, area;
- the amount of material needed for construction.
Remember that for mistakes the fence will “revenge” its creator with rickety posts, cracks and other troubles. In the case of light fences, correcting the error is not so difficult. For heavy stone and brick fences, negligence in calculations will result in large financial losses and the need to completely redo all the work.
Working with veins
Not only the characteristics of the veins are very important, but also the correct calculation of their number. If you plan to install a fence up to two meters high, it will be sufficient to install a couple of strong veins on one span of the fence. You can make these yourself from a profile square; the thickness of the profile walls should be at least three millimeters. The veins are usually attached to metal supports that are already installed by welding. In this case, both the veins and the supports must be coated with a suitable primer.
To get the exact, required distance between the veins, this method is suitable: where the outermost pillar of the structure will stand, you will need to pull the thread and stick a nail into the ground, directly above it. The length of the nail must be at least seven centimeters. Now you should measure three meters from this place with a tape measure, insert a second nail, also strictly along the thread. The operation must be repeated again and again, reaching the second corner.
Veins for a wooden fence
There is no doubt that parts made from carefully planed wood are highly durable and economical. They are also convenient to paint, they look organic, easy to install and maintain, and are completely environmentally safe.
The load-bearing element in a fence made of wood is veins (they are also called “legs”). It is quite possible to buy such parts ready-made, of the required size, or you can make them yourself, directly at your summer cottage, which you plan to enclose with a fence. To make them, you need to take beams with a cross section of fifty by eighty millimeters. Poles of any suitable length can be suitable for this purpose; their diameter can be from sixty to one hundred millimeters. To use them, the poles must be cleared of bark before starting work.
It is permissible to splice wooden legs during the installation of the fence in absolutely any place along the run. The secret of a strong structure is to ensure that the places where the top and bottom veins meet never coincide, but are as far apart as possible.
Veins made of wood will be stronger and more durable if they are planed from above, and on one slope. After such thorough treatment, the water will drain from them completely, without lingering in the wood, and the veins will rot less.
Materials for racks and types of fences
Diagram indicating the distance between the supports of a brick fence
DIYers most often install wooden, metal, stone, concrete or brick pillars. Wooden ones are the cheapest, but also the least durable. They are mainly used for fencing made of the same material.
Metal is a stronger, but cheaper material and for this reason is very popular. Posts made from it are used for all types of fences, with the exception of particularly heavy brick and stone structures.
Concrete and stone are the most durable, but difficult to install and expensive. Their use is justified when a heavy fence made of stone, concrete, brick or a solid forged metal fence is being built. Brick ones are loved by all home craftsmen. More about them below.
Now let's look at the most popular fence options, paying special attention to the distance between posts:
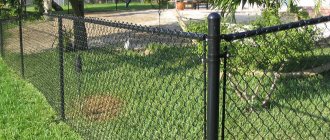
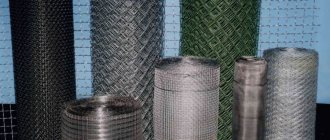
- Mesh fencing. Their height usually does not exceed 1.5 m (this is the standard width of a roll of chain-link mesh). To create the most durable structure, it is enough that the distance between the pillars is 2.5 m. With a larger distance, it will not be possible to stretch the mesh well.
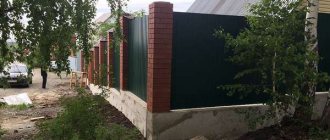
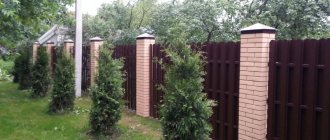
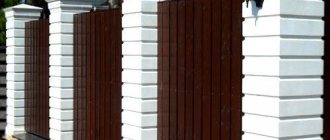
- Brick fences. The height of this type of fence varies from 2 to 3 m. It is not recommended to make brick fences higher. It is better to install pillars every 2.5-3 m. The structure will be durable, beautiful and cost-effective.
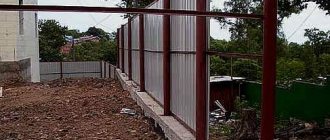
- Fences made of corrugated sheets on metal supports. Considering the standard dimensions of the profile sheet, experts advise placing pillars every 2-2.5 m.
- Wooden fences are built so that the distance between the posts is in the range from 2 to 3 m.
When the material is selected, you will need to calculate your “own” distance between the pillars.
How to choose veins for a fence
Quite often it happens that a strong, reliable and solid fence is needed even before the construction of a house has begun. There are many types of fences now; fairly solid fences are made of brick, picket fence, concrete slabs and blocks, and forged structures. This material describes in detail the characteristics of various fences and how to choose veins for such a fence. Photos of different types of fences are attached to this material.
What are veins?
Fences made of corrugated sheets, metal and plastic gratings, wooden boards, as well as cellular polycarbonate require the use of veins during the construction of structures. By choosing any of the options, you can really ensure the high functionality of the fence enclosing a dacha or private territory:
- prevent the entry of stray animals and strangers;
- ensure protection of the territory from street dust, debris, and strong winds;
- approach the site in terms of color and style;
- protect from unwanted views of strangers.
It is important that such a fence will be relatively cheap and easy to manufacture. The costs of maintaining it (during further operation) will be minimal. Almost one hundred percent it can be said that no investments will be required to repair and paint it.
However, only the design for the construction of which the best, highest quality consumables will be chosen will be such. This material talks about how to choose the right veins for a fence, and also presents photos showing fences and veins.
What determines the distance between the pillars?
Calculation of the number of pillars taking into account the wicket and gate
First of all, the distance between the fence supports depends on the material from which the posts and fence sections are made. In addition, it is necessary to take into account the parameters of the structure itself. The higher it is, the more often you will have to install supports. Wind and weight loads increase. It is also important how firmly the supports are installed in the ground. The stronger, the greater the distance between them can be.
When calculating the distance between posts, it is recommended to determine the position of corner posts, gates and wickets. It should be borne in mind that it is advisable to make all sections the same size. Now do some simple arithmetic calculations.
For example, if the area on which the brick fence will stand is 9 m, then you will need 3 posts at a distance of every 3 m. And for a fence of the same length made of corrugated sheets - 4 posts, and the distance between them will be 2.25 m .
Why not put more pillars, say 5 or 6? Unfortunately, too many posts will not benefit your fence. This will only unjustifiably increase the cost of the fence and create unnecessary load on the foundation, make the fence insufficiently flexible and reduce its ability to withstand wind loads. The fence will be less attractive in appearance.
What if the distance between the fence posts is increased and, accordingly, their number is reduced? In this case, the structure will not be strong enough. For fences that use logs, the load on the support posts will increase, so they require a stronger foundation. And, again, the appearance of the structure will suffer greatly. Therefore, we choose the “golden mean”.
Screw or weld – which is easier?
There are different methods for attaching lags.
Welding
The most common and simplest method of fastening is welding. The logs are welded to the fence posts, and they are also joined together by welding. This fastening is durable and, in addition to welding skills and a welding machine, does not require additional costs for additional types of fasteners.
When welding, the coating of finished products is damaged. Welding areas must be thoroughly cleaned, primed and painted.
Attaching to pole ears
If you bought fence posts with already welded ears, then secure the logs with bolts. This event is more time- and money-consuming than welding.
First you need to cut the required length of the log, then drill holes for the bolts and screw them on. For example, for a fence 50 meters long, you need to drill about 200 holes in the joists and purchase 200 bolts.
A fence post with welded ears is offered on the market at a higher price than without them.
Therefore, the purchase of poles with the provided fastenings to the joists is a questionable saving.
It’s easier to weld the fence veins to the posts than to screw them.
X-shaped fence brackets
Also, an IHS-shaped connection is used to attach the log to the fence. X-brackets on the market are offered with varying price tags. You will have to spend money on good and durable ones. Brackets made of thin metal will quickly rust and become unusable. Among the advantages of mounting on brackets, it can be noted that additional holes in the joists for the brackets are not drilled. The logs are fastened with metal screws.
What determines the installation depth of the pillars?
Scheme for the construction of brick supports for a fence with a foundation
On the one hand, the deeper the support is, the stronger the structure; on the other hand, the cost of work increases with every centimeter of depth. They become more labor-intensive and require the use of technical means. Here you need to determine the best option. The installation depth of the supports depends on the following factors:
- the parameters of the fence, that is, its height and weight - the larger they are, the deeper the well for support should be;
- wind loads, which depend on the type of structure (transparent or solid) and terrain features;
- type of soil, its composition, freezing depth, groundwater level, and so on.
It is important to remember that the supports are affected by the force of the wind and the weight of the structure. Together, these two forces create a torque that reaches a maximum at the point where the support leaves the ground. Bending moment is the main cause of structural failure. But it will not be able to harm your fence if the installation depth of the posts ensures their sufficient elasticity.
Use of galvanized wires
To install a fence made of corrugated sheets, you can use galvanized wires. During their production, metal profile blanks are dipped into molten zinc. When cooled, a coating is formed on the surface of the metal, which increases the resistance of products to factors such as moisture and temperature changes.
The fastening of such veins is carried out not by conventional welding, but using screw connections that do not damage the treated metal surface. To do this you will need screws and special connecting plates.
And this will cause additional cash costs. The advantages of attaching the logs to the support posts in this way is that it allows you to disassemble the fence and rearrange its parts.
This is what galvanized veins look like
The main fastening elements of screw connections are X-brackets. They are made from metal plates using stamping or cutting into patterns. This cross-shaped part has edges bent in different directions and holes for attaching the vein to the support.
The central part of the part is bolted to the support post. This makes it easier to dismantle the structure when it becomes necessary to move it to another location. If, under the influence of physical force, the fence is damaged, for example, by a car bumper, then the broken span can be easily replaced and repaired. With this connection, not only galvanized wires are used, but also X-brackets with the same coating, which increases the service life of the entire fence.
X brackets for veins
When constructing some types of fences, only metal fence logs should be used. For example, sheathing made of corrugated sheets requires metal veins. If they are made of wood, then such a structure cannot be called strong enough. The fact is that these materials have different deformations when temperature and air humidity change. As a result, premature wear of some elements may occur while the rest are in good condition, and will lead to unexpected repair costs.
Calculation of depth using an example
Laying a post on a finished fence foundation
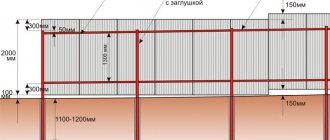
Here is an example of calculating the depth for a solid fence with the following parameters:
- fence height – 2 m;
- section width 2.5 m.
Multiplying these two values, we determine the area of each section: 2 * 2.5 = 5 m2. To determine the wind load, it is necessary to multiply this value by the aerodynamic coefficient (1.4 is accepted for the middle strip) and the amount of wind pressure (approximately 40 kg).
Multiplying, we get: 5 * 1.4 * 40 = 280 kg. That is, each rack in our design will experience a weight load of 280 kg. To calculate the bending moment, this value is multiplied by a constant equal to 0.8: 280 * 0.8 = 224 kg/m.
To determine the required depth, it is enough to divide this value by the coefficient of the moment of resistance, which is taken equal to 225 kg. We get: 224 kg/m: 225 kg = 0.99 m. That is, approximately 1 m.
With such a depth of installation of the support, wind and weight loads will be fully compensated. But it should be remembered that the top layer of soil is usually quite loose, so another 20 cm is added to the obtained value.
In addition, it is necessary to take into account another important point - the depth of soil freezing. If in your area the soil tends to swell when it freezes, then the lower part of the support must be buried below the freezing level. This is approximately 1.5 m deep for the middle zone. If this is not possible, then the support in the lower part is concreted with an extension that plays the role of an anchor.
Installation steps
The main stages are:
- digging recesses for a point or solid foundation;
- installation of supports;
- pouring concrete or backfilling with earth, gravel, and other materials;
- fastening the corrugated sheet to a metal or wooden frame.
Can you do the installation yourself?
YesNo, I don't think so
Installation of metal pipe supports
Holes for metal supports can be dug manually, or drilled using a drill. The diameter of the hole should be at least 10 cm larger than the diameter of the pipe. A hole that is too large will require more cement mortar consumption when pouring.
Useful Welded sectional fences made of metal mesh with polymer coating - features and installation
It is best to install the pipe on a sand and gravel pad with a thickness of at least 20 cm. When installing, it should not sink deeply into the cushion. To do this, a flat platform or structure made of profiles arranged in the shape of a cross is welded onto the lower end.
Expert opinion
Vladimir Ulyanov
I have been involved in fences for over 10 years, answering questions and helping people cope with the installation task on their own.
Ask a question to an expert
To give the metal stand greater stability, it is fixed with cement mortar at ground level. You can raise the foundation to a height of 10 cm above the ground.
It is recommended to treat the area that will be located underground with an anti-corrosion compound and wrap it with roofing material to provide protection from moisture. The upper cut is closed with decorative plugs.
Foundation for brick pillars
If thick corrugated sheeting of large dimensions is used, then this design requires a solid foundation. For less massive structures, it is enough to prepare a point foundation. All subsequent work must be carried out only after the foundation has dried.
Construction of brick pillars
The brickwork is made 1.5 - 2 bricks wide and up to 2.5 - 3 m high. During the construction process, plates are embedded into the brick, onto which the crossbars will be attached. The upper edge is covered with a lid or a concrete slope is made to provide protection from moisture.
Brick pillars are the best option
Laying a brick support element for a fence
Wood is not strong enough, a metal pole requires constant attention, and creating a concrete structure is a costly and lengthy process. Brick fence posts are especially loved by home craftsmen. We will talk about them in more detail, but first, all about the advantages of brick pillars.
First of all, it is a universal design. It can be used for almost any type of fence, such as wood, metal or brick. The construction of a brick pillar does not require the use of expensive equipment.
A correctly folded and installed brick pillar will not require any attention in the future. A brick pillar is a successful combination of excellent performance, attractive design and exceptional strength. At the same time, we should not forget that when we talk about the advantages of a brick pillar, we mean a structure built according to all the rules from high-quality material.
Wooden logs
Despite the fact that today the market is replete with various offers of fences made of durable materials: metal, plastic, brick, wood is still willingly used in construction.
From time immemorial, villages have erected wooden fences - low palisades and palisades.
Wooden pickets are capricious and require periodic maintenance, but this does not stop amateurs.
Wooden picket fences are often combined with metal posts and logs; this is considered more practical. After all, it is always easy to replace a board (picket fence) with a new one if it has dried out or become unusable. And wooden posts and logs are already a major overhaul of several fence sections.
But true connoisseurs of warm wood are ready to sacrifice practicality and durability. Then the pillars and logs, as well as the fence sheet, are made of wood.
In addition, with proper processing, careful care and the right choice of wood species, the fence can last for decades.
Which tree to choose for transverse fence joists?
Transverse joists are most often made from coniferous species - larch, pine, cedar, etc. These species (especially larch) are more resistant to external environmental influences. Wooden crossbars should be chosen that are smooth, strong, and free from rot and rotten areas. The wood must be dry to avoid future deformation. The size of wooden logs is usually chosen 40x40, 50x50, 50x40.
Nuances of choice
Choosing bricks for building fence supports
Selecting a good brick and laying it correctly requires certain knowledge and skill.
Brick pillars vary:
- according to the type of brick used. It can be a regular ceramic, silicate, clinker, hyper-pressed type;
- in height, which depends on the height of the fence itself;
- according to the installation depth of the metal pipe, which is selected taking into account the characteristics of the terrain and soil, as well as the height of the fence;
- by type of masonry. The most popular is one and a half or two bricks. The thickness of the pillar and the amount of material required will depend on the type of masonry.
The disadvantages of brick pillars include their high cost. Therefore, it is especially important to choose the right type of pillar and calculate how much material is needed for its construction.
Installing a corrugated fence with your own hands
The construction of the fence must take place in stages, which includes:
- Accurate marking of terrain and locations for support pillars.
- Installation of pillars.
- Installation of logs between pillars.
- Attaching metal sheets to the frame.
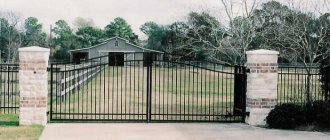
- Installation of gates or wickets.
Perimeter marking
Along the entire length of the future fence, marks are placed on the ground for support posts, both for the fence and for the gate or wicket. This can be done by driving wooden pegs into the ground or simply pouring a pile of sand.
When marking, it is necessary that the marks are located at the corners of the fence and in places of possible bends (changes in the straight direction). To ensure that the pillars are in the same plane, a nylon thread is stretched between the corner pegs, which will later serve as a guide for the intermediate pegs.
Installation of support pillars
The initial stage of installing pillars (supports) in the ground is digging holes, but not all of them in a row, but those in which the main (guide) supports will be installed. These are corners and bends. The depth of the pits should be at least 1.2 - 1.5 m and a width of 15 - 20 cm, which contributes to the stability of the pillars under various types of influence on them (mechanical or natural interference).
a little coarse crushed stone is poured onto the bottom After this, you need to measure the depth of the hole and transfer (mark) this indicator to the surface of a round pipe or square profile. To the indicated length it is necessary to add the height of the corrugated sheet and add 2 - 3 cm, which will subsequently serve as the lower gap between the soil and the sheet (natural ventilation).
When all the marks are applied , the unnecessary section is cut off from the total length of the profile with a grinder.
Having prepared the profile for installation , it is placed in the hole and 1/3 of the depth of the hole is filled with crushed stone. A layer of pre-prepared concrete is poured on top of it. During pouring, it is necessary to monitor the vertical level of the post. According to this scheme, all other corner pillars are installed, but at the same time, monitoring their height relative to the ground.
To avoid discrepancies in the indicators , a rope is stretched between their tops, which should show a horizontal zero mark when checked with a building level.
When the main pillars are installed , you should proceed with the installation of intermediate pillars according to the same principle. Stretched auxiliary guide ropes guarantee the correct location of the posts and their surface height. In order to prevent moisture from penetrating inside the support pillars, their upper part is welded with metal plates.
For example, if a sheet 2 m long is selected, and the depth of the dug hole is 1.2 m and a gap of 3 cm is selected, then the length of the metal pillar should be 3.13 m, taking into account the 10 cm layer of crushed stone previously poured onto the bottom.
After installing all the pillars, construction work stops for 7 - 10 days so that the concrete acquires the necessary hardness.
There is another method of installing pillars - manual driving into the ground. To do this, one person holds the pipe in a vertical position, and the second hammers it in with a sledgehammer on the top of the pipe. It is worth noting that this method requires enormous physical expenditure and time from the participants in the process, therefore it is of little use in construction.
Installation of support beams
In order for the profiled sheets to become a full-fledged fence, it is necessary to build a metal sheathing between the posts to which they will be attached.
To do this, it is necessary to secure the logs between the pillars. The number of lags may vary, depending largely on the height of the sheets. For a standard sheet height of 2 meters, two parallel logs are required at the bottom and top of the pillars, respectively.
Marks are made on the pillars at the top and bottom along which the logs will be mounted. It is necessary to retreat 20 cm from the upper and lower edges. The width between them will be within 1.6 m, which is quite acceptable. Metal profiles with a cross section of 20×40 mm or 20×45 mm are used as logs.
To secure the profile between the steel posts, you first need to measure the distance between them and use a grinder to cut the required piece from the workpiece. It is recommended to fasten by welding, which guarantees the reliability of the joining points.
If you have no experience in welding, you can fasten the profiles using L-shaped metal corners, but this process has several disadvantages: labor-intensive and time-consuming. And the most important nuance of this type of fastening is the possible loosening of the fastening elements and subsequent vibrations of all sections of the fence.
Fastening corrugated sheeting to a metal frame
When the frame has been assembled with your own hands and tested for strength , you should begin installing the corrugated sheeting. To carry out fastening, at least two people will need to be involved in the process. One will hold the sheet correctly relative to the frame, and the second will fasten it.
You should start from one of the corner posts . Having leaned the sheet against the frame, it is necessary to monitor the horizontal and vertical planes of the sheet, because in the future the slightest deviations from the zero mark can lead to unevenness of the sheets.
After leveling the sheet, it is secured to the metal joists with special self-tapping screws with a drill-shaped tip. This type of self-tapping screw does not require the usual drilling of holes - it will go deeper into the body of the profile itself. Thanks to the wide hexagonal head with a rubber gasket, the self-tapping screw securely fastens the corrugated sheet and does not scratch its surface.
Initially, for one sheet, 4 self-tapping screws screwed into its corners are enough. The second sheet is leaned against the first in such a way that the joining strips overlap and are fastened in the same way. The whole process is repeated identically with all subsequent sheets.
Upon completion of fastening all the sheets around the perimeter or a separate part of the fence, you must return to the first sheet and secure it completely. To do this, a self-tapping screw is screwed into each recessed wave of the sheet. Fastening the remaining sheets is repeated identically to the first. When the top and bottom sheets are properly secured to the frame, the fence is considered almost ready.
Calculation of the number of bricks
Calculation of material depending on the laying method
Experienced craftsmen do not recommend using bricks from different batches (even if the samples are of the same brand) for the construction of brick pillars. Firstly, a microscopic difference in composition can result in a difference in thermal expansion coefficients. The likelihood of cracks will increase. Secondly, the color of samples from different batches may not match, which will not have a very good effect on the appearance of the fence.
The home craftsman is faced with the task of immediately purchasing the required amount of material and, at the same time, getting by with minimal financial costs. We'll show you how to perform the necessary calculations. An example would be a pillar with the following parameters:
- type of masonry - one and a half bricks;
- the dimensions of one brick are standard 0.25* 0.12* 0.065 m;
- seam thickness – 1 cm;
- pillar height – 1.5 m.
Let's calculate the number of bricks. To install one row, you need 4 bricks, the thickness of each row is equal to the thickness of the brick plus the thickness of the mortar layer: 0.065 +0.01 = 0.075 m. Then the number of rows in the column is calculated to be 1.5: 0.075 = 20 rows.
Since each of them contains 4 bricks, a total of 80 bricks are required for one pillar. It is recommended to purchase bricks with a small margin of 5% in case of damage or defects. Thus, you will need to purchase 84 bricks to build one pillar.
Installation of corrugated sheets
After welding work is completed, the welding areas are cleaned using a grinder with a grinding wheel installed, and the entire structure is covered with a layer of primer. When choosing a primer, you should pay attention to the fact that it has the ability to lie on top of the rust. The primer is laid with a brush in such a layer that there are no gaps in the metal.
After priming, the entire frame is painted. You can use a spray can, or paint it yourself with a regular brush. The paint used should have the same consistency as the previously applied primer.
This will prevent swelling and peeling of the coating.
Installing a profiled sheet on a frame is easier to do in pairs
Installation of the profiled sheet is carried out after the frame has completely dried. The sheets can be screwed to horizontal veins using special roofing or ordinary universal screws, or they can be attached using rivets to the lower wave of the profile. The first sheet is screwed so that the supporting gate or wicket pipe is covered.
Next, they are screwed onto the overlay on one wave, in order to prevent the fence from moving up or down. When fastening, the installation of each element should be checked horizontally and vertically using a level.
The frequency of screws or rivets should be at least every other lower wave. If the terrain allows you to install a metal profile fence in a horizontal plane, then secure the structure with your own hands using a stretched cord. If horizontal installation is not possible, then the sheets are screwed with small ledges up and down, or by raising and lowering spans or longer sections.
It is undesirable to cut a profile with your own hands, without resorting to the help of a specialist, since an unprotected edge of the metal is formed, which can lead to subsequent corrosion at the cutting sites.
Calculate the amount of solution
Mortar for laying bricks on fence supports
For masonry, its volume is taken equal to 1/5 of the total volume of brick, which will be: 0.25 * 0.12 * 0.065 * 80 = 0.156 m3. Dividing by 5, we get a value of 0.032 m3 - this is the amount of mortar that will be needed for masonry.
But don’t forget that you still need to fill the cavity inside the column with the solution. It has the shape of a parallelepiped, at the base of which is a square with sides of 0.14 * 0.14 m and a height of 1.5 m. We calculate its volume: 0.14 * 0.14 * 1.5 = 0.0294 m3. Total amount of solution: 0.032 + 0.0294 = 0.0614 m3.
You can count it differently. Simply subtract the volume of the brick (0.2166–0.1560 = 0.606 m3) from the volume occupied by the pillar (0.3802 * 1.5 = 0.2166 m3) and get approximately the same value.
So, for one pillar you need 84 bricks and approximately 0.0614 m3 of mortar (to put it in simpler terms - a little more than six standard buckets).
In fact, the required amount will be slightly less, since the reinforcement also takes up some volume. The difference (if a steel pipe 80*80 mm with a thickness of 2 mm is used for these purposes will be about 1/10 of a standard bucket) can be written off as unforeseen expenses. And they are always present.
Similarly, you can calculate the amount of material for laying two bricks or for pillars of a different height. You will also have to calculate the required amount of brick and mortar for sections, reinforcement and everything necessary for the foundation.
If all the calculations are completed and all the nuances are taken into account, you can purchase the material. And start building your own fence. Let it be successful!